Whereby: Record Meetings Efficiently [2025 Updated]
Jean updated on Apr 17, 2025 to Screen Recording Utility
How to start Whereby record meetings? This article lists different ways to record Whereby meetings on PCs or cloud storage services. You can also get related tips about Whereby record meetings.
Yes, you can. Whereby allows you or your room hosts to record Whereby meetings and saves these recordings locally in the browser or using a cloud-based service. In addition, some points deserve your attention.
1️⃣Only Pro or Business users are allowed to record Whereby meetings. That is to say, its meeting or screen recording features are only available to paid users.
2️⃣The recording is only accessible for Chrome on desktop or laptop computers and comes as a plugin. More precisely, this program cannot be used on mobile devices.
3️⃣To ensure a successful recording of your Whereby meetings, select the specific Chrome tab you want to record rather than the entire screen or an app window.
4️⃣If you desire to record Whereby meetings with the YouTube integration, it cannot record YouTube audio with your meeting screen. To capture your desired audio from the video you’re viewing in the Whereby room, we recommend sharing your screen with audio.
Since Whereby has so many meeting recording constraints, many customers are seeking a more friendly alternative to Whereby.
Are you seeking ways to record Whereby meetings without any cost? Why not try out EaseUS RecExperts? This user-friendly, free screen recording software allows you to effortlessly record Whereby meetings on Windows, Mac, or online.
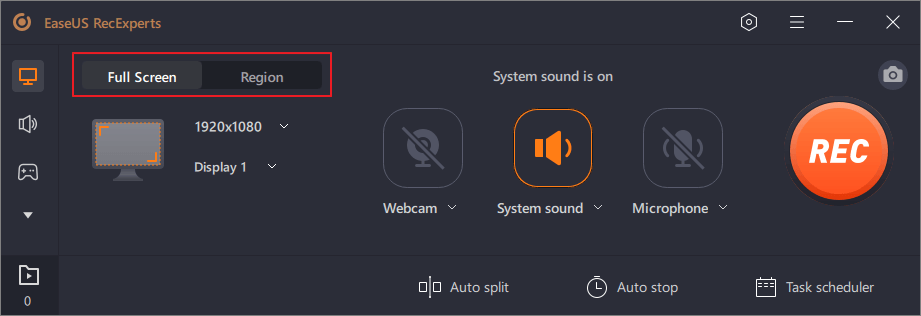
Step 1. Go to the meetings that you want to record. Then, launch EaseUS RecExperts on your devices. Choose the "Full Screen" recording mode or select the recording area in the "Region" mode.

Step 2. Choose to record the webcam, system sound, microphone sound or none by clicking on the according buttons.
Step 3. It offers an AI background changer and green screen feature to users. You can change the video conference background as you like. When all is done, click on the red "REC" button to begin and click "F10" and "F9" to pause or stop recording.
Step 4. After recording, you can view the meeting videos in the pop-up recording list. You can even click "Edit" > "AI Assistant" > "Start" to get a text file of what has been said.
Whereby offers two ways to store your video recordings. Please have a closer look at them below.
Local recording is handled entirely locally in the room host’s browser and cache. More clearly, it refers to the recordings only generated and saved locally.
Here are the steps below:
Step 1. Install the Chrome extension > log in to Whereby with your Google account > upgrade to Pro or Business.
Step 2. Set a name for your room > go to the meeting room > click the Rec button to begin Whereby meeting recording.
Step 3. After the meeting recording process, a notification will remind you to download the recording file > click Start Recording.
Step 4. Select the Chrome tab that your meeting room is open > click Select this and press share to record > click Confirm.
With the release of premium Embedded plans, Whereby offers a new level of flexibility with cloud recording. You can now record your Whereby meetings and choose to store them in our Whereby-provided storage or in external storage that you own and maintain.
It now only supports Amazon S3 as external storage for cloud recordings. If needed, you can get more details about how to set up cloud recording in an Amazon S3 bucket.
“Can you record meetings on Whereby freely?” Of course, you can.
You could utilize the first-recommended EaseUS RecExperts instead of Whereby. Apart from prices, the former exceeds Whereby in product patterns (desktop or web options), screen recording features, video/audio editing features, and friendly design.
Naturally, this article also introduces Whereby recording meeting options and storage methods.
This part lists several common questions about Whereby and Zoom online meetings.
In this scenario, EaseUS RecExperts is a good helper for recording audio and video separately or extracting audio from Whereby recorded meetings using it.
The most efficient way to transcribe a meeting is to use tools that can capture accurate transcription, summarize the discussion, record action items, and generate shareable meeting clips. These programs include Riverside, Firefiles, MeetGeek, and Airgram.
If you’re using a Mac and wish to record your Zoom conference with audio, you can utilize QuickTime Player on your PC. Please refer to the following steps.
Step 1. Create a Zoom meeting > click Record > select Record on this PC.
Step 2. End the meeting > wait for Zoom to finish the meeting recording process.
Step 3. Go to your default recording location to find your recordings by opening Zoom Settings > click Recording.
Step 4. Zoom meeting recording each create a folder with 3 files > change the default file name from zoom_0.mp4 to something more description.
Step 5. Distribute your recording.
Related Articles
Discord Screen Recorder? EaseUS RecExperts Has a Game-Changing Trick..
How to Save Video from Twitter DMs [2025 Updated]
How to Record a Presentation with Your Face (Audio and Video)
5 Best Hidden Webcam Recorders [Free and Paid]