
- About
- Discover EaseUS
- Reviews & Awards
- License Agreement
- Privacy Policy
- Student Discount
[Solved] Take Screenshots on Windows 10 with/Without Print Screen
Jean Updated on
Apr 28, 2025|
min read
PAGE CONTENT:
Print Screen Key on Windows 10
Desktop functionality has been assured, with multiple quick functions available across the device. From copying data to undoing anything important across the folder, Windows features multiple quick shortcuts that can be achieved with the help of some buttons. Similar is the case with taking a screenshot across the device. Rather than going for the original setting present across the computer, users consider using the "PrtScn" button available on the keyboard.
This quick function is available across all Windows desktops and laptops. If you own a Windows 10 device, you will find the Print Screen Windows 10 button across the first line in the keyboard, adjacent to the keyboard's function keys. To understand more about what you can do with this key, we will focus on it in the following article. We will also direct our discussion to help users how to take screenshots without using the respective function key.
Take Screenshots on Windows 10 With Print Screen
For starters, we will cover three convenient methods to take screenshots on Windows 10 with the PrtScn button. You can consider using the Print Screen Windows 10 button under three different and unique methods with diverse functionalities:
- Method 1: Take Screenshots with Only "Print Screen"
- Method 2: Take Screenshots with "Print Screen" and "Windows"
- Method 3: Take Screenshots with "Print Screen" and "Alt"
Method 1: Take Screenshots with Only "Print Screen"
This is one of the easiest ways to take a screenshot on Windows 10. However, this does not save the screenshot anywhere in a respective folder. Using the "Print Screen" button only saves the screenshot across the clipboard that can be managed respectively. Go through the steps to learn this screenshot method:
Step 1: Tap the "Print Screen" button after opening the respective window you wish to take the screenshot of.

Step 2: Search for "Paint" across the "Search" bar that you access on the taskbar. On opening the Paint, use the "Ctrl + V" or "Paste" option to insert the screenshot taken using the Print Screen Windows 10 button.

Step 3: Access "File" from the top-left menu and select the option of "Save As." Save the file under an appropriate name and proper location on your computer.

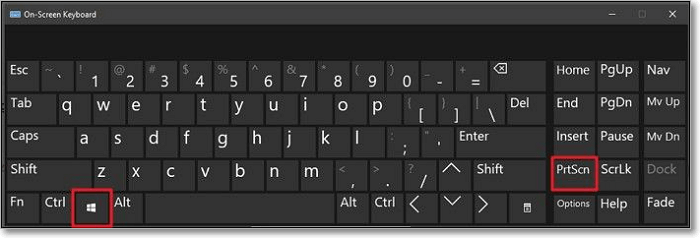
Method 2: Take Screenshots with "Print Screen" and "Windows"
The second method involves a basic combination of "Windows Key + Print Screen" that is used to take a screenshot. This saves it as a file across the "Screenshots" folder on the Windows 10 computer. The provided steps give a clear direction to the user on using this key combination:
Step 1: Press the "Windows" and "PrtScn" buttons simultaneously to take a screenshot. The screen dims up to assure that the screenshot has been taken.
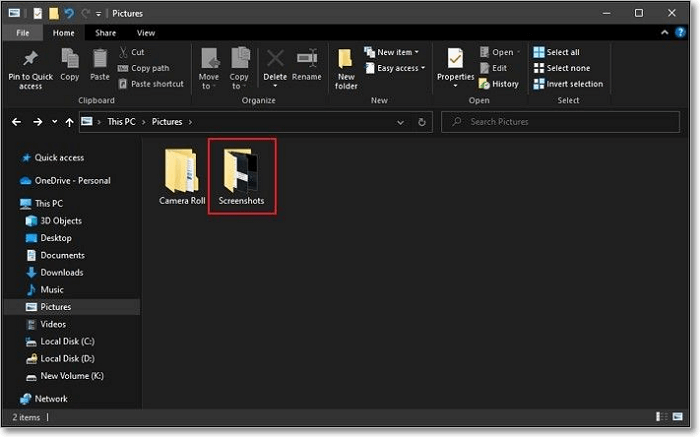
Step 2: Open the "File Explorer" on your Windows 10 computer and access the "Pictures" from the left panel featuring different folders. As you lead into the "Pictures" folder, find the "Screenshots" sub-folder in the list. As you open it, you will find your screenshot saved across this location.
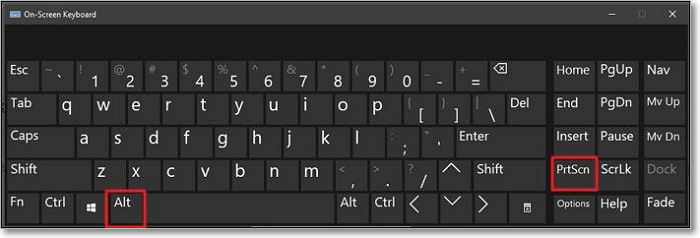
Method 3: Take Screenshots with "Print Screen" and "Alt"
The "Alt + Print Screen" key combination has a similar result to the first method provided in this part. As it saves the screenshot across the clipboard, you can use it effectively for taking a screenshot of the active window where you are working on the computer. Follow the simple steps below:
Step 1: Press the "Alt" and "PrtScn" buttons simultaneously to take the screenshot of the active window.
Step 2: Follow the steps of pasting and saving the screenshot across the Paint provided in the first method of this part.
Take Screenshots on Windows 10 Without Print Screen
We will now shift our focus across taking screenshots on the computer without the Print Screen Windows 10 shortcut key. In circumstances where you want to take a very specific screenshot on your computer, you should consider such options on your Windows 10 computer. We shall focus on four different techniques that can be implemented as an alternative to the Print Screen Windows 10 button.
- Method 1: Take Screenshots with Screen Capture Software
- Method 2: Take Screenshots with Snipping Tool
- Method 3: Take Screenshots with Game Bar
- Method 4: Take Screenshots with "Power" and "Volume Up"
Method 1: Take Screenshots with Screen Capture Software
If your motive is to customize the screenshot and annotate it for further use, you should consider opting for the quickest of methods. The EaseUS ScreenShot is known for such functions and is one of the best techniques in the market to take a screenshot. For more about the process, follow the steps featured below:
Step 1. Download and install EaseUS Screenshot on your PC, then launch it.
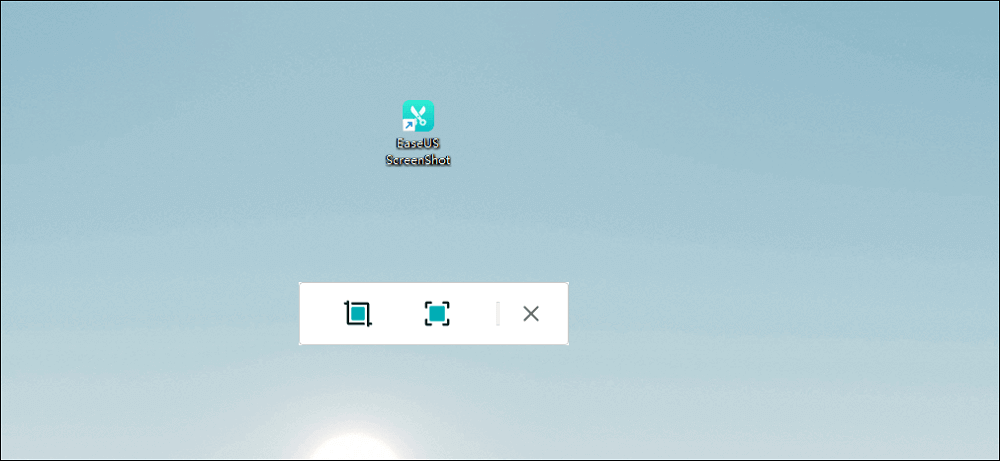
Step 2. You will see two options on the toolbar. The left one is for "Rectangular screenshot", and the right one is for "Full screenshot".
To take a partial screenshot, you just click on the left button (or double click the "Ctrl" key), then drag your mouse to select the area on your screen; To take a full screenshot, you can click the right button (or double click "Alt" on keyboard).

Step 3. When the screen is captured, you can see an editing toolbar below the screenshot. It provides a set of tools to modify the screenshot by drawing, adding text, mosaic, etc.
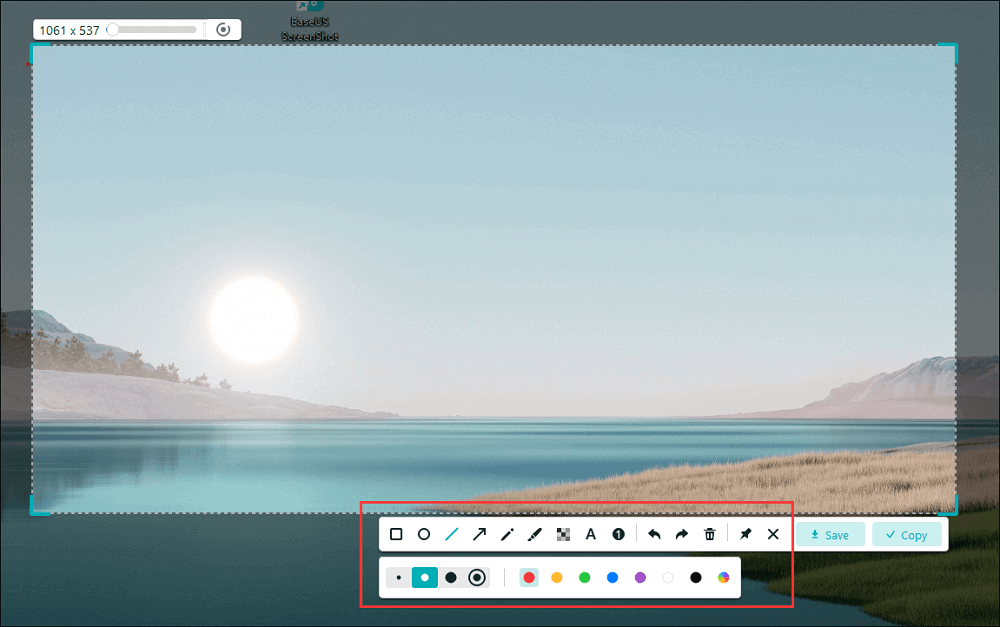
Step 4. Once done, click the "Save" button or press "Space" to save the screenshot. Or, you can click "Copy" or hit the "Enter" key to copy the screenshot to the clipboard.
Of course, besides Windows 10, the EaseUS ScreenShot is suitable for other versions of Windows. When you don't know how to screenshot on Windows 8/8.1, you can have a try on the EaseUS ScreenShot.
Method 2: Take Screenshots with Snipping Tool
The Snipping Tool is another great feature available across the Windows 10 computer for taking screenshots. It acts as a great alternative to the Print Screen Windows 10 button as it allows proper screenshots of any size across the screen. Users can set the screenshot, which saves a lot of time in cropping out the unnecessary parts. To follow this through, go across the details provided in the step:
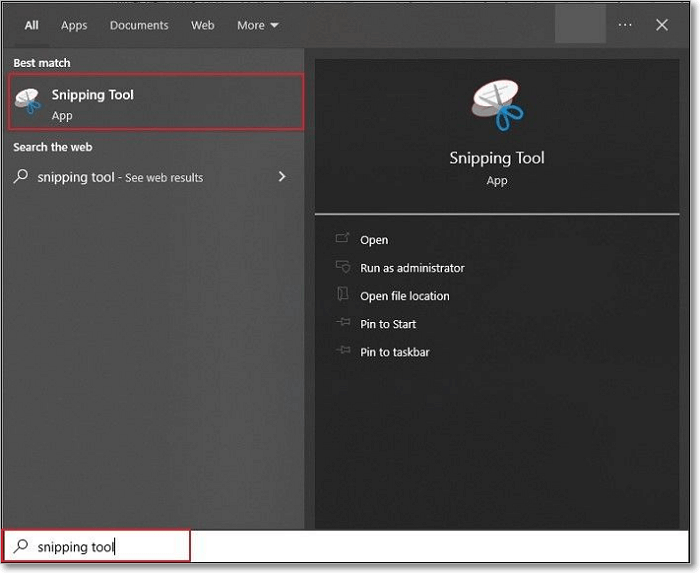
Step 1: Tap the "Search" icon on the taskbar and type in "Snipping Tool." This opens up a window in front of you.
Step 2: Make sure the right screen is open on your computer. Click on the "New" button on the Snipping Tool to select the screen you want to take the screenshot of with the mouse or trackpad.

Step 3: As the screenshot is taken, it is pasted across the Snipping Tool, where you can make some small edits if required. Once done, save the screenshot to your desired location.

Method 3: Take Screenshots with Game Bar
Windows 10 provides a dedicated Game Bar to its users for multiple functions. It can also be used to take full-screen screenshots with ease. For this, you need to follow the set of simple steps:
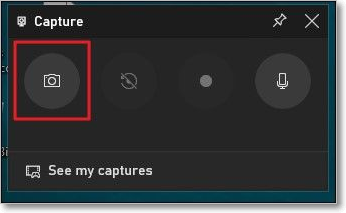
Step 1: Use the "Windows + G" key combination to open the Game Bar on your Windows computer. As it appears in front of you, click the "Capture" button on the overlay menu to take a screenshot.
Step 2: The screenshot is saved in PNG format, which can be found in the "Captures" folder. For this, open the "File Explorer" and access "Videos" from the left panel. You will find the respective folder where the screenshot is saved.

Method 4: Take Screenshots with "Power" and "Volume Up"
If you own a Microsoft Surface device, you can use the key combination of the "Power + Volume Up" button to take the screenshot. The screen dims up, and the screenshot will be saved across the "Screenshots" sub-folder that can be discovered in the "Pictures" folder.

Fix Print Screen on Windows 10 Not Working
What if your Print Screen Windows 10 button is not working? There is nothing to worry about, as proper fixes are available for resolving all problems involving this button. We will be discussing a couple of effective fixes that will help you in resolving the Print Screen button issue within your device:
Fix 1: Stop Background Programs
Different programs operate in the background of your Windows 10 computer. Usually, they become the reason for multiple issues across the operations of the Windows device. The only proper way to resolve this issue is to stop the background programs, which can be done by:
Step 1: Use the "Ctrl + Shift + Esc" key combination to open the Task Manager of your Windows.
Step 2: Find the respective programs that are hindering the process in the "Processes" tab. Next, right-click on the processes and select "End Task" from the sub-menu.

Fix 2: Update Keyboard Driver
If there are issues with managing the Print Screen Window 10 button, there is a chance that the keyboard drivers might be outdated. To keep them updated, you may have to manually access the settings, which is done by following the steps featured below:
Step 1: Click on the "Search" icon on the taskbar and type "Device Manager" to open it up on a new screen.

Step 2: Go across the "Keyboards" section and find your keyboard drivers in the list. Following this, right-click on your drivers to select the option of "Update driver."

Wrap Up
This article features a comprehensive discussion of the Print Screen Windows 10 button with its complete functionality. Along with discussing different methods that are involved in taking screenshots with this button, multiple methods are discussed for taking screenshots without the respective button. The EaseUS ScreenShot is one of the best choices for you, and you can deal with many things related to screenshots with it. Go through the guide in detail to know how to deal with this matter perfectly.
FAQs
1. Where do Screenshots go on PC?
This file app icon is in your taskbar or Start menu. Navigate to a location where you want to save your screenshots. Since the default location is "This PC > Pictures > Screenshots," you can try moving them to "This PC > Documents > Screenshots."
2. Why are Screenshots not showing up?
First, check if a Screenshots folder is visible in the Library tab under Photos on the device. If not, a complete reset of the Google Photos app might clear things up. Please wait until it completes leaving the app open and plugged in if necessary.
3. Why Windows Shift S is not working?
If you've turned off notifications for the Snip and Sketch tool, the shortcut might be working, but you're just not seeing the result. You can quickly fix this issue by turning the notifications back on. This way, once you press the Windows + Shift + S shortcut, a message will appear in the bottom-right corner.
Was This Page Helpful?