-
![]()
Daisy
Daisy is the Senior editor of the writing team for EaseUS. She has been working in EaseUS for over ten years, starting from a technical writer to a team leader of the content group. As a professional author for over 10 years, she writes a lot to help people overcome their tech troubles.…Read full bio -
Jane is an experienced editor for EaseUS focused on tech blog writing. Familiar with all kinds of video editing and screen recording software on the market, she specializes in composing posts about recording and editing videos. All the topics she chooses …Read full bio
-
![]()
Alin
Alin is an experienced technical blog writing editor. She knows the information about screen recording software on the market, and is also familiar with data cloning and data backup software. She is expert in writing posts about these products, aiming at providing users with effective solutions.…Read full bio -
Jean is recognized as one of the most professional writers in EaseUS. She has kept improving her writing skills over the past 10 years and helped millions of her readers solve their tech problems on PC, Mac, and iOS devices.…Read full bio
-
![]()
Jerry
Jerry is a fan of science and technology, aiming to make readers' tech life easy and enjoyable. He loves exploring new technologies and writing technical how-to tips. All the topics he chooses aim to offer users more instructive information.…Read full bio -
![]()
Rel
Rel has always maintained a strong curiosity about the computer field and is committed to the research of the most efficient and practical computer problem solutions.…Read full bio -
![]()
Gemma
Gemma is member of EaseUS team and has been committed to creating valuable content in fields about file recovery, partition management, and data backup etc. for many years. She loves to help users solve various types of computer related issues.…Read full bio -
![]()
Shelly
"I hope my articles can help solve your technical problems. If you are interested in other articles, you can check the articles at the bottom of this page. Similarly, you can also check my Twitter to get additional help."…Read full bio
Page Table of Contents
Jane Zhou
Updated on Jun 09, 2026
0 Views |
0 min read
Key Takeaways
- Free tools like QuickTime Player and Audacity can record internal audio on Mac, but they require additional setup with audio loopback drivers such as BlackHole. Best for technically proficient users on Intel Macs (macOS 10.14–10.15).
- Third-party recorders like EaseUS RecExperts provide a faster, simpler solution with built-in editing tools, supporting Apple Silicon (M1/M2) and Intel Macs on macOS 10.13 and later. Ideal for users seeking high-quality internal audio recording with minimal setup.
If you want to record internal audio on a Mac, such as for YouTube, streaming music, or online meetings, this guide will show you multiple effective methods, including free options like QuickTime Player + BlackHole and professional tools like EaseUS RecExperts.
Record Internal Audio on Mac Directly with EaseUS RecExperts
Support Mac devices: Apple Silicon Macs (M1/M2) — macOS 10.13+
Best for: Users can use this tool to record and edit high-quality system sound on almost all Mac models easily and export the audio recordings in various formats, like MP3, FLAC, etc.
If you are looking for the fastest, most stable, and zero-configuration solution for recording internal audio on your Mac, EaseUS RecExperts is the recommended choice. This professional Mac screen and audio recorder features a built-in virtual sound card, completely bypassing macOS's native limitations on capturing system sound.
Compared to free methods that require manual installation and configuration of BlackHole or similar drivers, EaseUS offers superior advantages:
- Zero-Configuration Hassle: No external drivers needed. The software installs instantly and is ready to record system sound immediately.
- Ultimate Compatibility: Fully compatible with the latest macOS Sonoma/Ventura and runs natively on M1, M2, and the newest M3 Apple Silicon Macs, eliminating legacy driver conflicts.
- High-Quality Lossless Output: Easily capture YouTube audio, streaming music, or meeting sounds, supporting multiple high-quality audio formats like MP3, FLAC, and AAC.
- All-in-One Utility: Beyond high-quality recording, it provides professional screen recording capabilities and built-in audio editing tools, making it easy to modify and share your recordings instantly.
With EaseUS RecExperts, you don't have to worry about driver issues or complex settings—just a few clicks and you're recording.
Download EaseUS Screen Recorder
Download EaseUS Screen Recorder
Trustpilot Rating 4.7
Here is how to record internal audio on Mac using EaseUS RecExperts:
Step 1. Launch EaseUS RecExperts on your computer, and click "Audio" (looks like a speaker) on the left side of the main interface.
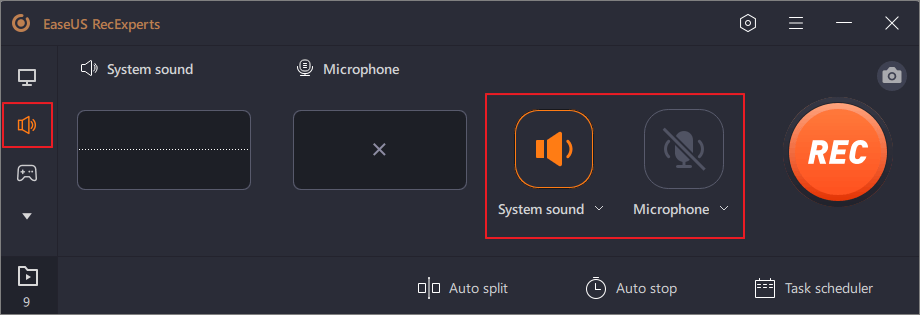
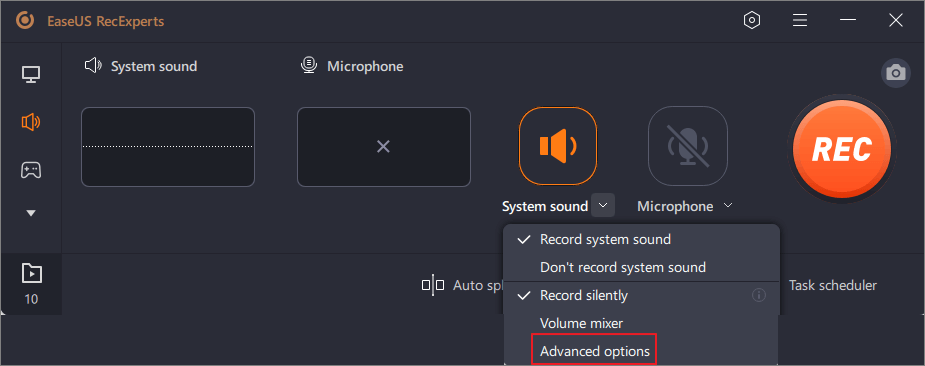
Step 2. To record the internal audio, you need to select the "System sound" option on the next window. You can adjust the volume by clicking on "System sound" > "Advanced options".
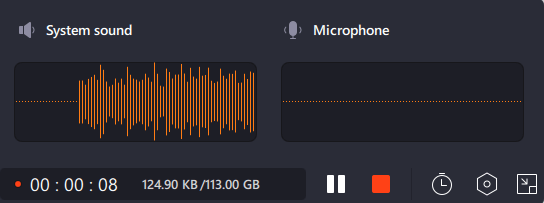
Step 3. Next, click on the red "REC" button to begin your recording. While recording, you can pause or stop the recording by clicking on the according buttons.
Step 4. Once done, you can find the recordings in the pop-up recording list window.

If this post solves your problem, share it with more users now!

Record Mac's Computer Sound with OBS Studio Free
Previously, OBS Studio required virtual audio drivers like BlackHole or Loopback. However, with recent updates (version 30 and above), OBS has overcome this limitation on newer macOS systems. As long as your Mac is running macOS Ventura 13 or later, you can record both the screen and system audio directly, making it the fastest free method available.
Based on reviewing OBS's documentation and hands-on testing, this zero-driver method is confirmed to work.
Step 1. Ensure your Mac is running macOS Ventura 13 or newer and that your OBS Studio is version 30 or above.
Step 2. Go to Settings > Audio > Global Audio Devices. Select your system audio input from Desktop Audio and choose mic sound input from Mic/Auxiliary Audio.
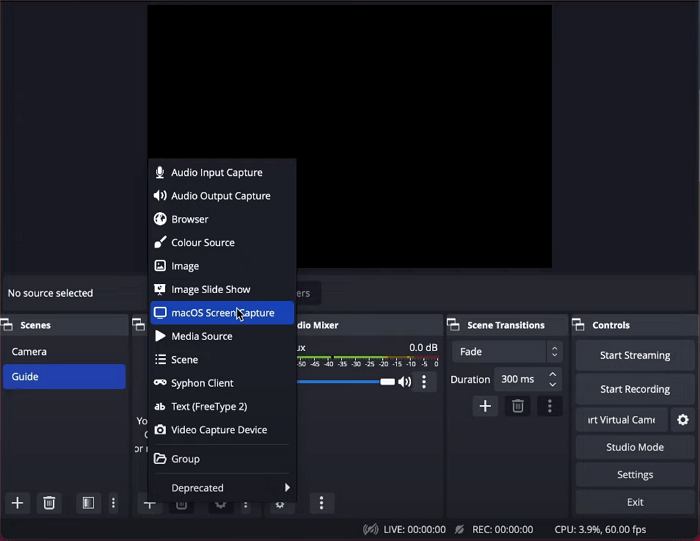
Step 3. Click + (Sources), select Audio Output Capture, and finish the setup.
Step 4. Play the music you want to record and click Start Recording. Click Stop Recording to end the session.
Record Mac Computer Audio with QuickTime & BlackHole
Support Mac devices: Intel/Apple Silicon Macs (M1/M2) — macOS 10.10+
Best for: Those who are technically proficient and willing to set up and configure the virtual audio interface manually.
While QuickTime Player is a native macOS application, it only records microphone audio by default. To capture internal system sounds, you must install and configure a virtual audio driver like BlackHole.
Step 1. Install BlackHole and Access Audio MIDI Setup
- Download and install the BlackHole driver.
- Go to Finder > Applications > Utilities > Audio MIDI Setup to open the configuration utility.
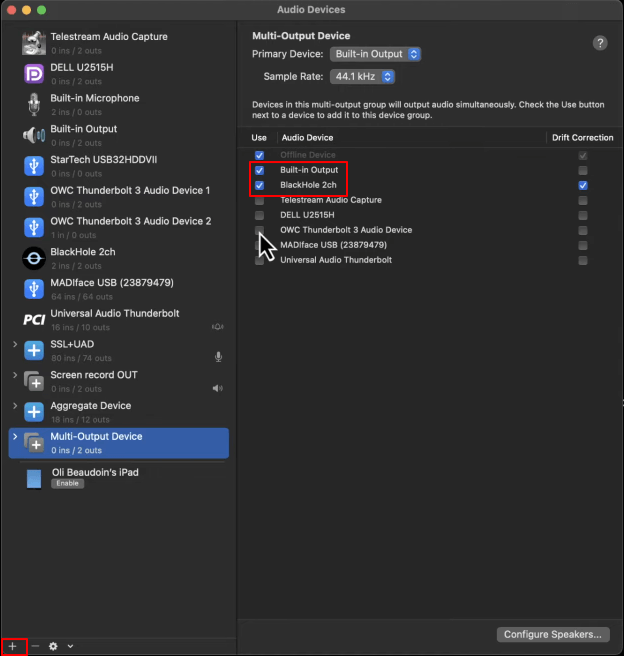
Step 2. Create a Multi-Output Device (Crucial Step)
- Click the "+" button in the bottom-left corner and select "Create Multi-Output Device."
- In the list, tick the boxes for "Built-in Output" (so you can hear the sound) and "BlackHole 2ch" (the recording input).
- Right-click the new device and choose "Use This Device For Sound Output."
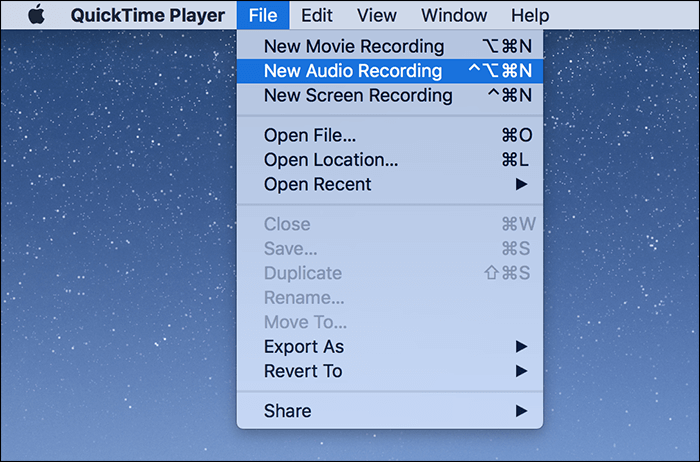
Step 3. Open QuickTime Player
Open QuickTime Player and go to File > New Audio Recording.
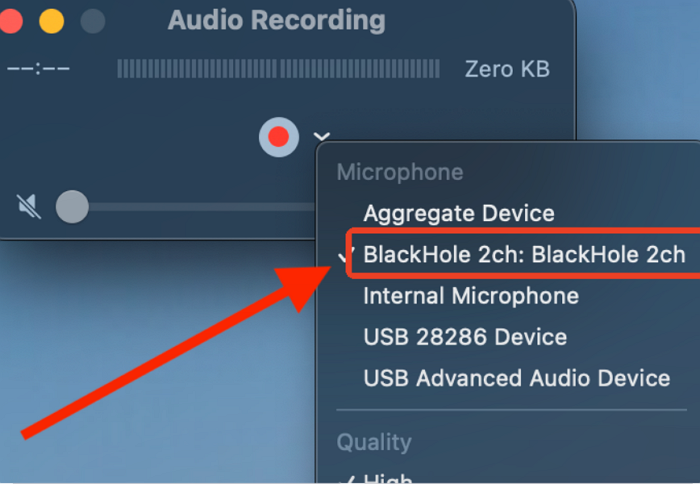
Step 4. Select the BlackHole Input
Click the down-arrow next to the record button and choose BlackHole 2ch (or the BlackHole variant you installed) as the input source.
Step 5. Start Recording
Play the internal audio you wish to record (e.g., from YouTube) and hit the large red record button in QuickTime Player.
Share this post now!
Record Desktop Audio on Mac Free via Audacity
Support Mac devices: Intel-based Macs only - macOS 10.15 Catalina or earlier
Best for: Mac tech-savvy users who have needs for internal audio recording and editing
Audacity is a powerful, free audio editing software ideal for users who need advanced post-recording features (like trimming, noise reduction, and effects). However, it does not natively capture macOS system audio and must rely on the BlackHole driver.
Step 1. Install Audacity
Download and install the latest version of Audacity compatible with your macOS system.
Step 2. Configure Audacity's Audio Setup
Open Audacity and locate the audio device toolbar, and configure the following settings, usually at the top of the interface:
- Audio Host: Select Core Audio (macOS audio interface).
- Recording Device: Select BlackHole 2ch (or the corresponding BlackHole device you installed).
- Recording Channels: Select 2 (Stereo) Recording Channels.
Step 3. Start Recording
- Start playing the internal audio source you wish to capture (e.g., a song on Spotify, a YouTube video).
- Click the Record button (the large red circle) in Audacity. The recording should begin immediately, capturing the audio routed through BlackHole.
- Click the Stop button when finished.
Conclusion to the Best Way for Mac Internal Audio Recording
Recording internal audio on Mac is pretty easy, provided you set up things the right way. If you do not know what that means, the above guide will walk you through each stage of the procedure one by one. This way, you will learn how to record internal audio Mac using various methods on your Mac machine.
Download EaseUS Screen Recorder
Download EaseUS Screen Recorder
Trustpilot Rating 4.7
Record Internal Audio on Mac FAQs
1. How to record internal audio on a Mac without Soundflower?
To record internal audio on a Mac, Soundflower is necessary while using some free audio recording software. If you want to install such add-on software on your Mac, you can use EaseUS RecExperts to record system audio on Mac:
Step 1. Download and launch this software, and click Audio.
Step 2. Enable the System Sound option by clicking the Sound icon from the bottom left corner of the interface.
Step 3. Click REC to start your audio recording.
2. How do you screen record on Mac with internal audio?
There are lots of screen recorders with internal audio for Mac on the internet, which helps you record Mac screen with internal audio effortlessly. You can go ahead to this post for more information: how to screen record on Mac with internal audio.
3. Does Mac have a built-in internal audio recorder?
Mac offers some built-in audio recorders like QuickTime Player and Voice Memo to let you record your sound. However, when it comes to the internal audio recorder, Mac doesn't have one. If you need to record internal audio on a Mac, you can rely on some professional Mac internal audio recorders, like EaseUS RecExperts, Audacity, OBS Studio, or others.
4. How to record internal audio and external audio on Mac?
There are two ways to help you record internal audio and external audio on a Mac. One is QuickTime Player, which will assist you in recording external audio on a Mac. However, if you want to capture the internal audio, you need to install another add-on program called Soundflower. It may sound a little complex. Another is to use fantastic audio recording software (EaseUS RecExperts, OBS Studio, MP3 Audio Recorder, etc.), and these programs let you complete your task with simple clicks.