
- About
- Discover EaseUS
- Reviews & Awards
- License Agreement
- Privacy Policy
- Student Discount
Screenshot on Mac Not Working? Fix it Now
Jane Zhou Updated on
May 10, 2024|
min read
We all know that it is easy to screenshot on Mac by hitting some keys. However, you may sometimes be bothered with this issue – screenshot on Mac not working. Generally speaking, that is a common problem we will run into in work or study. Then how to deal with it?
Don't fret. This post is gonna help you fix screenshot not working on Mac. Just keep reading to find the workable solutions now!
Solution 1. Check Shortcut Settings
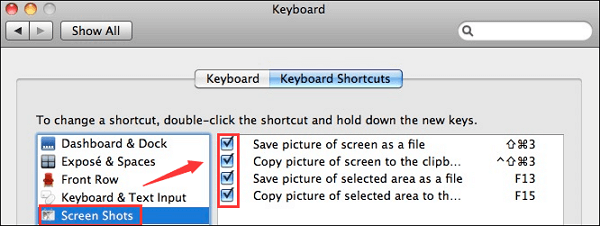
If you press Command + SHIFT + 4 on your keyboard to screenshot your Mac and it doesn't work, then there may be something wrong with your keyboard shortcuts. The shortcut settings on the keyboard may have been changed or switched off, so first of all, check the shortcut settings:
Step 1. Click the Apple menu and open the System Preferences.
Step 2. Click Keyboard, and next, click on the "Shortcut" tab.
Step 3. Select the Screenshots option on the left side of the window. Make sure that all the boxes are checked and that shortcuts are set properly.
Solution 2. Reboot Your Mac
If all things go well about the shortcut settings, then just restart your Mac. Sometimes, your Mac might be possible that certain functions respond if you haven't forced restarted it in a long time. It is a quick and easy method to fix small glitches. So, now try it by check the following steps:
Step 1. Press the power button and select the "Restart" option when a dialog box appears.
Step 2. Go to the Apple menu, and click on "Restart".
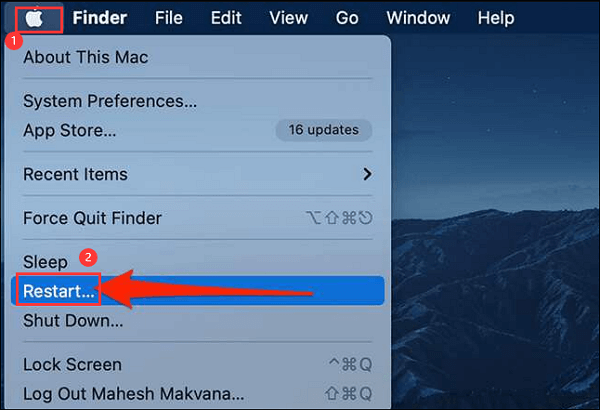
Step 3. At last, press Control + Command + Eject/Power to restart your Mac. Once done, you can take a snapshot to check if the screenshot function is working.
Solution 3. Check Location of Saving Mac Screenshots
Another method to fix screenshots on Mac not working is to confirm the location of the saved screenshots. Generally, the images will be saved on the desktop. But sometimes, you may change the settings without remembering it. And after taking screenshots on your Mac, you cannot find the images. That seems it is due to the screenshot not working. So, just confirm the screenshot's location.
Step 1. Open the Screenshot app and choose the "Options" button.
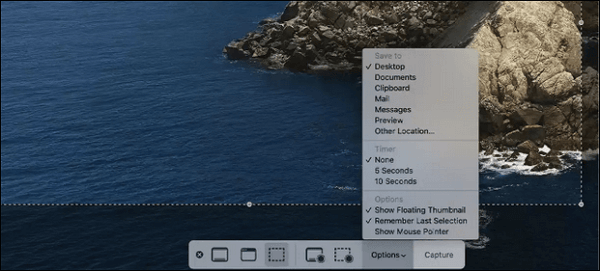
Step 2. Check if the location is correct. If it is correct, just hit the Save to section. If not, change it to Desktop and Save it.
Solution 4. Check Dropbox Settings
Except for checking the location of the screenshots, you also need to confirm the Dropbox settings if you have installed it. It may change where screenshots on Mac as well. That's why Mac screenshots are hidden or disappeared.
Step 1. Launch Dropbox on Mac.
Step 2. Click "Settings", unfold "Preferences" and then select "Import".
Step 3. Unselect the "Share screenshots using Dropbox".
Solution 5. Load Mac in Safe Mode
Load your Mac in Safe Mode may help you fix screenshot not working on Mac, and follow the below steps to start it.
Step 1. Click Apple menu > Shut Down to turn off the Mac.
Step 2. Turn on your Mac and press the Shift key immediately until you see the login screen.
Step 3. Login. Then your Mac is running in Safe Mode.
Solution 6. Resetting Mac's NVRAM
If all the methods above cannot work, let's go down deeper into a whole new level – go through Mac's internal settings. Just reset the non-volatile random-access memory, and that is similar to restart your Mac.
Step 1. Click the Apple icon and select "Shut Down" to turn off your Mac.
Step 2. Next, turn on Mac, and press Command + Option + P + R keys for about 10 to 20 seconds.
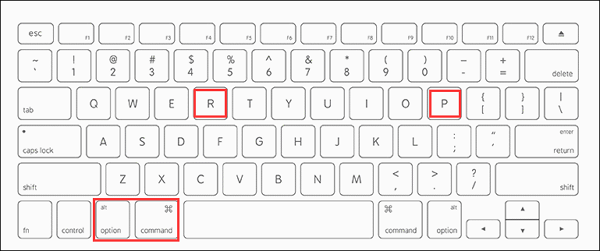
Step 3. Then your Mac will restart and remove glitches. Just try to take a screenshot on the Mac.
Solution 7. Screenshot on Mac in Preview
Apart from using the hotkeys to screenshot on your Mac, you also can snapshot Mac with Preview. If the screenshot not working on Mac suddenly, you can use this freeware to take screenshots of your Mac screen.
Step 1. Open Preview on your Mac.
Step 2. Click "File" > "Take Screenshot" from the drop-down menu.
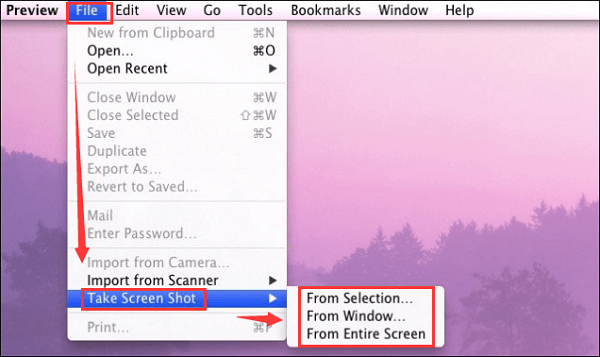
Step 3. Select the "From Selection", "From Window", or "From Entire Screen" option according to your needs.
Solution 8. Find an Alternative Snapshot Tool
EaseUS ScreenShot is a professional snapshot tool that is friendly to both novices and pros because of its intuitive workflow. With its help, you are able to screenshot any region on your screen with one simple click. Also, this software support shortcut, which means you are able to take screenshots by hitting the hotkey simply.
More than that, it acts as a long screenshot taker. You just need to scroll your mouse when taking a screenshot to get one. Also, you can highlight, mosaic, and add elements to the screenshots as you like. After editing, just save it to your computer or copy it to your clipboard.
Step 1. Download and install EaseUS Screenshot on your PC, then launch it.

Step 2. You will see two options on the toolbar. The left one is for "Rectangular screenshot", and the right one is for "Full screenshot".
To take a partial screenshot, you just click on the left button (or double click the "Ctrl" key), then drag your mouse to select the area on your screen; To take a full screenshot, you can click the right button (or double click "Alt" on keyboard).

Step 3. When the screen is captured, you can see an editing toolbar below the screenshot. It provides a set of tools to modify the screenshot by drawing, adding text, mosaic, etc.
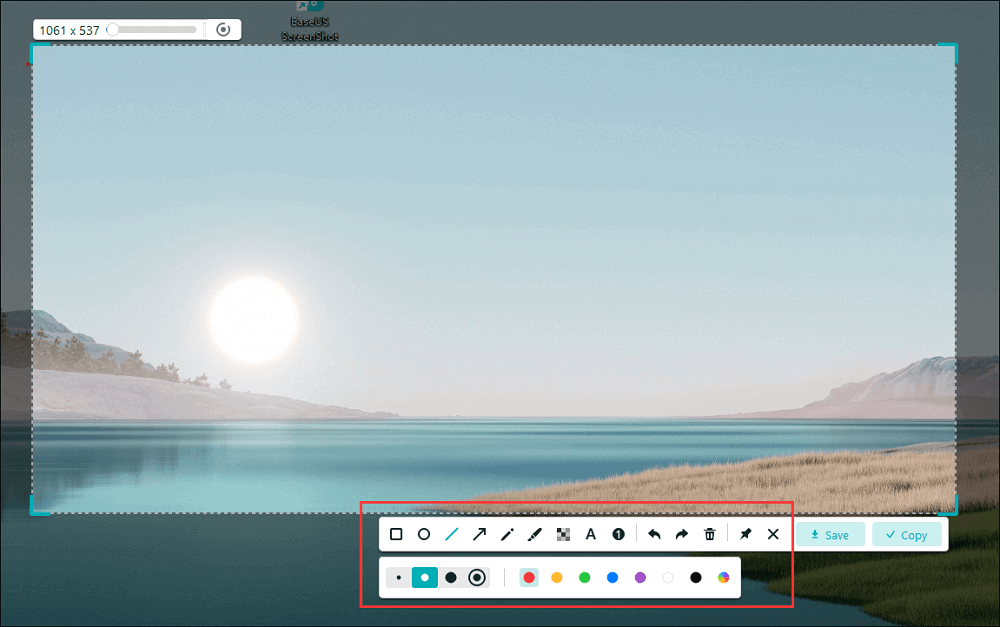
Step 4. Once done, click the "Save" button or press "Space" to save the screenshot. Or, you can click "Copy" or hit the "Enter" key to copy the screenshot to the clipboard.
Was This Page Helpful?