-
![]()
Daisy
Daisy is the Senior editor of the writing team for EaseUS. She has been working in EaseUS for over ten years, starting from a technical writer to a team leader of the content group. As a professional author for over 10 years, she writes a lot to help people overcome their tech troubles.…Read full bio -
Jane is an experienced editor for EaseUS focused on tech blog writing. Familiar with all kinds of video editing and screen recording software on the market, she specializes in composing posts about recording and editing videos. All the topics she chooses …Read full bio
-
![]()
Alin
Alin is an experienced technical blog writing editor. She knows the information about screen recording software on the market, and is also familiar with data cloning and data backup software. She is expert in writing posts about these products, aiming at providing users with effective solutions.…Read full bio -
Jean is recognized as one of the most professional writers in EaseUS. She has kept improving her writing skills over the past 10 years and helped millions of her readers solve their tech problems on PC, Mac, and iOS devices.…Read full bio
-
![]()
Jerry
Jerry is a fan of science and technology, aiming to make readers' tech life easy and enjoyable. He loves exploring new technologies and writing technical how-to tips. All the topics he chooses aim to offer users more instructive information.…Read full bio -
![]()
Rel
Rel has always maintained a strong curiosity about the computer field and is committed to the research of the most efficient and practical computer problem solutions.…Read full bio -
![]()
Gemma
Gemma is member of EaseUS team and has been committed to creating valuable content in fields about file recovery, partition management, and data backup etc. for many years. She loves to help users solve various types of computer related issues.…Read full bio -
![]()
Shelly
"I hope my articles can help solve your technical problems. If you are interested in other articles, you can check the articles at the bottom of this page. Similarly, you can also check my Twitter to get additional help."…Read full bio
Page Table of Contents
Alin
Updated on Jan 21, 2026
0 Views |
0 min read
PAGE CONTENT:
You may take screenshots on Mac because you've found some interesting images or content you would like to save for future use. If you want to reference the screenshot some other time, you'll only need to visit its exact location to open it. Sometimes, people find it hard to locate their recent or past screenshots.
This could be because they've taken many screenshots or their default storage location is disorganized. That shouldn't worry you much since this article will guide you on where screenshots are stored on Mac by default. We'll also outline steps to find lost screenshots and tips for changing your default screenshot location to improve their organization.
Screenshots Are Usually Saved to The Desktop
When you take screenshots on your Mac, the device will automatically save them to Desktop and listed as PNG files. Your device will save the screenshots under the name "Screen Shot," followed by the date and time of modification. In situations where you've taken many screenshots, they'll most likely fill up your Desktop and make it look disorganized and untidy. You'll therefore face a hard time locating a specific screenshot.
To make things easier on your side, you can use the "View" menu to organize your MacOS Desktop. Click on "View" then "User Stack" to have the files sorted automatically based on stacks. Once you've located a screenshot on the Desktop, you can view it through the following steps:
Step 1. Double-click on the screenshot icon.
Step 2. Check to confirm the image preview.
Step 3. If no screenshot is displayed, your system has saved it in a different location.
You'll therefore need to apply additional steps to trace the screenshots. We'll show you how to do this in the next section.
How to Find Out Where Mac Screenshots Are Saved
Sometimes, applying the method outlined in the above section may not yield any results. This could be frustrating at times. Despite that, we will show you additional methods to help you find saved screenshots on Mac. These methods include the following.
- Method 1. Accessing the Recents Folder
- Method 2. Using the Finder Search Bar
- Method 3. Through Spotlight Search
Method 1. Accessing the Recents Folder
You can use the Recents Folder to trace your latest screenshots on Mac through the following steps:
Step 1. Open Finder.
step 2. Click on "Recent" from the left sidebar.
Step 3. Cross-check the files under "Images" to find your most recent screenshots.
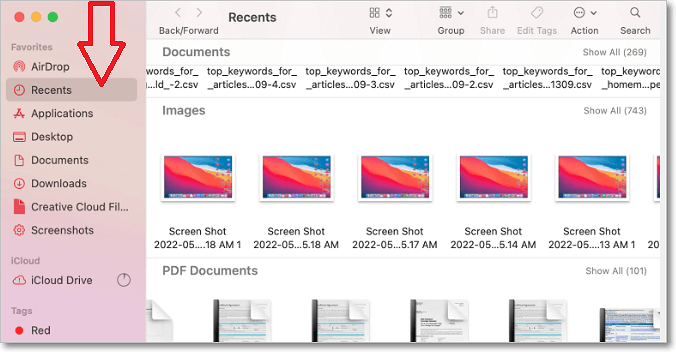
Step 4. Once you trace the screenshot you needed, you can drag and drop it to a location that will be easy to find next time.
Method 2. Using the Finder Search Bar
Another easy way to find saved screenshots on Mac is typing specific search tags on the Finder search bar. This will display all the screenshots saved on your device. You can apply this method through the following steps:
Step 1. Launch Finder.
Step 2. Click on the magnifying glass icon to open the search bar.
Step 3. Copy the search tag below and hit Return.
kMDItemIsScreenCapture:1
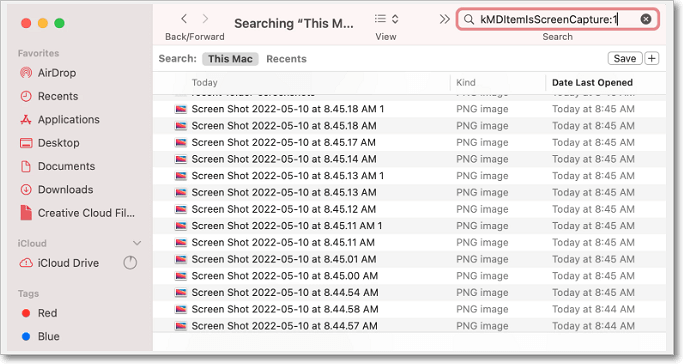
Step 4. Click on "Save" under the search bar for the system to create a smart folder based on the search results. You'll then view all the screenshots saved on your device.
Step 5. Alternatively, you can search for a specific screenshot by typing its name on the search bar. This is only possible if you know the exact name.
Method 3. Through Spotlight Search
Apart from using Finder, you can also utilize the Spotlight tool to find saved screenshots on your Mac. You can achieve this through the following steps:
Step 1. Launch Spotlight.
Step 2. Copy the command below and hit Return.
kMDItemIsScreenCapture:1
Step 3. You'll see a list of screenshots saved on your device—double-click on any image to view it.
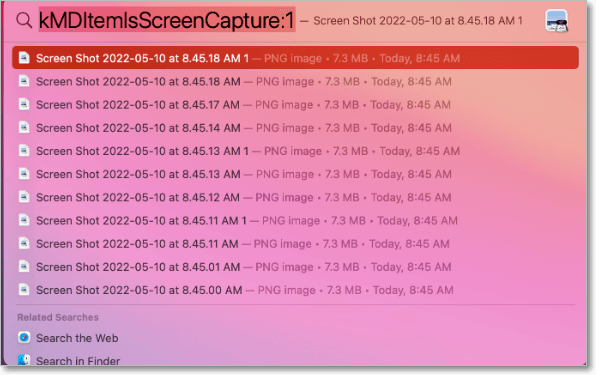
Step 4. To know the exact location for a given screenshot, click on it and hit Command + Return.
How to Find Lost Screenshots on Mac
If you've lost or accidentally deleted screenshots on Mac, many ways exist to recover them. We'll outline two methods to find lost/deleted screenshots in the section.
Method 1. Restoring Screenshots from Trash
When you delete any file on Mac, the Trash folder will save a copy of it. Provided you've not emptied your trash; it's effortless to find deleted screenshots. You can apply the following steps to restore screenshots from Trash:
Step 1. Click on the Trash icon.
Step 2. Scheme through the deleted files to find your lost screenshot.
Step 3. Once you confirm the lost screenshot, you can drag it to a preferred location or right-click on it and select Put Back to recover it.
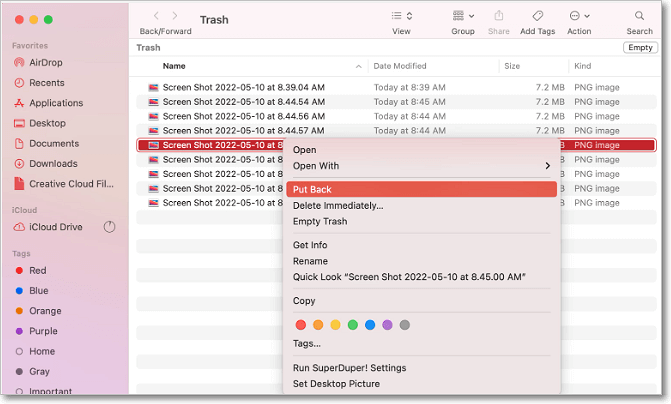
Step 4. With the Put-Back feature, you'll save your screenshot to its initial location, i.e., Desktop.
Method 2. Using Time Machine Backup
Time Machine allows you to back up and restore documents, videos, images, and music on Mac. If you had saved your screenshots on Time Machine but have lost the copies on your Mac, you can recover them through the following steps:
Step 1. Connect your Mac to the external drive with your Time Machine backups. (You can skip this step if the backups are in your internal drive).
Step 2. Click on the "Time Machine" icon.
Step 3. Select "Enter Time Machine" from the drop-down.
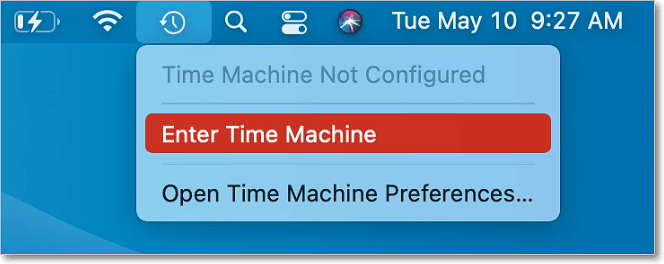
Step 4. Select your backup version based on the timeline provided on the left.
Step 5. Go to the original folder for the lost or deleted screenshot.
Step 6. Click on the file you want to recover and choose Restore. You'll have the lost file back to its location.
How to Change the Default Location for Screenshots
If you don't want to save your screenshots on the Desktop or are tired of losing them because of disorganized files, we have a tip for you! You can save the time taken to find your screenshots by changing their default location on Mac.
There are two ways to change the default location for your screenshots based on the OS version you're using, i.e., 1) macOS Mojave or later and 2) macOS High Sierra or Earlier. Let's look at the steps to change the default screenshot location for each OS version.
Method 1. macOS Mojave or Later
Apply the following steps to change your default screenshot location:
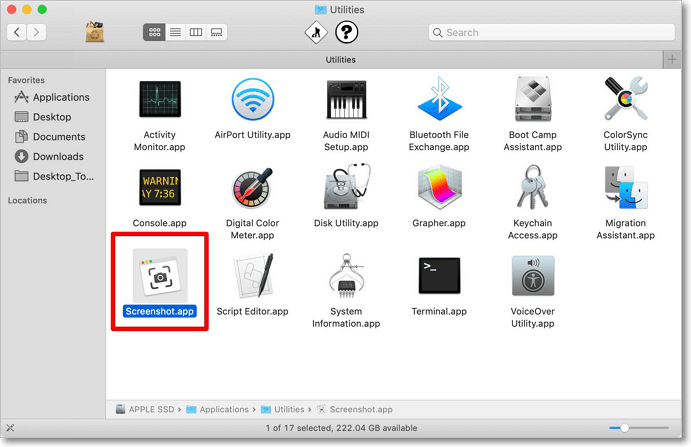
Step 1. Open the Screenshot app under the Utility folder.
Step 2. Click on "Options" to view the available ways to save your screenshot, i.e., Desktop, Documents, Clipboard, etc.
Step 3. Select a "Save to" option for your screenshots.

Step 4. Once you've selected a given option, Mac will make it the default location for your subsequent screenshots.
Method 2. macOS High Sierra or Earlier
You can change your default screenshot location through the following steps:
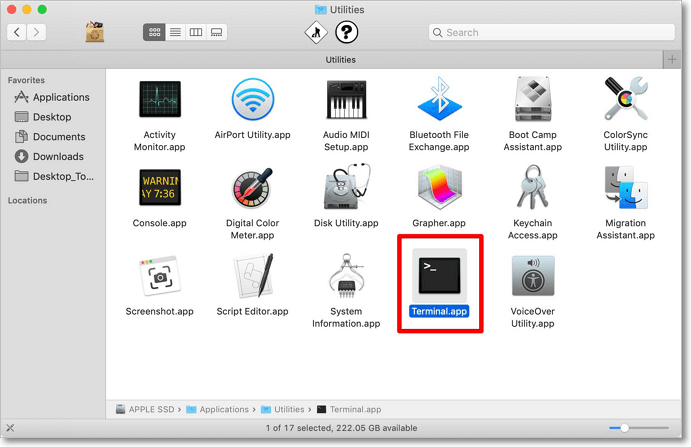
Step 1. Open the Terminal app under the Utility folder.
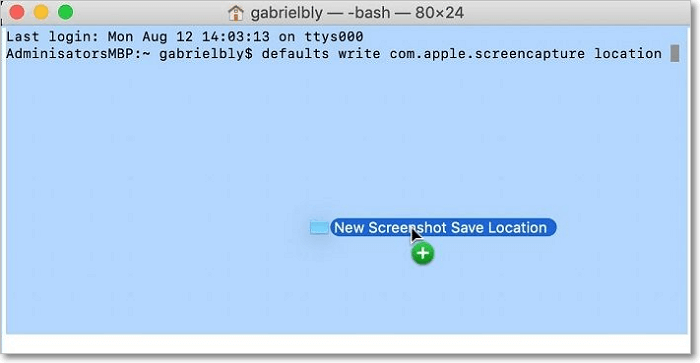
Step 2. Copy the command below, followed by a space:
Default write com.apple.screencapture location
Step 3. Drag and drop the folder to be saved on the Terminal command box.
Step 4. Next, press Enter.
Step 5. Copy the command below:
killall SystemUIServer
Step 6. Press Return. You've now set the default location to save your screenshots.
Bonus Tip: How to Take Screenshots on Mac
You can use EaseUS RecExperts to take screenshots on Mac in high resolution. This powerful and user-friendly Mac screenshot tool supports full-screen, partial-area, and specific-window screenshots, meeting diverse screenshot needs. Its recording-process screenshot feature captures all your actions and annotations during recording, making it particularly suitable for education, training, and personal learning, effectively enhancing the readability and engagement of your content.
Furthermore, it supports one-click screenshots (F11 shortcut) and automatically saves images in PNG format to a designated folder for easy viewing and use at any time. Besides, as a powerful Mac screen recorder, it makes it easy to screen record on Mac with internal audio without installing third-party plugins or tools.
Download EaseUS Screen Recorder
Download EaseUS Screen Recorder
Trustpilot Rating 4.7
1Step 1. Launch this tool and choose your desired area to take a screenshot on your screen. If you want to take a full-screen snapshot, click "Full Screen" and choose Display (if there is more than one monitor). Then, click the camera icon in the upper right to start your task.
2Step 2. (Optional) If you are going to take a partial screen, choose the Region option. Next, left-click and hold your mouse to select the target region. Once selected, choose the camera icon to snapshot your screen.
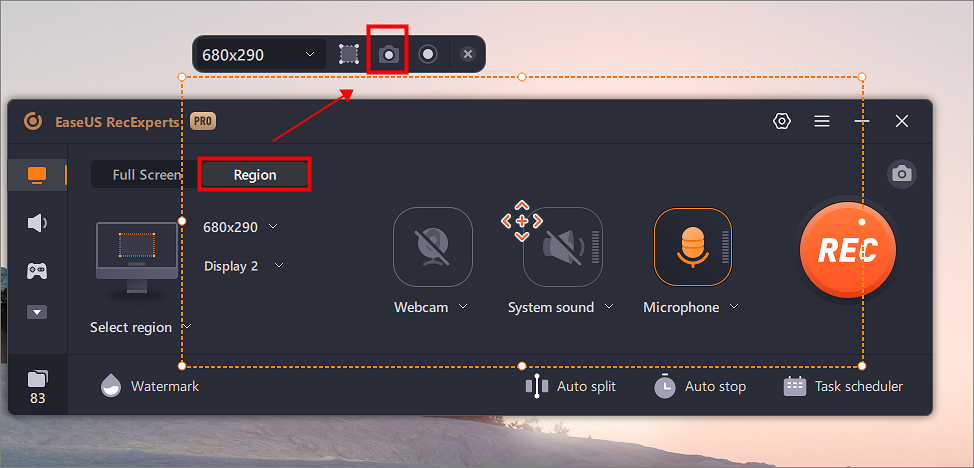
3Step 3. Finally, you can click Recordings >Pictures to find and view your screenshots.
FAQs
1. Why can't I find my Mac screenshots?
When you take a screenshot on your Mac, it is automatically saved to your Desktop. You can find them either by navigating to your Desktop screen or using Finder to open the Desktop folder and see your saved images there.
2. How do you save a screenshot on Mac?
To capture the entire screen, press Command-Shift-3. The screenshot will be automatically saved as a PNG file on your desktop with the filename starting with "Picture" followed by a number, for example, Picture 1, Picture 2, and so on. To copy the entire screen, press Command-Control-Shift-3.
Conclusion
The default location for all screenshots taken on Mac is the Desktop. To find a given screenshot, you'll just need to navigate there, and you'll find it. If this process doesn't work, you can find saved screenshots on Mac by accessing the Recents folder, using the Finder search bar, or through Spotlight search.
If you lose or accidentally delete screenshots on Mac, you can recover them using the Trash folder or Time Machine backup. These steps help restore the lost screenshots to their default or a new location. If you're not comfortable with the current location for your screenshots, you can assign them a new default location.
The steps for changing the default location vary based on your macOS version. For macOS Mojave or later, you can use the EaseUS RecExperts app. The Terminal app is your best option for macOS High Sierra or earlier. Happy screenshot-taking!
Download EaseUS Screen Recorder
Download EaseUS Screen Recorder
Trustpilot Rating 4.7
EaseUS RecExperts

One-click to capture anything on screen!
No Time Limit, No watermark
Start Recording