-
![]()
Daisy
Daisy is the Senior editor of the writing team for EaseUS. She has been working in EaseUS for over ten years, starting from a technical writer to a team leader of the content group. As a professional author for over 10 years, she writes a lot to help people overcome their tech troubles.…Read full bio -
Jane is an experienced editor for EaseUS focused on tech blog writing. Familiar with all kinds of video editing and screen recording software on the market, she specializes in composing posts about recording and editing videos. All the topics she chooses …Read full bio
-
![]()
Alin
Alin is an experienced technical blog writing editor. She knows the information about screen recording software on the market, and is also familiar with data cloning and data backup software. She is expert in writing posts about these products, aiming at providing users with effective solutions.…Read full bio -
Jean is recognized as one of the most professional writers in EaseUS. She has kept improving her writing skills over the past 10 years and helped millions of her readers solve their tech problems on PC, Mac, and iOS devices.…Read full bio
-
![]()
Jerry
Jerry is a fan of science and technology, aiming to make readers' tech life easy and enjoyable. He loves exploring new technologies and writing technical how-to tips. All the topics he chooses aim to offer users more instructive information.…Read full bio -
![]()
Rel
Rel has always maintained a strong curiosity about the computer field and is committed to the research of the most efficient and practical computer problem solutions.…Read full bio -
![]()
Gemma
Gemma is member of EaseUS team and has been committed to creating valuable content in fields about file recovery, partition management, and data backup etc. for many years. She loves to help users solve various types of computer related issues.…Read full bio -
![]()
Shelly
"I hope my articles can help solve your technical problems. If you are interested in other articles, you can check the articles at the bottom of this page. Similarly, you can also check my Twitter to get additional help."…Read full bio
Page Table of Contents
0 Views |
0 min read
A quick snap of what's happening on your screen can be really helpful. A screenshot lets you share errors in your work, important achievements of your game, or preserve something for your memories. And all the laptops or PCs available now generally come with simple keyboard shortcuts or settings to take a snap of your screen, including Chromebooks.
PAGE CONTENT:
Due to the arrangement of keys and the inclusion of new keys altogether, the ways to take a screenshot on Chromebook get a little confusing. Though the relevancy of Chromebooks is on the verge, they can be confusing to users who just switched from Windows PCs or Macs. This passage will show you how to take a screenshot on Chromebook with and without the Keyboard keys.
How to Take a Screenshot on Chromebook With Keyboard
Every laptop comes with a default way to take screenshots using the keyboard, and so is Chromebook. The keys to using to take a screenshot on Chromebook ate Ctrl and Show. There are instructions on using these keys to take full-screen and partial screenshots.
- For Full-Screen Screenshots: Ctrl + Show
- For Partial Screenshots: Ctrl + Shift + Show
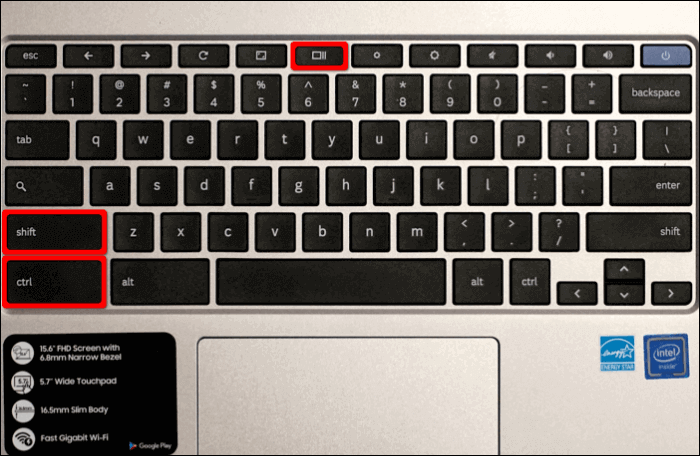
The Show Windows key on a Chromebook is up on the Keyboard's top row. You can see an icon with a window and two parallel lines stacked beside it.
How to Take a Screenshot on Chromebook Without Windows Key
If you do not want to use Show Windows key or the Key is not working? You may some methods to get a snap of the screen. So, if you are looking for alternate methods to take a screenshot of your Chromebook, the next section shows you 5 methods to do it without Windows Key.
1. Using Quick Settings
Almost all Chromebooks from manufacturers like ASUS, Dell, HP, Lenovo, etc., come with Quick Settings. And these Settings comprise a Screenshot button, so let us look at how to access and use it for different screenshots.
Step 1. Click on Chromebook's Shelf ( on the time bar) at the bottom of the screen.
Step 2. Quick Settings appears. You can find the Screen Capture options here. If you did not see it, click on the upward arrow to access all the Quick Settings.

Step 3. After clicking on it, you will see a Screenshot toolbar on the screen. Now, press the Screenshot button to select it.
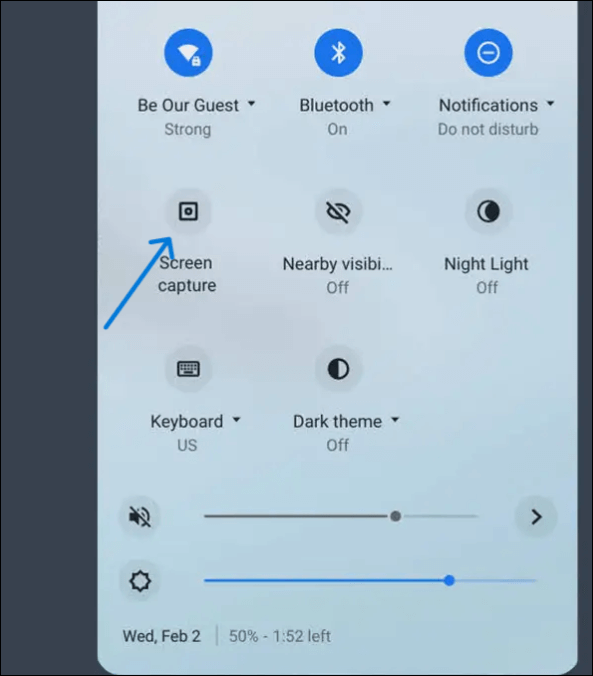
Step 4. You can take three types of Screenshots using this.
- Full-screen Screenshot: Captures the entire screen of your Chromebook.
- Partial Screenshot: Allows you to capture an area of your screen.
- Window Screenshot: Takes the snap of the active window.

Step 5. Choose the one you want, you can screenshot or record, and your Chromebook takes a snap of it and saves it.
2. Using Physical Buttons
The Chromebook allows you to take a screenshot, just like a smartphone, if you own a convertible tablet-style or 2-in-1 Chromebook. The way is to use the Power button + Volume down button simultaneously to take a screenshot on Chromebook.
You need to note that the Volume button is different from the Volume Key. You can see the Volume button on the right or left side of the device. Another thing is this method only captures the full screen. To get the partial screenshot, you will have to edit or crop it later.
3. Using Google Chrome Built-in Tool
You can also use Google Chrome's built-in tool to take a snap of your screen. But this only works for what's on your browser. You cannot use this feature to take screenshots outside the Chrome browser. Let us see how to use this feature to take a screenshot on Chromebook.
Step 1. Open Google Chrome and choose the three vertical dots on the top.
Step 2. Hover over the More Tools part to see the options. And click on the Take Screenshot from the options to take the screenshot of the current window.

Your screen gets dark for a second by using the screen capture software. You will receive a notification indicating the same, and you can access the screenshot from the screenshots/downloads folder on your Chromebook.
4. Using Google Assistant
Since Chrome OS powers the Chromebook, we can take a screenshot of the Chromebook screen via Google Assistant. You need to tell the assistant to "Take a Screenshot," which will do the job. However, first things first, you need to enable Google Assistant. And there are two ways you can follow to enable the Google Assistant on your Chromebook.
1. The first method is via Chromebook Settings. Go to Chromebook Settings > Search & Assistant > Google Assistant. Now, turn on the toggle next to Off to enable the assistant. If you want to train the assistant with your voice, click on the dropdown beside "Hey Google" and select Always on from it.
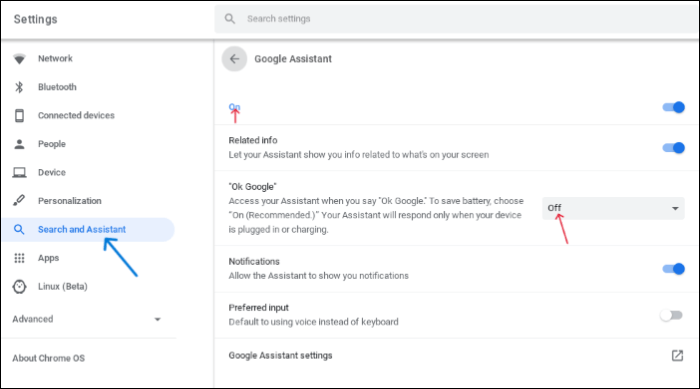
- Notice:
- It will work only if your Chromebook is on charge. This is to train the voice.
2. The alternate method is to click on the Assistant icon in the Chromebook's search bar to activate Google Assistant. Here, you can either type or ask the assistant to take a screenshot.
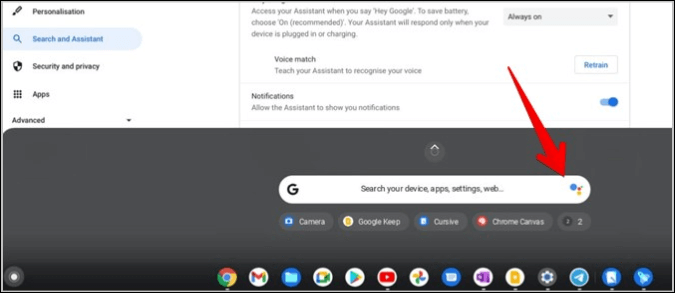
Pro Tip: How to Take a Screenshot on Google Chrome Windows 10
Sometimes we do not remember the keyboard combinations. Even if we do, the inbuilt features on the Chromebook do not provide us with good options to edit the screenshot. That is the problem with the other methods too. Either they come with some limitations or need some external app to edit them. Therefore, it is better to use an excellent screenshot tool, like EaseUS RecExperts, to capture a partial screenshot and easily avail of many editing options for free.
EaseUS RecExperts is an all-in-one screen-capturing tool specialized in screen capturing for all PCs. It provides a lot of flexible editing features to enhance the screenshot. We can also set up hotkeys to capture the screen with ease. Additionally, features like full screen, a specific window, or region capturing make it an ideal tool for all your screen-capturing and editing needs.
🎯 Key Features of EaseUS RecExperts:
- Add annotations, highlights, edits, watermarks, and more to enhance the screenshot
- It can help you take a partial or full screenshot on Windows
- A simple and intuitive interface with all features
- Completely free screen-capturing software
Conclusion
Almost all PCs include a few ways to capture the screen in multiple ways, and the same can be seen with the Chromebook. Due to the inclusion of some new keys, the users are confused as to how to take a screenshot on Chromebook. We also recommend a free screenshot tool: EaseUS RecExperts, with even better features to enhance your experience and screenshots.
Maybe you are interested in the following articles, and you can read these articles about screenshots.
FAQs About How to Take a Screenshot on Chromebook
Here are some relevant questions about how to take a screenshot on Chromebook. If you have similar queries hope this will help you.
1. What Button Do You Press to Take a Screenshot on Chromebook?
We can use the power and Volume down buttons, just like how we use a phone to take screenshots. It is possible only if you own a 2-in-2 or convertible tablet.
2. What Is an F12 Screenshot?
When pressing the F12 key on the keyboard, then your system will capture a screenshot, and these screenshots are saved in the Screenshots folders in Disk C.
3. How Do You Screenshot on a Chromebook Without a Ctrl Key?
There are some methods you can take a screenshot without the Ctrl key:
- If your Chromebook has it, use the screenshot key.
- Use Quick Settings to capture your screen.
- Ask the Google Assistant to take a snap of your screen.
EaseUS RecExperts

One-click to capture anything on screen!
No Time Limit, No watermark
Start Recording