
- About
- Discover EaseUS
- Reviews & Awards
- License Agreement
- Privacy Policy
- Student Discount
Popular And Easy Shortcuts to Take Screenshots on a Mac [2025 Update]
Jean Updated on
Apr 28, 2025|
min read
PAGE CONTENT:
Taking screenshots on Mac is fun if you have the keyboard shortcuts at your fingertips! This saves you the time and effort of taking screenshots using other methods. You may want to take a screenshot on Mac to save part of a document, webpage, or screen. Screenshots are also an excellent way to store important information for reference or sharing.
If you want to know the easy and popular shortcuts to take screenshots on Mac, you're at the right place. The article will also guide you on finding saved screenshots and methods to address the "screenshot not working" issue.
Easy Shortcuts to Take Screenshots on a Mac
To efficiently capture screenshots on Mac, you can use various keyboard combinations. With these key shortcuts, you can screenshot a portion of your screen, a whole page, and an active window.
Getting started with shortcut keys for screenshots on Mac isn't difficult. The keys will also allow you to copy the captured screenshots to the clipboard. Below, we'll outline how the various shortcuts work.
- Shortcut 1. Capture a Portion of the Screen
- Shortcut 2. Copy a Portion of the Screen to the Clipboard
- Shortcut 3. Capture a Screenshot of an Active Window
- Shortcut 4. Copy a Screenshot of an Active Window to the Clipboard
- Shortcut 5. Capture a Screenshot of a Whole Page
- Shortcut 6. Copy a Screenshot of a Whole Page to the Clipboard
- Shortcut 7. Shortcuts for Touch Bar MacBooks: CMD-Shift-6
Shortcut 1. Capture a Portion of the Screen
You can achieve this through the following steps:
Step 1. Press Command+Shift+4. This changes the cursor to a crosshair.
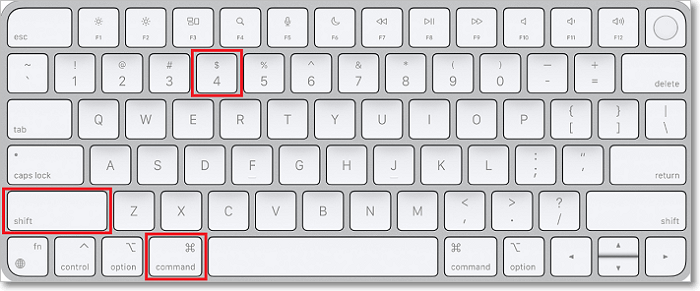
Step 2. Click and drag the cursor over the section of the screen you want to capture.

Step 3. Release the mouse button once you've highlighted the selected area. The system will then take a screenshot of this section and save the image as a PNG file.
Shortcut 2. Copy a Portion of the Screen to the Clipboard
Below are the steps to achieve this:
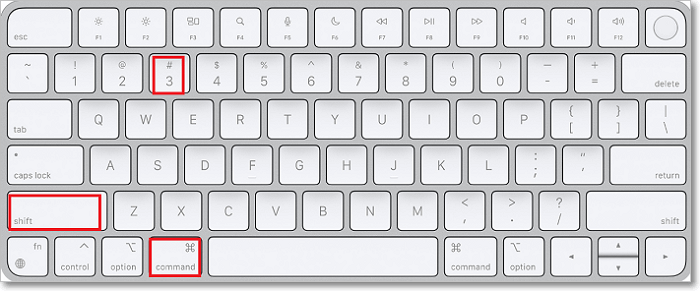
Step 1. Hit Command+Control+Shift+4 on your Mac keyboard.
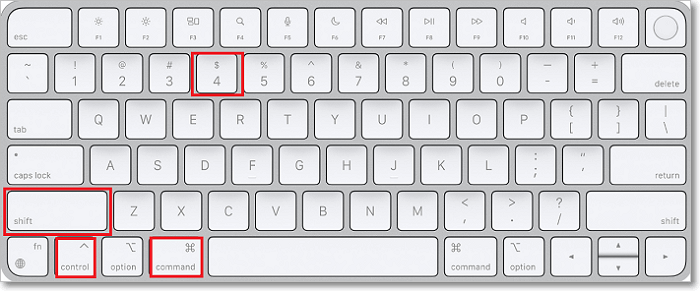
Step 2. Click and drag the cursor over the portion of the screen you want to capture.

Step 3. Click on the selected area to save its screenshot to the clipboard.
Step 4. Choose the application where you want to paste the captured image, i.e., Word or Skype.
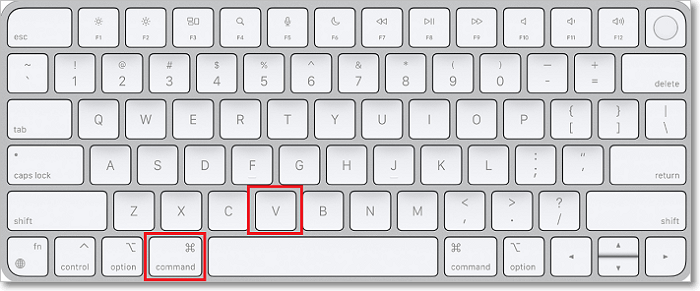
Step 5. Press Command+V to paste the image on the selected application.
Shortcut 3. Capture a Screenshot of an Active Window
You can make use of the following steps to screenshot an active window:
Step 1. Press Command+Shift+4. The pointer will change to a crosshair.
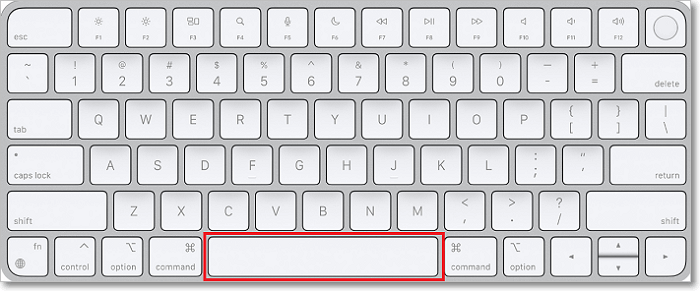
Step 2. Press the spacebar key on your keyboard. This action will change the cursor to a camera shape.
Step 3. Move the cursor over the active window to select and highlight it.

Step 4. While still on the highlighted window, click on the mouse button. The system will capture the active window and save it as a PNG file on the desktop or default location for screenshots.
Shortcut 4. Copy a Screenshot of an Active Window to the Clipboard
You can accomplish this process through the following steps:
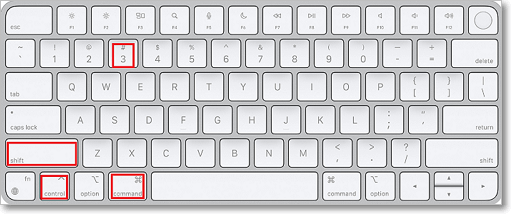
Step 1. Hit Command+Control+Shift+4 to turn the pointer into a crosshair.
Step 2. Press on the spacebar to have the cursor change into a camera shape.
Step 3. Move the cursor over the active application you want to capture. This step will have the active window highlighted.
Step 4. Click on the highlighted window to take a screenshot and save it on the clipboard.
Step 5. Select where you want to paste the captured image, i.e., Word or Skype.
Step 6. Hit Command+V to have the screenshot pasted on the selected application.
Shortcut 5. Capture a Screenshot of a Whole Page
To capture an entire page on Mac, apply the following simple procedures:
Step 1. Press Command+Shift+3. This action screenshots the whole page on your display.
Step 2. The system will automatically save the captured image as a PNG file on your Desktop or your default location for screenshots.
Shortcut 6. Copy a Screenshot of a Whole Page to the Clipboard
You can apply the following steps to achieve this process:
Step 1. Hit the Command+Control+Shift+3 buttons to capture the entire screen.
Step 2. The system will automatically save the image to your clipboard.
Step 3. Choose the application to insert the copied screenshot.
Step 4. Hit the Command+V button to have the screenshot pasted on the target application.
Shortcut 7. Shortcuts for Touch Bar MacBooks: CMD-Shift-6
It's also possible to take a screenshot on Mac using the Touch Bar. However, you should note that this method only works for MacBook Pro devices. With the Touch Bar feature on MacBook Pro, you can capture:
- An entire screen
- A selected portion of the screen, or
- An active widow.
You can take screenshots on MacBook Pro using the Touch Bar by either pressing Command+Shift+4 or Command+Shift+6.
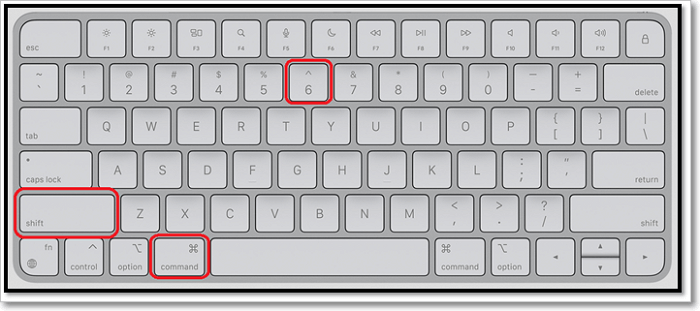
You'll have a wide, skinny snapshot image of the Touch Bar. Your PC will then save the image as a PNG file.
Bonus Tip: The Way to Take Screenshots on Windows
All the above methods are nice for Mac users, and the seven tips are enough for their daily life and work. However, not all people are Mac users, and there are a large number of Windows users. So, for these ones, EaseUS ScreenShot is conducive to taking a screenshot on Windows.
EaseUS ScreenShot is a professional screen capture software that is friendly to both novices and pros due to its intuitive workflow. By using this great tool, you can screenshot any region on your screen with one simple click.
Also, this software support shortcut, which means you are able to take screenshots by hitting the hotkey simply. After screenshot taking, you can highlight, mosaic, and add elements to the screenshots as you like. After editing, just save it to your computer or copy it to your clipboard.
Step 1. Download and install EaseUS Screenshot on your PC, then launch it.

Step 2. You will see two options on the toolbar. The left one is for "Rectangular screenshot", and the right one is for "Full screenshot".
To take a partial screenshot, you just click on the left button (or double click the "Ctrl" key), then drag your mouse to select the area on your screen; To take a full screenshot, you can click the right button (or double click "Alt" on keyboard).

Step 3. When the screen is captured, you can see an editing toolbar below the screenshot. It provides a set of tools to modify the screenshot by drawing, adding text, mosaic, etc.
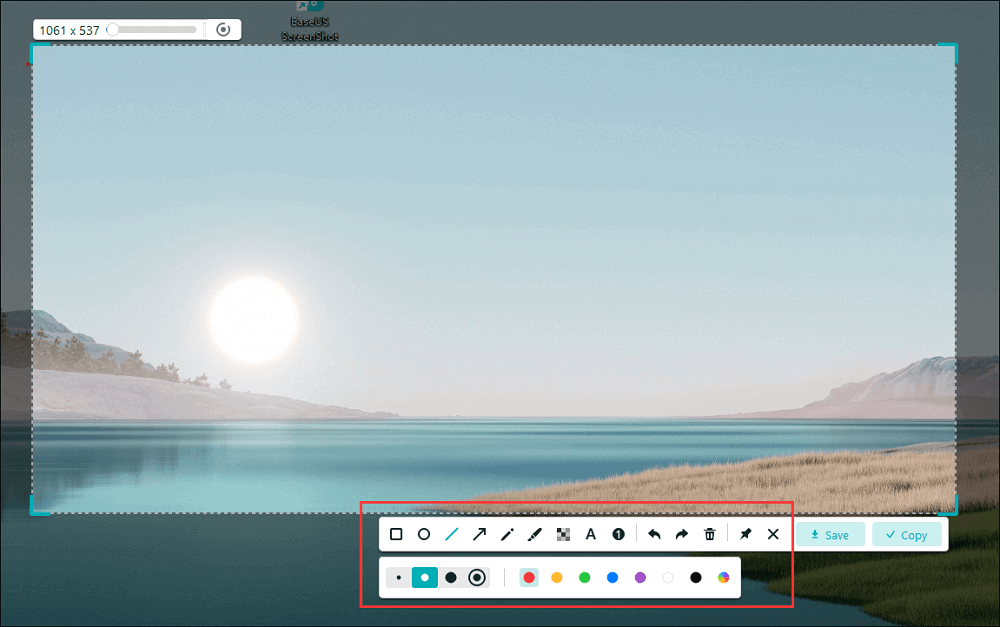
Step 4. Once done, click the "Save" button or press "Space" to save the screenshot. Or, you can click "Copy" or hit the "Enter" key to copy the screenshot to the clipboard.
What to Do if Screen Capture on Mac Is Not Working
If you find that the screen capture feature on your Mac device isn't working, you can solve it through the following methods.
- Method 1. Check if Keyboard Shortcut Settings are Activated
- Method 2. Restart Your Computer
- Method 3. Use the Grab App
Method 1. Check if Keyboard Shortcut Settings are Activated
Usually, we use "Command+Shift+4" to capture a selected portion and "Command+Shift+3" to capture an entire screen. If none of these keyboard shortcuts is working, you might have messed up or deactivated the configuration settings.
You can apply the following steps to confirm whether your keyboard shortcut settings are active:
Step 1. Navigate to the Apple menu and click on "System preferences."
Step 2. Click on the "Keyboard" tab and then "Shortcuts."
Step 3. Navigate to the left of the screen and click on the "Screenshots" option.
Step 4. Ensure all the text boxes are checked.
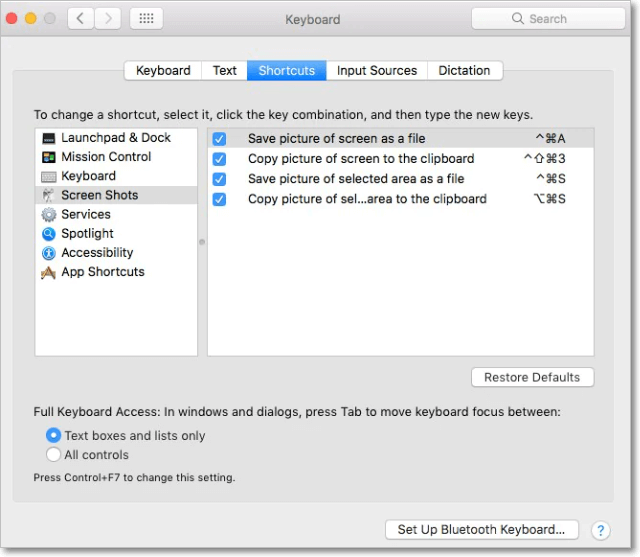
Step 5. Close the Window and try retaking a screenshot using the shortcut keys to confirm if the issue is solved. If the problem persists, you can try method 2 below.
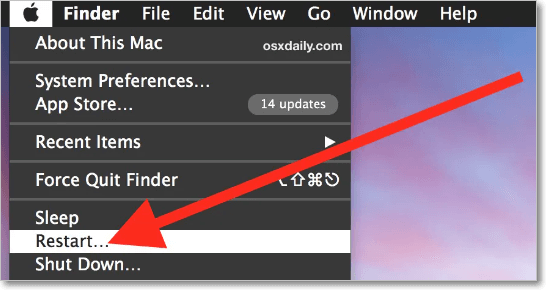
Method 2. Restart Your Computer
Sometimes, your device might fail to capture the screen because of a simple runtime error. You can solve such an error by simply restarting your Mac computer. Most people have applied this strategy in solving the "screen capture not working" issue and found it effective. Therefore, we recommend trying it out.
You can restart your Mac by pressing Control+Command+Eject or Control+Command+Power and clicking on "Restart."
Method 3. Use the Grab App
Another method to solve the "screen capture not working" issue is using an alternative tool—the Grab app. You can use this app to take a screenshot through the following steps:
Step 1. Open Finder and click on "Applications."
Step 2. Next, click "Utilities" and select "Grab. app" to launch the application.
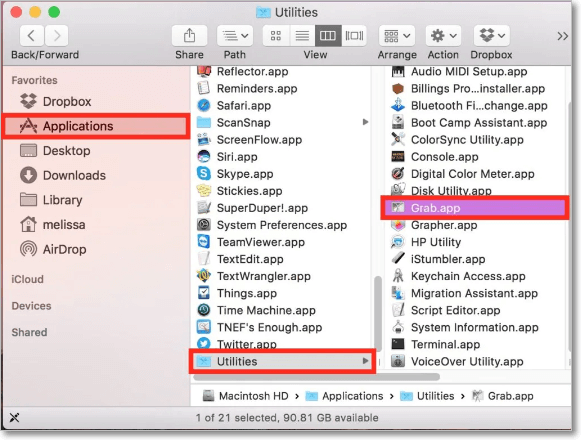
Step 3. Navigate to the screen you want to screenshot and click on "Capture." Grab will capture your screen and save the image on your default screenshot folder.
Pro Tip: Where to Find Your Saved Screenshots on a Mac
After you've taken screenshots on your Mac using the shortcuts outlined above, it's important to know where the images go so you can easily find them. By default, the system will store all the screenshots on your Desktop. You should therefore navigate to this location and check out the images recently captured.
However, if you can't find anything on the Desktop, you can try checking out this file path: Finder>Go>Home>Pictures>Screenshots. This works well for most Mac devices. If using macOS Catalina, you can find saved screenshots by visiting: Finder>Go>Home>Library>Pictures>Screenshots.
To quickly find your saved screenshots next time, you can also set a new default location that you can easily remember. You can make such changes in macOS Mojave and other later versions by opening the Screenshot app and clicking on the Options dropdown. Next, select where to save your screenshots, i.e., Desktop, Messages, Mail, Clipboard, etc.
Conclusion
Pressing the Command+Shift+4 keyboard shortcut on Mac captures a portion of your screen or an active window. To copy the captured image to the clipboard, you should press Command+Control+Shift+4. Pressing the Command+Shift+3 keyboard shortcut on Mac helps you capture a whole page. To save this image to the clipboard, you can press Command+Control+Shift+3.
Additionally, you can use the Touch Bar to take screenshots on Macbook Pro. To achieve this, you can either press the Command+Shift+4 or Command+Shift+6 keys. If you encounter any issue with taking screenshots on Mac, you can solve it by either:
- Confirming if keyboard shortcut settings are activated
- Restarting your device, or
- Using the Grab app as an alternative.
Besides all the above methods, EaseUS ScreenShot is also a great choice through which you can take screenshots easily on Mac,
To ensure you don't forget the shortcut keys for taking screenshots (on Mac) mentioned in this article, you should practice using them each time you want to capture your screen. Within no time, you'll have mastered the seven shortcuts discussed in this article!
FAQs
1. What happens to screenshots on Mac?
By default, screenshots save to your desktop with the name "Screen Shot [date] at [time].png." In macOS Mojave or later, you can change the default location of saved screenshots from the Options menu in the Screenshot app. You can also drag the thumbnail to a folder or document.
2. How do you change what happens to screenshots on Mac?
To change the destination folder for a screenshot, press Cmd + Shift + 5 on your keyboard, which should open the Screenshot Tool. From here, click on Options, and choose the location you want to use to save your screenshots. This will be the default location for all future screenshots you take on your Mac.
3. Why did my screenshot stop working?
Many times, less storage space is responsible for screenshots not working on Android. Some users get the "Can't take screenshot due to limited storage space" error as well. To check your storage, go to Settings > Storage or Settings > General Management > Storage.
Was This Page Helpful?