
- About
- Discover EaseUS
- Reviews & Awards
- License Agreement
- Privacy Policy
- Student Discount
3 Simple Ways to Capture Video Screen on Your Mac
Jean Updated on
May 10, 2024|
min read
PAGE CONTENT:
Some users want to record their Mac screen to capture a specific part of any online video into a small video clip. At the same time, a set of users record their Mac screens for demonstration purposes, such as recording tutorial videos. Recording a Mac screen is even simpler than cropping a screenshot on Mac. There are varied ways to capture your Mac screen into a video, but you might not know the exact process of doing them. Mac has a few built-in tools that let you video capture your Mac screen quickly. Many third-party screen recording apps can let you do the same. Here in this article, we have explained all possible methods to record your Mac screen. Check out the below-mentioned ways to capture your Mac screen in a video with ease.
How to Capture Video Screen on Mac with Screenshot Toolbar
All thanks to the Mac's Screenshot Toolbar to make screen recording much easier on Mac. Screenshot Toolbar is a built-in screen recording tool that lets you capture your Mac screen into a video. You can record the entire screen as well as a particular portion of the screen. This tool is available for all Mac users and can be accessed by simply pressing a key combination. Follow the below-mentioned steps to capture the video screen on Mac with the built-in tool, Screenshot Toolbar.
Step 1. Open the Screenshot Toolbar from the Spotlight Search.
Or
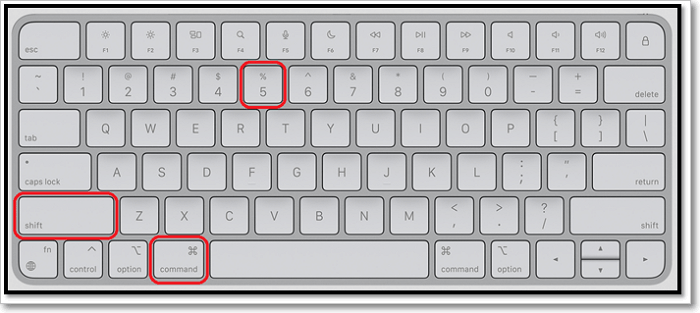
Step 1. Press Command + Shift + 5 simultaneously on your keyboard to launch the Screenshot Toolbar.
Step 2. You will now see the control bar on your screen having a few options on it.
Step 3. Select from Record Selected Portion and Record Entire Screen option.
- Record Selected Portion: If you select this option, you can record a particular portion of the screen. You can use the cursor to select the area you want to record.
- Record Entire Screen: On the other hand, if you select this option, it will record the entire screen from edge to edge without any interruptions.
Step 4. Click on "Options" in the Control Bar.

Step 5. Select the "Save To" option to where you want to save your screen recordings.

Step 6. From the Options section, select what should be recorded and what should not. You can choose from three options: Show Floating Thumbnails, Remember Last Selection, and Show Mouse Pointer. Select and deselect them as per your choice.
Step 7. Click the "Capture" to start the screen recording.

Step 8. Once the aim to record the video is fulfilled, click on the "Stop" button to stop the screen recording.
Step 9. Once the recording has been stopped. You will find it in your selected destination folder.
Step 10. That's it.
Screenshot Toolbar is an excellent tool, but one of its drawbacks is its limited features. It doesn't come with the advanced features needed for professional screen recording. Here, we have listed some of the pros and cons of the Screenshot Toolbar.
Pros:
- No need for third-party tools
- Unlimited number of screen recordings
- No time limit
- Ease of use
- Basic features, like timer, customization options
Cons:
- Misses advanced features, like scheduling
- Frequent errors in accessing the Screenshot Toolbar
- Very few editing features
- Annotation available only through Preview mode
How to Capture Video Screen on Mac with QuickTime
QuickTime is another preinstalled screen recording app on Mac. You can use this tool to quickly video capture your screen and voice. Additionally, it allows you to quickly capture and edit movies with its intuitive interface. QuickTime is available for all Mac users for free.
You can access it from the Applications Menu, Spotlight Search, and Launchpad. In case your Mac doesn't come with this software preinstalled, you can download it on your Mac from the official support page.
Step 1. Open the QuickTime app through the Spotlight Search or Launchpad.
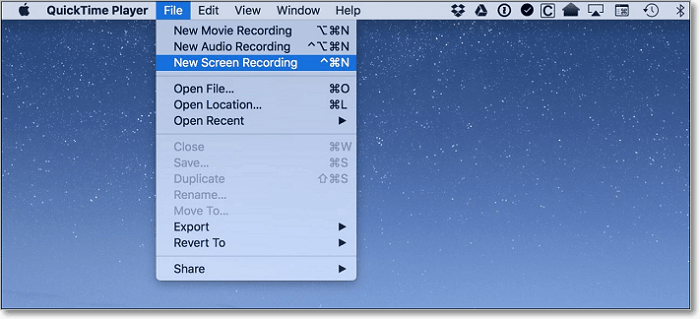
Step 2. Click on the "File" option in the top ribbon menu.
Step 3. Select the "New Screen Recording" option from the drop-down menu.
Step 4. Click on the "Arrow" next to the Record button.
Step 5. Select the "Microphone" option to Internal Microphone. You can also use any other external microphone connected to your Mac for audio recording purposes.
Step 6. Choose "Show Mouse Clicks" in Recording in the Options section.
Step 7. Now, click on the "Record" button and click anywhere on the screen to start recording with your voice.
Step 8. Press the Stop button or Command-Control-Escape to stop the recording.
Step 9. Once the recording is stopped, QuickTime will automatically play the screen recording.
QuickTime app only has some basic screen recording features that aren't enough to capture a perfect screen in the video. Here, we have mentioned all pros and cons in the listicles.
Pros:
- Easy to use
- Easily accessible
- No time and recording limits
- Integrated tool
Cons:
- Records background noise
- Lack of advanced features
- Not enough editing features
How to Capture Video Screen on Mac Free Online
You can easily use Mac's built-in tools for screen recording purposes. But these integrated tools don't have enough editing and customization features. In that case, online screen recording tools are the best choice of tools if you want more editing options and flexibility.
There are many online screen recording tools out there, but one of our favorite screen recording tools is HitPaw Screen Recorder. HitPaw Screen Recorder is our favorite screen recording tool for many reasons. One of the primary reasons for liking this tool is that it lets you record your Mac screen in high resolution. In addition, you can use it to record both audio and video in a few steps. It is available for both Windows and Mac.
You can follow the below-mentioned steps to check the process of recording your Mac screen with HitPaw Screen Recorder.
Step 1. Launch the HitPaw Screen Recorder on your Mac.
Step 2. On the main window, click on Screen.
Step 3. Hit Space Bar on your keyboard to select the entire screen. Else, use the cursor to select a particular part of the screen you want to record in the video.
Step 4. Select "Yes" in the popup to confirm the screen recording.
Step 5. Click on the "Capture Arrow" option to open the customization settings. You can change your arrow color and even turn it off from there.
Step 6. Click on the "Gear" icon to change Hardware Acceleration, Frame Rate, Resolution, and Output Format.
Step 7. Click on the "Record" button to start recording the entire screen or the selected area.
Bonus Tip: The Best Way to Capture Video Screen on Windows
Besides the methods for capturing video screens on Mac, ways for Windows users are also in need. To work efficiently and quickly, EaseUS ScreenShot is an indispensable tool for you. Why not try it now? Apart from the keyboard rules for screenshots, it's beneficial to use the dedicated screenshot tool named EaseUS ScreenShot. Avoid using complex rules on the keyboard, and this tool allows customizing the screenshot hotkey as you like. From F1 to F12, choose the hotkey you like. It goes fully compatible with Windows 11/10/8.1/8/7. Click here to download it right now!
Step 1. Download and install EaseUS Screenshot on your PC, then launch it.

Step 2. You will see two options on the toolbar. The left one is for "Rectangular screenshot", and the right one is for "Full screenshot".
To take a partial screenshot, you just click on the left button (or double click the "Ctrl" key), then drag your mouse to select the area on your screen; To take a full screenshot, you can click the right button (or double click "Alt" on keyboard).

Step 3. When the screen is captured, you can see an editing toolbar below the screenshot. It provides a set of tools to modify the screenshot by drawing, adding text, mosaic, etc.
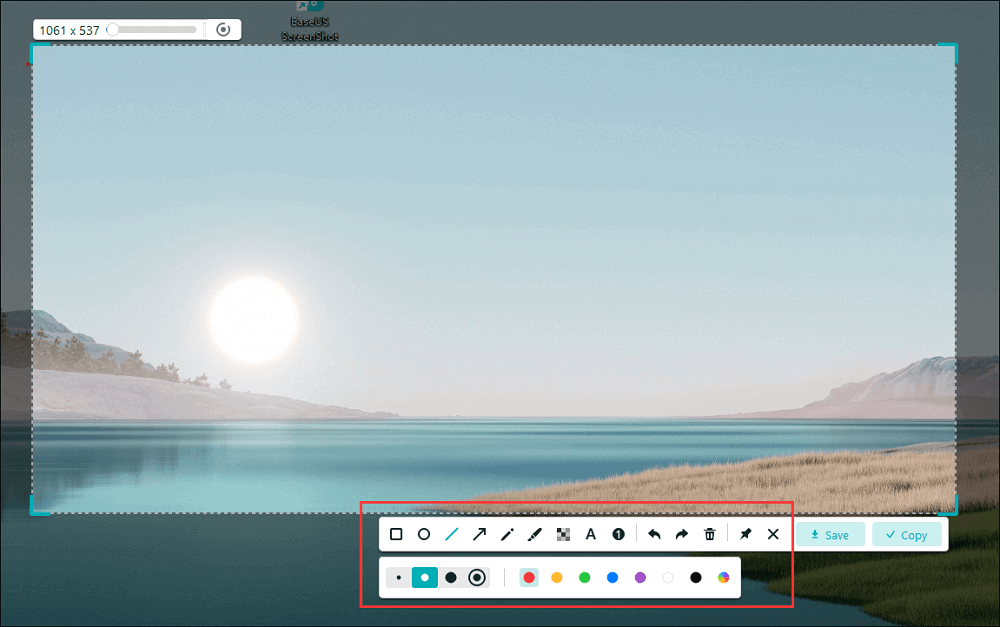
Step 4. Once done, click the "Save" button or press "Space" to save the screenshot. Or, you can click "Copy" or hit the "Enter" key to copy the screenshot to the clipboard.
Conclusion
Recording your Mac screen isn't that difficult. Mac already has two powerful built-in tools, Screenshot Toolbar and QuickTime. Screenshot Toolbar is one of the most useful tools as it's user-friendly and much faster than any other screen recording tool. No doubt, QuickTime is also an excellent screen recording tool on Mac. However, these tools don't have advanced features, so in that case, the HitPaw Screen Recorder tool covers you with its advanced yet easy-to-use features. HitPaw Screen Recorder is a free online screen recording tool with an intuitive interface. Capturing a video screen on Mac isn't complicated with the above-mentioned methods. Additionally, to capture video screens on Windows, the EaseUS ScreenShot will fit you the most.
Capture Video Screen FAQs
There are very few chances that you may have some doubts after reading this in-depth tutorial. In case you still have any doubts, we will try to solve them in this section. Here in this section, we have answered some of the most commonly asked questions about capturing video screens on Mac.
1. How To Record Screen on Mac?
One of the easiest ways to record your Mac screen is using the Screenshot Toolbar. Here's how to record the screen on a Mac with the Screenshot Toolbar.
- Press Command + Shift + 5 on your keyboard to open the Screenshot Toolbar.
- Select from Record Selected Portion and Record Entire Screen.
- Lastly, click on the Capture option to start screen recording.
2. How To Take a Screenshot on Mac?
There are several ways to take a screenshot on a Mac. Here are some common methods to take screenshots on Mac.
- Press Shift + Command + 3 to take a normal screenshot.
- Press Shift + Command + 4 to capture a screen of a particular portion.
- Press Shift + Command + 4 + Space Bar to capture a screenshot of a particular window or menu.
Was This Page Helpful?