-
![]()
Daisy
Daisy is the Senior editor of the writing team for EaseUS. She has been working in EaseUS for over ten years, starting from a technical writer to a team leader of the content group. As a professional author for over 10 years, she writes a lot to help people overcome their tech troubles.…Read full bio -
Jane is an experienced editor for EaseUS focused on tech blog writing. Familiar with all kinds of video editing and screen recording software on the market, she specializes in composing posts about recording and editing videos. All the topics she chooses …Read full bio
-
![]()
Melissa Lee
Melissa Lee is an experienced technical blog writing editor. She knows the information about screen recording software on the market, and is also familiar with data cloning and data backup software. She is expert in writing posts about these products, aiming at providing users with effective solutions.…Read full bio -
Jean is recognized as one of the most professional writers in EaseUS. She has kept improving her writing skills over the past 10 years and helped millions of her readers solve their tech problems on PC, Mac, and iOS devices.…Read full bio
-
![]()
Jerry
Jerry is a fan of science and technology, aiming to make readers' tech life easy and enjoyable. He loves exploring new technologies and writing technical how-to tips. All the topics he chooses aim to offer users more instructive information.…Read full bio -
Larissa has rich experience in writing technical articles. After joining EaseUS, she frantically learned about data recovery, disk partitioning, data backup, screen recorder, disk clone, and other related knowledge. Now she is able to master the relevant content proficiently and write effective step-by-step guides on various computer issues.…Read full bio
-
![]()
Rel
Rel has always maintained a strong curiosity about the computer field and is committed to the research of the most efficient and practical computer problem solutions.…Read full bio -
![]()
Gemma
Gemma is member of EaseUS team and has been committed to creating valuable content in fields about file recovery, partition management, and data backup etc. for many years. She loves to help users solve various types of computer related issues.…Read full bio
Page Table of Contents
0 Views |
0 min read
It's easy to send others a screenshot to explain something as there are always tools you can use to take a screenshot, whether you are using a Windows PC or a MacBook. However, sometimes you only want to capture only a part of the screen to emphasize the content, but the tool may only allow you to capture the whole screen.
Is there any way to solve this problem and help you take a partial screen? Yes, you can capture only a section of your screen with many tools on Mac, including both the built-in and third-party applications. This post will tell you how to crop a screenshot on Mac in 4 easy and workable ways. Keep reading to know the steps.
1. How to Crop Screenshot on Mac with EaseUS RecExperts
EaseUS RecExperts is a worth noting recorder for users who want to capture their Mac screens without slowing down the device. This Mac screen recorder can help you a lot in taking screenshots on Mac. For instance, you can set only part of your screen as the capturing region so that the screenshots are just in the aspect ratio you want. In other words, this recorder allows you to crop screenshots on Mac during the capturing process.
Besides the suitable aspect ratio, this software can keep the original quality and ensure that you can get the screenshots as clear as what you see on the Mac screen. The captured screenshots will be found in the Recordings list, and all those pictures are in PNG format. If you want to record your Mac screen in GIF format, all that you need to do is adjust the output format as GIF in the Settings and start recording.
More Features:
- Take a partial screenshot on Windows and Mac
- Support more than 10 video/audio/image formats
- Support record screen automatically using Task Scheduler
- Support Auto-Stop & Auto-Split
For cropping screenshots directly, this software is what you can never miss. Click on the button to download it.
How to Take a Cropped Screenshot on Mac with EaseUS RecExperts:
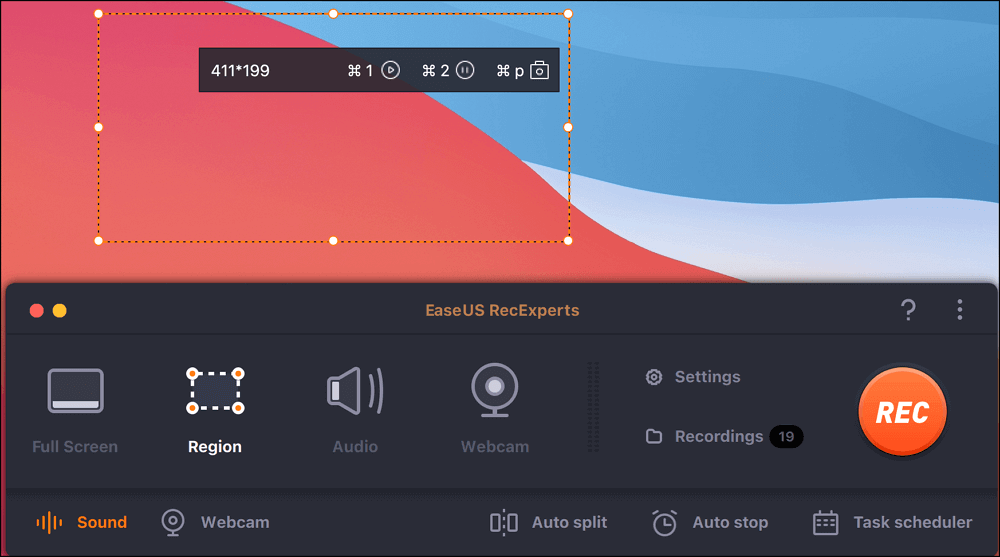
Step 1. Open this program on your Mac, and select the "Region" option on the panel.

Step 2. Drag your mouse to cover the area that you want to take a snapshot. Next, press the ⌘ + P keys on the keyboard to take screenshots. Also, you can click the camera icon directly.
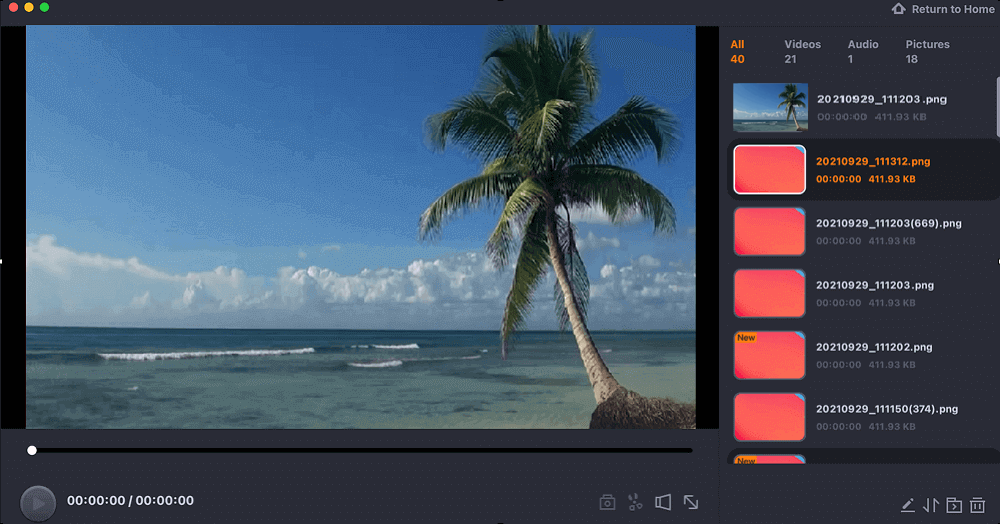
Step 3. Go back to the main interface, click "Recordings" > "Pictures", and you can find all the screenshots you need.
2. How to Crop a Screenshot on Mac with Built-in Tool
For many reasons, sometimes, the best way to crop a screenshot on Mac is using the built-in tools. For instance, when there is no Internet connection or when you cannot install any third-party software on your Mac, the tools offered by your device are available.
At the first step, the shortcuts will help you take a screenshot of the entire screen. You only need to press the keys, i.e., shift + command + 3, at the same time to capture the full Mac screen. Then, a thumbnail of the screenshot will appear in the lower right corner of your screen, and you can click it to crop it directly. In addition to that, the Photo app is also available to crop your Mac screenshot.
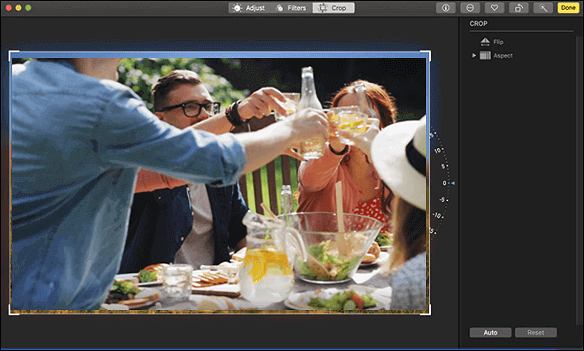
How do you crop a screenshot on a Mac? This tutorial will guide you through doing that using the Photo app.
Step 1. When you want to capture your Mac screen, press shift + command + 3 on your keyboard, and you will get a screenshot of the whole screen.

Step 2. After saving the picture to your device, go to the Photo app to find the screenshot.
Step 3. Double-click the screenshot you want to crop and click on the "Edit" button in the upper right corner.
Step 4. Select the "Crop" option in the top toolbar and crop Mac screenshot freely.

Step 5. Finally, click on the "Done" button to save the cropped Mac screenshot. Or you can choose the "Reset" option to crop the screenshot again.
3. How to Take a Cropped Screenshot on Mac with Shortcuts
If you find that taking a screenshot of the full screen and cropping it is tiring, Mac also offers you some shortcuts to crop the screenshot during the capturing process. The key combination "shift + command + 4" is used to capture only a portion of your Mac screen, which means you don't have to find another app to crop the screenshot as long as you set the aspect ratio correctly. This might be a convenient way to take a cropped screenshot on your Mac.
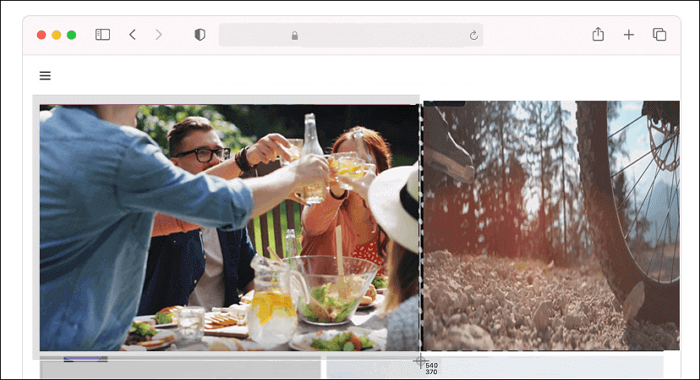
How to Crop a Screenshot on a Mac with Shortcuts:
Step 1. Press the "shift + command + 4" key combination on your keyboard.

Step 2. When you see your mouse turn a crosshair, drag it to select the region you want to capture.
Step 3. Then, you need to release your mouse to take the cropped screenshot.
Step 4. The cropped screenshot will be saved to your device directly. Click on the thumbnail of the picture to edit it further.
4. How to Crop a Screenshot on MacBook with Online Tools
The methods of using the shortcuts and the built-in app are straightforward, but they cannot meet the requirements of all users. As Mac only provides you with the most basic capturing tools, the lack of advanced features may cause some inconvenience. For instance, you cannot freely customize the picture resolution and image format, and this is the main reason why you need an online tool.
This online screenshot tool is more versatile than the default tools offered by Mac as it allows you to adjust the settings. This online tool offers you options like device, platform, browser, resolution, and picture format. However, it cannot be ignored that this tool can only be used to capture the webpages.
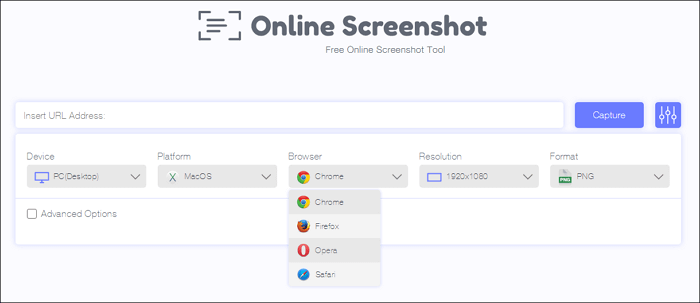
Steps to Capture a Screenshot on Mac:
Step 1. Go to the page of Online Screenshot.
Step 2. Enter the URL of the webpage you want to capture into the textbox.
Step 3. Adjust the settings according to your actual situation.
Step 4. Click on the "Capture" button to get the screenshot of the webpage.
Step 5. Click on the "Download" button to save the screenshot to your Mac.
Now, you have got a screenshot of the whole webpage. How do you crop a screenshot on a Mac online? There are also some helpful online image editors, such as PicResize.
How to Crop Screenshot on Mac with Online Tool:
Step 1. Go to the page of the online image editor.
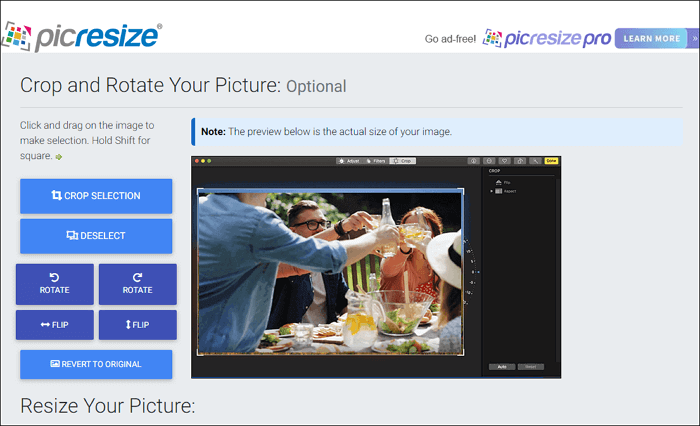
Step 2. Click on the middle of the page to upload the screenshot you want to crop.
Step 3. Edit the tools on your left side to crop, rotate, or flip the image following your needs.
Step 4. There is a button that says, "I'M DONE, RESIZE MY PICTURE!" Click on it to crop your screenshot online.
Conclusion
This post talked about how to crop a screenshot on Mac and offered you four workable methods. You can capture the whole screen and crop the screenshot, as well as crop the screenshot along with the capturing process. Among all those solutions, the best is capturing a cropped screenshot with EaseUS RecExperts, a powerful and all-in-one recorder that can work perfectly on both Windows and Mac.
Download this software and try it now.
EaseUS RecExperts

One-click to capture anything on screen!
No Time Limit, No watermark
Start Recording


