-
![]()
Daisy
Daisy is the Senior editor of the writing team for EaseUS. She has been working in EaseUS for over ten years, starting from a technical writer to a team leader of the content group. As a professional author for over 10 years, she writes a lot to help people overcome their tech troubles.…Read full bio -
Jane is an experienced editor for EaseUS focused on tech blog writing. Familiar with all kinds of video editing and screen recording software on the market, she specializes in composing posts about recording and editing videos. All the topics she chooses …Read full bio
-
![]()
Alin
Alin is an experienced technical blog writing editor. She knows the information about screen recording software on the market, and is also familiar with data cloning and data backup software. She is expert in writing posts about these products, aiming at providing users with effective solutions.…Read full bio -
Jean is recognized as one of the most professional writers in EaseUS. She has kept improving her writing skills over the past 10 years and helped millions of her readers solve their tech problems on PC, Mac, and iOS devices.…Read full bio
-
![]()
Jerry
Jerry is a fan of science and technology, aiming to make readers' tech life easy and enjoyable. He loves exploring new technologies and writing technical how-to tips. All the topics he chooses aim to offer users more instructive information.…Read full bio -
![]()
Rel
Rel has always maintained a strong curiosity about the computer field and is committed to the research of the most efficient and practical computer problem solutions.…Read full bio -
![]()
Gemma
Gemma is member of EaseUS team and has been committed to creating valuable content in fields about file recovery, partition management, and data backup etc. for many years. She loves to help users solve various types of computer related issues.…Read full bio -
![]()
Shelly
"I hope my articles can help solve your technical problems. If you are interested in other articles, you can check the articles at the bottom of this page. Similarly, you can also check my Twitter to get additional help."…Read full bio
Page Table of Contents
Jean
Updated on Jun 09, 2026
0 Views |
0 min read
Tired of cluttering your desktop with unnecessary screenshot files? Whether you're capturing a quick image for a chat, document, or design task, knowing how to save screenshot to clipboard can save time and reduce file chaos. In this guide, we'll show you how to do it effortlessly on Mac, Windows, and Linux.
How to Automatically Save Screenshots to Clipboard
If you often take screenshots and need them copied to the clipboard instantly, a flexible tool like EaseUS RecExperts is your best bet. Unlike built-in OS shortcuts, it offers full control over screenshot behavior. You can capture the full screen, a selected region, or even a specific window, and immediately send the image to the clipboard without saving a file. It's ideal for fast-paced workflows, whether you work in customer support, education, or content creation.
Even better, EaseUS RecExperts lets you choose your preferred image format (PNG, JPG, BMP, or more), assign hotkeys, and define default save paths. You can also take a scrolling screenshot, record screen and audio simultaneously, making it a full-featured capture solution
⭐Top Screenshot Features Users Care About:
- Save as PNG, JPG, BMP, or GIF
- Auto-copy to the clipboard without saving
- Choose a custom file save path, like local or cloud
- Seta delay or timed screenshots
- Assign personalized keyboard shortcuts
🚩How to save screenshots to clipboard on Mac and Windows:
Step 1. Launch EaseUS RecExperts and get the screen ready that you want to capture. Click Custom.

Step 2. Then drag your mouse to select the area you want to capture. After that, click the Screenshot button (camera icon) on the main toolbar.
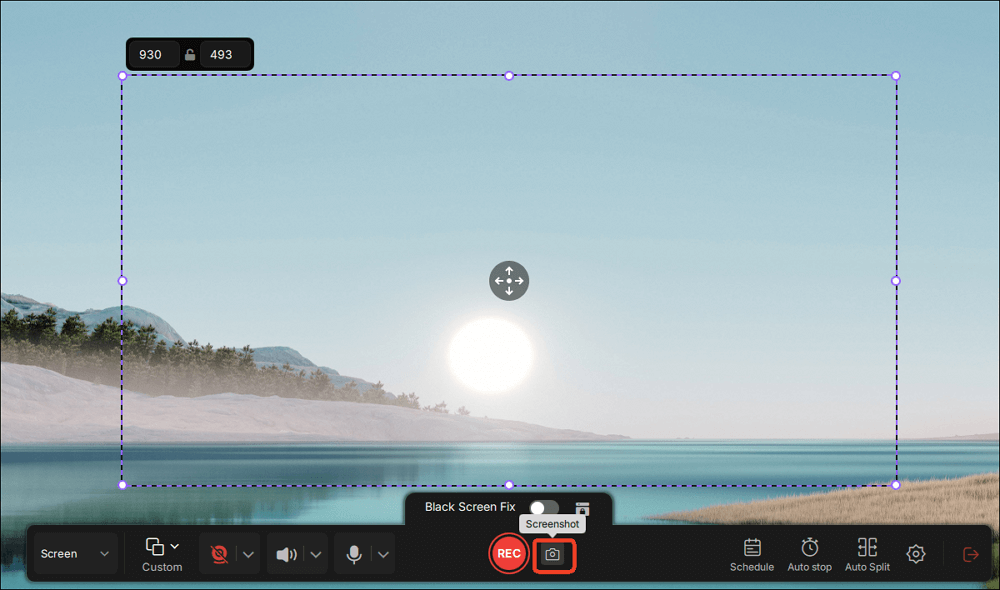
Step 3. The screenshot will be captured instantly and saved to the default folder. You can view or manage it later in My Library.
Share this guide if you find it helpful!

How to Save Screenshots to Clipboard Mac
Change screen shot to always copy to clipboard? Reddit
According to Apple Support official document and UGC content, saving screenshots directly to the clipboard on macOS is simple using built-in shortcuts. The key is to hold the Control key while taking a screenshot. This way, the image won't be saved as a file - it goes straight to your clipboard instead.
🚩How to save a screenshot to the clipboard on Mac automatically:
Step 1. Choose a screenshot mode:
- Full screen to clipboard: Press Command (⌘) + Control + Shift + 3
- Selected area to clipboard: Press Command (⌘) + Control + Shift + 4, then drag to select
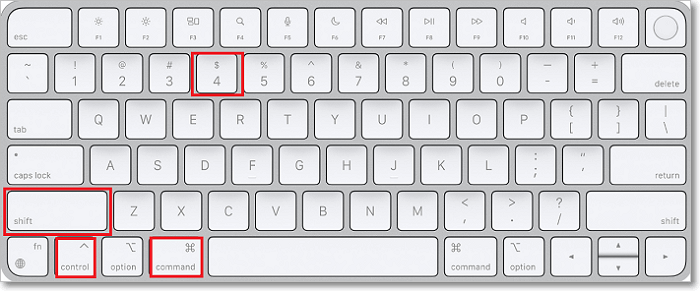
- Specific window to clipboard: Press Command (⌘) + Control + Shift + 4, then hit Spacebar, then click the window
Step 2. Open an app like Preview, Pages, or Photoshop and press Command + V to paste.
- Tips:
-
1. If you forget to hold the Control key, the screenshot will be saved to your Desktop by default.
2. Screenshots copied to the clipboard work seamlessly in messaging apps, email, and cloud docs.
3. To verify it's on the clipboard, open Preview > File > New from Clipboard.
Share this guide if you find it helpful!
How to Save Screenshots to Clipboard Windows 11/10 Without Saving
According to the official Microsoft Support document, Windows 11/10 users can quickly save screenshots to the clipboard without creating extra files by using the Snipping Tool (via the shortcut Windows + Shift + S). It lets you capture any part of the screen and copies it directly to the clipboard for pasting.
🚩How to make screenshots automatically saved to clipboard on Windows:
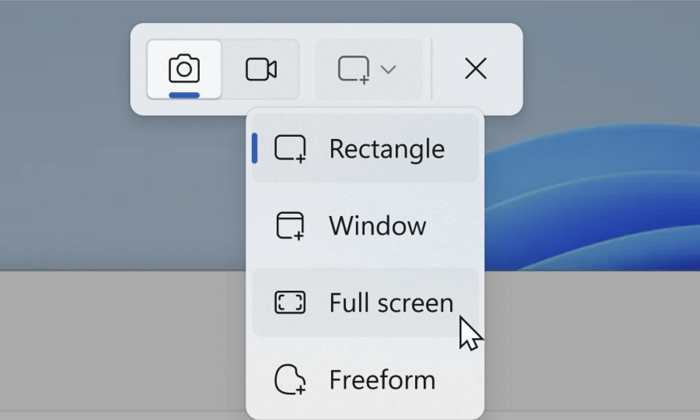
Step 1. Press Windows + Shift + S. Your screen will dim, and the Snipping Tool overlay will appear.
Step 2. Select one of the capture modes: Rectangular snip, Freeform snip, Window snip, Full-screen snip.
Step 3. The screenshot is now automatically copied to your clipboard
Step 4. Open any app (e.g., Word, Paint, Slack) and press Ctrl + V to paste.
- Tips
-
1. After capture, a notification appears - clicking it opens the Snipping Tool editor.
2. You can annotate, crop, or save manually if needed.
3. Clipboard screenshots are not saved as files unless you manually choose to save them.
Share this guide if you find it helpful!
How to Save a Screenshot from Clipboard on Linux
On Linux, saving screenshots to the clipboard varies by desktop environment, but most modern distros like Ubuntu and Fedora make it easy with built-in shortcuts. Typically, you capture to the clipboard first, then paste into an image editor or file manager to save.
🚩How to save a screenshot to the clipboard on Linux (GNOME example):
Step 1. Press Ctrl + Print Screen to copy the entire screen to the clipboard.
Step 2. Open an image editor, such as GIMP or Shotwell.
Step 3. Press Ctrl + V to paste the screenshot.
Step 4. Save the image manually by choosing File > Save As and selecting your format and location.
- Tips
-
1. On KDE, use the Spectacle tool and select Copy to Clipboard before capturing.
2. If clipboard pasting doesn't work, ensure clipboard managers like xclip or wl-clipboard are installed
3. You can also paste directly into chat apps or document editors that support image pasting
Share this guide if you find it helpful!
Conclusion
Saving screenshots directly to the clipboard boosts productivity across Mac, Windows, and Linux. Whether using built-in shortcuts or a versatile tool like EaseUS RecExperts, you can capture, copy, and share images faster without cluttering your device.
Try EaseUS RecExperts for an all-in-one, customizable solution for taking screenshots and recording your screen.
How to Make Screenshots Automatically Save to Clipboard FAQs
If you're new to saving screenshots to your clipboard or want quick answers to common questions, here are the most frequently asked questions about the process across different devices.
1. Where do I find my clipboard screenshots?
Screenshots saved to your clipboard are not stored as files by default. Instead, they are temporarily held in the clipboard memory until you paste them into an application like an image editor, document, or chat window. To save or view them permanently, you need to paste and save manually.
2. How do you save screenshots to clipboard?
On most systems, you can save screenshots to the clipboard by using specific keyboard shortcuts:
- Mac: Hold Control while pressing the screenshot keys (e.g., Command + Control + Shift + 3/4).
- Windows: Use Windows + Shift + S to open Snipping Tool and capture to clipboard.
- Linux: Press Ctrl + Print Screen or use tools like Spectacle with "copy to clipboard" option.
3. How to copy a screenshot to the clipboard on Android?
Android devices do not natively save screenshots directly to clipboard, but you can:
- Take a screenshot (usually Power + Volume Down)
- Immediately tap the preview or notification, then select Copy (if available)
- Alternatively, use third-party apps like Screenshot Easy that support clipboard copying.
4. How to save screenshot to clipboard iPhone?
iPhones do not directly copy screenshots to the clipboard when you press Side Button + Volume Up. However, after capturing a screenshot, tap the preview thumbnail and use the Share option to copy the image. Apps like Notes or Photos allow pasting images copied this way.
Share this guide if you find it helpful!