
- About
- Discover EaseUS
- Reviews & Awards
- License Agreement
- Privacy Policy
- Student Discount
Best Methods | 2024 How to Screenshot on Mac Easily
Rel Updated on
May 10, 2024|
min read
Screenshots help demonstrate, show, and communicate the essential content with people. By sending the specific image, the viewer can understand immediately what you want to explain.

So how do you take a screenshot on a Mac? To take a screengrab, you can use shortcuts with the keyboard. Also, the third-party screenshot tool is helpful. Follow this post to learn how to screenshot on Mac now.
How to Screenshot on Mac with Shortcuts
The easiest method for Mac screenshots is using shortcuts. No matter you are using MacBook Air or MacBook Pro, just use the keyboard. Initially, the default settings of the keyboard have a series of rules as follows.
Tips: To customize the keyboard shortcut on your Mac, go to "System Preferences" > "Keyboard". Then, find "Shortcuts" and hit "Screenshots". Meanwhile, you can click "Restore Defaults" to restore the original settings.

There are three options for screenshots on Mac, including the entire monitor, partial screen, and a window.
Print Whole Screen on Mac
How do you screenshot on a Mac for the entire screen? Press Shift + Command + 3. If you want to edit the snapshot, find the thumbnail at the bottom of the display.
Take a Partial Screen on Mac
Hold down the three buttons at the same time, Shift + Command + 4. Then, a crosshair appears, and you use the mouse to drag the area you want to capture. Meanwhile, hold down the Space bar to adjust the selection.
When you want to finish taking the snapshot, hold down the Esc key.
Capture a Window on Mac
How to screengrab the specific window on Mac? Try Shift + Command + 4 + Space bar. A camera icon shows, and you can immediately take a screenshot of it. By pressing the target window, you can screenshot that area.
Screenshot with the Touch Bar
How to take a screenshot on MacBook Pro using the touch bar? When having the MacBook model with the Touch Bar, you can capture your screen quickly. Try Shift + Command + 6 on your 16-inch MacBook Pro.
![]()
Where to Find Screenshots on Mac
Originally, the screenshot is saved to your desktop. The format should be PNG.
If you are going to change the saving path, make sure you use macOS Mojave or above. You can change the saving path in the Screenshot setting. Choose "Menu" > "Options" > "Save".
How to Screenshot on Mac with Custom Hotkey
Two excellent tools are introduced in this post. Choose one of them. Each tool can customize the hotkey.
Tool 1. EaseUS RecExperts for Mac (Simple Interface)
EaseUS RecExperts for Mac is the best third-party screenshot tool to help you capture the screen on Mac. You can custom the hotkey from F1 to F12 and save the snapshot in PNG format.
Meanwhile, you must know that it's an all-in-one screenshot tool and screen recorder which can record screen with audio on Mac. If you are watching YouTube or other interesting videos, just capture it as a video rather than an image. Also, you can take a screenshot from the saved videos.
Main features of this all-in-one screenshot tool and screen recorder:
- Capture the screen, gameplay, webcam, and voice on Mac
- Customize the hotkey as you like
- Record audio on Mac, including system and external sound
- Take a high-resolution screenshot on Mac
Now, catch this precious chance to download this tool!
2Now, follow the below guide on how to take a screenshot with this Mac screen recorder:
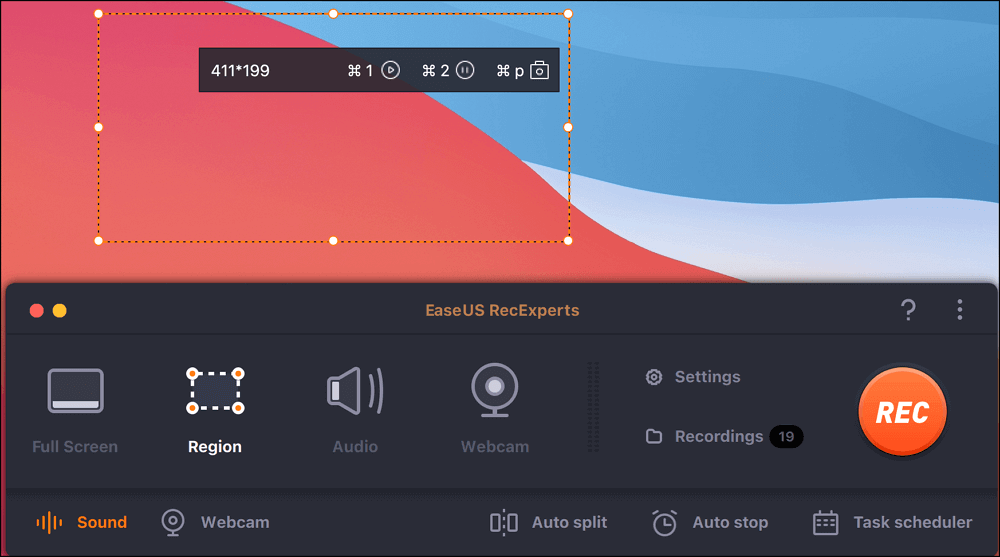
Step 1. Open this program on your Mac, and select the "Region" option on the panel.

Step 2. Drag your mouse to cover the area that you want to take a snapshot. Next, press the ⌘ + P keys on the keyboard to take screenshots. Also, you can click the camera icon directly.
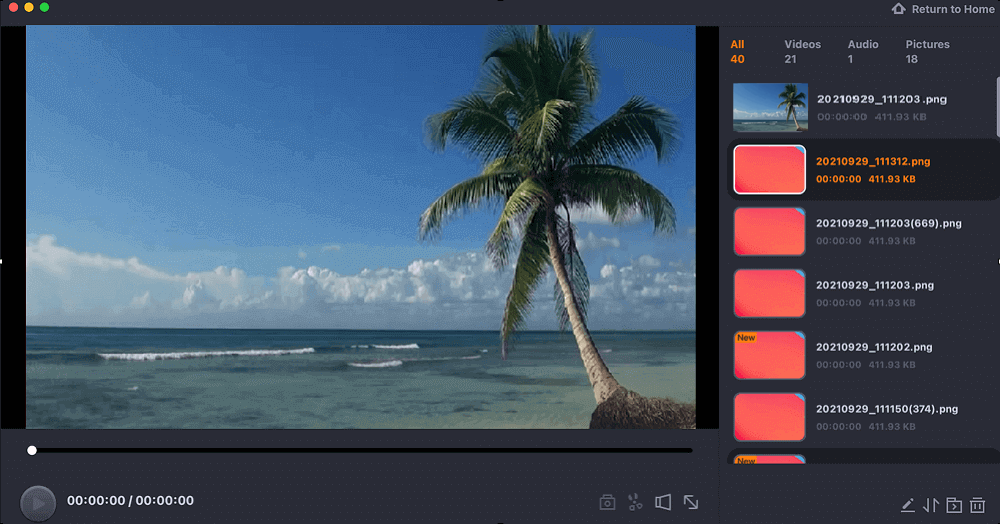
Step 3. Go back to the main interface, click "Recordings" > "Pictures", and you can find all the screenshots you need.
Capturing the screen on Mac is easy when choosing a great screen recorder like EaseUS RecExperts for Mac. It records an adorable video...

Tool 2. OBS Studio
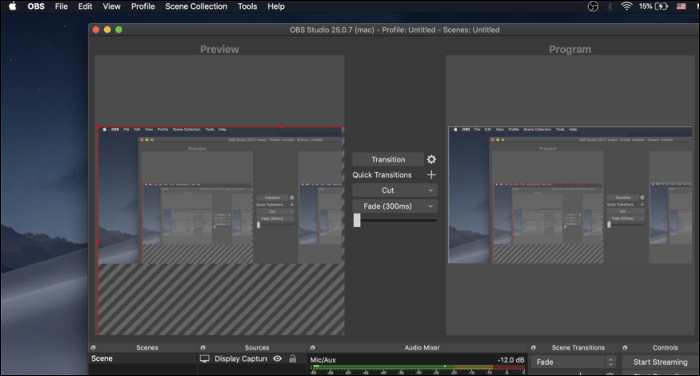
As the famous open-source screen capturing software, OBS Studio features the ability to record any area of your screen and take a screenshot on Mac. You may know its screen recording function, while screenshot is also a beneficial function. It's optional to change the saving path and hotkey on the keyboard.
How to take high-resolution screenshots on Mac, using OBS Studio:
Step 1. Download OBS Studio and apply Mac screen settings for OBS. Go "Settings" > "Output" > "Recording Path" > "Browse". Change the saving path firstly. Also, select "Hotkeys" to customize taking screenshots.
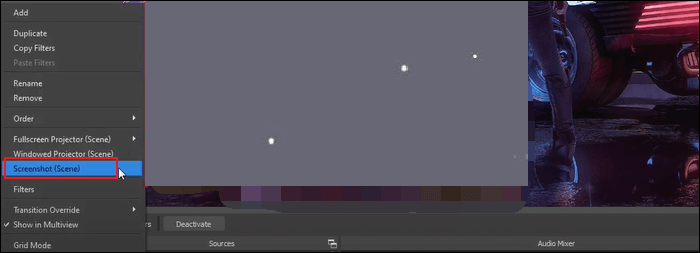
Step 2. After setting, return to the main interface and right-click on the Scene box. Choose "Screenshot". And you can also use the hotkey you just set.
Step 3. Find the snapshots you created from the location you set.
FAQs About How to Screenshot on Mac
Don't skip this part if you want to know more helpful knowledge about screenshots on Mac.
1. How do I capture a screenshot?
For macOS users, it's easy to use the hotkey of your keyboard. You can press Shift + Command + 3/4 to take the whole or partial screen. To find the saving, move to the desktop and find the snapshot in PNG format.
2. Is there a Snipping tool on Mac?
Windows has its famous Snipping tool that allows users to edit screenshots. Regarding Mac, Apple has the alternative to the Windows Snipping tool. You can find it with shortcuts on Mac.
Press Shift + Command+ 5 (For macOS Mojave or later). You access a control pane of the macOS Snipping tool.
If you cannot solve these problems as well, go to https://support.apple.com for help.
Was This Page Helpful?