-
![]()
Daisy
Daisy is the Senior editor of the writing team for EaseUS. She has been working in EaseUS for over ten years, starting from a technical writer to a team leader of the content group. As a professional author for over 10 years, she writes a lot to help people overcome their tech troubles.…Read full bio -
Jane is an experienced editor for EaseUS focused on tech blog writing. Familiar with all kinds of video editing and screen recording software on the market, she specializes in composing posts about recording and editing videos. All the topics she chooses …Read full bio
-
![]()
Alin
Alin is an experienced technical blog writing editor. She knows the information about screen recording software on the market, and is also familiar with data cloning and data backup software. She is expert in writing posts about these products, aiming at providing users with effective solutions.…Read full bio -
Jean is recognized as one of the most professional writers in EaseUS. She has kept improving her writing skills over the past 10 years and helped millions of her readers solve their tech problems on PC, Mac, and iOS devices.…Read full bio
-
![]()
Jerry
Jerry is a fan of science and technology, aiming to make readers' tech life easy and enjoyable. He loves exploring new technologies and writing technical how-to tips. All the topics he chooses aim to offer users more instructive information.…Read full bio -
![]()
Rel
Rel has always maintained a strong curiosity about the computer field and is committed to the research of the most efficient and practical computer problem solutions.…Read full bio -
![]()
Gemma
Gemma is member of EaseUS team and has been committed to creating valuable content in fields about file recovery, partition management, and data backup etc. for many years. She loves to help users solve various types of computer related issues.…Read full bio
Page Table of Contents

Rel
Updated on Nov 10, 2026
0 Views |
0 min read
📢Update: Good news for Mac users! With macOS 27 Golden Gate and later, you can now record system audio using the built-in Screenshot tool. Simply enable Include System Audio in the recording options before starting. You can also select a microphone to capture your voice at the same time. If you start a screen recording through QuickTime Player and see the Screenshot controls, this option is available there too.
Still using an earlier version of macOS, such as Tahoe 26, Sequoia 15, Sonoma 14, or Ventura 13? Depending on the tool you choose, you'll need a third-party screen recorder or an audio-routing solution to capture system sound.
In this guide, we'll walk you through four practical methods to record your Mac screen with internal audio. Whether you're using a MacBook Air, MacBook Pro, iMac, or Mac mini, you can choose the method that best fits your macOS version and recording needs.
Best Mac Screen Recorder with Internal Audio & Microphone
| Rating: 4.7⭐ |
| macOS: macOS 10.13 or later. |
| Pro: Supports recording on MacBook Pro, Air, iMac, Mac mini with system sound; no watermark; 13+ file formats, etc., suitable for professionals and novices. |
| Cons: Free version has limited features. Advanced functions require payment. |
If you want more flexibility than the built-in macOS recording tools offer, EaseUS RecExperts for Mac is a straightforward option. It lets you record your Mac screen with system audio, microphone input, or both at the same time, without configuring a separate audio-routing setup.
Download EaseUS Screen Recorder
Download EaseUS Screen Recorder
Trustpilot Rating 4.7
Unlike the built-in Screenshot tool, which focuses on screen recording, RecExperts also offers a dedicated audio recording mode. This makes it a convenient choice if you only want to record internal audio on Mac without recording the screen. You can also adjust audio output settings, including the format and bitrate, to suit your needs.
Beyond screen and audio recording, RecExperts supports webcam recording with sound, making it useful for creating tutorials, presentations, and other video content. Its simple interface lets you choose what to record without navigating through multiple system settings.
🔎How to screen record on Mac with internal audio using EaseUS Mac Screen Recorder:
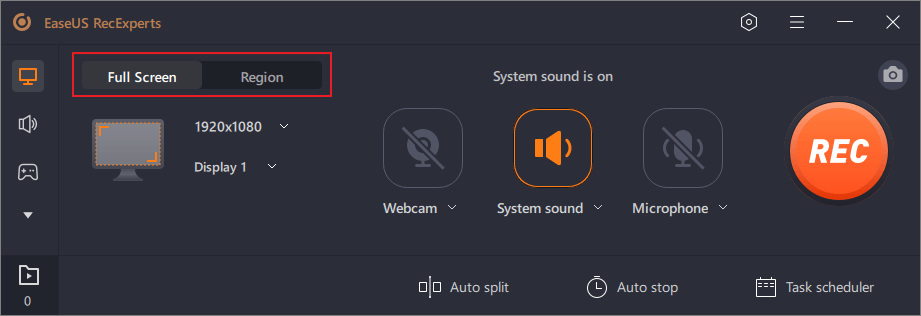
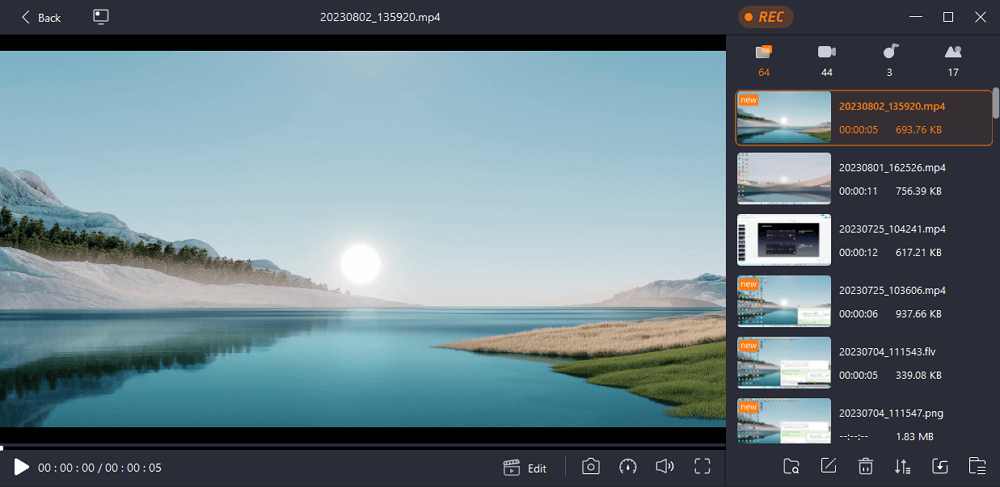
Step 1. Run EaseUS RecExperts on your device and you will see two recording modes. You can choose "Full Screen"to record the whole screen or choose "Region" to select the recording area manually before recording.
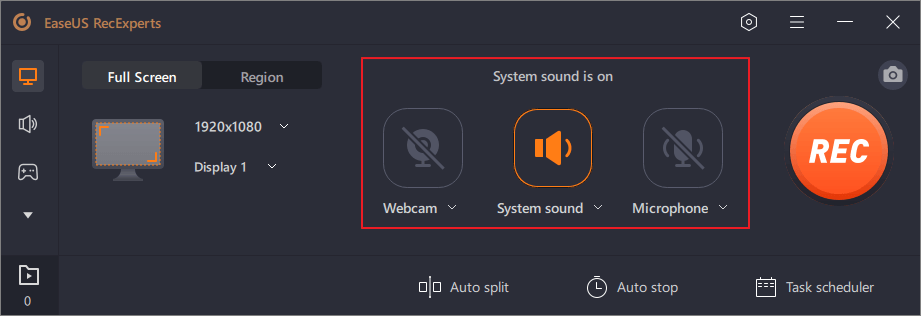
Step 2. After that, you can choose to record the webcam, system sound, microphone or record none of them as you like. You can also set auto split, auto recording with various functions on the interface.
Step 3. Then, you can click the red "REC" button to start recording. Here will be a menu bar on your screen. To pause the recording, click on the white double vertical bar; to end the recording, click on the red square sign.

Step 4. After recording, you will be led to the list interface. Here you can view or edit your recordings. To start a new recording, just click on the "REC" button on the top of the interface.
Download EaseUS Screen Recorder
Download EaseUS Screen Recorder
Trustpilot Rating 4.7
If this post is helpful for screen recording with audio on Mac, you can share it with more people now!

Screen Record on Mac with Internal Audio via Screenshot
| macOS: macOS Mojave 10.14 or later |
| Pros: Free and built into macOS; macOS 27 and later can capture system audio directly without additional software. |
| Cons: Earlier macOS versions require a virtual audio driver such as BlackHole and some additional setup. |
Screenshot is a built-in macOS tool that lets you capture your screen by pressing Shift + Command + 5. The way it records system audio depends on your macOS version.
On macOS 27 Golden Gate or Later
If your Mac runs macOS 27 Golden Gate or later, you can record system audio directly through Screenshot without installing a third-party audio driver.
Here's how:
Step 1. Press Shift + Command + 5 to open the Screenshot toolbar.
Step 2. Choose Record Entire Screen or Record Selected Portion.
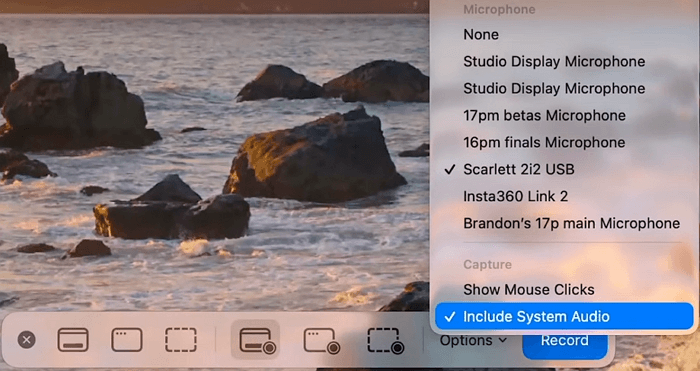
Step 3. Click Options and select Include System Audio. If you also want to record your voice, choose a microphone under Microphone.
Step 4. Click Record to start capturing your screen and system audio. When you're done, click the Stop button in the menu bar.
On Earlier macOS Versions (Using BlackHole)
If you're using an earlier macOS version, such as Tahoe 26, Sequoia 15, Sonoma 14, or Ventura 13, Screenshot doesn't offer the built-in Include System Audio option. You can still capture your Mac's internal audio by routing it through a virtual audio device such as BlackHole.
BlackHole is a free virtual audio driver that routes sound between applications. With a Multi-Output Device, you can send your Mac's audio to both BlackHole and your speakers or headphones while recording.
🔎Here's how to use BlackHole to perform Mac screen recording with system audio:
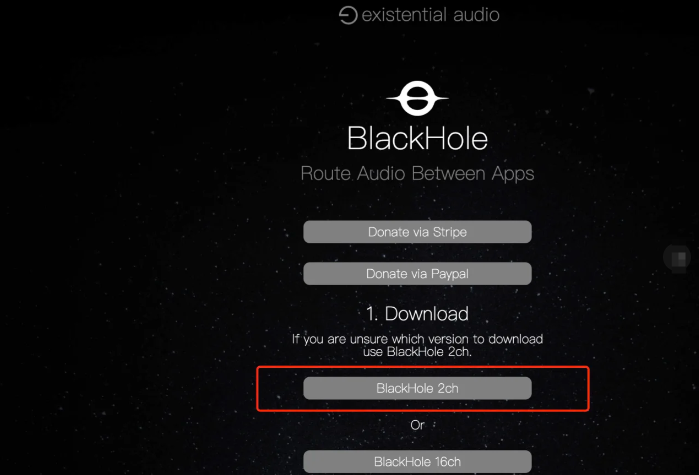
Step 1. Install the BlackHole driver from GitHub or Existential Audio. The BlackHole 2ch version is suitable for most users.
Step 2. Search for and open the Audio MIDI Setup app that comes with Mac to manage audio devices. Then, click the + icon at the bottom and choose Create Multi-Output Device.
Note: If you need to capture desktop and external audio simultaneously, please choose the Create Aggregate Device option.

Step 3. Later, check BlackHole 2ch and Mac Speakers.

Step 4. Open "System Settings" > "Sound" > "Output", select Multiple Output Devices.
Note: Adjust the system volume in advance. You can't adjust the speaker/headphone volume during recording!
Step 5. After setting up, enable QuickTime Player or press Shift-Command-5 to open the Screenshot tool on Mac, and select BlackHole 2ch as the audio source to capture system sound.

Note: To record the desktop and external audio of the screen at the same time, select "Aggregate Device".
Step 6. Click on the Recording button to start recording the screen and internal audio on Mac.
Note: If you also want to capture your microphone, create an Aggregate Device in Audio MIDI Setup that combines BlackHole 2ch with your microphone. Then select that Aggregate Device as the audio input in Screenshot. Also, macOS may not let you adjust the Multi-Output Device volume using the regular volume keys, so set your listening volume beforehand or adjust the individual device levels in Audio MIDI Setup.
Record Mac Screen with Internal Audio via QuickTime Player
| Pros: Free built-in screen recorder; supports basic screen and microphone recording. |
| Cons: Its traditional screen-recording window doesn't directly capture system audio. A virtual audio driver is needed for this setup. will large. |
QuickTime Player is another built-in macOS option for screen recording. However, its traditional screen-recording window doesn't provide a dedicated system audio recording option. To capture your Mac's internal sound, you can use a virtual audio driver such as BlackHole as the audio input.
Important: On macOS 27 Golden Gate or later, QuickTime Player may open the Screenshot recording controls when you choose File > New Screen Recording. If you see the Screenshot toolbar, simply enable Include System Audio under Options and follow the previous method. The steps below apply to the traditional QuickTime screen-recording window.
If you've already installed BlackHole and configured a Multi-Output Device using the steps above, you don't need to repeat that setup.
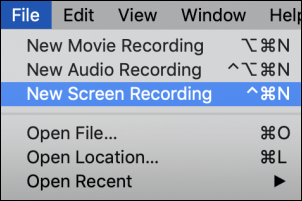
Step 1. Open QuickTime Player and select File > New Screen Recording.
Step 2. In the traditional screen-recording window, click the arrow or drop-down menu next to the Record button.
Step 3. Select BlackHole 2ch as the microphone or audio input.
Step 4. Click Record and choose the entire screen or a selected area to start recording. QuickTime will capture the screen along with the system audio routed through BlackHole.
Step 5. When you're finished, click the Stop button in the menu bar to end the recording.
If this post is helpful for screen recording with audio on Mac, you can share it with more people now!
Screen Record on Mac with Sound Using OBS Studio
| Rating: 4.7⭐ |
| Pro: Free and open-source, supports direct system audio capture, offers advanced recording controls |
| Cons: More complicated to set up than built-in Mac tools; some features require newer OBS and macOS versions |
If you're looking for a free, open-source screen recorder for Mac with more control over your recording setup, OBS Studio is worth considering. Starting with OBS Studio 28 and macOS Ventura 13, you can capture system audio directly through the built-in macOS Screen Capture source, without installing a virtual audio driver like BlackHole or Soundflower.
OBS Studio 30 and later also offer a dedicated macOS Audio Capture source. This lets you capture all desktop audio or audio from a specific application independently of your screen recording. You can also add a microphone, webcam, and other sources to the same scene, making OBS a flexible choice for tutorials, gameplay, presentations, and live streaming.
🔎 How to Record Your Mac Screen with System Audio Using OBS Studio
Before you start: Make sure you're running OBS Studio 28 or later on macOS 13 Ventura or newer. Update to OBS Studio 30 or later if you want to use the separate macOS Audio Capture source.
Method 1. Capture System Audio Separately (OBS 30 or Later)
If you only want to record audio without including your screen, OBS Studio 30 and later provide a dedicated audio source.
Step 1. In the Sources dock, click + and select macOS Audio Capture.
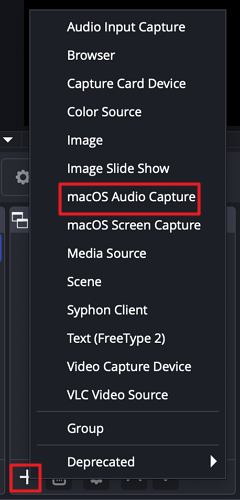
Step 2. Name the source and click OK. In its properties, choose what to capture:
- Desktop Audio Capture: Record sounds from your Mac.
- Application Audio Capture: Record audio from a specific application.
Step 3. Click OK and check the Audio Mixer to make sure the audio source is receiving sound.
Step 4. Click Start Recording to save your audio. If you also want to capture your screen or microphone, add the corresponding sources to your scene before recording.
Method 2. Capture Your Screen and System Audio Together (OBS 28 or Later)
Step 1. Download and install OBS Studio on your Mac, then launch it.
Step 2. In the Sources dock, click the + button and select macOS Screen Capture. Give the source a name and click OK.
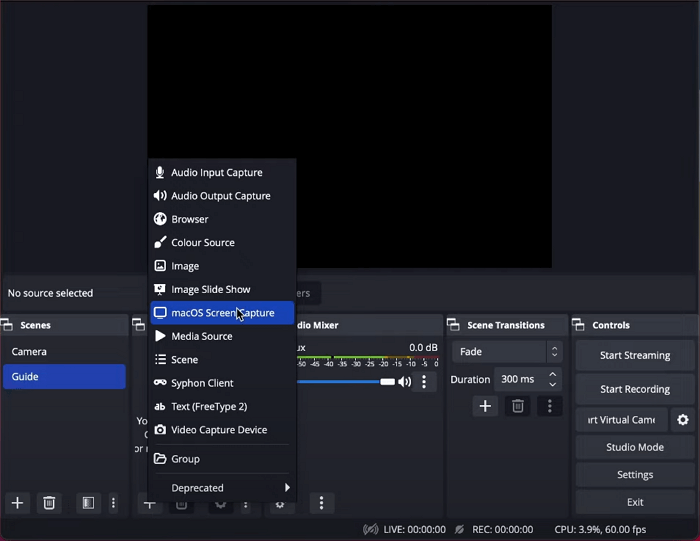
Step 3. In the source properties, choose what you want to capture:
- Display Capture: Record your entire Mac screen.
- Application Capture: Record a specific application.
- Window Capture: Record a selected window.
- Click OK to add the source. On macOS 13 or later, this source can capture the selected screen content along with its audio.
Step 4. Play some audio on your Mac and check the Audio Mixer in OBS. You should see the audio level move when system sound is playing. If you also want to record your voice, add an Audio Input Capture source and select your microphone.
Step 5. Arrange your sources and adjust their audio levels as needed. Click Start Recording in the Controls dock to begin.
Note: If you're using macOS 12.3–12.6 or an earlier version, OBS's native macOS screen capture source does not support system audio capture. You'll need an additional audio-routing solution, such as a compatible virtual audio driver, to route system sound into OBS.
Choose the Best Screen Recorder for Mac with Internal Audio
In case you don't know how to choose a good Mac screen and audio recorder, you can follow the standards below:
- Device compatibility: The screen recording software you choose should be compatible with your Mac computer.
- Ease of use: You'd better choose a simple and practical screen recorder. It will save you a lot of time.
- Functions and features: Choose the software that covers all the basic features and supports some advanced features.
- Custom settings support: The software that supports custom settings can make it easier for you to use.
- After-sales service: A good after-sales service can help you solve any problems while using it.
- Cost-effectiveness: Choose a cost-effective software. Of course, if you're rich, you can ignore this one.
If this post is helpful for screen recording with audio on Mac, you can share it with more people now!
Conclusion
Recording your Mac screen with internal audio is now easier with macOS 27 and later, thanks to the built-in Screenshot tool. If you need more recording flexibility, want to capture system audio without recording your screen, or use an older macOS version, third-party tools like EaseUS RecExperts and OBS Studio offer additional options. Choose the method that best fits your macOS version and recording needs.
FAQs About Mac Screen Recording with Internal Audio
1. Can you record internal audio on a Mac without installing extra software?
Yes. On macOS 27 Golden Gate or later, you can use the built-in Screenshot tool to record your screen with system audio. Open the recording options using Shift + Command + 5 and enable Include System Audio. On earlier macOS versions, you may need a compatible third-party recorder or an audio-routing tool.
2. Can QuickTime Player record internal audio on Mac?
It depends on the recording interface. When QuickTime Player opens the Screenshot recording controls on macOS 27 or later, you can enable Include System Audio. However, the older QuickTime screen-recording window does not provide a built-in system audio option. You can use a third-party audio-routing tool with it instead.
3. How do I record system audio and microphone audio at the same time on Mac?
On macOS 27 or later, open the Screenshot toolbar with Shift + Command + 5, select Options, enable Include System Audio, and choose your microphone. You can also use EaseUS RecExperts or OBS Studio to capture both audio sources.
4. Can OBS record system audio on Mac?
Yes. OBS Studio 28 and later can capture system audio through the macOS Screen Capture source on macOS 13 Ventura or newer. OBS Studio 30 and later also provide a separate macOS Audio Capture source for recording desktop or application audio independently.
5. How can I record audio on Mac without recording the screen?
Use a dedicated audio recording mode in a third-party tool such as EaseUS RecExperts. OBS Studio 30 and later also support audio-only capture through the macOS Audio Capture source. The built-in Screenshot tool is designed for screen recording and does not offer a standalone system audio recording mode.