-
![]()
Daisy
Daisy is the Senior editor of the writing team for EaseUS. She has been working in EaseUS for over ten years, starting from a technical writer to a team leader of the content group. As a professional author for over 10 years, she writes a lot to help people overcome their tech troubles.…Read full bio -
Jane is an experienced editor for EaseUS focused on tech blog writing. Familiar with all kinds of video editing and screen recording software on the market, she specializes in composing posts about recording and editing videos. All the topics she chooses …Read full bio
-
![]()
Alin
Alin is an experienced technical blog writing editor. She knows the information about screen recording software on the market, and is also familiar with data cloning and data backup software. She is expert in writing posts about these products, aiming at providing users with effective solutions.…Read full bio -
Jean is recognized as one of the most professional writers in EaseUS. She has kept improving her writing skills over the past 10 years and helped millions of her readers solve their tech problems on PC, Mac, and iOS devices.…Read full bio
-
![]()
Jerry
Jerry is a fan of science and technology, aiming to make readers' tech life easy and enjoyable. He loves exploring new technologies and writing technical how-to tips. All the topics he chooses aim to offer users more instructive information.…Read full bio -
![]()
Rel
Rel has always maintained a strong curiosity about the computer field and is committed to the research of the most efficient and practical computer problem solutions.…Read full bio -
![]()
Gemma
Gemma is member of EaseUS team and has been committed to creating valuable content in fields about file recovery, partition management, and data backup etc. for many years. She loves to help users solve various types of computer related issues.…Read full bio -
![]()
Shelly
"I hope my articles can help solve your technical problems. If you are interested in other articles, you can check the articles at the bottom of this page. Similarly, you can also check my Twitter to get additional help."…Read full bio
Page Table of Contents
0 Views |
0 min read
PAGE CONTENT:
When using Microsoft Teams to meet, whether it is online training, team meetings, or personal presentations, learning how to auto record Teams meeting is very beneficial to us.
This article will walk you through how to set Teams' automatic cloud recording and use professional meeting recording software to record on Teams automatically without any restrictions.
Can You Set a Teams Meeting to Automatically Record
Yes, it's possible to record meetings on Microsoft Teams automatically. Typically, the meeting organizers select the automatic recording and transcription option when they create a meeting. Users can also use the meeting Template or Sensitivity label to always keep this automatic recording feature on.
Requirement activate Record and transcribe automatically:
- You have a Teams premium account like a work and school account or a Microsoft 365 subscription.
- You are the meeting organizer.
- The organizer delegates the right to access the calendar.
- You can edit the calendar.
However, if you do not have the relevant permissions or are using a personal account, you will not be able to set up automatic recording or have the recording function. You need to use a third-party recording program to do so.
Share this post on your social media platforms.
How to Set a Teams Meeting to Record Automatically
When you have the Teams Premium account, you can use its cloud recording feature to record and transcribe your meetings. As organizers, you can also enable Teams' automatic recording functionality.
Here are the steps to set up recording meetings on MS automatically:
Step 1. Log in to your Teams premium account. Choose the Calendar or Create a Meeting button to schedule a meeting.
Step 2. On the right side of the Schedule New Meeting page, turn on the Recording and Transcribe automatically and click on the Save button.

Step 3. If you have scheduled a meeting, you can choose the meeting and click the Edit icon. Then click on Meeting options.

Step 4. Then, you will find the Record and Transcribe automatically option to enable it.
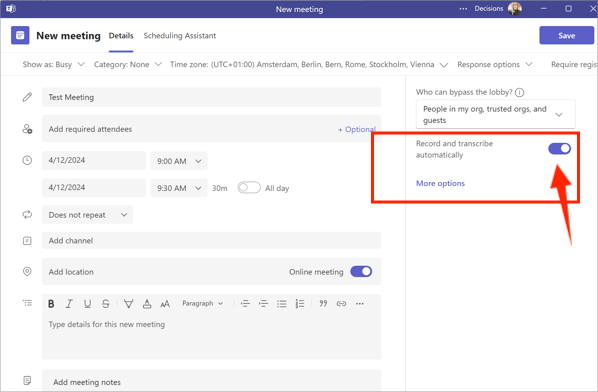
The method is also suitable for Outlook Calendar. You can try it by yourself. Once you enable this function, your meetings will be recorded automatically.
Note: Cloud recordings will be saved in OneDrive or SharePoint by default. Please remember that the recordings are not saved permanently and will be deleted after 120 days by default, so please save the recordings locally in time.
Share this post on your social media platforms.
Automatically Record Teams Meeting via Automatic Screen Recorder
To screen record Microsoft Teams meeting automatically without notification, you can use a powerful video conference recorder like EaseUS RecExperts. This meeting screen recorder also allows you to record Teams meeting in laptop with audio, webcam, and screen simultaneously or separately.
This Teams meeting recorder can help users record online meetings instantly or schedule recordings to record automatically without any restrictions. Moreover, it can also transcribe the meeting content. With its versatile editing functions, you can edit your recordings, such as adding text, graphics, or clipping, whether you are recording or finished.
More importantly, it can save the online meeting to your local disk. You no longer have to worry about automatic deletion after the recording time expires with Teams' cloud recording. You can easily access or share your recordings. Besides, you can also use it to screen record Zoom meeting without permission.
Here are the steps to easily record yourself on Teams with an automated screen capture app:
Step 1. Create a Timed Recording Task
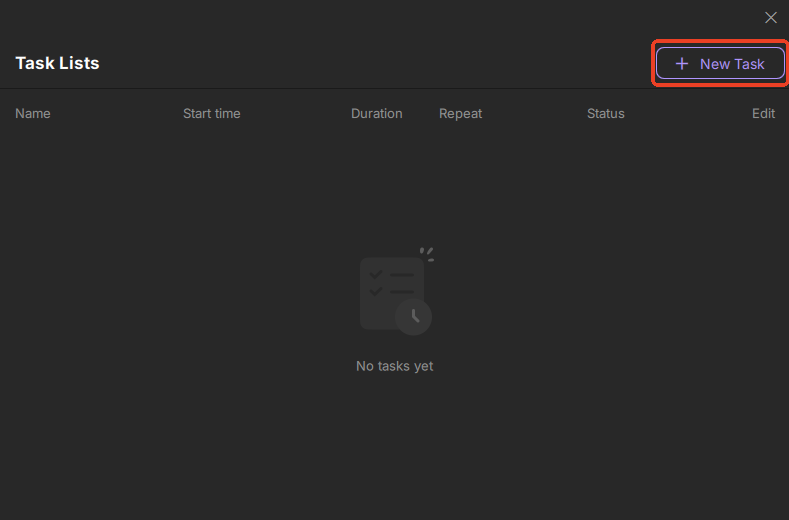
Download and launch the EaseUS screen recorder on your Windows or Mac PCs. Then, click the Schedule Recording button in the upper right corner of the main interface.
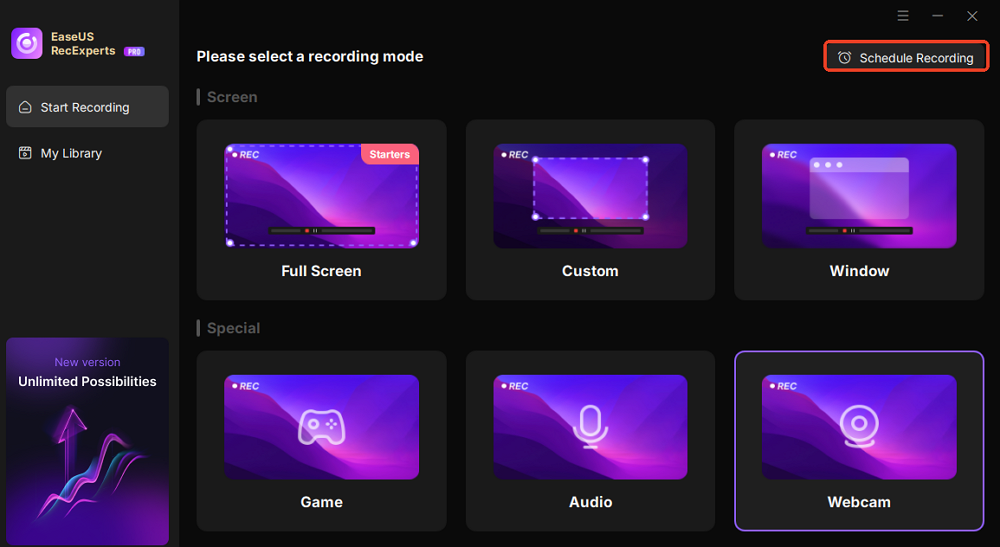
Then, select the New Task option to add a new schedule for the program.
Step 2. Configure the Scheduled Recording Task
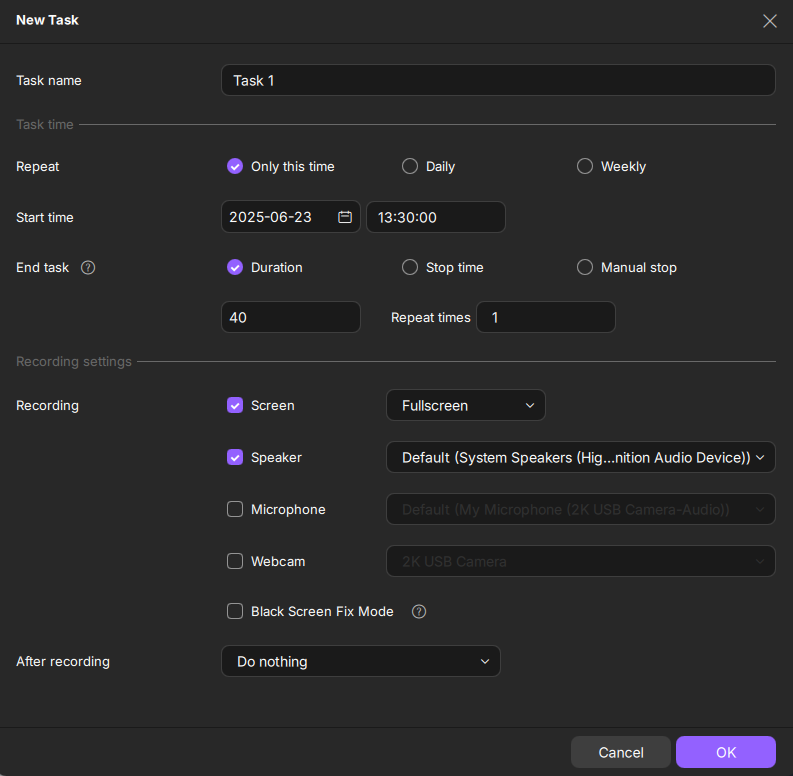
Next, you need to set the relevant information for your scheduled task.
- Name your recording task in the Task name tab.
- In the Task time tab, choose repeat time and specify the recording start and end time.
- In the Recording setting tab, select the recording area, choose the audio input, webcam setting, or choose black screen fix mode. Plus, you can choose to exit the program, sleep/shut down the computer, or do nothing after recording. Then, hit the OK button.
Step 3. Edit or Delete a Scheduled Recording
If you need to change the scheduled recording time or other settings, click the Edit button. If you need to delete the schedule, click the Delete icon.

Step 4. View Your Scheduled Screen Recordings
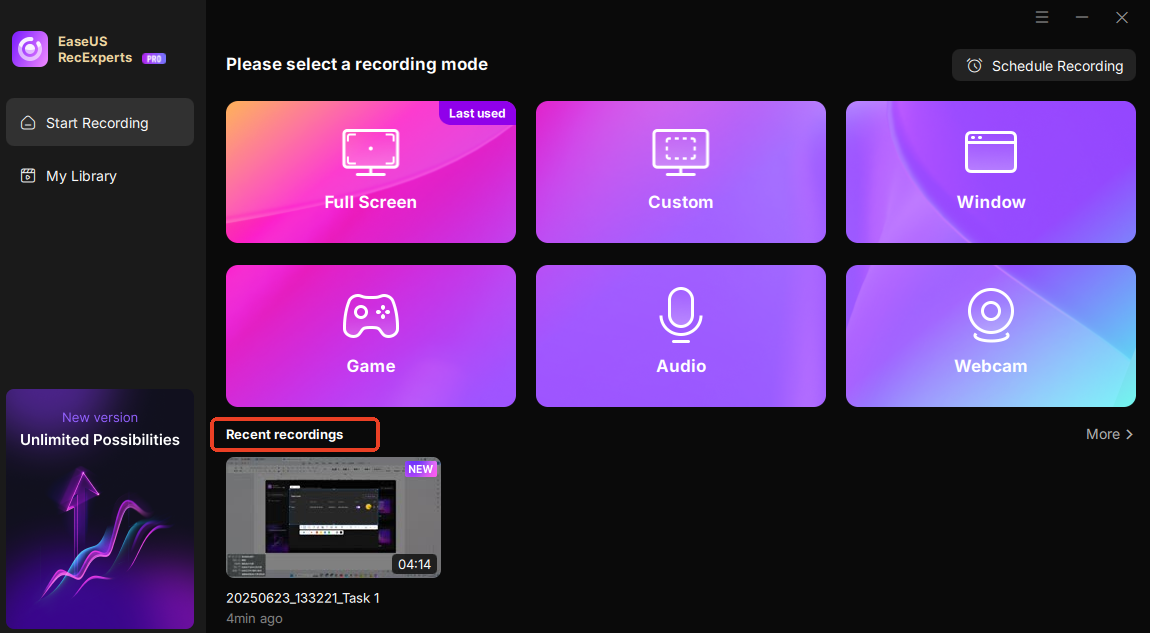
When the recording start time you set comes, the software will screen record and save the recording video file automatically. You can view this file by clicking the recorded video in the Recent recordings tab.
Conclusion
This detailed guide shows you two effective ways to record meetings on Microsoft Teams automatically. Teams support enables the auto recording function.
If you prefer to have no time, notification, or storage constraints, it is recommended to use professional conference recording software like EaseUS RecExperts to help you record any Team's content automatically with its scheduled recording feature.
Teams Auto Record Meetings FAQs
1. How to record yourself presenting a powerpoint on Teams?
To record yourself presenting a PowerPoint on Microsoft Teams, you can do this
Step 1. Launch your Microsoft Teams on your PC.
Step 2. Click on the Create a Meeting link and Join. Also, you can schedule a new meeting if you want to present to others.
Step 3. Press the Share icon to choose the PowerPoint application window. Then, click the More options and select the Record and transcribe option to start recording.
Step 4. To finish it, click the Stop Recording button.
2. How long are Teams Recordings stored?
The default storage period for Teams recordings is 120 days, but this period can be adjusted based on administrator settings. Thus, please make sure to share the recordings with those who need them and save them to your local disk before they expire.
3. How to Record a Video on Teams By Yourself in Laptop?
You can use Teams' built-in record feature to record videos by yourself. You can also record video or audio clips in Teams and send them to other people, but remember that recorded video or audio clips can be up to one minute long.
Step 1. Open the one-to-one or group chat and click the + icon (actions and apps).
Step 2. Choose the Record video clip option and select what you want to record, such as Video, Record screen, or Audio.
Step 3. Then, you can record video or audio clips on Teams by yourself.
Step 4. When you finish, you can download the video or send it to your chat.
EaseUS RecExperts

One-click to capture anything on screen!
No Time Limit, No watermark
Start Recording