-
![]()
Daisy
Daisy is the Senior editor of the writing team for EaseUS. She has been working in EaseUS for over ten years, starting from a technical writer to a team leader of the content group. As a professional author for over 10 years, she writes a lot to help people overcome their tech troubles.…Read full bio -
Jane is an experienced editor for EaseUS focused on tech blog writing. Familiar with all kinds of video editing and screen recording software on the market, she specializes in composing posts about recording and editing videos. All the topics she chooses …Read full bio
-
![]()
Alin
Alin is an experienced technical blog writing editor. She knows the information about screen recording software on the market, and is also familiar with data cloning and data backup software. She is expert in writing posts about these products, aiming at providing users with effective solutions.…Read full bio -
Jean is recognized as one of the most professional writers in EaseUS. She has kept improving her writing skills over the past 10 years and helped millions of her readers solve their tech problems on PC, Mac, and iOS devices.…Read full bio
-
![]()
Jerry
Jerry is a fan of science and technology, aiming to make readers' tech life easy and enjoyable. He loves exploring new technologies and writing technical how-to tips. All the topics he chooses aim to offer users more instructive information.…Read full bio -
![]()
Rel
Rel has always maintained a strong curiosity about the computer field and is committed to the research of the most efficient and practical computer problem solutions.…Read full bio -
![]()
Gemma
Gemma is member of EaseUS team and has been committed to creating valuable content in fields about file recovery, partition management, and data backup etc. for many years. She loves to help users solve various types of computer related issues.…Read full bio -
![]()
Shelly
"I hope my articles can help solve your technical problems. If you are interested in other articles, you can check the articles at the bottom of this page. Similarly, you can also check my Twitter to get additional help."…Read full bio
Page Table of Contents
Jane Zhou
Updated on Jun 09, 2026
0 Views |
0 min read
In today's fast-paced digital world, Zoom has become essential for remote collaboration. But what if you need to record a Zoom meeting on Mac—whether it's a MacBook Pro, MacBook Air, iMac, or another model—for future reference or to share with colleagues? Why is your Zoom recording silent? Will hosts or participants detect if you screen record the meeting?
This comprehensive guide on how to record Zoom meeting on Mac with audio will help you. Whether you are a host or participant in a Zoom meeting, you can capture and save the meeting on your MacBook or iMac effortlessly by following the methods below!
Quick View:
- Zoom Built-in Recorder - Hosts or co-hosts can record meetings directly. The participants require granted permission from the host. It initiates notifications when recording.
- EaseUS Mac Screen Recorder -It allows all participants to record Zoom without permission, watermark, and time limit. No notifications during the recording session.
- QuickTime Player - Mac built-in free recorder that allows recording microphone sound.
- OBS Studio - Free and open source tool to record Zoom meetings on Mac secretly.
Can You Screen Record a Zoom Meeting on Mac?
Of course, yes! You can screen record Zoom meetings with audio on Mac hassle-free, as it offers a built-in recorder that allows both host and participants to record video, shared content, and audio-only file on the meetings during a Zoom session on Mac. Remember, participants need permission from the host to record Zoom meeting.
Besides the Zoom built-in recording feature, you can also use third-party Zoom recording software like EaseUS RecExperts to record a Zoom call on Mac. Compared to the inbuilt one, they allow you to record Zoom meeting without permission on Mac.
Share this post with others in need!

How to Enable Recording in Zoom and Use the Built-in Recorder
The first way to record Zoom meeting on MacBook or iMac is to use Zoom's built-in recording feature. As we mentioned before, you can record Zoom meeting on iPhone or Mac if you are the host, co-host, or get the hots' permission. Users can record Zoom calls on Mac without installing other apps.
However, the host's account settings control whether local or cloud recording is allowed in that meeting. If the host hasn't enabled local recording or doesn't want to change the setting, you can't record with Zoom's built-in recorder.
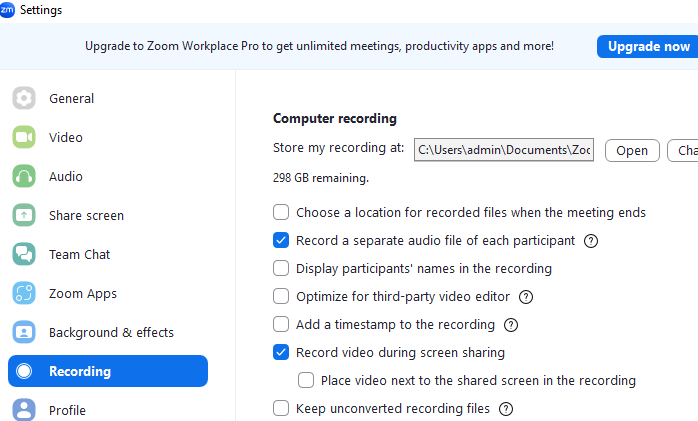
To enable the computer recording feature in Zoom account:
Step 1. Sign in to the Zoom web portal.
Step 2. Go to Account Management > Account Settings > Recording & Transcript.
Step 3. Under the Recording section, toggle on Record to computer files.
Step 4. You can customize other recording options if needed.
Now, let's see how to use the Zoom recorder on Mac to record Zoom conversations locally:
Step 1. Launch Zoom on your MacBook or iMac and sign in to your account.
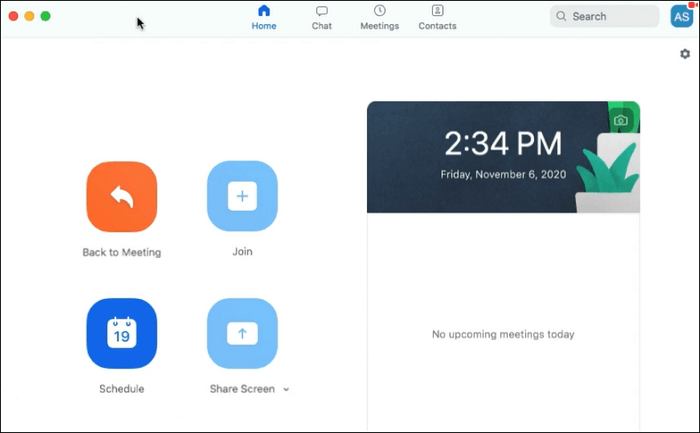
Step 2. Click Home > Settings > Recording tab to check the required options.
Step 3. Next, start a meeting, and you will see some options at the bottom of your Zoom session screen.
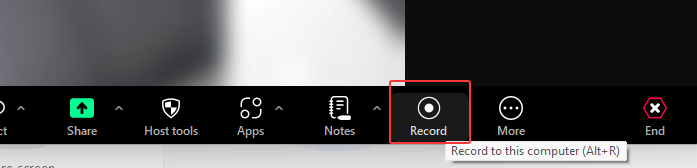
Step 4. When you are ready, click the Record button to capture the meeting's video and audio. During the recording, you can hit Pause or Resume to pause or resume your recording flexibly.
You may also like: Zoom Screen Sharing not Working on Mac
Share this post with others in need!
Record Zoom Meeting on Mac with Audio via EaseUS Recorder
How to record Zoom meeting without permission on Mac? Feel reluctant to notify host and participants? Without a doubt, EaseUS Mac Screen Recorder is the straightforward way. It allows you to record a Zoom meeting as a participant without permission. As one of the best Mac screen recorders, it is capable of recording Teams Meeting, Zoom, Google Meet, etc.
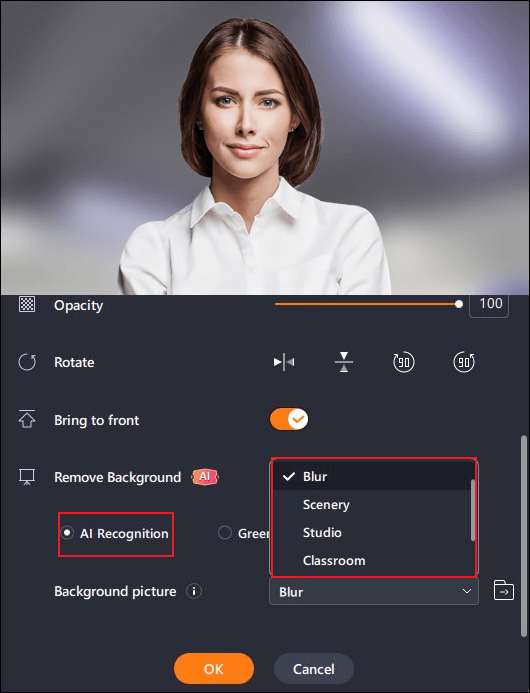
More importantly, You can also change your background to blur, scenery, studio, or classroom while recording the screen with a webcam. Besides, there are many tools available that assist you in editing your recording in real-time or transcribing Zoom meetings. You can also save or record audio only on Zoom within this tool.
Steps on how to record Zoom meeting on Mac without host permission with sound:
Step 1. Go to the meetings that you want to record. Then, launch EaseUS RecExperts on your devices. Choose the "Full Screen" recording mode or select the recording area in the "Region" mode.

Step 2. Choose to record the webcam, system sound, microphone sound or none by clicking on the according buttons.
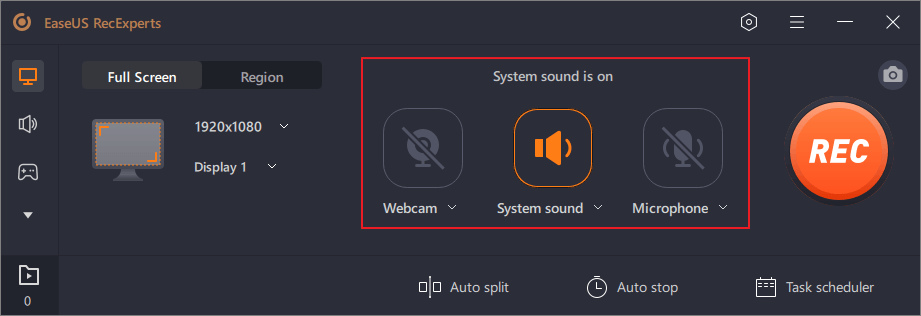
Step 3. It offers an AI background changer and green screen feature to users. You can change the video conference background as you like. When all is done, click on the red "REC" button to begin and click "F10" and "F9" to pause or stop recording.
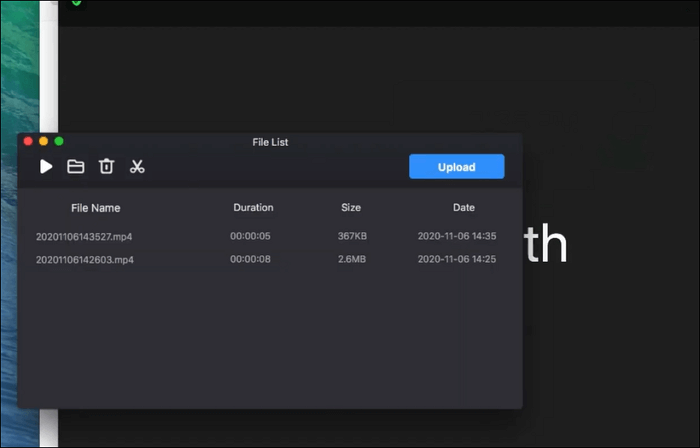
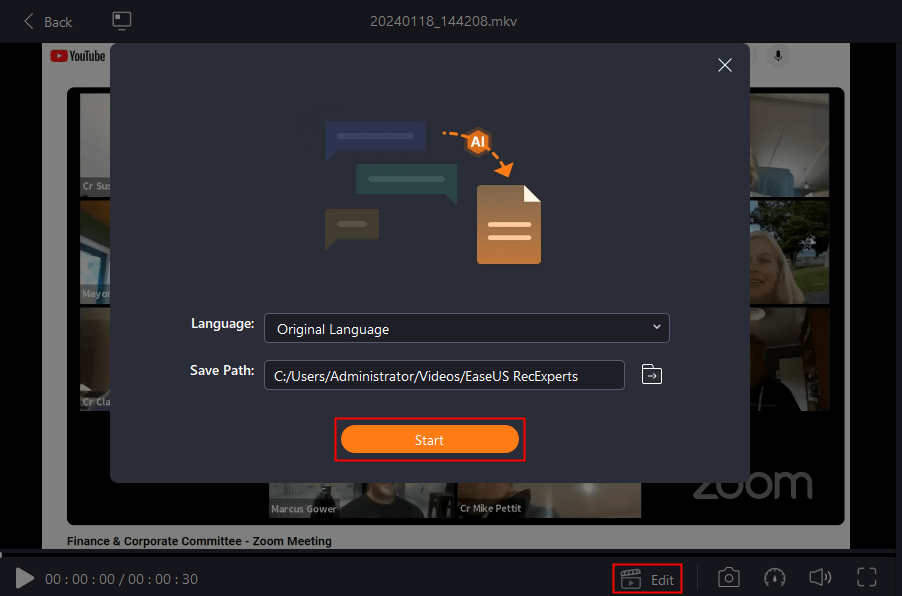
Step 4. After recording, you can view the meeting videos in the pop-up recording list. You can even click "Edit" > "AI Assistant" > "Start" to get a text file of what has been said.
Share this post with others in need!
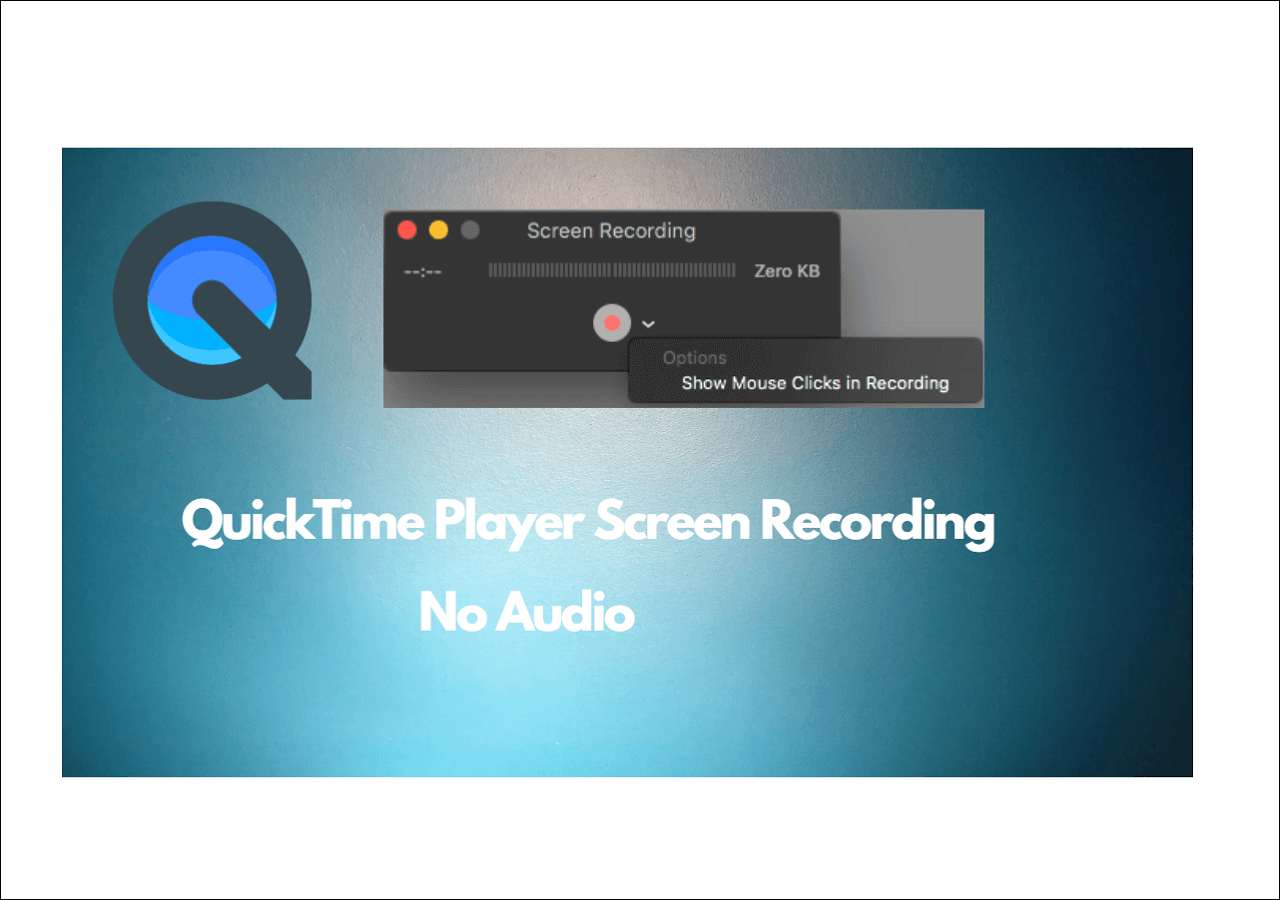
How to Record Zoom Meeting with QuickTime Player
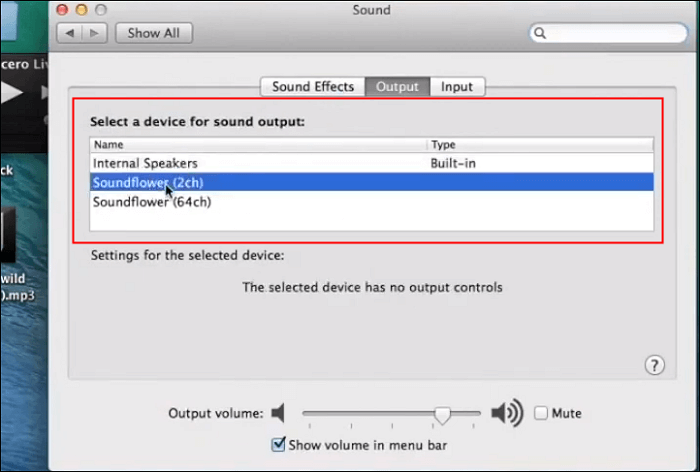
QuickTime Player is also an excellent choice for capturing Zoom meetings on Macbook Pro, Air, or iMac. This software is pre-installed on your device, so you can directly launch it and start a recording. However, using this freeware, you can only record Zoom videos with your own sound. To record others' voices or system sound, install virtual audio devices like Soundflower or BlackHole to record internal audio on Mac.
Steps on how to use QuickTime to record Zoom meeting with audio:
Step 1. Open Zoom on your macOS device and join a meeting. Then, download and install Soundflower on your Mac device.
Step 2. Click System Preferences > Sound > Output > Soundflower (2ch) to choose your Mac's output device.
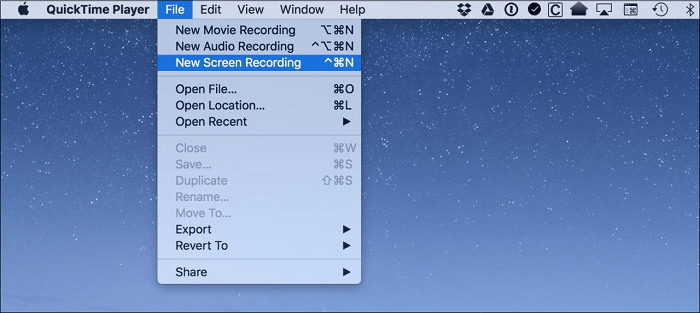
Step 3. Launch QuickTime Player, click "File" > "New Screen Recording" from the top menu bar. Or press Command + Shift + 5 to enable the recording function.
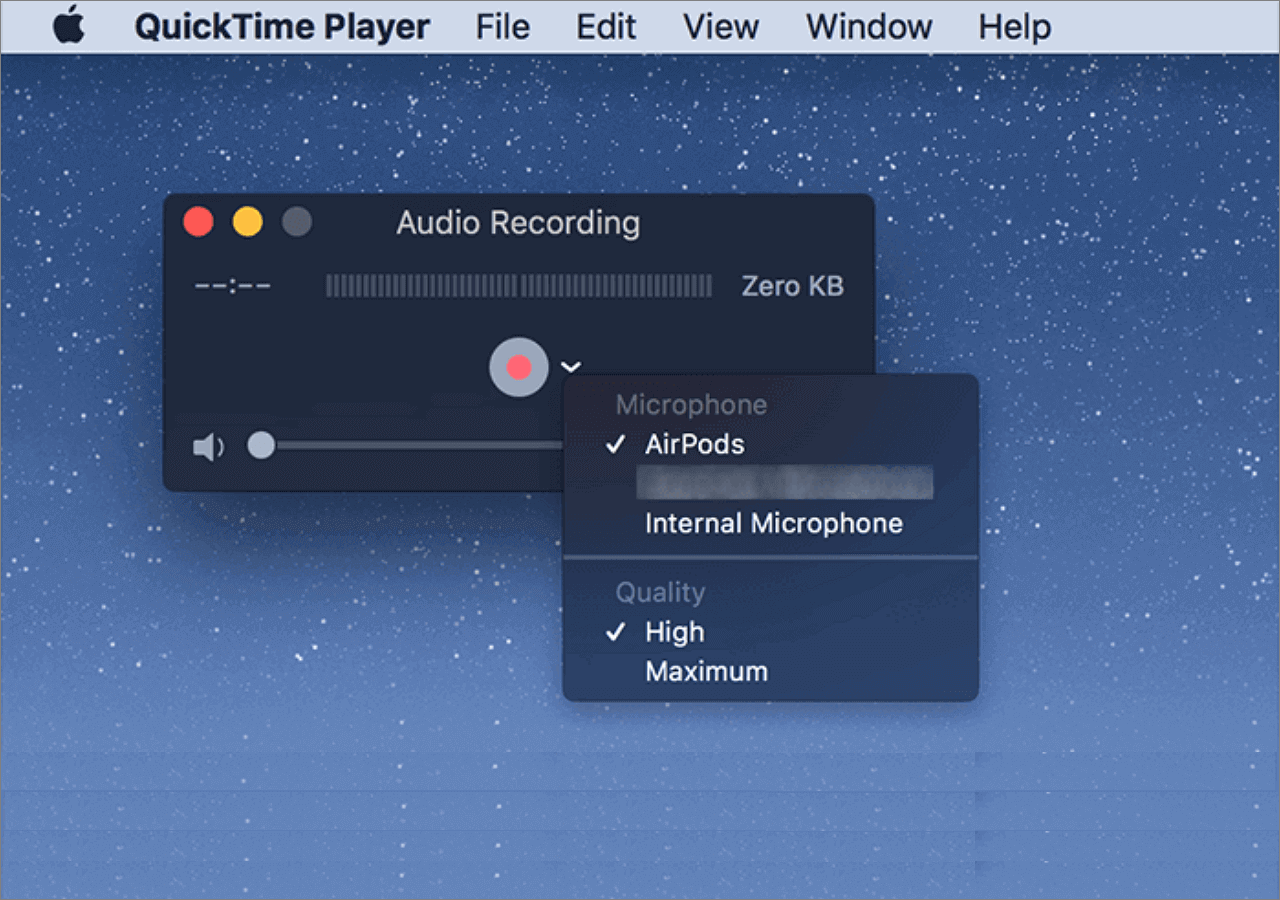
Step 4. Next, you can freely record Zoom sessions in full screen or a selected portion. If needed, choose the Options to select your desired microphone.
Step 5. When everything goes well, click Record to start recording in Zoom.
- Tip
- Since Soundflower is no longer updated, you can also resort to BlackHole screen recording with the Quicktime if needed.
How to Record Zoom Meeting with OBS on Mac
If you want to enjoy more advanced recording features but have a low budget, then look at OBS Studio. As a free and open source screen recorder, it is completely free to use to record anything on your Mac screen. That means you can easily record a Zoom meeting with sound using OBS, whether you're a host or participant.
With its help, you are able to screen record Zoom with sound on Mac without effort. You can also add mouse effects during the recording. But, this software is a little complicated to use because of its UI. If you are a novice, you might need to take a long time to learn this program.
Here are steps on how to record Zoom meeting using OBS on MacBook or iMac:
Step 1. Download and launch OBS on your Mac.
Step 2. Click the "+" icon in the Scenes box to create a new scene. Next, click the "+" icon and select "macOS Screen Capture".
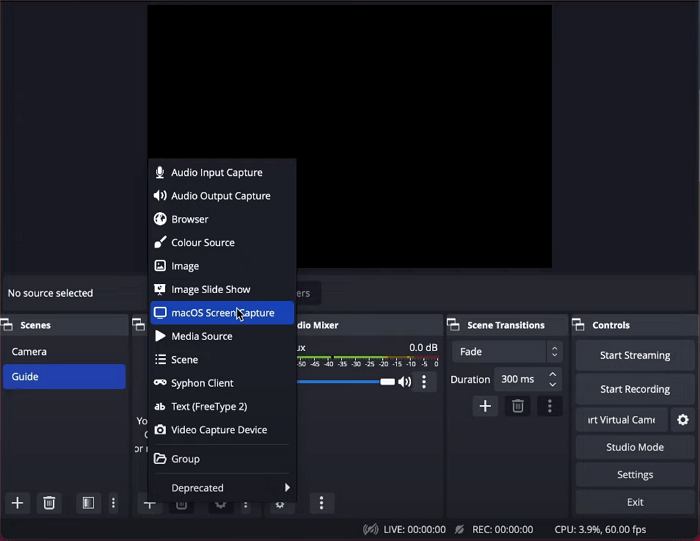
Step 3. A window will appear with a list of available displays. Choose the display where your Zoom meeting will appear and click "OK."
Step 4. Once done, click the "Start Recording" button in the lower-right corner. OBS will now start recording your Zoom meeting.
Share this post with others in need!
Final Words
Learning how to record Zoom meetings on Mac is necessary for your daily work and study. This post covers several ways to help you complete the task:
If your macOS device is out of storage space, you can use the built-in Zoom recorder or QuickTime Player to start recording.
If you want to enjoy more advanced recording features, you can opt for OBS and EaseUS RecExperts. OBS is only for the professional, as it is difficult to operate. If you are a novice, download and try EaseUS RecExperts now.
Record Zoom Meetings on Mac FAQs
1. How do I record a Zoom meeting on my Mac without the host's permission?
With a great Zoom recording software, you are able to record a Zoom meeting on your Mac without host's permission. Here are some recommendations:
- EaseUS RecExperts
- QuickTime Player
- OBS Studio
- Debut Video Capture Software
- Movavi Screen Recorder
2. Where is Zoom meeting recording on Mac?
If you use the built-in recording feature, you can find the Zoom recordings /Users/[Username]/Documents/Zoom.
3. Is it legal to record Zoom meeting without permission?
Unauthorized recordings may violate Zoom's terms. If you are only using the recording for personal viewing, this is usually legal.
4. How to enable cloud recorder on Zoom?
To turn on cloud recording in Zoom, you need to upgrade to Zoom Workplace Pro to get 5 GB of cloud storage. Then, you can follow the steps below:
Step 1. Log in to the Zoom web portal. And go to Settings > Recording.
Step 2. Toggle on Cloud Recording.
Step 3. As the host, click Record during a meeting and select Record to the Cloud.
5. How to enable transcription in Zoom?
Zoom's auto-transcription feature only works with Cloud Recording.
Step 1. Log in to the Zoom web version and go to Settings > Recording.
Step 2. Toggle on Audio Transcript under Cloud Recording.
Step 3. During a meeting, click Record > Record to the Cloud to automatically generate a transcript.
✅ Article Update Log (2025, November)
1️⃣Added the steps to enable computer recording in Zoom, which is a prerequisite for using the built-in recording feature.
2️⃣Corrected inaccurate instructions — for example, when using OBS on Mac, users should select "macOS Screen Capture" instead of "Display Capture".
3️⃣Added more helpful details to ensure readers understand key points, such as the fact that free Zoom accounts cannot use the built-in recorder on mobile devices.