-
![]()
Daisy
Daisy is the Senior editor of the writing team for EaseUS. She has been working in EaseUS for over ten years, starting from a technical writer to a team leader of the content group. As a professional author for over 10 years, she writes a lot to help people overcome their tech troubles.…Read full bio -
Jane is an experienced editor for EaseUS focused on tech blog writing. Familiar with all kinds of video editing and screen recording software on the market, she specializes in composing posts about recording and editing videos. All the topics she chooses …Read full bio
-
![]()
Melissa Lee
Melissa Lee is an experienced technical blog writing editor. She knows the information about screen recording software on the market, and is also familiar with data cloning and data backup software. She is expert in writing posts about these products, aiming at providing users with effective solutions.…Read full bio -
Jean is recognized as one of the most professional writers in EaseUS. She has kept improving her writing skills over the past 10 years and helped millions of her readers solve their tech problems on PC, Mac, and iOS devices.…Read full bio
-
![]()
Jerry
Jerry is a fan of science and technology, aiming to make readers' tech life easy and enjoyable. He loves exploring new technologies and writing technical how-to tips. All the topics he chooses aim to offer users more instructive information.…Read full bio -
![]()
Rel
Rel has always maintained a strong curiosity about the computer field and is committed to the research of the most efficient and practical computer problem solutions.…Read full bio -
![]()
Gemma
Gemma is member of EaseUS team and has been committed to creating valuable content in fields about file recovery, partition management, and data backup etc. for many years. She loves to help users solve various types of computer related issues.…Read full bio -
![]()
Shelly
"I hope my articles can help solve your technical problems. If you are interested in other articles, you can check the articles at the bottom of this page. Similarly, you can also check my Twitter to get additional help."…Read full bio
Page Table of Contents
0 Views |
0 min read
PAGE CONTENT:
With people foraying into content creation at a large scale, making videos and editing them has really become a thing. However, background noise is an annoyance for many people. It hinders your audio and causes headaches while post-production, affecting your content, podcast, or voiceover work.
In this post, we will decode the reasons, solutions, and tips to record audio without background noise for better audio quality. Now, let's delve into the practical ways to reduce background noise when recording.
Common Causes of Background Noise When Recording
While there are many factors that add up to the background noise, here are some of the common causes of background noises when recording. Additionally, you can work on them to improve the audio quality.
- Ambient Environment: Your physical surroundings, like street noise, fans, or appliances, will contribute to the background noise.
- Microphone Quality: A bad microphone will render the audio by not filtering out unwanted noise and results in a poor signal-to-noise ratio.
- Electronic Devices: All devices like computers, mobiles, and other electronics transmit signals that might introduce interference and hum into the recording.
- Poor Acoustics: Rooms with bad soundproofing and acoustics cause reverberation, echoes, and noise reflections.
- External Sources: If you are recording outside, factors like wind, trees, breeze, and traffic may introduce unwanted noise.
Share this post about reducing background noise when recording with others in need!
2 Tools of Reducing Background Noise While Recording
You can use a voice recorder with noise cancellation to minimize background noise while recording on your computer. Here are two recommendations: EaseUS RecExperts and Audacity. Here's a table reflecting the effectiveness of both methods.
| 🛠️Method | 👍Effectiveness | 🙉Difficult Level |
| EaseUS RecExperts | High - The AI-powered noise reduction features will help you maintain an accurate signal-to-noise ration | Super Easy |
| Audacity | Medium - Noise Profile is not accurate in some cases and may remove the actual vocals | Medium |
Tool 1. Use Professional Voice Recorder to Reduce Background Noise
The best possible way to reduce background noise while recording is to use a professional recorder like EaseUS RecExperts. The tool contains real-time AI-powered noise reduction features which automatically remove the background noise and help you maintain a good sound-to-noise ratio to produce audio of high quality. You can record both the desktop and microphone sounds in great sync.
This tool is perfect for screen recording without background noise on Mac and Windows. This tool comes with an added advantage of a professional screen recorder and helps you easily extract audio for further editing. You can have a try now.
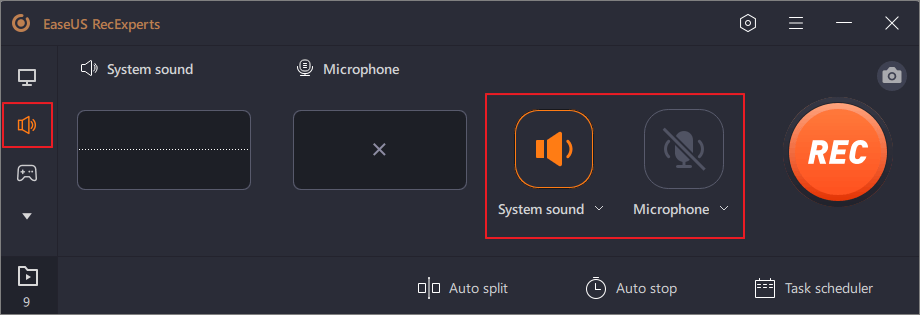
Step 1. Run EaseUS RecExperts, and click Record audio on the left panel. Next, choose the audio source you want to record, like System sound or microphone.
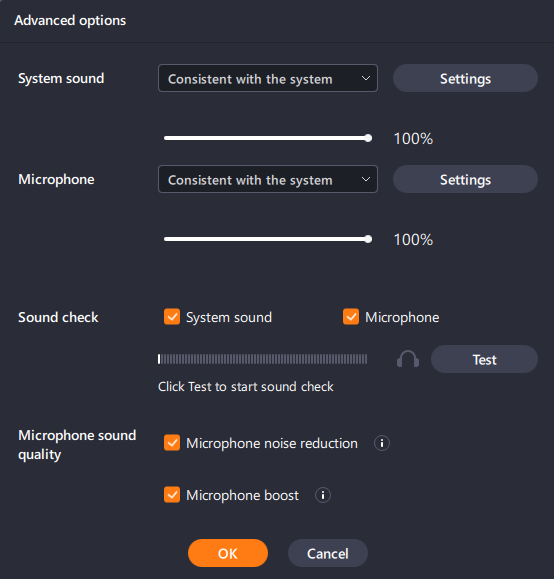
Step 2. Click the down-arrow icon next to System Sound or Microphone, choose the Advanced options, and tick the Microphone boost and Microphone noise reduction options. Moreover, you can also adjust the volume.
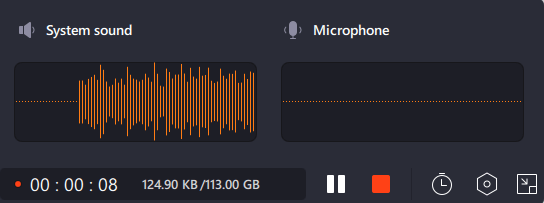
Step 3. Once done, click REC to start your audio recording.
Tool 2. Use Noise Cancelling Audio Recorder - Audacity
Audacity is an open-source audio recorder that comes with an inbuilt noise suppression tool, which cancels out the hums, sounds, buzz, and other unwanted background noise from your audio. It also supports cross-platform use on Windows, macOS, and Linux and has strong community support.
Powerful recording, editing, and noise reduction features make Audacity a professional tool suitable for removing background noise from audio recordings.
Here is the guide on Audacity how to filter background noise:
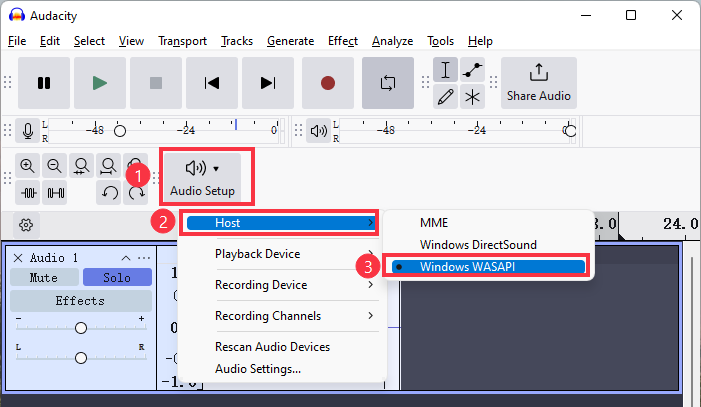
Step 1. Download and open Audacity on your system. To select the Audio Host, click Audio Setup and choose Host. Then, select Windows WASAPI from the drop-down.
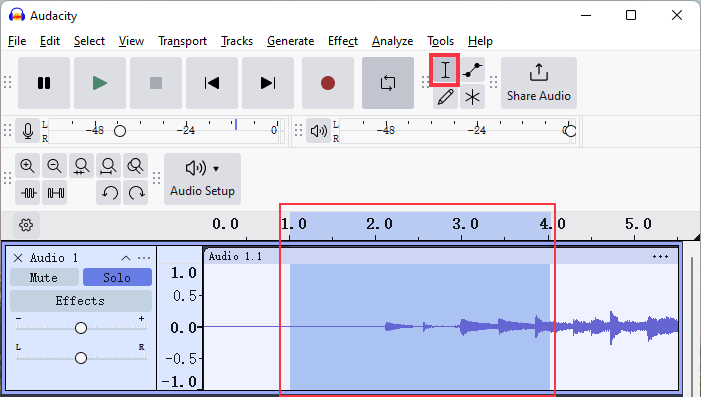
Step 2. Record or import the audio file you want to reduce background noise. Click on the Selection Tool or press F1 to choose the part that needs to be noise-removed.
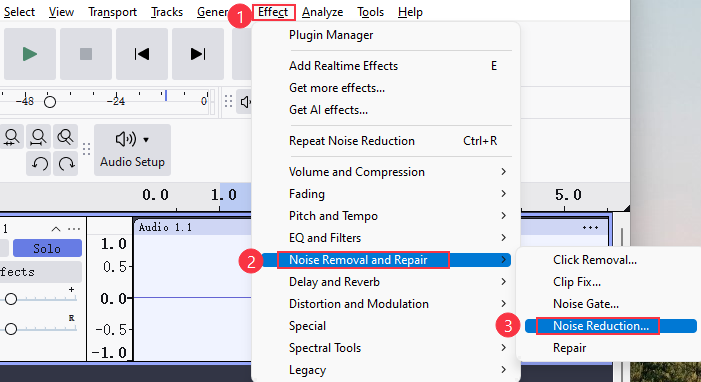
Step 3. Then, click on Effect on the top and select Noise Reduction.
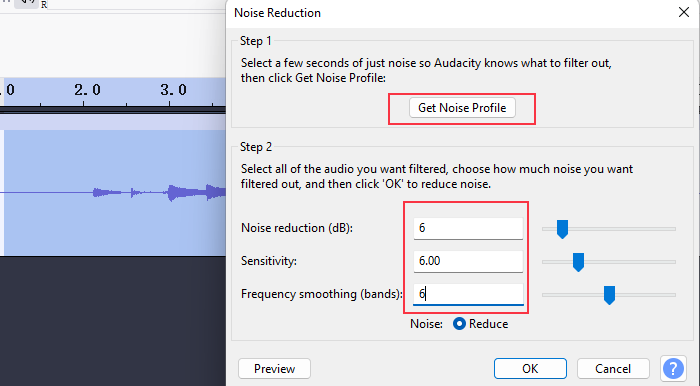
Step 4. In the Noise Reduction windows, click on Get Noise Profile. Record samples while raising the Noise Reduction meter to know the right value.
Step 5. Once done, go to the toolbar > File > Export > Export Audio and choose the desired format.
Share this guide on how to reduce background noise while recording with others.
Pro Tips About Reducing Background Noise While Recording
While recording with no background noise is impossible due to many underlying factors around the surroundings, microphones, and the devices themselves. You can follow some simple tips to reduce background noise while recording.
1. Use a directional microphone
Directional microphones are a very popular choice for audio recording. These microphones are more sensitive in one direction; in other words, they are polar patterns rather than omnidirectional.
2. Reduce the subject-to-microphone distance and increase the microphone-to-noise distance.
This is the most effective way to improve the signal-to-noise ratio. Just like in live performances, how a singer holds the Microphone directly at/on their mouth. This criterion will overcome the other unwanted noise and capture the audio.
3. Employ a pop filter or windscreen
A pop filter or windscreen can help reduce certain noise sources, such as plosives and wind, helping to improve the clarity and quality of your recordings.
4. Remove background noise sources
Optimizing the recording space is very important. If possible, try to avoid or remove acoustic noise sources around you, like an air-conditioning unit, fans, traffic noise, wind noise, etc. Not easy at all, but all of these will reduce the audio quality. Moreover, it is far easier to remove them beforehand than in post-production.
5. Use a stand to secure the microphone
Before recording, you can find a stand to hold the microphone in place and adjust the proper angle and distance to minimize vibrations and handling noise during recording.
6. Use a high-pass (low-cut) filter at the microphone
To avoid pink-noise-like, which accounts for the major part of background noise, use a high-pass (low-cut) filter. A high-pass filter will cut the noise out since the pink noise's most energy is at a low frequency.
Conclusion
To reduce background noise when recording, you can use a professional screen recorder like EaseUS RecExperts to record HD recordings or eliminate background noise with Audacity. Additionally, some tips like maintaining a quiet environment, using high-quality directional microphones, etc., are also critical to getting high-definition audio recordings.
Reduce Background Noise While Recording FAQs
Here are some of the most frequent FAQs asked on reducing background noise while recording. If you have similar queries hope this will help you.
1. How do I stop my mic from picking up background noise?
The background noise while recording is inevitable, but here are a few things you can do to minimize your mic from picking background noise.
- Get close to the Microphone and speak
- Remove any electrical appliances like AC, fans, etc, which introduce noise
- Make sure you choose a room that's good enough
- Use pop filters to remove plosives
- Use a background noise reduction filter
2. Why does my mic pick up background noise better than my voice?
This happens in some situations while recording. If your Microphone is too far from your mouth or close to noisy sources. The other case is if you have multiple sound sources around you, they tend to introduce ambient noise.
3. How to Avoid Background Noise When Recording on Phone?
Here's what you can do to avoid background noise when recording on the phone.
- Choose a quiet place
- Use your headphones
- Place a sound-dampening case around your phone
- Adjust the sound sensitivity on your phone.
EaseUS RecExperts

One-click to capture anything on screen!
No Time Limit, No watermark
Start Recording