-
![]()
Daisy
Daisy is the Senior editor of the writing team for EaseUS. She has been working in EaseUS for over ten years, starting from a technical writer to a team leader of the content group. As a professional author for over 10 years, she writes a lot to help people overcome their tech troubles.…Read full bio -
Jane is an experienced editor for EaseUS focused on tech blog writing. Familiar with all kinds of video editing and screen recording software on the market, she specializes in composing posts about recording and editing videos. All the topics she chooses …Read full bio
-
![]()
Alin
Alin is an experienced technical blog writing editor. She knows the information about screen recording software on the market, and is also familiar with data cloning and data backup software. She is expert in writing posts about these products, aiming at providing users with effective solutions.…Read full bio -
Jean is recognized as one of the most professional writers in EaseUS. She has kept improving her writing skills over the past 10 years and helped millions of her readers solve their tech problems on PC, Mac, and iOS devices.…Read full bio
-
![]()
Jerry
Jerry is a fan of science and technology, aiming to make readers' tech life easy and enjoyable. He loves exploring new technologies and writing technical how-to tips. All the topics he chooses aim to offer users more instructive information.…Read full bio -
![]()
Rel
Rel has always maintained a strong curiosity about the computer field and is committed to the research of the most efficient and practical computer problem solutions.…Read full bio -
![]()
Gemma
Gemma is member of EaseUS team and has been committed to creating valuable content in fields about file recovery, partition management, and data backup etc. for many years. She loves to help users solve various types of computer related issues.…Read full bio -
![]()
Shelly
"I hope my articles can help solve your technical problems. If you are interested in other articles, you can check the articles at the bottom of this page. Similarly, you can also check my Twitter to get additional help."…Read full bio
Page Table of Contents
Jane Zhou
Updated on Jun 09, 2026
0 Views |
0 min read
Creating vertical videos on a Mac is becoming more common as TikTok, Instagram Reels, and YouTube Shorts continue to dominate mobile-first content. But many Mac users quickly discover a major issue: macOS does not provide a native vertical recording mode, and QuickTime Player can only capture in the orientation of your display.
This article shows you practical ways about how to record vertical video on Mac while solving common problems. Let's get started.
| 🛠️Method | 👍Effectiveness | 🙉Difficult Level |
| EaseUS RecExperts | High - Record vertical videos and live streams on Mac with webcam and internal audio if your computer screen's physical resolution is tall enough for 1080x1920 or the size you want. | Very Easy |
| OBS | High - Change the Canvas resolution to 1080x1920 or another vertical size, even if your Mac screen is not tall enough to reach 1920 pixels. | Difficult |
| QuickTime | Medium - Use QuickTime to record directly from your Mac's built-in camera and edit in iMovie; or use an iPhone connected to your Mac for higher-quality portrait footage. | Moderate |
Why Need to Record Vertical Video on Mac
Vertical (9:16) videos have become the default format for TikTok, Instagram Reels, and YouTube Shorts. If you're creating content for any of these platforms on a Mac, recording in portrait mode saves time; no more rotating footage or cropping during editing.
Here are a few reasons creators prefer recording vertical videos on macOS:
- Perfect format for TikTok, Reels, and Shorts
- No need to crop or rotate footage afterward
- Helps your content look clean and professional
- Gives viewers a full-screen, mobile-first experience
Most Mac apps record in horizontal or landscape mode by default, which often confuses users. The good news? You can record vertically - you need the proper settings or tools. Below, we'll walk you through the easiest ways to record a vertical video on your Mac.
Don't forget to share this useful guide with others!

Record Vertical Video on Mac
Recording vertical videos on a Mac can feel straightforward or tricky, depending on the tool you use. Third-party apps like EaseUS RecExperts or OBS Studio make it easy to capture a true 9:16 portrait video. Using macOS's built-in QuickTime Player or screenshot tool is possible, but may require extra steps, such as rotating or cropping the footage afterward.
Below, we've summarized the most practical vertical video recorders for Mac, so you can create high-quality vertical videos with minimal hassle.
#1. Use EaseUS RecExperts
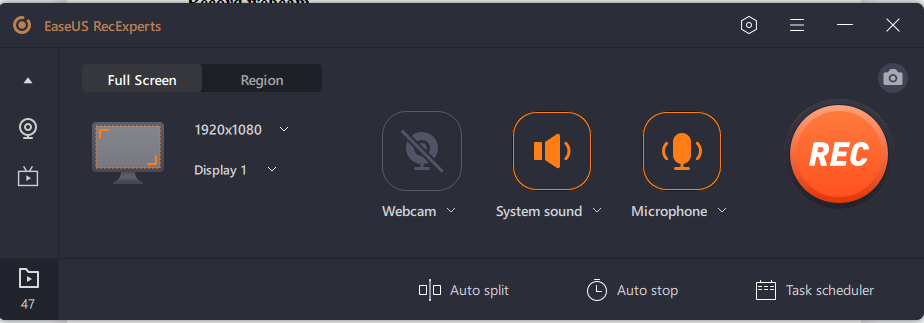
The EaseUS RecExperts is our premium pick. It is a powerful Mac screen recorder that can capture any region on your Mac screen, audio, and a webcam. You can simultaneously record webcam and screen to create social media videos, tutorials, presentations, and other videos.
This tool has a built-in media player and video editor for complete control of output video quality. To get a clear sound, it offers an AI noise remover. The tool also has a built-in video enhancer to record 4K/8K videos via webcam. All these features make it the most well-rounded screen recorder for Mac.
Download EaseUS Screen Recorder
Download EaseUS Screen Recorder
Trustpilot Rating 4.7
This is how you can record portrait videos on Mac with this screen recorder:
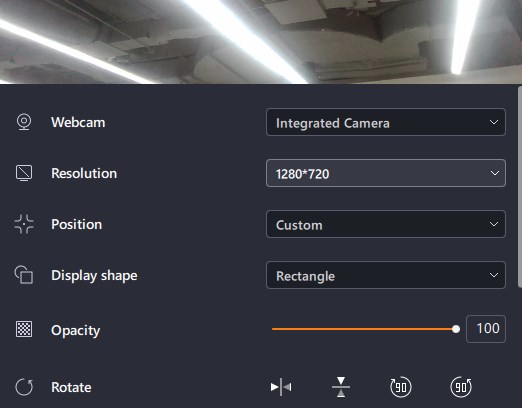
Step 1. Launch this webcam recorder, and select the little webcam icon by clicking the down-arrow button on the left panel.
Step 2. If there is more than one camera device connected to your computer, you can freely choose your desired one. Besides, you can also select the audio source, adjust resolution and position, and even adjust the opacity if needed.
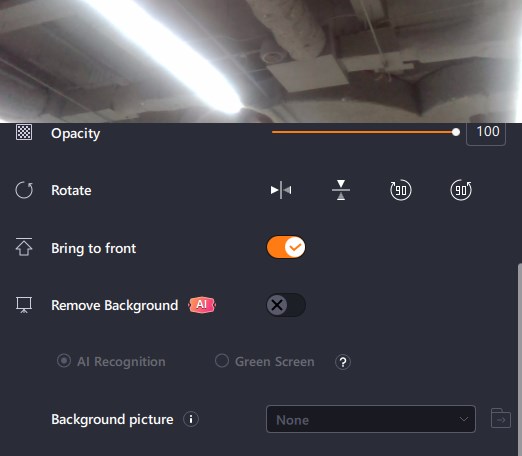
Step 3. Then enable the Remove Background, it will download the AI module.
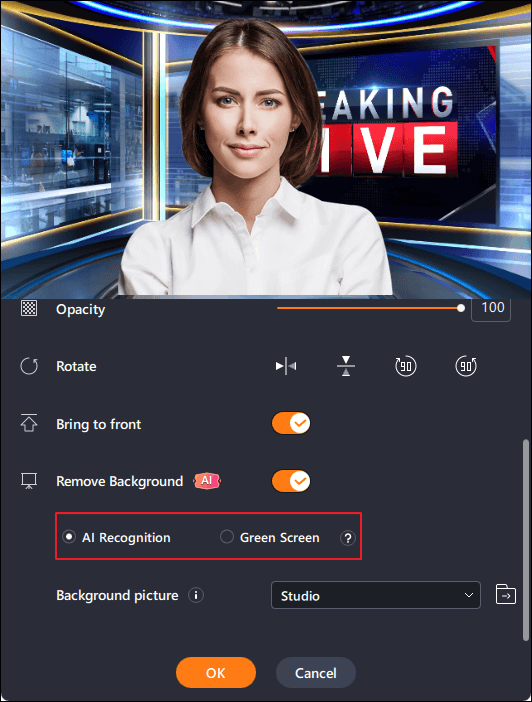
Step 4. After that, you can change the background picture by using some effects, like blur, scenery, studio, and classroom. Or you can upload a picture from your own device. It is recommended that you are in a solid color background, and the effect of AI recognition to remove the background will be better.
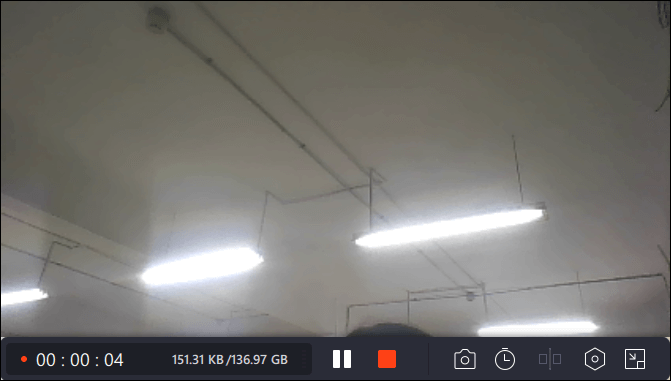
Step 5. You can click on the REC button when you are ready to start your webcam recording. During the process, you can choose to resize the recording window, take screenshots, pause or stop the recording flexibly. To end the recording, just click on the red square icon.
Step 6. Then, it will lead you to preview the recorded videos. Apart from that, you can enhance the recordings with some tools.
Download EaseUS Screen Recorder
Download EaseUS Screen Recorder
Trustpilot Rating 4.7
- Pro tips for using RecExperts:
-
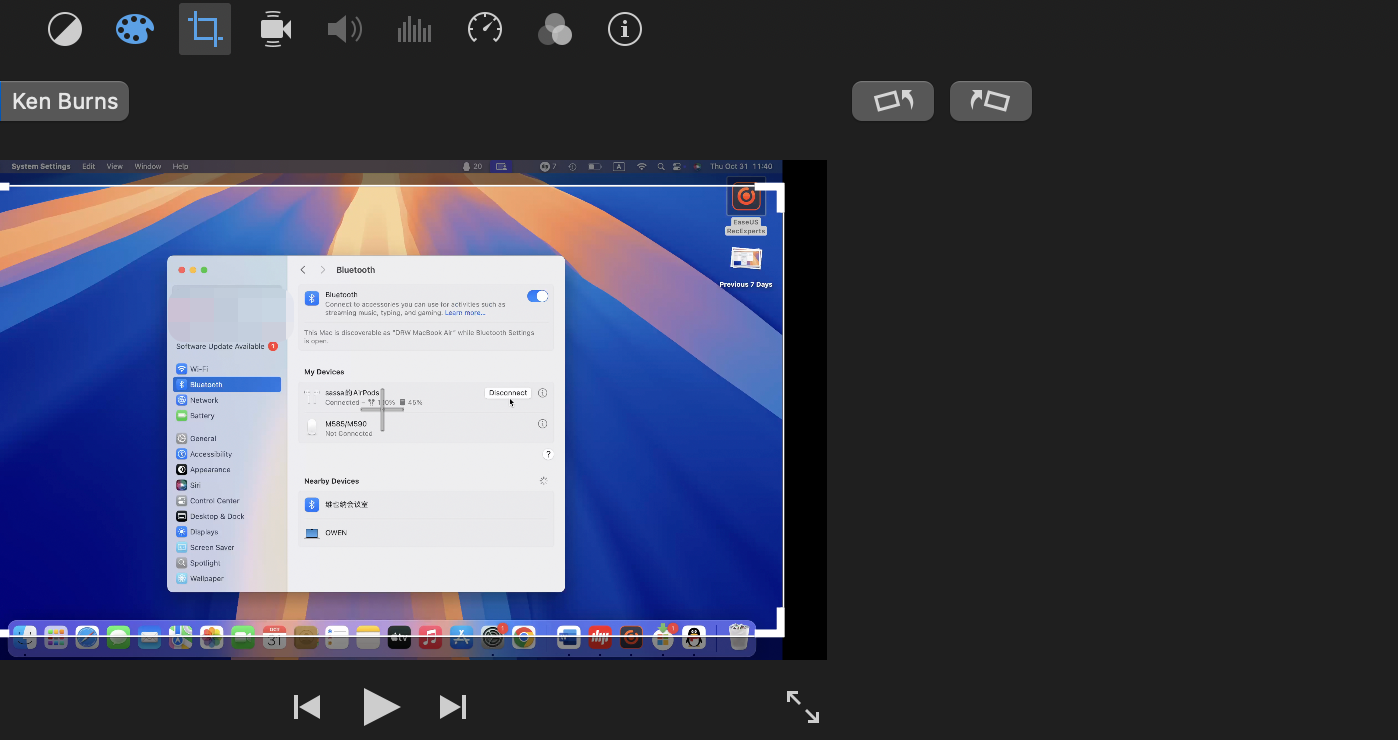
1. To record a 9:16 vertical video on your Mac using EaseUS RecExperts, switch to Region mode and manually drag the recording area. You'll notice the dimensions displayed in the top-left corner change as you pull. Adjust the area to 1080 × 1920 to capture full HD portrait video.
2. On some devices, such as a MacBook Air, you might find that the maximum draggable height is only around 1080 × 1050. This is because your screen's physical resolution isn't tall enough to capture a full 1920-pixel image. In such cases, you can record a smaller area and crop/scale the video in post-production to reach the 9:16 aspect ratio.
Don't forget to share this useful guide with others!
#2. Use OBS Studio
OBS Studio is a free, open-source screen recorder and streaming software. It supports both landscape and portrait video, and in fact, it offers more flexibility for vertical (portrait) recordings.
Even if your Mac screen is not tall enough to reach 1920 pixels, you can set up a virtual canvas with a resolution of 1080 × 1920, independent of your physical screen size. This makes OBS an ideal solution for recording vertical videos on Mac.
⚠️ Note: Setting up a vertical canvas in OBS involves a few extra steps compared to simpler tools like RecExperts, but it gives you complete control over resolution, frame rate, and layout.
See how to record vertical video on Mac with OBS:
Step 1. Download OBS Studio from the official website: https://obsproject.com. Install and open OBS on your Mac.
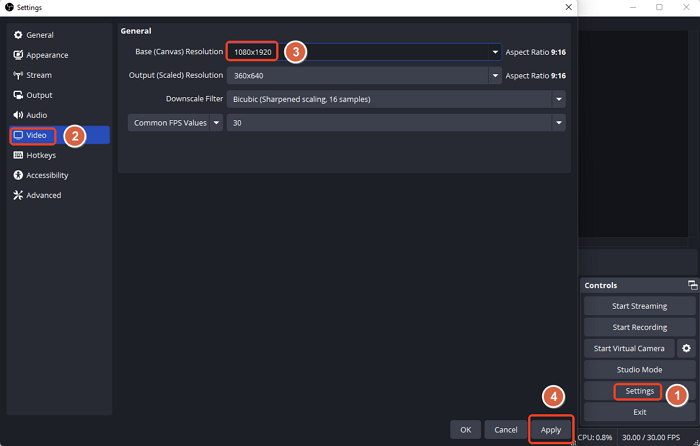
Step 2. Go to OBS > Settings > Video > and set Base (Canvas) Resolution: 1080 × 1920; Output (Scaled) Resolution: 1080 × 1920; FPS: 30 (general) or 60 (gaming/high-motion). Click Apply → OK.
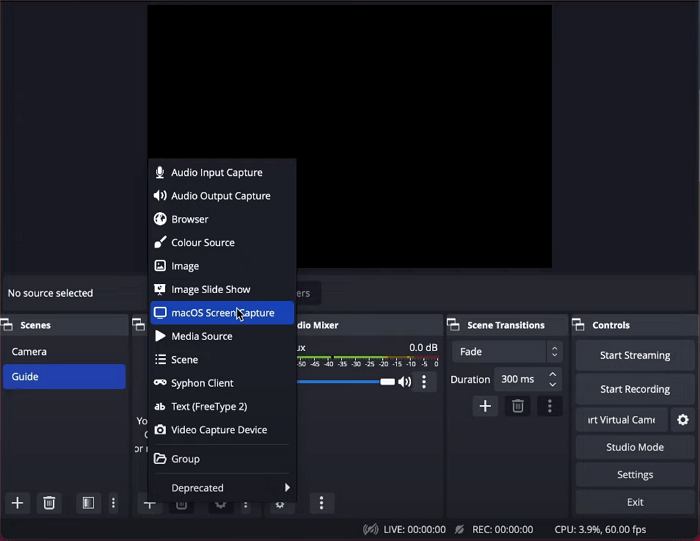
Step 3. In the Sources panel, click +. Add any of these sources depending on your content. Here is my setup:
- Video Capture Device → Record webcam
- macOS Screen Capture → Record screen
- Audio Input Capture → Record microphone
- Audio Output Capture → Record internal audio
Step 4. Click and drag the webcam corner to expand your shot to fill the frame in the center.
Step 5. Right-click on the webcam area or webcam source, select Transform, and use the following options:
- Rotate 90° clockwise → If webcam is horizontal
- Fit to Screen → Keep aspect ratio with black bars
- Stretch to Screen → Fill entire canvas (may distort image)
- Center to Screen → Make sure your source is perfectly aligned
Step 6. Click Start Recording in the bottom-right corner, perform your content as usual, and click Stop Recording when finished.
- Editor's Note:
- When I right-clicked on the webcam area or webcam source to select Transform, nothing happened. If you encounter the same problem, click Edit on the toolbar to select Transform instead.
Don't forget to share this useful guide with others!
#3. Use QuickTime Player
Apart from resorting to a third-party vertical video recorder, users also want to know how to record videos in portrait mode using the built-in tools (QuickTime Player or screenshot tools) on Mac. So in this section, I'll show you how to record vertical videos on a Mac using QuickTime Player. There are two main approaches: recording directly from your Mac's built-in camera or using an iPhone connected to your Mac for higher-quality portrait footage.
Recording directly from your Mac is quick and convenient, though it may have some limitations due to screen or webcam height. For the best results and actual 1080×1920 vertical video, we recommend connecting an iPhone in portrait mode. Follow the steps below to capture vertical videos efficiently, whether you're creating content for TikTok, Instagram Reels, or YouTube Shorts.
🚩Option 1. Record from your iPhone in portrait mode (better quality):
Step 1. Connect your iPhone to your Mac with a Lightning cable.
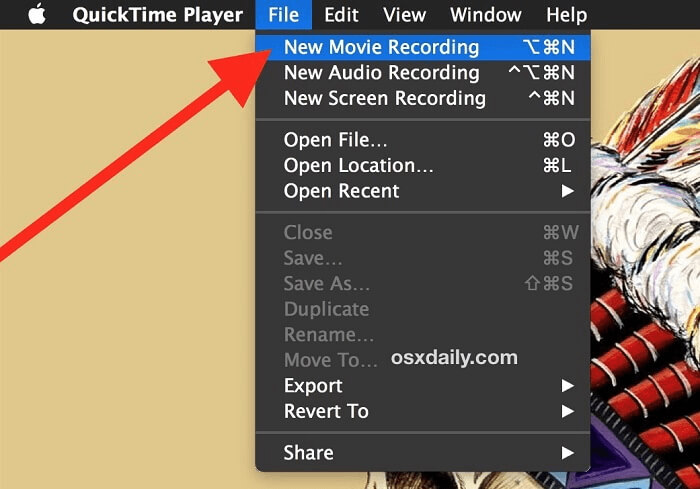
Step 2. Open QuickTime → File > New Movie Recording.
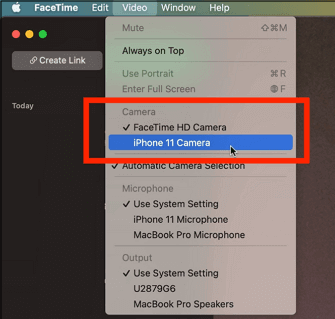
Step 3. Click the dropdown next to the record button → select your iPhone as the camera.
Step 4. Record your video in vertical orientation (portrait).
Step 5. Save the recording on your Mac.
🚩Option 2. Record directly from your Mac camera (limited vertical options):
Step 1. Open QuickTime Player → File > New Movie Recording.
Step 2. Click the dropdown next to the record button → select your FaceTime HD Camera.
Step 3. Position your Mac or webcam in portrait orientation (some webcams may require physical rotation).
Step 4. Click Record to start, and Stop when finished.
Edit Vertical Video with iMovie (Optional)
Once you've recorded your vertical video using QuickTime or your iPhone, you may want to make additional adjustments such as rotating, cropping, trimming, or enhancing the footage. This is where iMovie comes in - while it cannot record videos by itself, it provides an easy way to polish and finalize your vertical videos before sharing them on platforms like TikTok, Instagram Reels, or YouTube Shorts.
Here is how to create a vertical video with iMovie:
Step 1. Open iMovie → click Import Media → select your video.
Step 2. Drag the video to a new Project Timeline.
Step 3. Select the video in the timeline → click the Crop button.
Step 4. Choose Rotate Clockwise or Rotate Counterclockwise to convert horizontal footage into vertical (portrait) orientation.
Step 5. Use other editing tools as needed: trim, add text, stabilize, or adjust colors.
Step 6. Export the final 9:16 video for TikTok, Instagram Reels, or YouTube Shorts.
Final Words
Vertical videos are the present and future of video making. They offer greater reach and results across social media platforms such as Facebook, YouTube, Instagram, TikTok, and WhatsApp. You should learn to record vertical videos on your Mac device to stay on top.
This blog highlights three software programs for recording vertical videos. You can use EaseUS RecExperts, OBS Studio, and QuickTime. You can make a vertical video in iMovie on a Mac if the size needs to be adjusted.
Each software's introduction and recording tutorial has also been presented for better understanding. Based on video quality and user experience, we recommend EaseUS RecExperts. Download it now and start unlimited video recording from today.
Download EaseUS Screen Recorder
Download EaseUS Screen Recorder
Trustpilot Rating 4.7
How to Record Vertical Video on Mac FAQs
1. How do I record vertical videos on my computer?
The easiest way is to use vertical video recording software. You can use EaseUS RecExperts, OBS Studio, and iMovie for recording vertical videos on your computer.
2. Can iMovie make vertical videos?
Yes, iMovie can make vertical videos. The software is our go-to tool for creating high-quality vertical videos from Mac Devices.
3. How do I make a video vertical?
The easiest method is to use software like EaseUS RecExperts. It can make unlimited vertical video with ease. Follow the steps below.
Step 1. Open the EaseUS RecExperts app and select Region for recording.
Step 2. Turn on the Sound recording option and select the video format.
Step 3. Click the REC button to initiate recording. Once completed, press Stop and save it.
4. How do I change a video from vertical to horizontal on a Mac?
You can use iMovie to change a video from a vertical to a horizontal layout. This is how it works.
Step 1. Open the iMovie on your Mac and select the vertical video.
Step 2. Click the crop button; it will show all cropping controls.
Step 3. Select the "Rotate Clockwise" option on the right side. It will change the vertical video to horizontal.
Step 4. Save the results in a suitable folder.
✅ Article Update Log (2025, November)
1️⃣Added a new QuickTime solution for recording vertical videos. This update responds to common questions from Reddit and forum users who want to record portrait video by connecting their iPhone to a Mac.
2️⃣Split the iMovie method into its own H2 section. Since iMovie cannot record video and is only used for editing, the article structure has been reorganized to make the flow clearer and more logical.
3️⃣Updated the OBS steps for recording vertical videos. The previous instructions were not fully accurate and the screenshots lacked clarity. The section has now been rewritten with the correct, up-to-date workflow and improved visuals.