-
![]()
Daisy
Daisy is the Senior editor of the writing team for EaseUS. She has been working in EaseUS for over ten years, starting from a technical writer to a team leader of the content group. As a professional author for over 10 years, she writes a lot to help people overcome their tech troubles.…Read full bio -
Jane is an experienced editor for EaseUS focused on tech blog writing. Familiar with all kinds of video editing and screen recording software on the market, she specializes in composing posts about recording and editing videos. All the topics she chooses …Read full bio
-
![]()
Alin
Alin is an experienced technical blog writing editor. She knows the information about screen recording software on the market, and is also familiar with data cloning and data backup software. She is expert in writing posts about these products, aiming at providing users with effective solutions.…Read full bio -
Jean is recognized as one of the most professional writers in EaseUS. She has kept improving her writing skills over the past 10 years and helped millions of her readers solve their tech problems on PC, Mac, and iOS devices.…Read full bio
-
![]()
Jerry
Jerry is a fan of science and technology, aiming to make readers' tech life easy and enjoyable. He loves exploring new technologies and writing technical how-to tips. All the topics he chooses aim to offer users more instructive information.…Read full bio -
![]()
Rel
Rel has always maintained a strong curiosity about the computer field and is committed to the research of the most efficient and practical computer problem solutions.…Read full bio -
![]()
Gemma
Gemma is member of EaseUS team and has been committed to creating valuable content in fields about file recovery, partition management, and data backup etc. for many years. She loves to help users solve various types of computer related issues.…Read full bio -
![]()
Shelly
"I hope my articles can help solve your technical problems. If you are interested in other articles, you can check the articles at the bottom of this page. Similarly, you can also check my Twitter to get additional help."…Read full bio
Page Table of Contents
0 Views |
0 min read
Every guitar enthusiast tries to share their work with the audience through recording. It is common for such a person to think of ways to record guitar on their device. Undoubtedly, it can be tricky for the first time as you have to pick multiple devices.
But if you have a Mac device and want to connect a guitar for recording, you should read this guide. In this guide, we will share two easiest ways to let you learn how to record guitar on Mac. Let's get started!
| 🛠️Method | 👍User Experience |
| Use Microphone | You can easily and quickly record the guitar on your Mac via this method. But, the premise is that you need to choose an audio recording software as well as a microphone. |
| Use Direct Input | It is a direct way to record guitar on Mac without much extra preparation. But there might be much noise if your audio interface isn't strong enough. |
Method 1. Record Guitar on Mac using Microphones
Sometimes, you may be unable to use a DAW because of its complex interface. That's why we have listed the method to record guitar on Mac using a microphone and recording software. Read here how to set up the system and record your guitar's music.
1. Preparations
🎤Choosing an excellent microphone
First of all, you should make sure that you have an excellent microphone. Without choosing a reliable device for recording audio, you will get distortion in your voice. If you don't know which one is better, choose an XLR microphone.
🎵Audio recording software
Once you have selected a good-quality microphone, it is time to move to the next step, i.e., selecting the music recording software. It is the most challenging task as you will get confused among many software claiming to be the best.
We have researched for your ease and found that EaseUS RecExperts for Mac is the best choice. It is the best software that can record your audio as well as video while playing guitar. The best feature of this software is its advanced features like noise cancelation, which means you can record voice without background noise. So, we recommend you download this recording software and use it for guitar recording on a Mac.
🛖Create a Silent Environment
The last step that you should take before recording is a silent environment. Keep in mind that if you are sitting in a room with noise from outside or getting interruptions like this, you will never be able to record the guitar properly. If you have done so, you are ready to learn how to record guitar on a Mac using a microphone.
2. Start Recording Guitar on Mac in High Quality
Follow these steps to record the guitar on a Macbook with high-quality sound.
- ✨Set up your microphone using a stand, and keep enough distance between the mic and the guitar (about 3 feet is the best). Then, launch EaseUS RecExperts and follow the below tutorial:
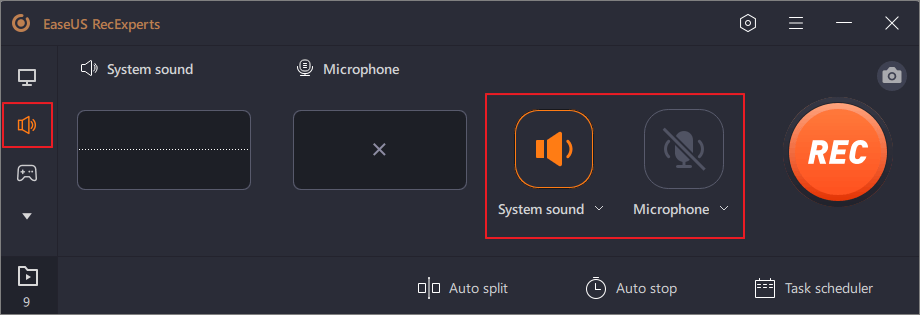
Step 1. Launch EaseUS RecExperts and choose "Audio" (looks like a speaker) from the left side of the interface. Select the sound source by clicking on the speaker sign (the system sound) or the mic sign (the microphone). Or, you can record them both at the same time.
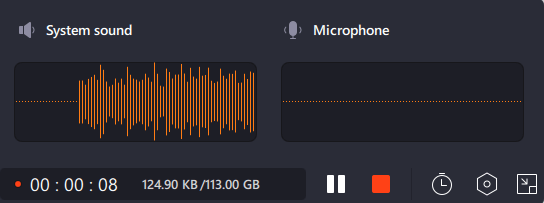
Step 2. Hit "REC" button to start recording audio. To finish it, you just click on the red square icon to stop the recording.
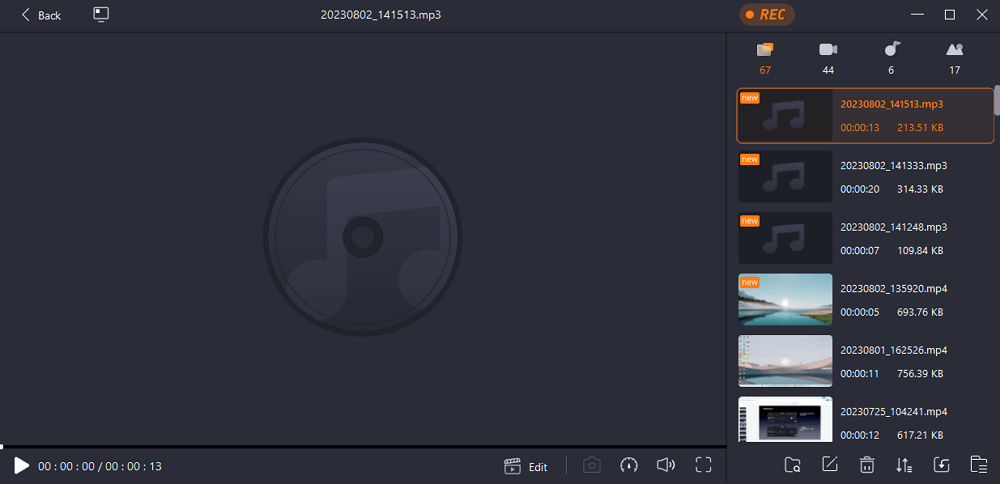
Step 3. After that, the recording list window will pop up automatically. You can listen to or edit the recording with built-in tools.
Share this helpful guide with others in need!
Method 2. Record Guitar on Mac via Direct Input
Another effective way to record guitar on Mac is through the Direct Input (DI) method. Undoubtedly, it is a reliable way to record because you don't have to perform multiple activities for preparations.
But it also has some drawbacks, like you will hear too much noise if your audio interface isn't strong enough. So, it would be best if you chose the right audio interface for recording and a reliable DAW like GarageBand. Let us show you how to prepare the setup for this and start recording.
1. Preparations
First of all, you should make a stable connection between your guitar and the audio interface. It is recommended to connect the guitar directly with an audio interface using its built-in port. By doing this, you will be able to create a smooth connection between devices for recording.
Also, you should ensure that your audio interface has enough power to record the sound without distortion. If it doesn't have enough power, you will end up with a sound full of noise. In turn, you can't hear your guitar via headphones or share a nice tune with others.
2. Begin Recording Guitar on Mac via GarageBand
Once you have set up everything for DAW like GarageBand, it is time to follow these steps to record guitar on Mac.
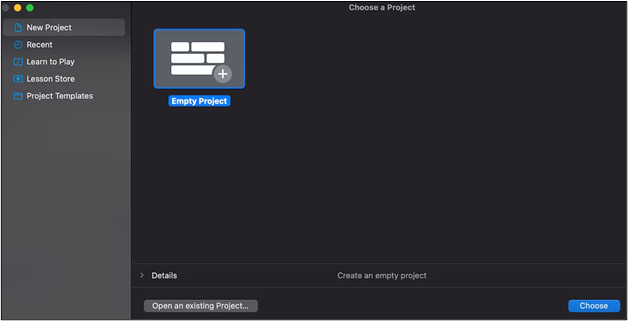
Step 1. Open "GarageBand" and tap "Empty Project" from the screen.
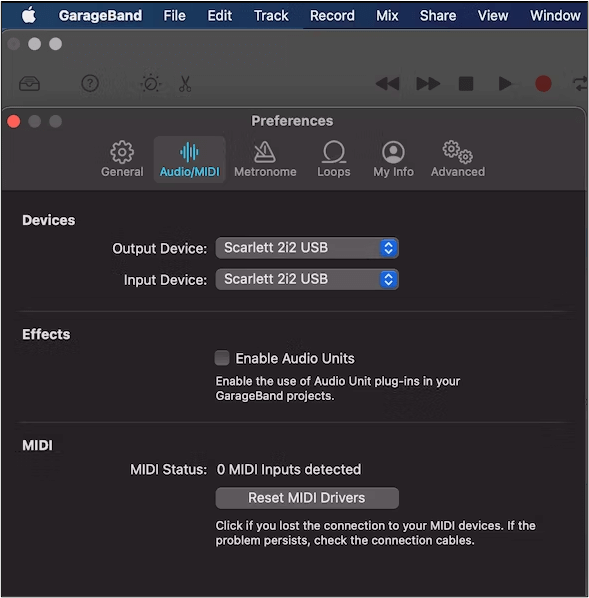
Step 2. Go to "Preferences" under the "GarageBand" option given in the menu bar, then select your "Microphone" as an input device from the "Audio/MIDI" option.
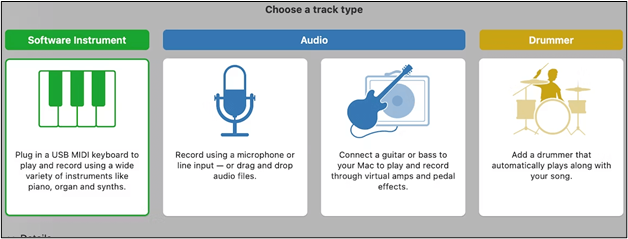
Step 3. Choose "Audio Track" as per your requirements.
Step 4. Select "Presets" as GarageBand enables you to have some high-quality built-in presets.
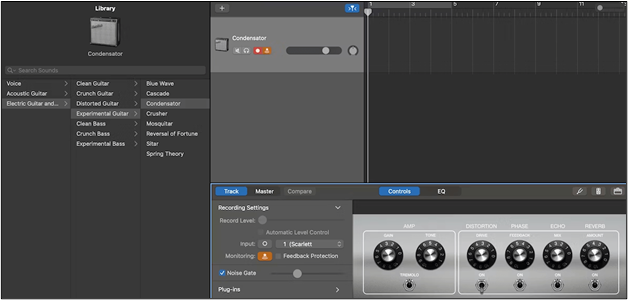
Step 5. Use GarageBand's built-in plugins, like the "Pedalboard Plugin", to get started with quality outcomes. Once done, click the "Red Record" button to get started.

Following these steps, you can easily record guitar on Mac without complications. We have shared the simplest ways to accomplish this task. So, you should follow these steps in the same way we have discussed to avoid any problems.
Tips for Getting Better Guitar Recordings
Undoubtedly, you have learned how to record guitar on Mac in different ways with effective results. But you still need to take care of some factors. Here, we have listed some tips to improve the recording experience.
- ✨Always set a sensible distance between the microphone and guitar to have enough sound for recording.
- 🎈Try to choose the audio interface with a built-in port to connect as DI because interfaces without ports may not hear your sound properly.
- 🎨Don't record something when you have noise in your surroundings.
- 🎯Try to isolate yourself in a place where no one comes for interruption-free recording.
- 🪄Never rely on a standard or ordinary-level microphone, as you will get a lot of noise with such devices.
- 🪄Choose a powerful audio interface to avoid noise in the background of your sound.
Final Words
You might be ready to record your guitar on Mac as you have learned how to record guitar on Mac in easy steps. Undoubtedly, you can choose any recording software according to your requirements.
But we recommend you choose EaseUS RecExperts for Mac. It is because this software has a simple interface with advanced features. Using this, you can reduce the noise from the background of your guitar's sound.
How to Record Guitar on Mac FAQs
1. How do I record my electric guitar on my Mac?
You can record your electric guitar on a Mac by following these simple steps.
- Set up a connection between your guitar and your Mac.
- Choose a reliable microphone if you want to use it.
- Browse EaseUS RecExperts for Mac
- Follow simple steps to record sound from its main screen.
2. What is the guitar recording app for Mac?
The best guitar recording app for Mac is GarageBand. You can also use EaseUS RecExperts if you don't have this application on your device.
3. Can GarageBand record guitar?
Yes, GarageBand has a built-in option to choose guitar as your soundtrack. It means you can record guitar using this DAW application.
EaseUS RecExperts

One-click to capture anything on screen!
No Time Limit, No watermark
Start Recording


