-
![]()
Daisy
Daisy is the Senior editor of the writing team for EaseUS. She has been working in EaseUS for over ten years, starting from a technical writer to a team leader of the content group. As a professional author for over 10 years, she writes a lot to help people overcome their tech troubles.…Read full bio -
Jane is an experienced editor for EaseUS focused on tech blog writing. Familiar with all kinds of video editing and screen recording software on the market, she specializes in composing posts about recording and editing videos. All the topics she chooses …Read full bio
-
![]()
Alin
Alin is an experienced technical blog writing editor. She knows the information about screen recording software on the market, and is also familiar with data cloning and data backup software. She is expert in writing posts about these products, aiming at providing users with effective solutions.…Read full bio -
Jean is recognized as one of the most professional writers in EaseUS. She has kept improving her writing skills over the past 10 years and helped millions of her readers solve their tech problems on PC, Mac, and iOS devices.…Read full bio
-
![]()
Jerry
Jerry is a fan of science and technology, aiming to make readers' tech life easy and enjoyable. He loves exploring new technologies and writing technical how-to tips. All the topics he chooses aim to offer users more instructive information.…Read full bio -
![]()
Rel
Rel has always maintained a strong curiosity about the computer field and is committed to the research of the most efficient and practical computer problem solutions.…Read full bio -
![]()
Gemma
Gemma is member of EaseUS team and has been committed to creating valuable content in fields about file recovery, partition management, and data backup etc. for many years. She loves to help users solve various types of computer related issues.…Read full bio -
![]()
Shelly
"I hope my articles can help solve your technical problems. If you are interested in other articles, you can check the articles at the bottom of this page. Similarly, you can also check my Twitter to get additional help."…Read full bio
Page Table of Contents
Alin
Updated on Jun 09, 2026
0 Views |
0 min read
I've seen many users on forums like Reddit and Quora asking questions like "How do I record live streaming videos?" or "Why can't I record Netflix without getting a black screen?". These posts show that recording streaming video, especially from DRM-protected platforms, can be tricky.
To help, I've gone through dozens of threads, collected user tips, and tested different tools. In this article, I'll share practical methods and recommended video recording software for two main cases: recording live streams and capturing DRM-protected videos. Whether you want to save live broadcasts or streaming movies, you'll find useful, ready-to-use tips here.
Live Streaming vs. DRM-Protected Videos: User Intent and Challenges
Based on dozens of forum threads and user discussions on platforms like Reddit and Quora, the following table summarizes common user intentions, challenges, and practical insights for capturing streaming videos.
| Scenario | User Intent | Common Challenges | Analysis Insight |
|---|---|---|---|
| DRM-Protected Video |
|
Black screen, DRM restrictions | DRM-protected content requires specialized tools or modes to capture video properly, while respecting platform rules. |
| Normal Live Streaming videos | Record Twitch, YouTube Live, etc. | Lag, audio/video sync issues, network fluctuation | Real-time recording needs a stable network and proper encoder settings. Tools with scheduling or background recording are helpful. |
The table above summarizes common challenges and user intentions based on real discussions from forums. As you can see, live stream recording mainly suffers from lag and sync issues, while DRM-protected content often results in black screens or missing audio.
Understanding these challenges is the first step. Next, we'll explore practical solutions, including recommended software and step-by-step tips, for recording both live streams and DRM-protected videos.
Share this post to help users save streaming videos with ease!

Legally Record Video from Streaming Services, Like Netflix, Disney+, and More
For many users, the primary reason for searching "record streaming videos" is to capture content from popular streaming services like Netflix, Disney+, and Hulu. Unlike livestreams, these platforms use DRM protection, which can prevent traditional recording methods. Here, we'll show practical ways to record screen over streaming apps while preserving quality legally.
🔊Note: Based on user discussions on Reddit (r/obs, r/videoessay, etc.) and Quora, here are the most effective and still working in 2025 methods to legally record streaming videos for personal use.
Way 1. Turn off Hardware Acceleration in Your Browser
One of the main reasons users see a black screen when recording streaming videos, especially from Netflix, Disney+, Hulu, or Amazon Prime Video, is due to browser hardware acceleration. This setting allows Chrome or Edge to use your GPU for decoding protected videos, but it also blocks screen recorders like OBS from capturing the playback properly.
Based on my own testing in 2025 using Chrome (version 141) on Windows 11 with OBS Studio, the fix still works. You just need to disable hardware acceleration and restart the browser. Note that the menu path has slightly changed from older Chrome versions, so follow these updated steps carefully.
Here is how to make it:
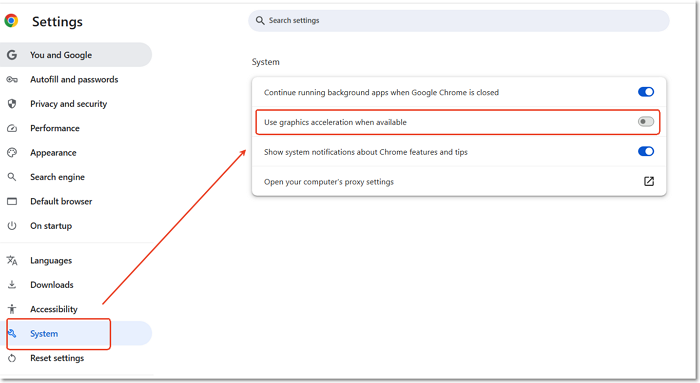
Step 1. Open Chrome and click the three-dot (⋮) in the top-right corner, and follow the steps below to disable hardware acceleration. Then restart your Chrome.
- System > Use graphics acceleration when available.
Step 2. Reopen the streaming site (Netflix, Disney+, Hulu, etc.), and launch OBS Studio.
Step 3. Click + > Display Capture or Window Capture in the Sources panel, select the screen where the streaming video will play, and click OK.
Once done, click Start Recording and play your video in Chrome.
Why it works:
Turning off hardware acceleration forces your browser to render video through software instead of GPU decoding, allowing recorders to capture the image correctly.
Way 2. Use a Third-Party Streaming Video Recorder (Tested Experience)
After trying the "disable hardware acceleration" method in Chrome, I found it generally works, but occasional black screens or stuttering still occur, especially after browser updates change the settings path. To find a more stable and hassle-free solution, I tested several desktop screen recorders, and EaseUS RecExperts delivered the most consistent results.
The software captures video directly from your desktop, including browser playback of Netflix, Disney+, or Prime Video, without requiring you to tweak any browser or system settings. In my own tests, video playback remained smooth, the recording was clear, and audio stayed perfectly synchronized.
Additional benefits I noticed during testing:
- ✅Take screenshots during recording: Capture key frames or highlights on the fly without stopping the recording.
- ✅Smooth recording in the background: Even if you switch tabs or open other apps, the video stays fluid and your computer doesn't slow down.
- ✅High-quality output up to 4K: The recording remains sharp, preserving details even for DRM-protected content.
- ✅Scheduled or automatic recording: Set it once and forget it, perfect for long movies, shows, or streams you can't watch live.
This method is especially useful for users who just want a reliable, no-hassle way to record browser-based streaming videos without losing quality or spending time on technical settings.
Step 1. Launch EaseUS RecExperts and select Full Screen as your recording mode. This ensures smooth capture of streaming movies, online shows, or live video content without missing any detail.

Step 2. Choose whether to record the Webcam, System Sound, or Microphone based on your needs. Then, open the major video sites or platforms you want to record from.

Step 3. If you experience a black screen when recording playback, enable the Black Screen Fix feature to ensure smooth video capture. Once it's turned on, the REC button will change to purple. Navigate back to your streaming video, then click the purple REC button to start capturing.

Step 4. After a 3-second countdown, the recording will begin. A floating taskbar will appear on your screen. Use the toolbar to Pause or Stop the recording anytime during playback.
Step 5. Once the recording ends, you'll be taken to the preview window. Here, you can watch, trim, or edit your captured video, ideal for reviewing recorded sessions, saving study notes, or creating commentary-based content.
Capture Videos from Livestream Shows
Based on real discussions on forums like Reddit, users often share their experiences and recommendations for recording live streams. For example, one user on r/streaming highlighted the need for a lightweight screen recorder that doesn't overload the CPU, can capture both system and microphone audio, and has minimal setup.
Here are a few tools that users frequently recommend for recording live streams:
- OBS Studio: Widely praised by forum users for real-time livestream capture, especially for watching and recording simultaneously
- Streamlabs: Designed specifically for live streaming with a quick setup. Recommended by Twitch and streaming communities for capturing broadcasts smoothly
- Xbox Game Bar: Almost used by normal users who want a quick, no-install solution without advanced features
With the most commonly mentioned tools and scenarios in mind, here are some practical tips to help you choose the right streaming video recorder for your specific setup:
- System performance: Pick a tool that doesn't heavily tax your CPU or GPU, ensuring smooth playback and recording.
- Multi-Track support: Make sure the recorder can capture both system audio and microphone separately if needed, and save them as individual tracks for easier editing.
- Ease of use: Choose a tool with a simple interface and minimal setup to reduce the learning curve.
- Recording time limit: Avoid tools that restrict recording duration, so you can capture the entire livestream without interruptions.
Recording Streaming Videos Safely: What I Learned from Testing
While testing different tools for recording streaming videos, I also paid attention to what's safe and legal. From my experience and reading multiple forum discussions, here are a few things I always keep in mind:
1️⃣Keep it personal: I record videos mainly for offline viewing or for study/tutorial purposes. Sharing or uploading them online can get you into trouble.
2️⃣Respect platform rules: Some services like Netflix or Disney+ clearly state that recording is against their terms. I make sure to use recordings only for myself.
3️⃣Use tools responsibly: Desktop recorders like EaseUS RecExperts make recording easy and high-quality, but it's still up to you to stay within legal boundaries.
Following these simple practices allows you to safely enjoy capturing streaming videos for personal use, without running into copyright issues.
Conclusion: Practical Takeaways from My Testing
After going through dozens of forum discussions and testing multiple tools myself, it’s clear that recording streaming videos falls into two main scenarios: live streams and DRM-protected content.
For live streams, I found that tools like OBS Studio, Streamlabs, or Xbox Game Bar work well depending on whether you want to watch while recording, your system performance, and how much control you need over audio and video.
For DRM-protected videos, desktop recorders like EaseUS RecExperts proved to be the most reliable in my tests. It handles browser playback smoothly, supports separate audio tracks, allows screenshots during recording, and even lets you schedule long recordings, all without the black screens or sync issues that can happen with simpler setups.
The key takeaway from my testing is this: choose the right tool for your scenario, test your setup in advance, and always keep recordings for personal use. With the right approach, recording streaming videos, whether a live broadcast or a protected movie, can be simple, smooth, and high-quality.
FAQs About How to Record Streaming Video
There are some related questions. If you want to learn more about it, go on reading!
1. How can I record streaming videos for free?
To capture live streaming or other streaming content for free, you can use a free online tool like EaseUS Online Screen Recorder. This web-based streaming recorder is 100% free and safe.
2. Can I record streaming video on my computer?
Yes, you can record it on your computer with the screen recording software like EaseUS RecExperts. This tool works on Windows and Mac. You can deal with the screen, system sound, and an external voice like a microphone.
3. Can you record a streaming show?
Yes, you can do it on Windows PC, Mac, iPhone, or iPad with the streaming video capturing software.
4. Which tool is best for multi-device support?
EaseUS RecExperts is available for both Windows and Mac, and it excels at capturing internal audio, delivering high-quality video, and effectively handling DRM content.
5. How to screen record Netflix without black screen on phone?
The quick way to screen record Netflix on iPhone and Android without black screen is to use an external device. Netflix app's technology to prevent screen recording and screenshots is more stringent than the web version. Thus, using another device to capture Netflix footage is the most direct way.