-
![]()
Daisy
Daisy is the Senior editor of the writing team for EaseUS. She has been working in EaseUS for over ten years, starting from a technical writer to a team leader of the content group. As a professional author for over 10 years, she writes a lot to help people overcome their tech troubles.…Read full bio -
Jane is an experienced editor for EaseUS focused on tech blog writing. Familiar with all kinds of video editing and screen recording software on the market, she specializes in composing posts about recording and editing videos. All the topics she chooses …Read full bio
-
![]()
Alin
Alin is an experienced technical blog writing editor. She knows the information about screen recording software on the market, and is also familiar with data cloning and data backup software. She is expert in writing posts about these products, aiming at providing users with effective solutions.…Read full bio -
Jean is recognized as one of the most professional writers in EaseUS. She has kept improving her writing skills over the past 10 years and helped millions of her readers solve their tech problems on PC, Mac, and iOS devices.…Read full bio
-
![]()
Jerry
Jerry is a fan of science and technology, aiming to make readers' tech life easy and enjoyable. He loves exploring new technologies and writing technical how-to tips. All the topics he chooses aim to offer users more instructive information.…Read full bio -
![]()
Rel
Rel has always maintained a strong curiosity about the computer field and is committed to the research of the most efficient and practical computer problem solutions.…Read full bio -
![]()
Gemma
Gemma is member of EaseUS team and has been committed to creating valuable content in fields about file recovery, partition management, and data backup etc. for many years. She loves to help users solve various types of computer related issues.…Read full bio -
![]()
Shelly
"I hope my articles can help solve your technical problems. If you are interested in other articles, you can check the articles at the bottom of this page. Similarly, you can also check my Twitter to get additional help."…Read full bio
Page Table of Contents
Jane Zhou
Updated on Jul 20, 2026
0 Views |
0 min read
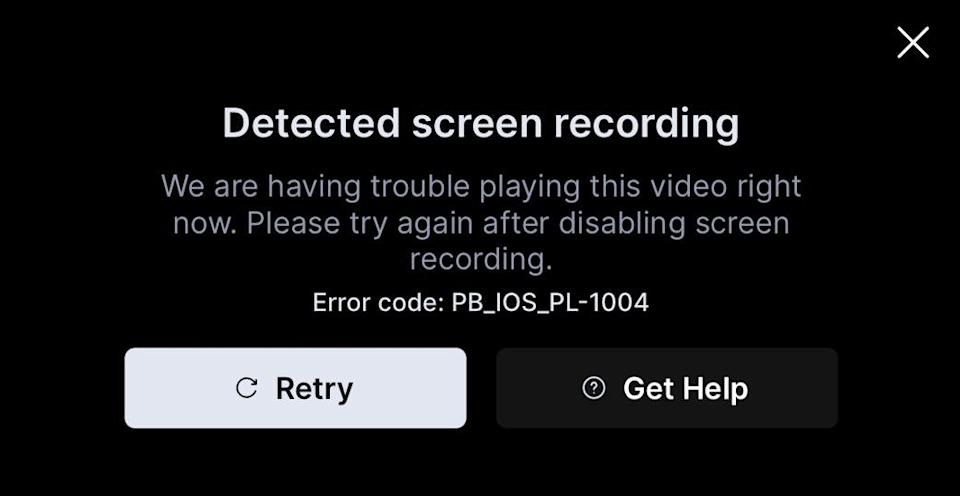
Trying to screen record a protected video but getting a black screen instead? The problem is usually caused by DRM protection, hardware acceleration, GPU overlays, or recording restrictions built into the browser or streaming app.
The good news is that a black screen is not always unavoidable. The method that works best depends largely on your device and how much setup you are willing to do.
|
Your device |
Recommended approach |
Why |
|
Windows PC |
A simpler dedicated recorder with a Black Screen Fix mode designed to address common protected-playback capture issues |
|
|
Mac |
A flexible, free option that gives advanced users more control over capture sources and recording settings |
|
|
iPhone or Android |
Mobile DRM restrictions are generally more difficult to record directly |
|
|
Chromebook |
Hardware acceleration settings may affect whether the captured video appears black |
- Warning
- All recordings of DRM-protected content are strictly for personal use and not for commercial gain. Always comply with applicable laws and respect copyright.
Why Keep Getting a Black Screen When Recording DRM-Protected Videos
You will encounter a black screen when recording on Neflix, Disney+, Amazon Prime Video, and more streaming platforms. This is because these streaming services or restricted apps use DRM protection to prevent unauthorized recording and copying. As a result, many screen recorders cannot properly capture protected playback, leading to black screens or audio-only recordings.
Common reasons include:
- DRM-encrypted video playback
- GPU overlay and hardware acceleration conflicts
- HDCP output protection restrictions
- Browser or app-level recording blocks
- Unsupported screen recording tools or settings
Can You Screen Record Protected Videos Without Black Screen?
Yes, but it depends on the platform, device, and recording method you use.
Most built-in recorders and free tools struggle with DRM-protected playback, especially on streaming services like Netflix and Hulu. However, some dedicated streaming video recorders, browser adjustments, or screen mirroring methods may reduce black screen issues in certain scenarios.
The recording quality and stability can vary, so choosing the right method is important for achieving smoother playback and clearer video capture.
In the following sections, you can read step-by-step guides on how to screen record protected videos without a black screen on Windows, Mac, iPhone, Android, and even Chromebooks.
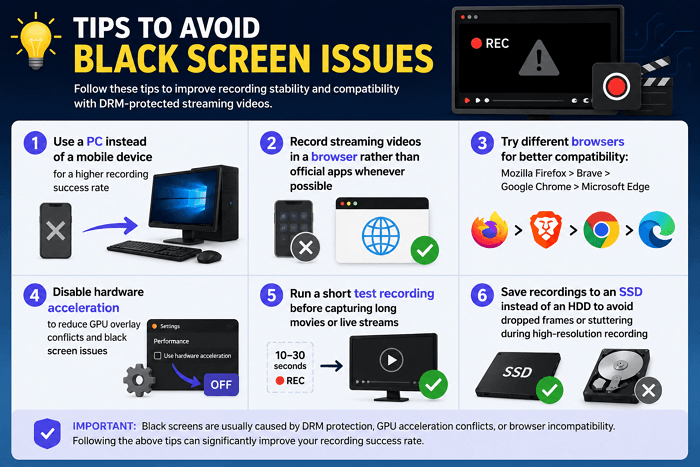
Before getting started, learn these tips to improve recording stability and compatibility with DRM-protected videos:
- Use a PC instead of a mobile device for a higher recording success rate
- Record streaming videos in a browser rather than official apps whenever possible
- Try different browsers for better compatibility: Mozilla Firefox > Brave > Google Chrome > Microsoft Edge
- Disable hardware acceleration to reduce GPU overlay conflicts and black screen issues
- Run a short test recording before capturing long movies or live streams
- Save recordings to an SSD instead of an HDD to avoid dropped frames or stuttering during high-resolution recording
Share this post with your friends and fans now!

How to Record Protected Videos Without Black Screen on PC
For PC users, using a dedicated screen recorder is usually the most reliable way to reduce black screen issues when recording DRM-protected videos. Compared with browser tweaks, screen mirroring, or basic recording tools, specialized software tends to provide more stable playback capture and better video quality.
EaseUS RecExperts is designed for recording streaming playback on Windows PCs. Its Black Screen Fix feature helps address common recording issues caused by hardware acceleration or protected video rendering, so you can start recording without having to adjust complex browser settings. It also supports full-screen recording, system audio capture, scheduled recording, and high-resolution export for movies, online courses, and live streams.
Steps to record protected videos without black screen:
Step 1. Launch EaseUS RecExperts and Select Full Screen Mode
Open EaseUS RecExperts on your Windows computer. Choose Full Screen mode to stream videos from platforms like Netflix, Disney+, or Amazon Prime Video in full screen without cropping the video area.

Step 2. Configure Audio Recording Settings
Enable System Sound to record the original streaming audio. If you want to create reaction videos, tutorials, or commentary content, you can also turn on the Microphone or Webcam. This helps capture both internal audio and voice narration during screen recording.

Step 3. Enable Black Screen Fix Before Recording
Turn on the Black Screen Fix feature before playing DRM-protected content. This mode is designed to reduce common black screen issues caused by hardware acceleration, GPU overlay protection, or encrypted video playback. Once enabled, the REC button will change color to indicate the mode is active.

Step 4. Play the Protected Video and Start Recording
Open the streaming website or app and play the video you want to capture. Then click the REC button to start recording protected videos without black screen interruptions. During recording, you can pause or stop the session at any time from the floating control bar.
![]()
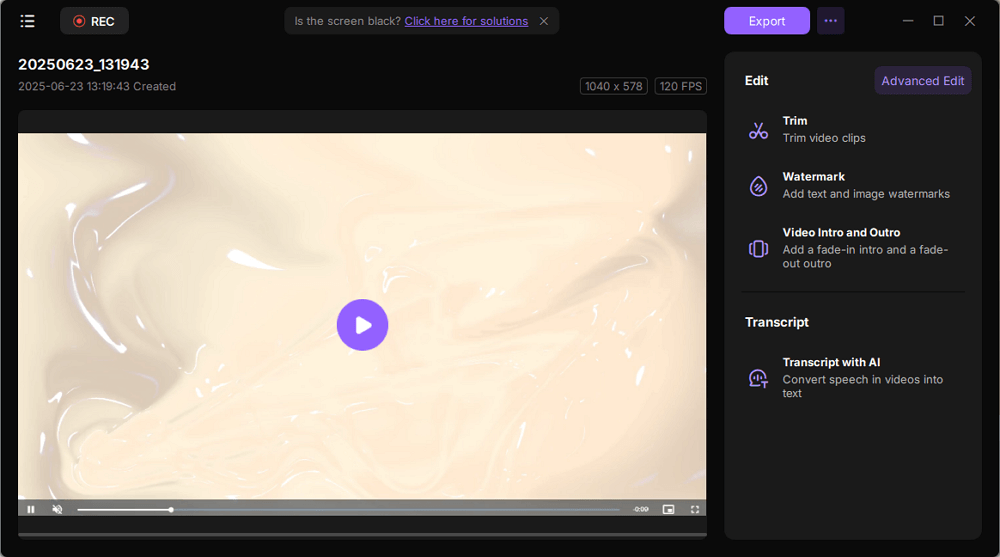
Step 5. Preview, Trim, and Export the Recording
After recording, the video will automatically open in the preview window. You can watch, trim, rename, or export the recording in different formats and resolutions. This is useful for saving movies, online classes, webinars, or live streams for personal offline viewing.
Share this post with your friends and fans now!
How to Screen Record Protected Videos on Mac
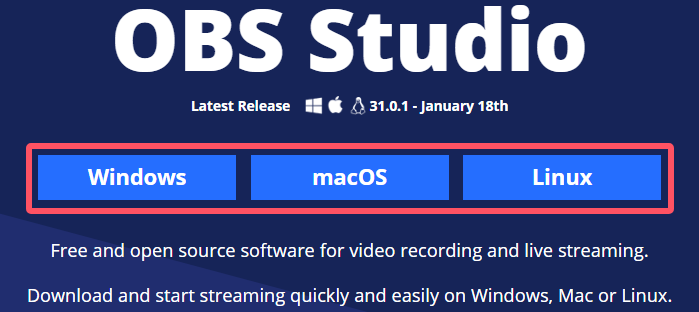
For Mac users, one of the most discussed workarounds is to use OBS Studio with Google Chrome after disabling hardware acceleration. Many users on Reddit report that this method helps reduce black screen issues when recording streaming videos, and our editor was also able to record protected playback successfully during testing.
This works because disabling hardware acceleration prevents Chrome from rendering protected videos via GPU overlay layers, allowing OBS to capture the browser window more reliably.
Steps to Record Protected Videos on Mac with OBS:
Step 1. Install OBS Studio on Your Mac
Download and install OBS Studio on macOS. Recent OBS versions also support recording internal system audio on Mac, so you can capture both video and streaming sound without additional plugins in many cases.
Step 2. Disable Hardware Acceleration in Chrome
Open Chrome and go to: Settings > System > Use graphics acceleration when available. Turn this option off, then relaunch the browser.
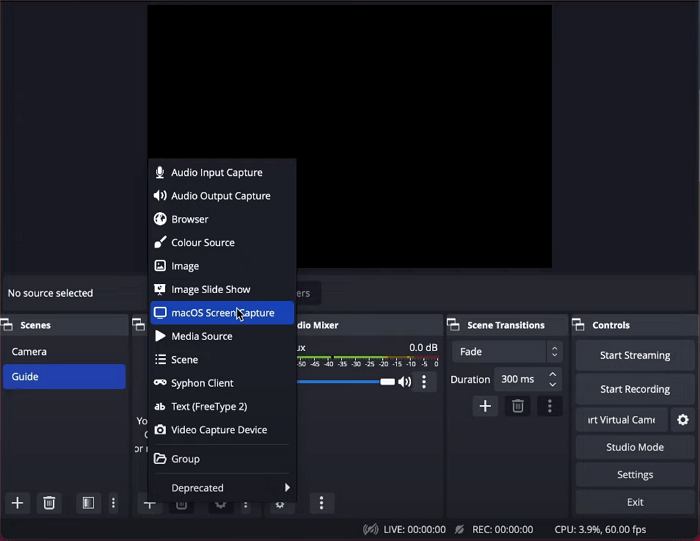
Step 3. Add a Screen Capture Source in OBS
Open OBS and create a new scene. Click the + icon under Sources and select macOS Screen Capture. Then choose your Chrome window playing the protected video.
Step 4. Start Playing the Streaming Video
Open platforms like Netflix or Disney+ in Chrome and start playback in windowed or full-screen mode.
Step 5. Start Recording in OBS
Click Start Recording in OBS. If the setup works correctly, OBS should capture the streaming video without showing a black screen.
Share this post with your friends and fans now!
How to Screen Record DRM Protected Videos on iPhone and Android
How to screen record without black screen on mobile devices? We all know that there is a built-in screen recorder on your iPhone or Android devices, but it still cannot record a protected video without a black screen. As far as we know, no iOS or Android screen recorder can bypass the DRM protection for recording. So, in the following, we will show you other ways to save the encrypted video on your mobile phones.
#1. Screen Record Protected Videos on Android/iOS via Rave App
Rave app, a third-party streaming video player, can assist you in screen recording blocked content on iPhone and Android devices. This software supports playing streaming videos from different platforms such as Vimeo, Prime Video, YouTube, MAX, etc. It can help you avoid black screen restrictions by playing the desired platform videos on it, effectively turning your phone's built-in recording tool into a DRM screen recorder.
This method has become my primary way to record movie and show clips on iPhone, with excellent reliability and consistent performance. You can directly search for the video name you want to clip or log in to your streaming account.
Steps on how to screen record restricted apps on iPhone and Android:
Step 1. Download and open the Rave app on iOS or Android.
Step 2. Click the plus button at the bottom right corner of the screen. Then, select the restricted content app and sign in to the account.
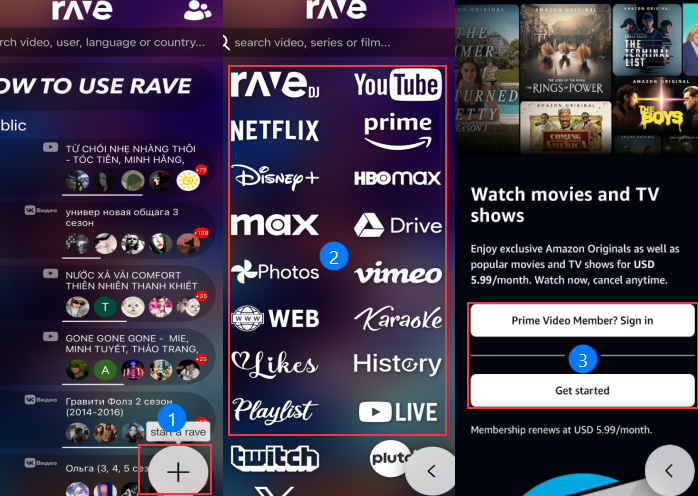
Step 3. Enable the screen recording feature on your mobile device and play the encrypted video you want to record. Press the Start Recording button to record.
Step 4. Once done, go to your phone's album and view the recorded video.
#2. Use Zoom Screen-Sharing Function
- Tip
- Note that this approach has its limitations. Certain content will trigger a restriction during screen sharing, displaying an error such as "Screen sharing is not allowed for this content."
For those who want to screen record protected video without a black screen on mobile devices, the Zoom app is a great choice.
The screen-sharing feature in Zoom allows you to share your cell phone screens with another device. So, you can record your desired protected videos without a black screen on your mirror device, which is an easy way to bypass screen record block restrictions. But please note that This method will compress the video quality. If you want high-definition recording, use EaseUS screen recorder for protected videos capturing.
Here's how to the steps you can follow to record protected or restricted apps:
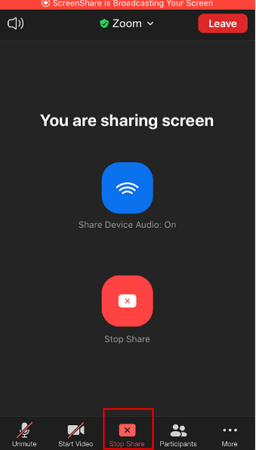
Step 1. Download, install, and open the Zoom application on your iPhone or Android device, then play the video you want to record.
Step 2. Tap New Meeting > Share Screen in Zoom to share your whole screen.
Step 3. Next, open a screen recorder on another device to start recording the protected videos.
Step 4. Once done, you can find the recorded videos that are without any black images.
#3. Mirror Your Mobile Phone Screen to PC/Mac
Another way is to mirror your iPhone or Android screen to a computer. Once done, you can use EaseUS RecExperts or other screen and audio recorders to capture the blocked content. In this way, you can record DRM videos without a black screen.
#4. Use External Recording Devices
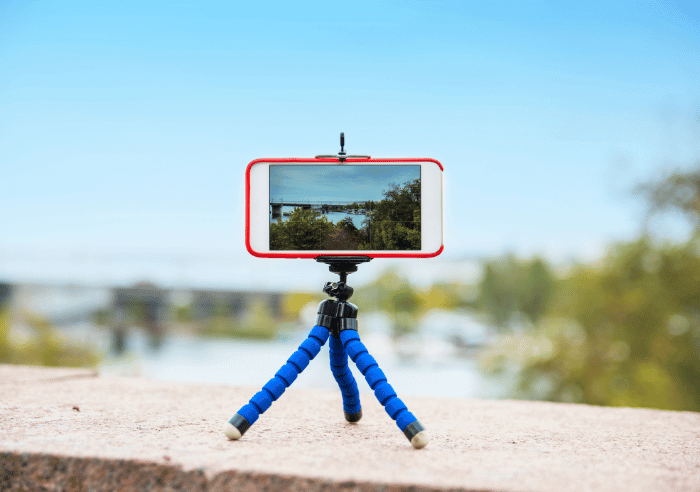
The last way is to use an extra camera or phone to screen record apps that don't allow it. Compared to the methods above, it is easier in terms of the operation. However, many other factors might affect the recording quality, like lightness, noise, etc. So, if you adopt this method, ensure you are in a quiet place and have a good background.
Step 1. Prepare an extra phone or other video recorder device, then get a tripod and put your extra phone that you will use in recording there.
Step 2. Play the protected video you want to record, then start recording on another device.
Share this post with your friends and fans now!
How to Screen Record Protected Content on Chromebook
Can't record protected content Chromebook? In fact, screen recording protected content on a Chromebook can be a challenge. You'll frequently see a "Can't capture content" error notification when attempting to record from apps like Hulu, Netflix, or Disney+. However, you can record these streaming services via their web pages on a Chromebook. Just disable the hardware acceleration feature first.
Here is the guide on how to screen record protected content on Chromebook:
Step 1. Turn off hardware acceleration in browser settings to avoid black screen issues when screen recording.
- For Chrome: Navigate Settings > System and disable Use graphics acceleration when available.
- For Firefox: Go to Settings > General > Performance, toggle off Use Recommended Performance and Use hardware acceleration.
- For Edge: Open Settings > System and Performance and disable Use hardware acceleration.
Step 2. Open a browser like Chrome and log in to Netflix, Disney+, or other streaming platforms from which you want to capture.
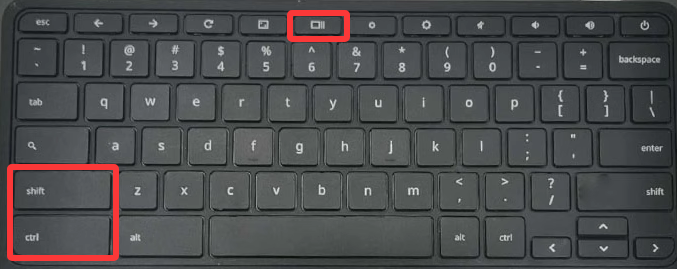
Step 3. Click the Quick Settings menu at the bottom right corner of the screen and click the Screen Capture option. Or use the shortcut Ctrl + Shift + Show Windows to open the capture tool.
Step 4. Then click the Screen Record icon and select the recording area, such as partial or window recording.
Step 5. Then, start recording by clicking the Record button.
Is It Legal to Record DRM-Protected Videos?
Recording DRM-protected videos may involve copyright restrictions depending on your country and how the content is used. In general, recording videos for personal offline viewing is treated differently from redistributing, uploading, or using copyrighted content commercially.
Streaming platforms like Netflix and Disney+ also prohibit unauthorized copying in their terms of service. Always follow local laws and use recordings responsibly for personal use only.
Final Words
Recording DRM-protected videos without a black screen is no longer as simple as using a built-in screen recorder. Modern streaming platforms use multiple layers of playback protection, which means the recording result often depends on your device, browser, and recording method. In most cases, PC-based solutions provide better compatibility and more stable performance than mobile recording methods.
If you want smoother playback capture with fewer setup issues, using a dedicated screen recorder like EaseUS RecExperts is usually the most practical option for Windows and Mac users. When combined with the right browser settings and recording workflow, it can significantly reduce black screen issues and improve recording quality for streaming videos, online classes, webinars, and other protected content.
Screen Record Protected Videos Without Black Screen FAQs
1. How do I get rid of the black screen when screen recording?
- If there is something wrong with your device or applications, you can update the screen recorder, restart your devices, clear the cache, etc.
- But if you screen record videos with a black screen, you should opt for an excellent screen recorder, like EaseUS RecExperts.
2. Why is my recorded video black?
The recorded video may appear black for various reasons, such as incorrect screen recording settings, compatibility issues, or software/hardware problems.
3. Why can't I record protected content?
Protected content cannot be recorded due to copyright restrictions and content protection measures implemented by the providers. They employ technologies that prevent unauthorized copying or recording of their content.