-
![]()
Daisy
Daisy is the Senior editor of the writing team for EaseUS. She has been working in EaseUS for over ten years, starting from a technical writer to a team leader of the content group. As a professional author for over 10 years, she writes a lot to help people overcome their tech troubles.…Read full bio -
Jane is an experienced editor for EaseUS focused on tech blog writing. Familiar with all kinds of video editing and screen recording software on the market, she specializes in composing posts about recording and editing videos. All the topics she chooses …Read full bio
-
![]()
Alin
Alin is an experienced technical blog writing editor. She knows the information about screen recording software on the market, and is also familiar with data cloning and data backup software. She is expert in writing posts about these products, aiming at providing users with effective solutions.…Read full bio -
Jean is recognized as one of the most professional writers in EaseUS. She has kept improving her writing skills over the past 10 years and helped millions of her readers solve their tech problems on PC, Mac, and iOS devices.…Read full bio
-
![]()
Jerry
Jerry is a fan of science and technology, aiming to make readers' tech life easy and enjoyable. He loves exploring new technologies and writing technical how-to tips. All the topics he chooses aim to offer users more instructive information.…Read full bio -
![]()
Rel
Rel has always maintained a strong curiosity about the computer field and is committed to the research of the most efficient and practical computer problem solutions.…Read full bio -
![]()
Gemma
Gemma is member of EaseUS team and has been committed to creating valuable content in fields about file recovery, partition management, and data backup etc. for many years. She loves to help users solve various types of computer related issues.…Read full bio -
![]()
Shelly
"I hope my articles can help solve your technical problems. If you are interested in other articles, you can check the articles at the bottom of this page. Similarly, you can also check my Twitter to get additional help."…Read full bio
Page Table of Contents
Alin
Updated on Jun 09, 2026
0 Views |
0 min read
Record Audio on Windows 11: Quick Answer
- ✨Built-in Sound Recorder makes it easy to record the microphone voice on Windows 11. However, it doesn't support internal audio recording.
- ✨EaseUS RecExperts offers the most comprehensive solution with easy setup, high-quality output, and screen recording support. It is ideal for all user levels.
- ✨Audacity is best for users who only need internal audio and want free, advanced editing capabilities.
- ✨Xbox Game Bar is convenient for quick, casual recordings but lacks only-audio output and editing features.
Recording internal audio on Windows 11 can be tricky, especially when the built-in tools don't allow you to capture system sounds directly. In this guide, we'll walk you through the steps to easily record system sound Windows 11, ensuring clear, high-quality audio with no hassle. Let's explore how you can get started with the best tools for internal audio recording.
How to Record Internal Audio on Windows 11 Perfectly
Best for: Users who need a simple yet powerful tool for high-quality audio recording
When it comes to effortlessly recording computer sound in Windows 11, EaseUS RecExperts comes to mind first. This Windows screen recorder supports both system audio and microphone input, allowing for simultaneous recording of both sources. You can adjust the volume levels for each audio source, ensuring balanced recordings. Additionally, it offers scheduled recordings and auto-stop features, making unattended audio capture convenient. All of these features make it ideal for recording music, game audio, online meetings, etc.
Most importantly, it's easy to set up and is friendly to all levels of users. But, some features are only available in the full version.
How to Record Computer Audio on Windows 11 PC:
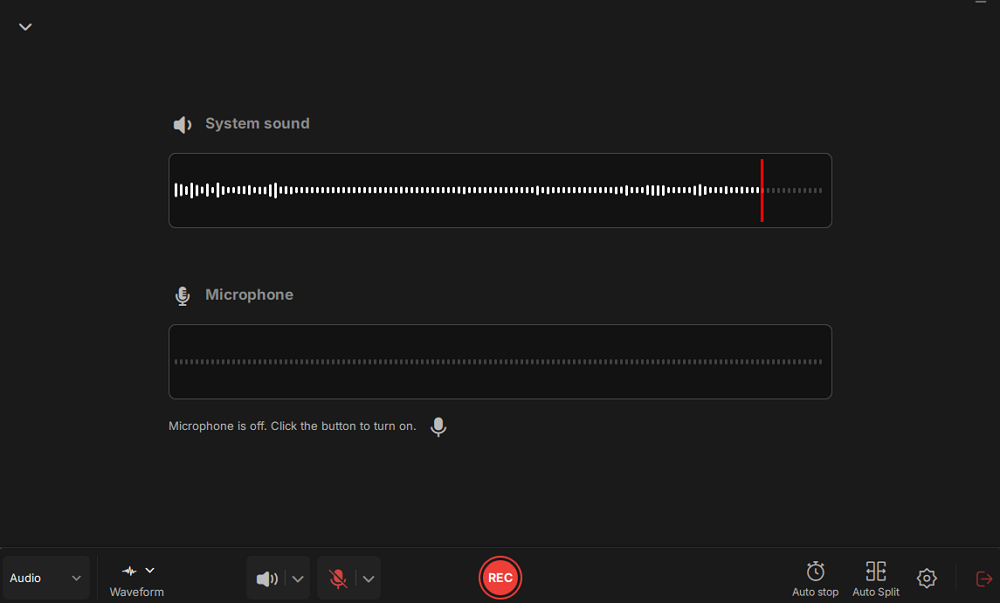
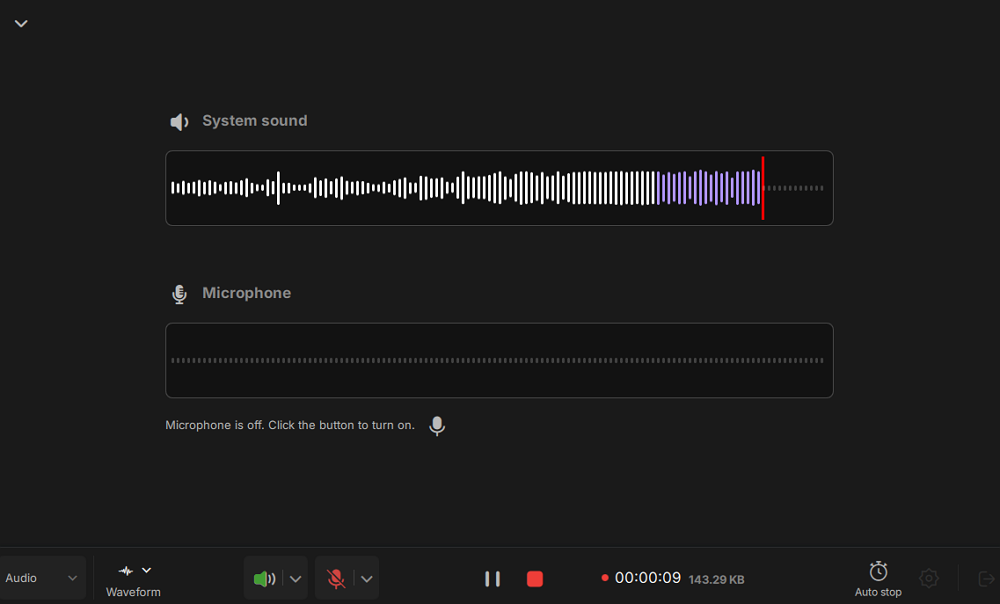
Step 1. Install and open EaseUS RecExperts on your computer, and click the Audio icon (which looks like a speaker) on the main interface.

Step 2. Click the Speaker icon to turn it on to record the internal audio. You need to turn off the microphone if you don't want to capture audio from the microphone.
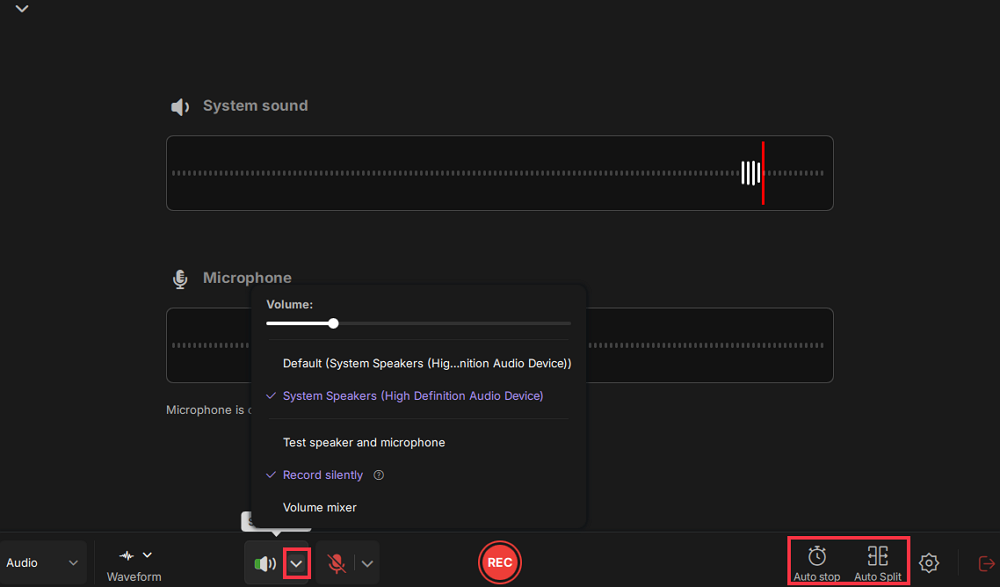
Step 3. Click the dropdown button next to Speaker to adjust the system volume and select the appropriate system speaker. You can also check the Record silently option, which allows you to record system sounds even when your computer is muted. If you need to adjust the volume further, click the Volume mixer option.
Next, click on the REC button to begin your recording.
Step 4. While recording, you can pause or stop the recording by clicking on the appropriate buttons.
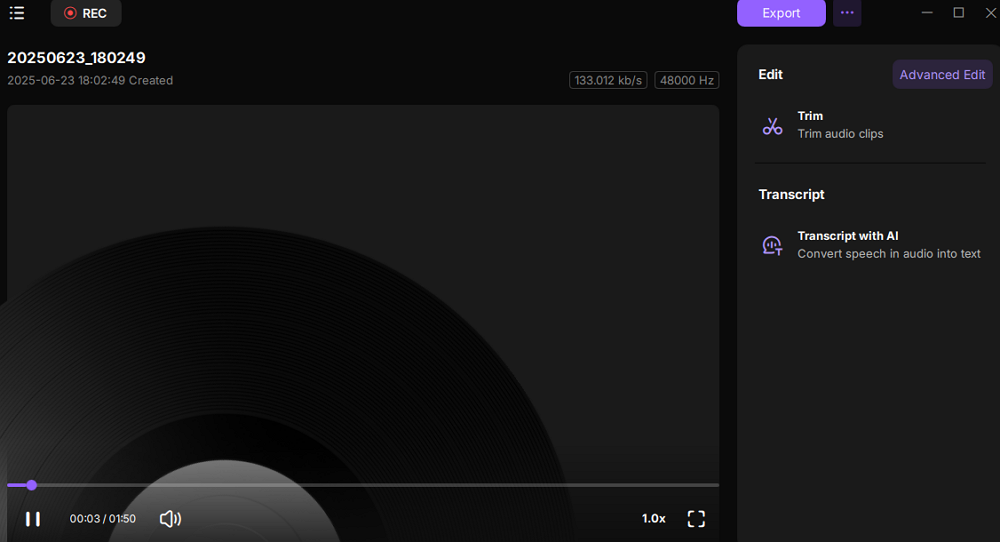
Step 6. Once you have completed the recording, you can click on the audio recording file that appears in the Recent recordings section. You can then listen to the audio using the built-in player. Additionally, you have the option to trim the audio or transcribe it into text.
Is this method helpful? If so, share it on Facebook or other sites with one simple click below!
How to Record System Audio in Windows 11 Audacity Free
Best for: Users focused on audio-only recording with editing needs
Audacity is a popular free, open-source internal audio recording software that offers a reliable solution for recording system audio directly on Windows 11. The WASAPI loopback feature allows users to capture high-quality system sounds, including game audio or any streaming content, without additional software.
Besides its recording capabilities, this open source audio recorder provides powerful editing tools, including multi-track support, noise reduction, and various effects, making it a go-to choice for users who want to edit their recordings. While its interface may not be the most beginner-friendly, Audacity delivers exceptional quality once properly configured.
Here are the steps for recording computer audio in Windows 11:
Step 1. Download and install Audacity from the official website.
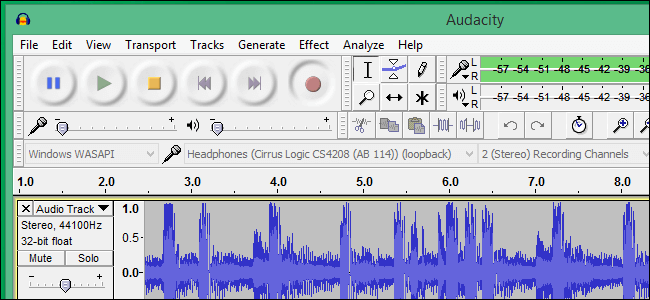
Step 2. Open Audacity and select Windows WASAPI as the host in the Device Toolbar.
Step 3. Choose the correct recording device, such as "Speakers (loopback)" or "Stereo Mix" to capture internal audio.
Step 4. Press the Record button to start recording, then play the content you want to capture.
Step 5. Once you're done recording, click the Stop button.
Step 6. Edit and trim the audio as needed, then save your recording by selecting File > Export.
How to Record Sounds on PC Windows 11 with Built-in Tool
Windows 11's built-in Sound Recorder is a fast and free option for recording a microphone voice. It's ideal for quick voice notes, simple narration, casual singing, or idea capture, without installing any third-party software. By default, Sound Recorder saves recordings in AAC format at about 1 MB per minute. For content that requires post-production, such as podcasts, vocal editing, or instrument sampling, this Windows voice recorder also supports FLAC and WAV output. Both are lossless formats recorded at 16-bit / 44.1 kHz, which preserves more audio detail for editing.
However, these formats generate much larger files, close to 10 MB per minute. If Sound Recorder shows "No input device", it usually means the microphone is not properly connected or microphone access is disabled in Windows 11 privacy settings.
How to Record Sound on Windows 11 with Sound Recorder (Step-by-Step):
Step 1. Press Windows + S, search for Sound Recorder, and open it.
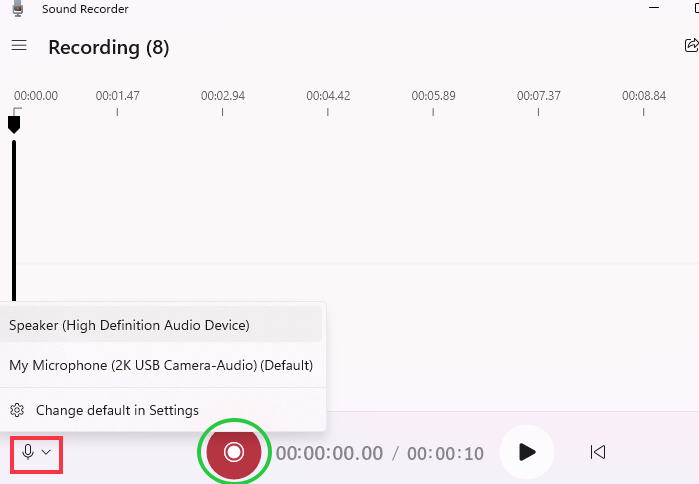
Step 2. Choose your microphone. If you see No input device:
Go to Settings > Privacy & security > Microphone and enable Microphone access and Let apps access your microphone.
Step 3. Hit the red REC button or press Ctrl+R to start recording your speech or singing.
Step 4. Click Stop to finish and save the recording automatically.
Is this method helpful? If so, share it on Facebook or other sites with one simple click below!
How to Record Audio on Windows 11 with Game Bar
Best for: Gamers and casual users needing quick screen with audio recordings.
The Xbox Game Bar is a built-in screen recording tool in Windows 11 that also supports capturing screen with internal audio. With just a shortcut (Win + G), users can access the overlay and start recording right away. It captures internal audio clearly, making it useful for tutorials, walkthroughs, and video calls. However, it lacks advanced audio editing features and doesn't support audio-only output, which may not suit professional creators.
How to Record Internal Audio on Windows 11 with Game Bar:
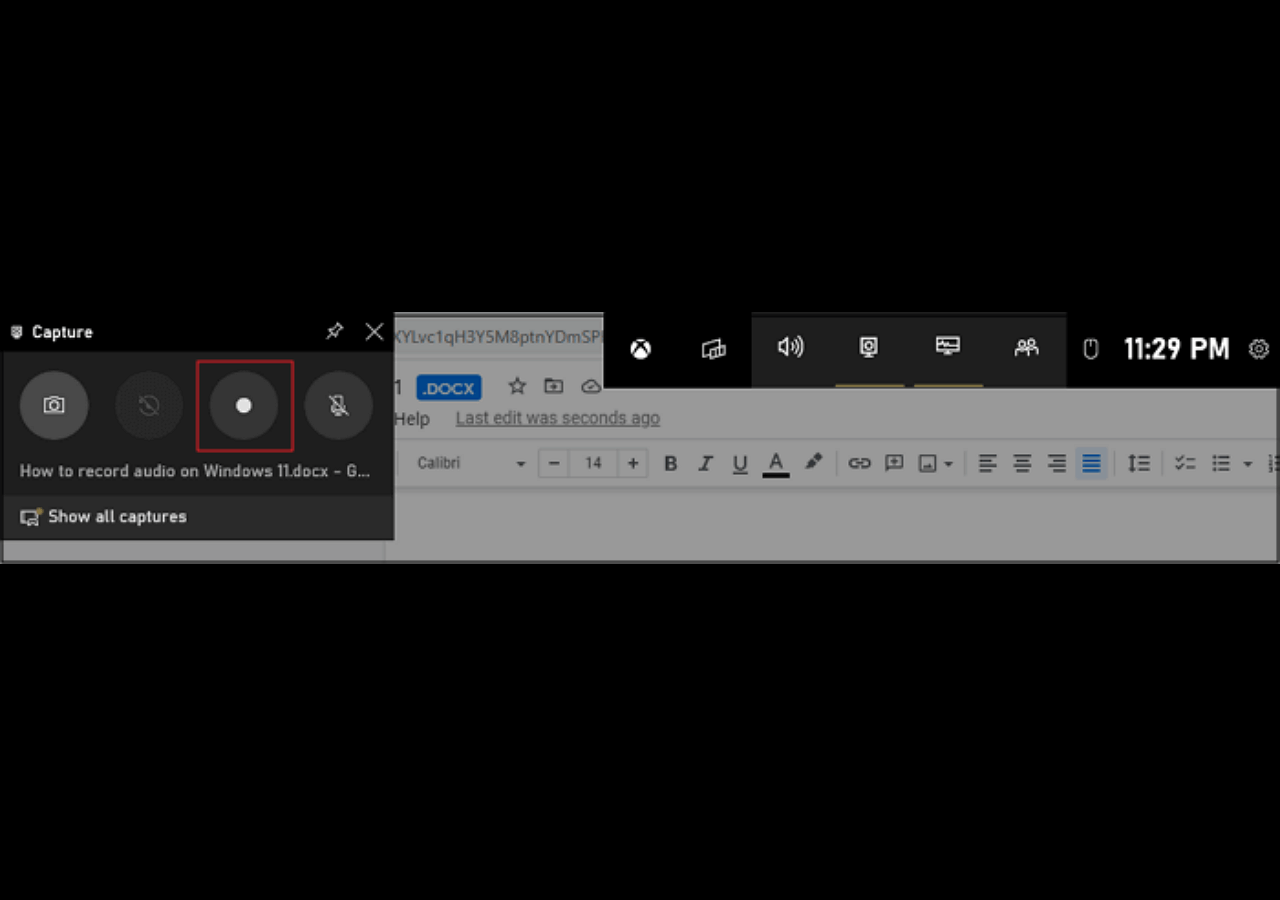
Step 1. To enable Game Bar, press Windows + G. Click "Capture" from the game bar preset. In the Capture window, click the Settings (gear icon) and make sure your system audio is enabled under "Capturing."

Step 2. Adjust your volume levels for system sound and microphone if needed.
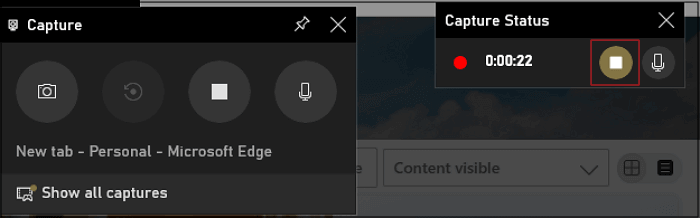
Step 3. Click the "Start Recording" icon in the "Capture" pane. Or press Windows + Alt + R to start/stop recording. The Xbox Game Bar will be minimized, and a "Capture Status" will show on the right edge of your PC screen.
Step 4. Click the "Recording" button or press Windows + Alt + R to stop recording.
Conclusion
This page shows you 4 ways to record computer audio in Windows 11. Among those methods, we highly recommend EaseUS RecExperts because of its recording features and high-quality output. Just hit the button below to get this tool now!
How to Record Internal Audio on Windows 11 FAQs
Check the frequently asked questions related to this topic below.
1. Does Windows 11 have a built-in voice recorder?
Yes, Windows 11 has a built-in voice recording tool called Voice Recorder. This simple application allows you to record audio using your computer's microphone easily. It's useful for tasks like recording notes, lectures, or voice memos. However, it does not support audio recording systems.
2. How do I record my screen with internal audio Windows 11?
You can record your Windows 11 screen with internal audio with the Xbox Game Bar or Snipping Tool:
Xbox Game Bar:
- Press Win + G to open the Xbox Game Bar.
- Ensure the System Audio is enabled in the Capture widget.
- Click the Record button to begin recording.
- Press Stop when you're finished. Your recordings will be saved in the Captures folder.
Snipping Tool:
- Open Snipping Tool, click Record > New recording
- Select the area of the screen you wish to record, then select Start
3. How do I record on Windows 11 without the Game Bar?
You can record on Windows 11 with other third-party software, like EaseUS RecExperts, OBS Studio, etc.
4. How to record audio on Windows 11 with mic and speakers at the same time?
Using EaseUS RecExeprts is one of the easiest ways to record audio on Windows 11 with mic and speakers simultaneously. This computer audio recorder supports one-click configuration of system audio and microphone voice. Here are the steps:
Step 1. Enable EaseUS RecExeprts and choose the Audio recording mode.
Step 2. Enable system and microphone options and click the REC button to begin audio recording.
5. What is the best audio recording software for Windows 11?
Windows 11 comes with Sound Recorder. Simply switch the format to WAV for lossless, instant recording. For something more professional, RecExperts allows you to capture both system and microphone recordings simultaneously with a single click, and also offers timed recording and internal editing. Audacity is free and open-source, and WASAPI allows for dual-track recording with noise reduction and compression to produce broadcast-quality output.
6. What audio format should I choose for recording on Windows 11?
For everyday voice notes, meetings, or long recordings, AAC is the best choice because it offers good quality with small file sizes (about 1 MB per minute). If you plan to edit the audio later—such as for podcasts, vocals, or music—choose WAV or FLAC, which are lossless formats but take up much more storage.