-
![]()
Daisy
Daisy is the Senior editor of the writing team for EaseUS. She has been working in EaseUS for over ten years, starting from a technical writer to a team leader of the content group. As a professional author for over 10 years, she writes a lot to help people overcome their tech troubles.…Read full bio -
Jane is an experienced editor for EaseUS focused on tech blog writing. Familiar with all kinds of video editing and screen recording software on the market, she specializes in composing posts about recording and editing videos. All the topics she chooses …Read full bio
-
![]()
Alin
Alin is an experienced technical blog writing editor. She knows the information about screen recording software on the market, and is also familiar with data cloning and data backup software. She is expert in writing posts about these products, aiming at providing users with effective solutions.…Read full bio -
Jean is recognized as one of the most professional writers in EaseUS. She has kept improving her writing skills over the past 10 years and helped millions of her readers solve their tech problems on PC, Mac, and iOS devices.…Read full bio
-
![]()
Jerry
Jerry is a fan of science and technology, aiming to make readers' tech life easy and enjoyable. He loves exploring new technologies and writing technical how-to tips. All the topics he chooses aim to offer users more instructive information.…Read full bio -
![]()
Rel
Rel has always maintained a strong curiosity about the computer field and is committed to the research of the most efficient and practical computer problem solutions.…Read full bio -
![]()
Gemma
Gemma is member of EaseUS team and has been committed to creating valuable content in fields about file recovery, partition management, and data backup etc. for many years. She loves to help users solve various types of computer related issues.…Read full bio -
![]()
Shelly
"I hope my articles can help solve your technical problems. If you are interested in other articles, you can check the articles at the bottom of this page. Similarly, you can also check my Twitter to get additional help."…Read full bio
Page Table of Contents
Jean
Updated on Jun 09, 2026
0 Views |
0 min read
Recording Webex meetings is a great way to save essential discussions, share sessions with absent teammates, or create training content. If you're the host or cohost, you can record meetings in Webex using its built-in feature. However, if you're a participant, you usually can't record, and you may need third-party software in some cases. In this guide, you'll learn how to record Webex meetings as a host, cohost, or participant on Windows, Mac, iOS, and Android, including official methods.
How to Record a Webex Meeting as Host or Cohost
If you are the host or co-host of a Webex meeting, the simplest way to record the webinar is to use the built-in recording feature, just like recording a Zoom meeting. This section will elaborate on the capability in detail.
Webex Recording Prestiquetes
|
Who can record Webex |
Host of the Webex webinar or co-host with granted permission if the host is absent. |
|
OS requirements |
Desktop from Windows and Mac. (Recording option not included on mobile or browser versions) |
|
Account Types and Recording Methods |
|
🚩How to record Webex webinars on a laptop or PC with the built-in recorder:
Step 1. Click Record in the meeting controls.
Step 2. Select Record on this computer (or Record to cloud if available).
Step 3. (Optional) Use Pause / Resume to keep a single recording file. For long meetings, consider multiple recordings to manage file size.
Step 4. Click Stop to end the current recording. The MP4 recording will save to the chosen location (Downloads-Webex Suite / Documents-Windows / Home-macOS folder by default).
Step 5. For cloud recordings: you'll receive an email when processing is complete (may take up to 24 hours depending on size/bandwidth).

(Image from Webex Help Center)
What Can You Record in Webex Meeting
- Participant audio when you choose Computer audio.
- Participant webcam video streams
- Screen share, application window, or shared content displayed during the meeting.
- Combined audio, video, and shared content merged into a single file
What You Cannot Record in Webex Meeting
- Chat panel and participants panel
- Transcripts, Q&A, polls, and files shared via Share File
- Camera overlays over shared content
- Phone-only joiners
What to Notice When Recording Webex Webinars
- All participants must give explicit consent before recording. Webex will prompt: This meeting is being recorded as long as you start recording.
- Ensure the site admin enables local/cloud recording; otherwise, there will be no recording option.
- The admin or user must enable automatic transcription, which is not available on free plans. If you need searchable transcripts, enable transcription before recording.
Common issues
- No Record button: Check account permissions and site admin settings. Free users must use the desktop app; the web app/Chromebook cannot record locally.
- No audio in recording: Confirm you chose Computer audio or that the host recorded from a supported audio source.
- Recording not visible in User Hub: Processing can take up to 24 hours. Check email notifications and the Recordings section in User Hub.
Share this post to help more users!

How to Record Webex Meeting with Audio as a Participant
Since there are so many limitations of the built-in recording feature of Webex, users are looking for how to record Webex meeting as participants. The answer is to use a third-party screen recorder, such as EaseUS RecExperts. This recording software has desktop and online versions, supporting Windows, Mac, and Chrome OS.
RecExperts overcomes the limitations of Webex's integrated recording feature. It lets users:
- Record Webex meetings as a host or participant without notifying others.
- Record everything on the screen, including any shared content, panel, and camera overlay.
- Transcript and summarize the content from the recording.
- Save recordings to a computer in MP4, MOV, MKV, and more formats.
- Record video, audio, and webcam together or separately.
🚩Here is how to record Webex meeting on Mac and Windows:
Step 1. Open the video conference you want to record, such as a meeting on Zoom, Microsoft Teams, Google Meet, or Skype. Then, launch EaseUS RecExperts on your device. Choose Full Screen, Custom, or Window to capture the entire meeting window, manually select the specific conference area, or record a specific window without distractions.

Step 2. Select your recording inputs by toggling on the Webcam, Speaker, and Microphone. You can choose to record all sources, just one, or none, depending on whether you want to include your own voice, the speaker's audio, or video feed. This flexibility is helpful when recording online meetings, remote interviews, or training sessions.

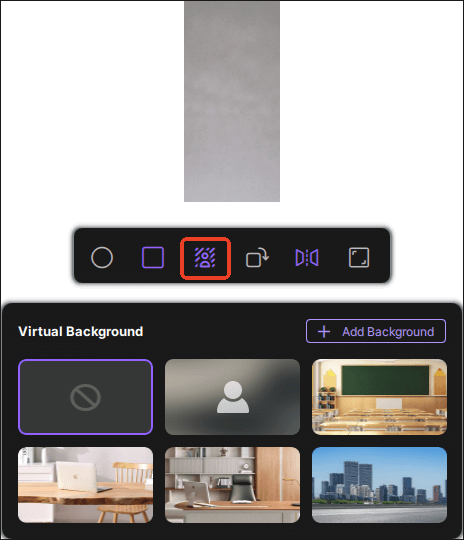
Step 3. If needed, apply the built-in AI background changer after toggling Webcam to customize your webcam view. You can blur your background, replace it with a virtual image, or insert a personalised backdrop, perfect for maintaining professionalism in your video call recordings.
Step 4. Once everything is ready, click the red REC button to start recording. You can also press F10 to pause and F9 to stop the recording quickly.
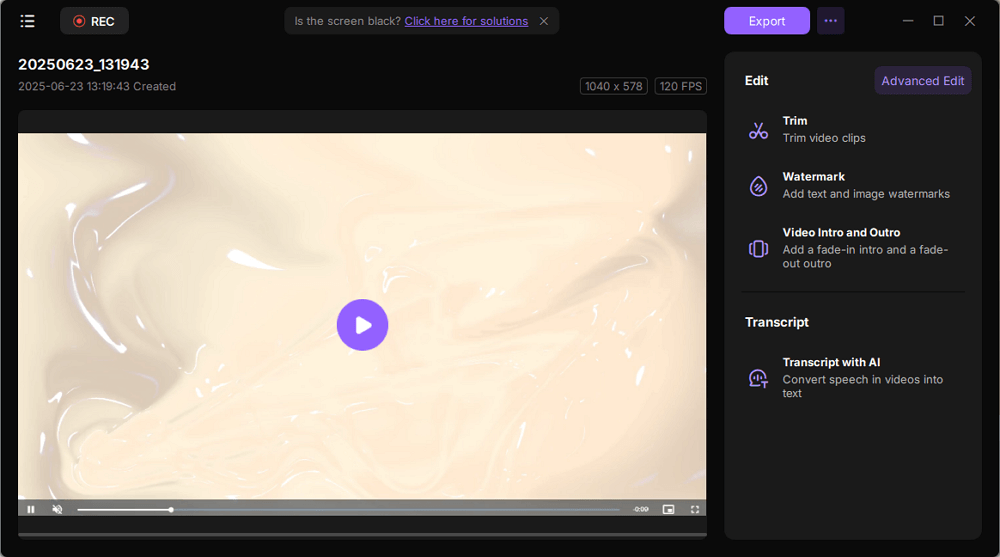
Step 5. After recording, your meeting video will appear in the pop-up recording preview interface. From here, you can play back, rename, or edit the file. If you need a meeting transcript, click Transcript with AI to generate an AI-powered text summary of everything that was said, ideal for post-meeting documentation or sharing with absent team members.
- Privacy reminder from the author:
- Before you record anything as a participant, make sure everyone in the meeting knows and agrees to it. Webex requires explicit consent from all participants, and recording without permission may violate company policies or local privacy laws. Always double-check with the host before you start capturing audio or video.
Share this post to help more users!
How to Record Webex Meeting on Phone
As mentioned earlier, the Webex mobile app, on both iPhone and Android, doesn't include a built-in recording feature, even if you're the meeting host. That means if you want to capture a Webex meeting on your phone, you'll need to rely on external tools.
The good news is that iPhone and most Android phones already come with a native screen recorder, so you can record the meeting directly on your device, whether you're the host or just a participant.
How to record Webex webinars on iPhone or iPad:
Step 1. Join your Webex meeting on the app.
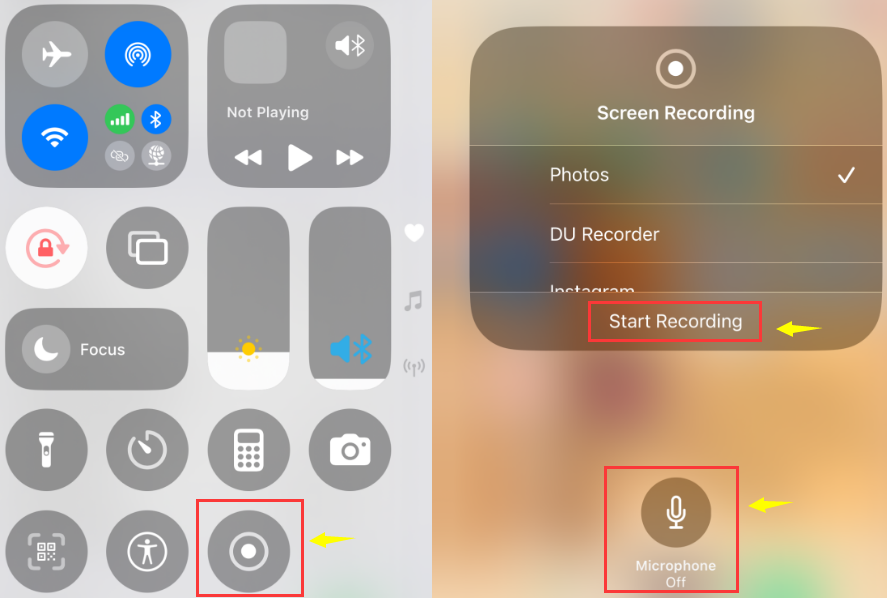
Step 2. Swipe down from the upper-right corner to open Control Center.
Step 3. Long-press the Record button → enable Microphone if you want to capture your own voice.
Step 4. Tap Start Recording, then return to your Webex meeting.
Step 5. When finished, tap the red status bar and select Stop.
Step 6. Your recording will be saved to the Photos app.
How to capture Webex meetings on Android:
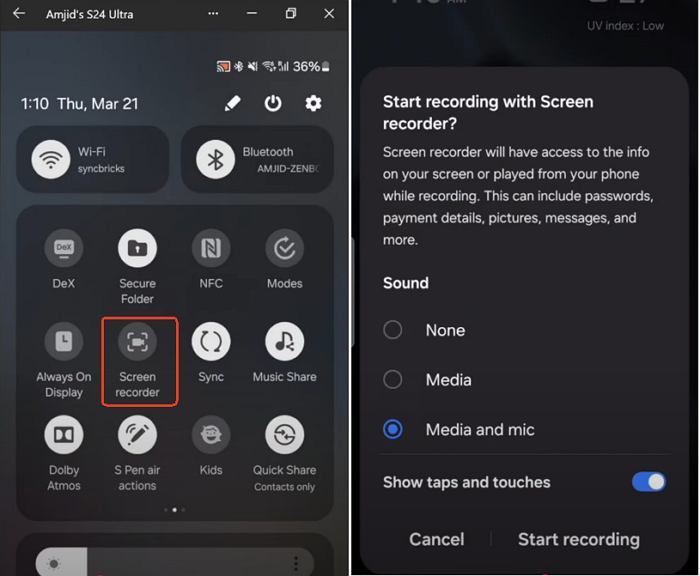
Step 1. Pull down the Quick Settings panel.
Step 2. Look for Screen Recorder (or Screen Recording).
Step 3. Join your Webex meeting.
Step 4. Tap Screen Recorder, choose whether to record device audio/mic, and start capturing.
Step 5. Once done, tap the Stop button on your screen or notification bar.
Step 6. The recording will be saved in your Gallery or Files app.
- Tip
- If your phone doesn't include a native recorder, you can use third-party Android screen recorder apps - but always check company policies and privacy requirements before recording meeting content.
Share this post to help more users!
Best Practice for Recording Meeting on Webex
Recording a Webex meeting is more than just pressing the Record button. To ensure clear audio, clean visuals, and a smooth playback experience for you and your viewers, here are some recommended best practices to follow before and during the meeting.

Webex Recording FAQs
1. Can I record Webex meetings as a free user?
Free users can record locally in the desktop app, but cloud recording and transcription are not available on the free plan.
2. Where are Webex recordings saved?
Local recordings are saved as MP4 files on your computer (Documents/Downloads/Home). Cloud recordings appear in User Hub.
3. How long does it take to get a cloud recording?
Processing can take up to 24 hours, depending on file size and bandwidth; you'll receive an email when ready.
4. Why is there no audio in my local recording?
You must choose Computer audio to capture system sound. Choosing Call In/Call Me may prevent audio capture in local MP4s.