-
![]()
Daisy
Daisy is the Senior editor of the writing team for EaseUS. She has been working in EaseUS for over ten years, starting from a technical writer to a team leader of the content group. As a professional author for over 10 years, she writes a lot to help people overcome their tech troubles.…Read full bio -
Jane is an experienced editor for EaseUS focused on tech blog writing. Familiar with all kinds of video editing and screen recording software on the market, she specializes in composing posts about recording and editing videos. All the topics she chooses …Read full bio
-
![]()
Alin
Alin is an experienced technical blog writing editor. She knows the information about screen recording software on the market, and is also familiar with data cloning and data backup software. She is expert in writing posts about these products, aiming at providing users with effective solutions.…Read full bio -
Jean is recognized as one of the most professional writers in EaseUS. She has kept improving her writing skills over the past 10 years and helped millions of her readers solve their tech problems on PC, Mac, and iOS devices.…Read full bio
-
![]()
Jerry
Jerry is a fan of science and technology, aiming to make readers' tech life easy and enjoyable. He loves exploring new technologies and writing technical how-to tips. All the topics he chooses aim to offer users more instructive information.…Read full bio -
![]()
Rel
Rel has always maintained a strong curiosity about the computer field and is committed to the research of the most efficient and practical computer problem solutions.…Read full bio -
![]()
Gemma
Gemma is member of EaseUS team and has been committed to creating valuable content in fields about file recovery, partition management, and data backup etc. for many years. She loves to help users solve various types of computer related issues.…Read full bio -
![]()
Shelly
"I hope my articles can help solve your technical problems. If you are interested in other articles, you can check the articles at the bottom of this page. Similarly, you can also check my Twitter to get additional help."…Read full bio
Page Table of Contents
Alin
Updated on Jun 09, 2026
0 Views |
0 min read
Make Screenshots from Sims 4 with Built-in Tool
Sims 4 is such a beautifully designed game that has many attractive things. The charming scenery makes you want in-game screenshots to record your virtual lawns and houses. To take a shot, there are many built-in methods like using the Tab key, UI Board, and "C" on the keyboard. You won't need third-party software.
1. Use UI Board to Take a Snapshot in Sims 4 Gameplay
When playing Sims 4, you can see the control board located at the bottom of the screen. It is the user interface board that allows viewing modes, controlling time, and even taking a snapshot in Sims 4 easily.
In the UI Board, you should find a camera icon. That's the option you can use to save a photo from Sims 4.

2. Press C in the Keyboard to Take Sims 4 Screenshot
When finish fixing your house and want to take a photo as a record, try the default hotkey method. "C" stands for printscreen method in Sims 4. It usually records the full screen in static.
By using the hotkey "C", you can take a snapshot from the Sims 4 game immediately. To find the image in the Sims 4 screenshots folder, go to \My Documents\Electronic Arts\The Sims 4\Screenshots.
Take Sims 4 Screenshots with EaseUS RecExperts
EaseUS RecExperts is one of the best free software that lets you take a customizable screenshot of your PC screen effortlessly. With its help, you can choose to take full or partial Sims 4 screenshots flexibly. It's worth mentioning that the hotkey feature is also available, and you can quickly take screenshots on PC by clicking F11.
It's also a powerful game recorder, helping you screen record Sims 4, LOL, Crossfire, Overwatch, or other gameplay without losing fps and no lag.
Now, you can screenshot on Sims 4 for free! In the trial version, you don't need to register an account.
Follow the steps to take screenshots from Sims 4 on Windows 10/11 using this fantastic tool, EaseUS RecExperts.
Step 1. Install and launch EaseUS RecExperts on your computer. Then, select the screenshot mode you want: Full Screen, Custom, or Window.

Step 2. By clicking the dropdown icon for area selection in the taskbar, you can also adjust the desired screen ratio, such as 16:9, 9:16, 4:3, or 1:1.
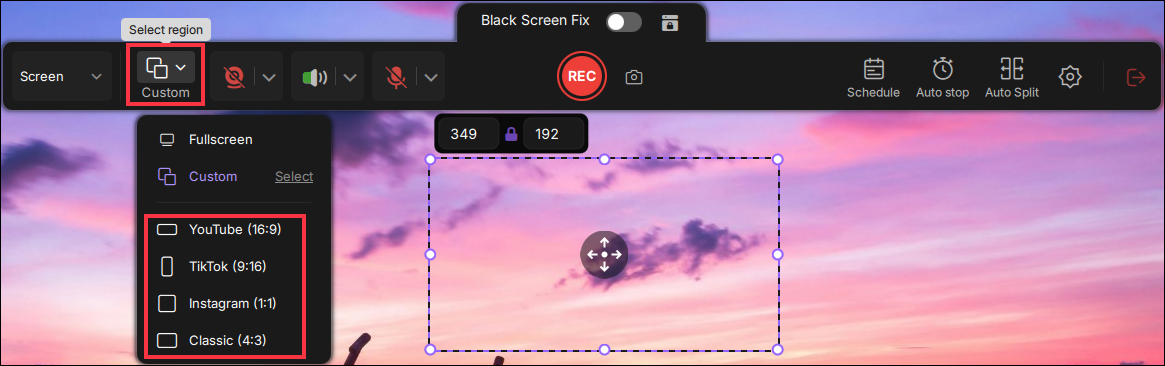
Step 3. After selecting the region, click the Screenshot button (camera icon) on the main toolbar or hit the F11 shortcut key to take a screenshot.
![]()
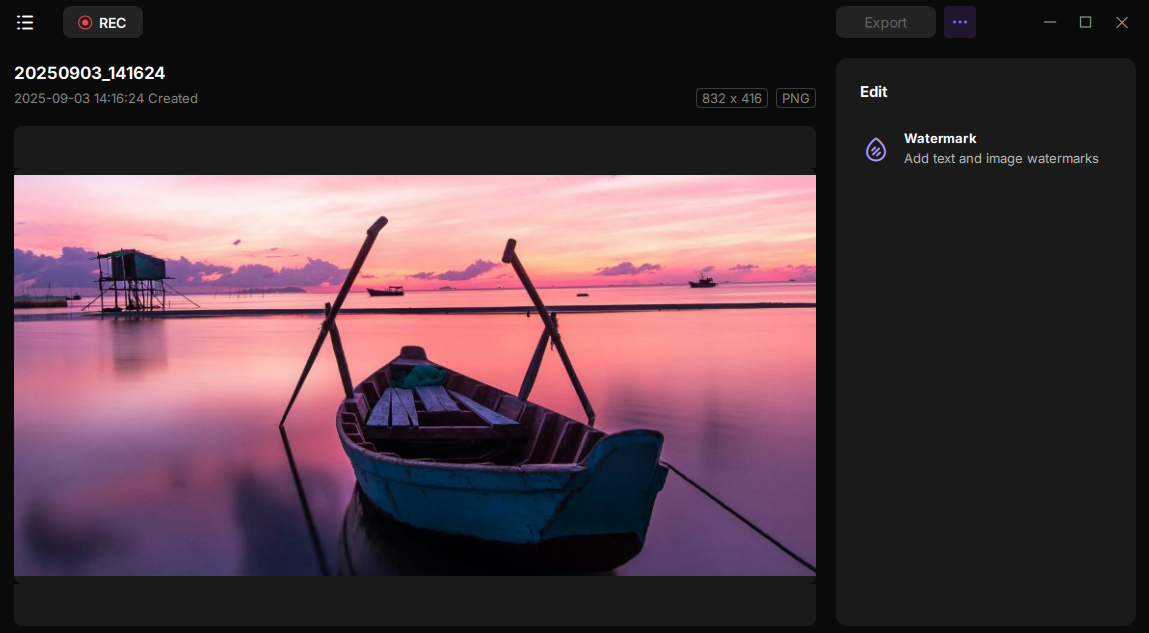
Step 4. The screenshot will be automatically saved to your default folder in PNG format. You can go to My Library to view the image. You can also add text and image watermarks.
Screenshots on Sims 4 with Keyboard
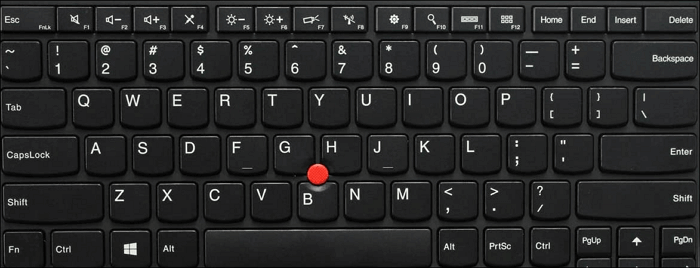
When you have a swimming pool in your house of Sims 4, be sure to take a screenshot to commemorate this precious moment. Apart from the above methods, don't forget you have the Windows keyboard. Depending on your computer model, find the PrintScreen on it. Then, follow the combo rules provided below.
- Take a full-screen: Press and hold down the Windows logo key + PrintScreen
- For part of screen/window on Windows 10/11: Hold down Alt + PrintScreen
- Customize the size of the Sims 4 screen: Use Windows logo key + Shift + S to select the target area
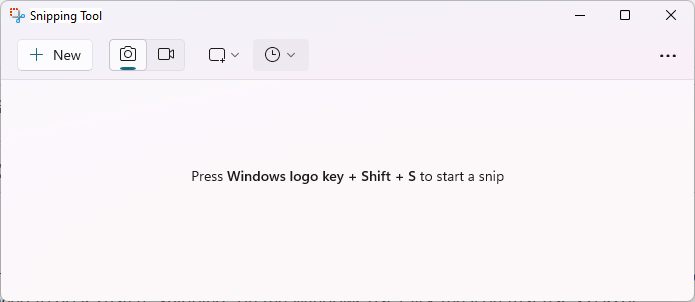
Take Sims 4 Screenshots via Snipping Tool
As a default tool, Sims 4 is a dedicated utility to save a favorite photo from your games. In this tool, you can choose the size, including a window, full-screen, custom size, and so on.
What's more, you can use the Delay function to make perfect work. Sometimes the delay can prevent you from taking the wrong place from the screen. Only need to open this tool and find the place to save the Sims 4 image.
To open Snipping Tool on Windows 10/11: Type its name on the Windows searching bar(Open with the Start button). Then, click "Mode" and hit the arrow-down button or press Alt + M to choose the screenshot size.
Where are Sims 4 snapshots saved? It's usually be saved in a clipboard. Use Ctrl + S to save the snapshot and press Ctrl + C to pass it to the clipboard. You can try tools like Paint.
FAQs About Sims 4 Screenshots
Keep on reading these frequently-asked questions gathered from the public.
1. Where are my Sims 4 screenshot?
Try UI Board or C key when playing Sims 4 can provide you with screenshots of the Sims 4 game. If you finish playing and want to find the saving images, go \My Documents\Electronic Arts\The Sims 4\Screenshots. It is automatically saved in this gameplay screenshots folder.
2. How do you take high-quality screenshots on Sims 4?
You need to adjust your camera of the UI Bar. Firstly, use the Tab key to select the Camera mode. Then, for you to move the shooting position, you can use w,a,s,d,q,e keys to adjust it. Also, if you want to keep the position, try Ctrl + 5, 6, 7, 8 to fix the position. Finally, just hold down the C key to save it.
3. How to take Screenshots from Sims 4 on Mac?
For Sims 4 default methods, you can try them as well. The same operation as Windows in this game. Also, you can use Shift + Command + 5. However, the screenshots folder on Mac will be different. In most cases, you can find the in-game screenshots on the desktop.
Besides default methods, you can use EaseUS RecExperts to take a screenshot as well. It's more efficient and has more useful functions.