-
![]()
Daisy
Daisy is the Senior editor of the writing team for EaseUS. She has been working in EaseUS for over ten years, starting from a technical writer to a team leader of the content group. As a professional author for over 10 years, she writes a lot to help people overcome their tech troubles.…Read full bio -
Jane is an experienced editor for EaseUS focused on tech blog writing. Familiar with all kinds of video editing and screen recording software on the market, she specializes in composing posts about recording and editing videos. All the topics she chooses …Read full bio
-
![]()
Alin
Alin is an experienced technical blog writing editor. She knows the information about screen recording software on the market, and is also familiar with data cloning and data backup software. She is expert in writing posts about these products, aiming at providing users with effective solutions.…Read full bio -
Jean is recognized as one of the most professional writers in EaseUS. She has kept improving her writing skills over the past 10 years and helped millions of her readers solve their tech problems on PC, Mac, and iOS devices.…Read full bio
-
![]()
Jerry
Jerry is a fan of science and technology, aiming to make readers' tech life easy and enjoyable. He loves exploring new technologies and writing technical how-to tips. All the topics he chooses aim to offer users more instructive information.…Read full bio -
![]()
Rel
Rel has always maintained a strong curiosity about the computer field and is committed to the research of the most efficient and practical computer problem solutions.…Read full bio -
![]()
Gemma
Gemma is member of EaseUS team and has been committed to creating valuable content in fields about file recovery, partition management, and data backup etc. for many years. She loves to help users solve various types of computer related issues.…Read full bio -
![]()
Shelly
"I hope my articles can help solve your technical problems. If you are interested in other articles, you can check the articles at the bottom of this page. Similarly, you can also check my Twitter to get additional help."…Read full bio
Page Table of Contents
Jane Zhou
Updated on Jun 09, 2026
0 Views |
0 min read
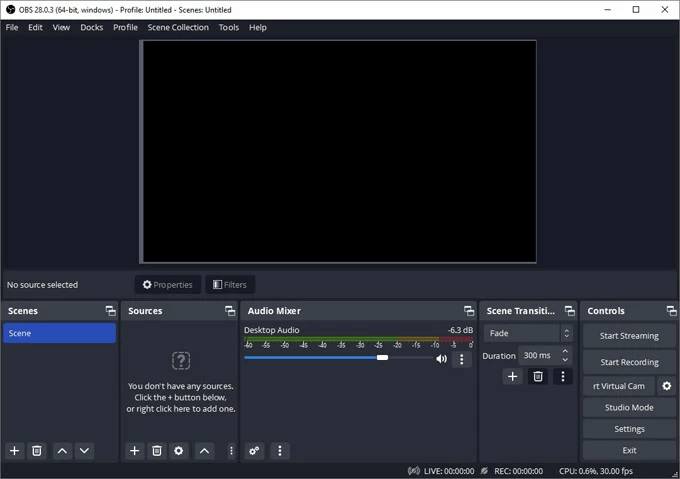
Have you ever recorded or streamed using OBS only to discover there was no desktop audio? You're not alone. Many OBS users, especially beginners, frequently face the issue of "OBS audio not working." Whether you're gaming, podcasting, or recording a tutorial, this problem can disrupt your entire session. In this article, we'll walk you through the common causes and practical fixes behind the desktop audio not working OBS issue!
Why Isn't Desktop Audio Working on OBS?
Before diving into the fixes, it's important to understand the possible causes behind OBS Studio no sound.
|
🛠️Possible Cause |
📚Explanation |
|
Muted in Mixer |
OBS may be muted in the system Volume Mixer or within OBS itself. |
|
Wrong Audio Device |
The wrong desktop audio device might be selected in OBS settings. |
|
Audio Monitoring Setting |
Audio monitoring may be set to 'Monitor Only' which disables recording. |
|
Sample Rate Mismatch |
Inconsistent sample rates can cause audio capture to fail. |
|
Outdated Audio Drivers |
Corrupted or outdated drivers can block audio signals. |
|
Software Glitch in OBS |
OBS may be temporarily malfunctioning or misconfigured. |
|
Incompatible Audio Tools |
Third-party audio routing apps can conflict with OBS. |
|
Improper Output Settings |
Misconfigured output mode or bitrate can prevent audio from recording. |
Share this post if you find it helpful!

Effective Ways to Fix OBS Desktop Audio Not Working
Now that we've identified the common causes, let's move on to solutions you can implement immediately to OBS record desktop audio.
Method 1: Check the System Volume Mixer for Muted OBS
🔍User case: Suitable if you suddenly lose desktop audio after changing your speaker or recording settings.
Obs was working fine a few days ago, but then all of a sudden the desktop audio stopped recording... From Reddit
OBS might be muted in the system's Volume Mixer without you realizing especially for Windows PCs.
🚩How to check the Volume Mixer in OBS:
Step 1. Right-click the speaker icon in the system tray and select "Open volume mixer."
Step 2. Locate OBS in the mixer and ensure it's not muted.
Step 3. Raise the volume level if needed.
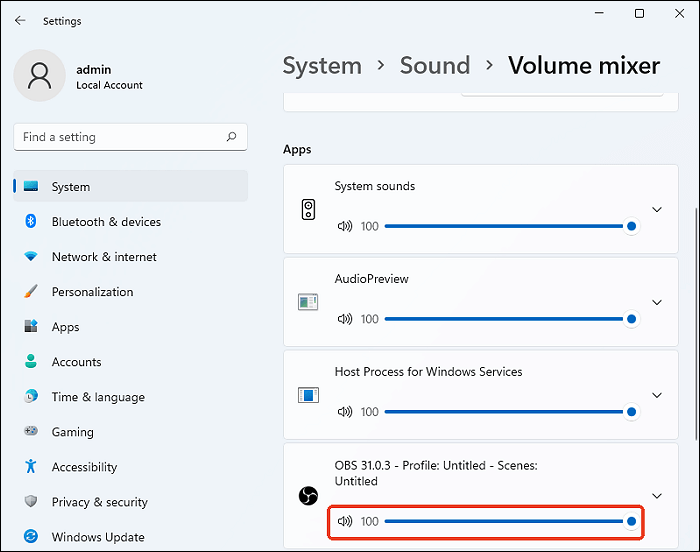
- Editor's Tip
- Make sure the OBS application is running so that you find it under Apps here.
Share this post if you find it helpful!
Method 2: Select the Correct Desktop Audio Device in OBS
🔍User case: Useful when your audio settings don't match your output device (headphones, speakers).
If OBS is set to an inactive or incorrect device, it won't capture audio.
🚩How to select the correct audio device in OBS:
Step 1. Open OBS and go to "Settings" > "Audio".
Step 2. Under the "Global Audio Devices" section, choose your active playback device for "Desktop Audio."
Step 3. Click "Apply" and restart OBS.
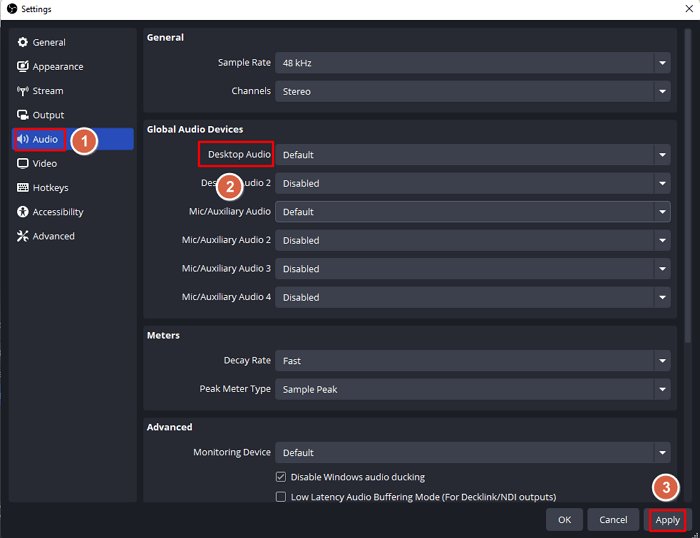
- Tip
- Mic/Auxiliary here captures the external audio like microphone. Don't mess the two audio sources up.
Method 3: Make Sure Audio Monitoring Isn't Set to Monitor Only
🔍User case: Applies if you can hear the audio live but it's missing from the recorded file.
OBS Recognizes Audio Interface, But No Sound --- From OBS Forum
The "Monitor Only" setting plays audio locally but doesn't include it in recordings or streams.
🚩How to change monitoring settings in OBS:
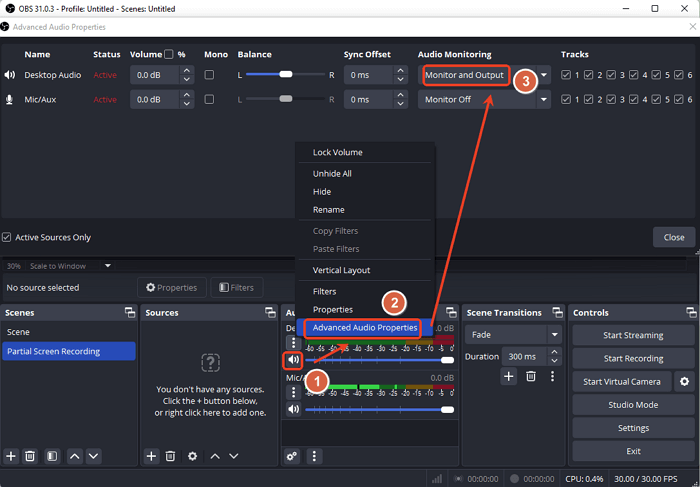
Step 1. In OBS, go to the "Audio Mixer" and click the "gear" icon next to your audio source.
Step 2. Select "Advanced Audio Properties."
Step 3. Change the "Audio Monitoring" option to "Monitor and Output."
Method 4: Match OBS Sample Rate and Adjust Output Settings
🔍User case: Applies when you see the mixer level move, but still no sound in playback.
Mismatch in sample rate or improper bitrate settings can disrupt audio encoding.
🚩How to match sample rate and fix output settings in OBS:
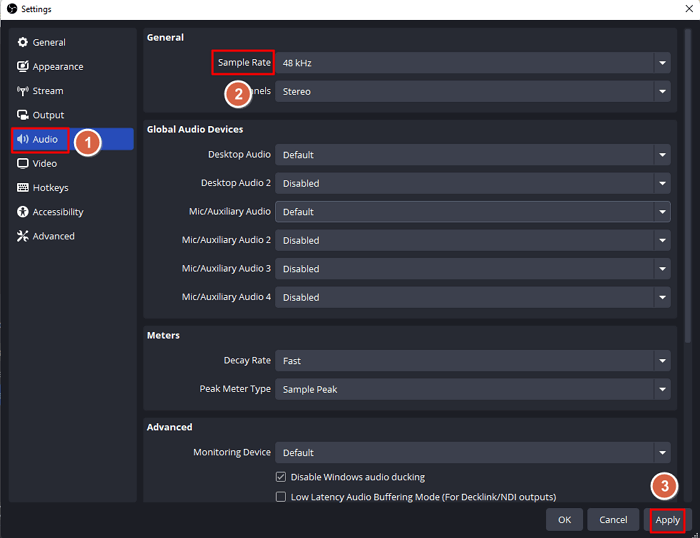
Step 1. Go to "Settings" > "Audio", then ensure Sample Rate is set to "44.1 kHz" or "48 kHz".
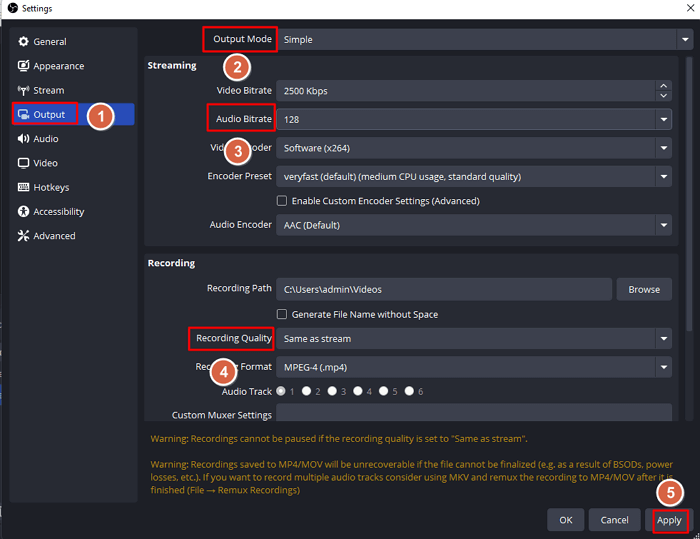
Step 2. Navigate to "Settings" > "Output". Set "Output Mode" to "Simple."
Step 3. Set "Audio Bitrate" to "128" and "Recording Quality" to "Same as stream." Click "Apply" to save changes
Method 5: Update or Reinstall Your Audio Drivers
🔍User case: Best for systems that recently updated OS or hardware.
Outdated or corrupted drivers can block OBS from accessing the system's audio feed.
🚩How to update audio drivers in Windows 10 or 11:
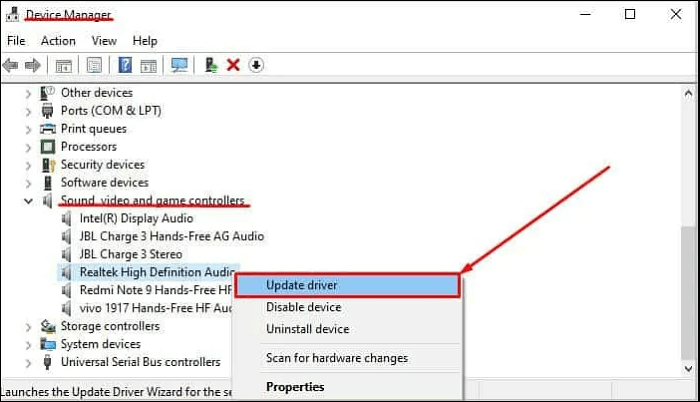
Step 1. Press "Win + X" and select "Device Manager."
Step 2. Expand "Audio inputs and outputs," right-click your audio device, and select "Update driver."
Step 3. Choose "Search automatically for drivers."
Method 6: Restart or Reinstall OBS Studio
🔍User case: Applicable when other fixes don't solve the issue.
Sometimes, a glitch or incomplete update can cause OBS to misbehave.
🚩How to restart/reinstall OBS:
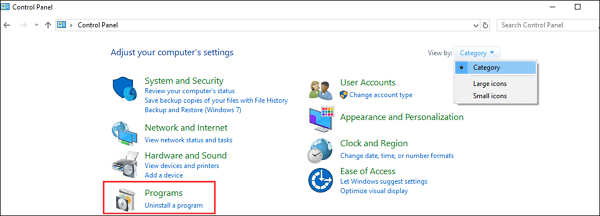
Step 1. Firstly, launch the "Control Panel" and hit "Uninstall a Program under the "Programs" section." You will see a new window for "Programs and Features."
Step 2. Now, search for the "OBS Studio" to checkmark and right-click the program to uninstall.
Step 3. Later, open the official website of OBS to download & install the program again. Make sure the problem is resolved or not.
Method 7: Try an OBS Alternative: EaseUS RecExperts
🔍User case: Ideal for users who need a simpler, more stable recording tool.
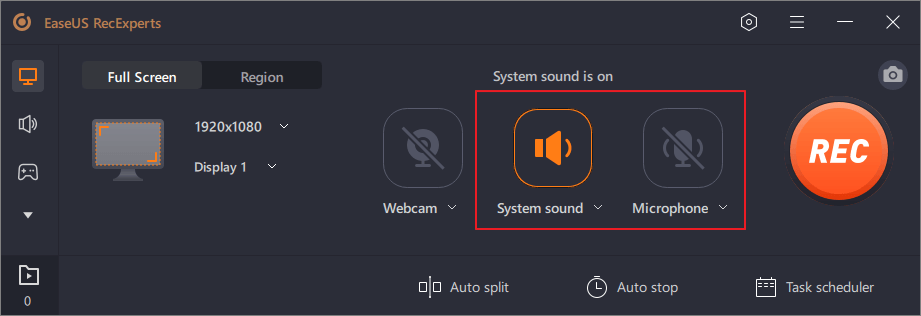
If you are unable to fix the desktop audio not working on the OBS Studio problem, the OBS alternative can be your way to go. Among its various efficient alternatives, EaseUS Screen Recorder is the leading solution.
Just like OBS, this software assists you with whether you want to record microphone and computer audio separately or at the same time.
It provides an AI noise reduction feature for high-quality screen recordings without background noise. You can also enjoy a variety of advanced video recording features. These include multi-screens and schedule recording, audio extraction, green screen technology, and many more.
However, it offers a cleaner and simpler-to-use interface for easier workflow than OBS. Even you won't have to face lag or crash problems while recording.
Method 8: Reset OBS Settings to Default (Last Resort)
🔍User case: Recommended when nothing else works and the issue may stem from a corrupted configuration.
Resetting OBS clears misconfigurations and reverts all settings to default.
🚩How to reset OBS settings:
Step 1. In OBS, click "File" > "Show Settings Folder".
Step 2. Exit OBS, then delete all files in the opened folder.
Step 3. Restart OBS, and it will rebuild fresh configuration files.
Final Words
Fixing the OBS audio not working issue may seem frustrating, but it's usually solvable with a few adjustments. Start with the simplest solutions, like unmuting or switching the correct audio device, before diving into resets or reinstallations. If OBS consistently fails, switching to a reliable alternative like EaseUS RecExperts can save your time and sanity.
OBS Desktop Audio Not Working FAQs
Besides presenting an in-depth discussion on the causes and fixes of OBS desktop audio not working, here are some additional questions to answer. Let's look into that!
1. How do I reset my OBS audio?
To reset OBS audio, you must reset all the settings. For this purpose, launch OBS, click File > Show Settings Folder. Now, exit the OBS Studio, and delete all the cached files from the already opened folder. Launch OBS again, and it will be restored to the default settings, including audio.
2. How do I separate desktop audio from mic audio OBS?
You can separate desktop audio from mic audio from OBS advanced settings. Launch OBS Studio, click Settings from the lower right side menu to open the main window. Go to Output, expand its drop-down menu, and select Advanced. Now, choose Recording, and checkmark all 6 tracks for separate audio recordings.
3. Why my PC sound is not working?
The hardware problem behind your PC sound not working is the outdated audio drivers. Update it, and if the issue persists, uninstall it quickly. Though it reinstalls at the moment, you must use a generic audio driver if it still doesn't work after reinstallation. Also, you need to get the speakers checked physically.