-
![]()
Daisy
Daisy is the Senior editor of the writing team for EaseUS. She has been working in EaseUS for over ten years, starting from a technical writer to a team leader of the content group. As a professional author for over 10 years, she writes a lot to help people overcome their tech troubles.…Read full bio -
Jane is an experienced editor for EaseUS focused on tech blog writing. Familiar with all kinds of video editing and screen recording software on the market, she specializes in composing posts about recording and editing videos. All the topics she chooses …Read full bio
-
![]()
Alin
Alin is an experienced technical blog writing editor. She knows the information about screen recording software on the market, and is also familiar with data cloning and data backup software. She is expert in writing posts about these products, aiming at providing users with effective solutions.…Read full bio -
Jean is recognized as one of the most professional writers in EaseUS. She has kept improving her writing skills over the past 10 years and helped millions of her readers solve their tech problems on PC, Mac, and iOS devices.…Read full bio
-
![]()
Jerry
Jerry is a fan of science and technology, aiming to make readers' tech life easy and enjoyable. He loves exploring new technologies and writing technical how-to tips. All the topics he chooses aim to offer users more instructive information.…Read full bio -
![]()
Rel
Rel has always maintained a strong curiosity about the computer field and is committed to the research of the most efficient and practical computer problem solutions.…Read full bio -
![]()
Gemma
Gemma is member of EaseUS team and has been committed to creating valuable content in fields about file recovery, partition management, and data backup etc. for many years. She loves to help users solve various types of computer related issues.…Read full bio -
![]()
Shelly
"I hope my articles can help solve your technical problems. If you are interested in other articles, you can check the articles at the bottom of this page. Similarly, you can also check my Twitter to get additional help."…Read full bio
Page Table of Contents
Alin
Updated on Jun 09, 2026
0 Views |
0 min read
Many users want to record computer audio and microphone at the same time, whether for tutorials, online meetings, or streaming clips with voice narration. Audacity is often recommended for this purpose, especially because it's free and widely used. However, after some trial and error, many users discover that recording system audio and a microphone simultaneously in Audacity is not as easy as it sounds. Depending on your operating system, additional settings or third-party drivers may be required.
In this article, we'll explain how Audacity handles computer audio and microphone recording, what actually works in practice, and why you might eventually need a more stable, lossless audio recording software to record computer sound.
Audacity Record Computer Audio and Mic Step by Step
Audacity is a free and open source audio recorder that works well for basic voice recording and audio editing. However, when it comes to recording computer audio and a microphone at the same time, the setup process varies greatly depending on your operating system. This is mainly because system audio (also called internal sound) is handled differently on Windows, macOS, and Linux.
Below, we'll walk through how Audacity records system audio and external microphone input on each platform, what limitations you may run into, and how to set it up step by step in practice.
Audacity Record Computer Audio and Microphone on Windows
On Windows, Audacity does not provide a single input source that combines computer audio and microphone sound. Instead, it relies on Windows WASAPI loopback to capture system audio. This means computer sound and mic input are usually recorded on separate tracks, which can feel unintuitive at first, but actually gives you more control during editing.
To work around this, you can adjust your Windows sound settings by enabling "Listen to this device" and using a loopback input such as WASAPI.
🚩Follow these steps to record desktop audio and mic at the same time:
Step 1. Enable the microphone's "Listen to this device" feature in Windows Sound settings.
- Right-click the speaker icon in the system tray at the bottom-right of your screen.
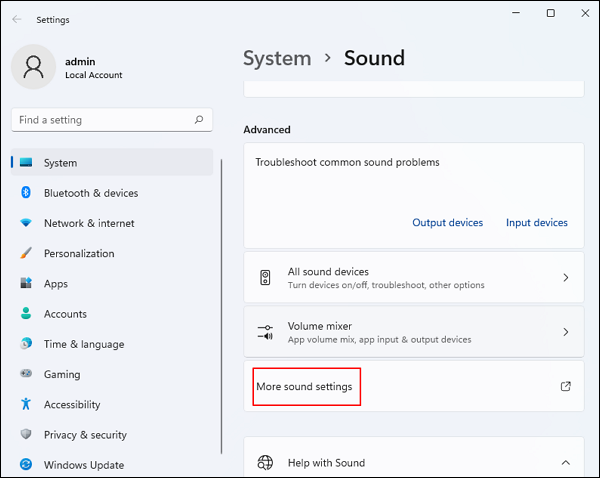
- Click Sounds (or Sound settings > More sound settings in Windows 11).
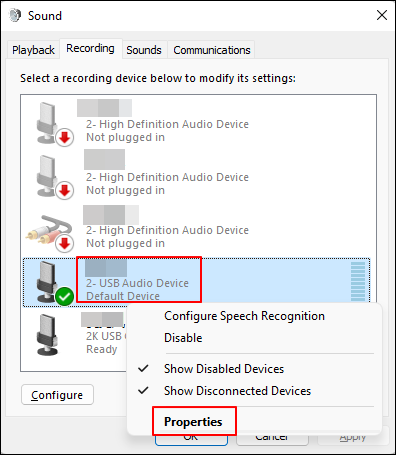
- Go to the Recording tab, right-click the mic used to capture sound from your computer, and click Properties.
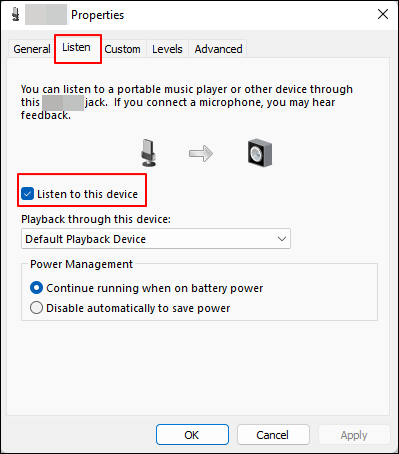
- Go to the Listen tab, check Listen to this device, and click Apply > OK. Now, you can hear sound from the mic in real time.
Step 2. Download and install Audacity to your Windows Computer.
- Visit its official website and choose an installer (Editor here chose the 64 bit installer). Follow the on-screen instructions to finish the installing setup. Then, launch the app.
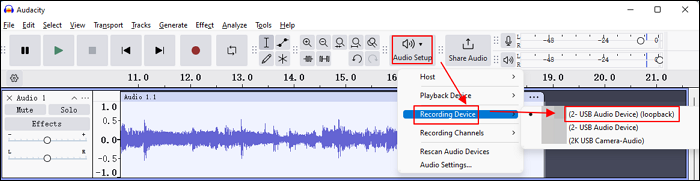
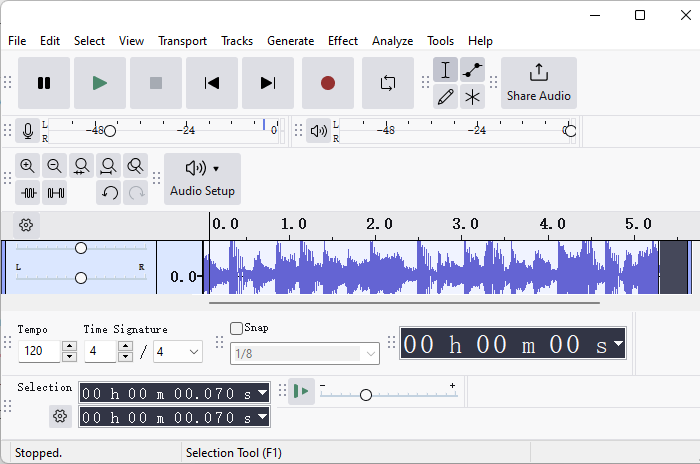
Step 3. Configure Audacity audio settings.
In Audio Setup:
- Set Host to Windows WASAPI. This enables direct system audio capture.
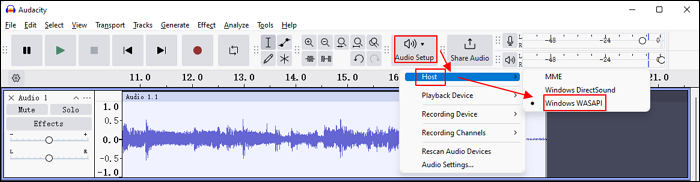
- Set Recording Device to Speaker (loopback). This records the internal sound your computer is playing. (When using the default MME host in Audacity, you may see a virtual input such as Stereo Mix or What U Hear. Selecting it allows you to record the sound played on your desktop.)
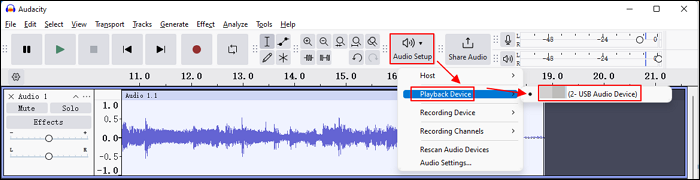
- Set Playback Device to your microphone. This ensures your mic input is also included in the recording.
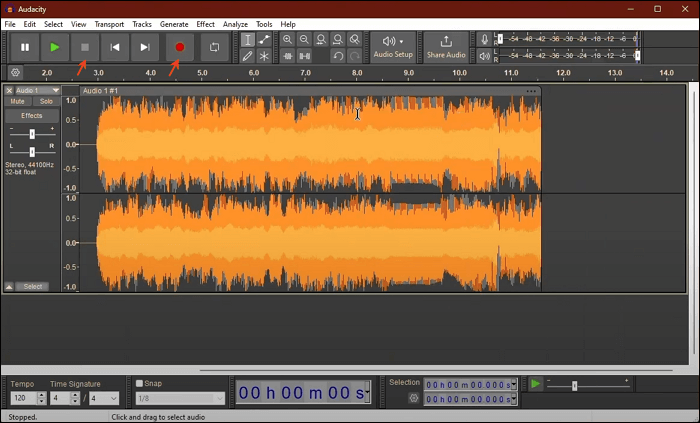
Step 4. Start recording system audio and mic on Audacity.
- Click the Record button (red dot) in Audacity.
- Speak into your microphone while playing system audio (music, videos, etc.).
- Both the microphone and system audio should appear as a single waveform.
- Click Stop (square) when done and playback to check the recording.
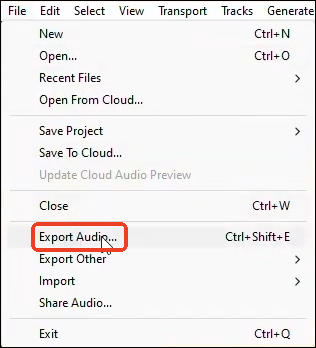
Step 5. Save the recording on your computer.
- Go to File > Export Audio... and follow the on-screen instructions to save your Audacity recording.
- Tips for "Listen to this device":
-
1. Use headphones to avoid echo or feedback.
2. Make sure you enable the correct microphone.
3. Turn it off when not recording to prevent unwanted playback.
4. Adjust the microphone volume to avoid distortion.
5. Some USB or laptop mics may not support this feature. Update drivers if needed.
Audacity Record Computer Audio and Microphone on Mac
Recording computer audio and mic simultaneously on macOS is more complicated. By default, macOS blocks applications from recording system audio, so Audacity cannot capture internal sound unless a virtual audio driver is installed.
This method is technically feasible but requires additional configuration and is not beginner-friendly.
🚩Step-by-step setup on macOS:
Step 1. Install a virtual audio driver (for example, BlackHole).
Step 2. Open Audio MIDI Setup on your Mac.
Step 3. Create a Multi-Output Device and include:
- Your speakers or headphones
- The virtual audio device
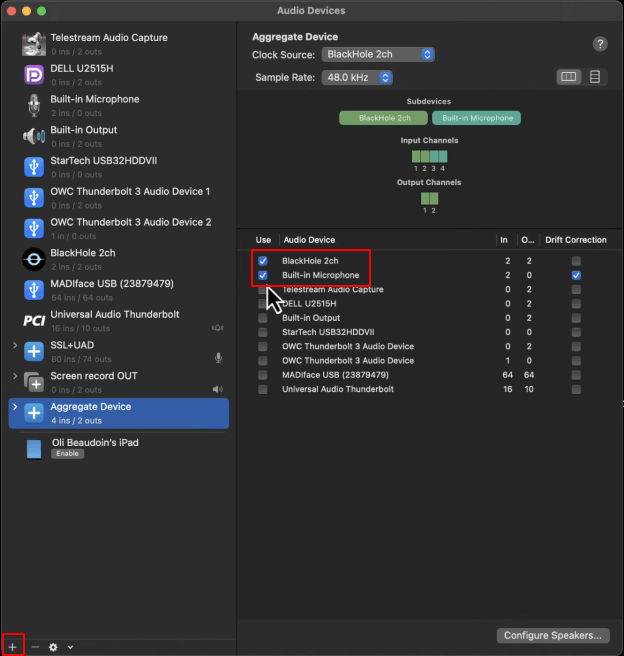
Step 4. Create an Aggregate Device that includes:
- The virtual audio device
- Your microphone
Step 5. Set the Multi-Output Device as the system output.
Step 6. In Audacity, select the Aggregate Device as the recording input.
Step 7. Click Record to capture system audio and microphone together.
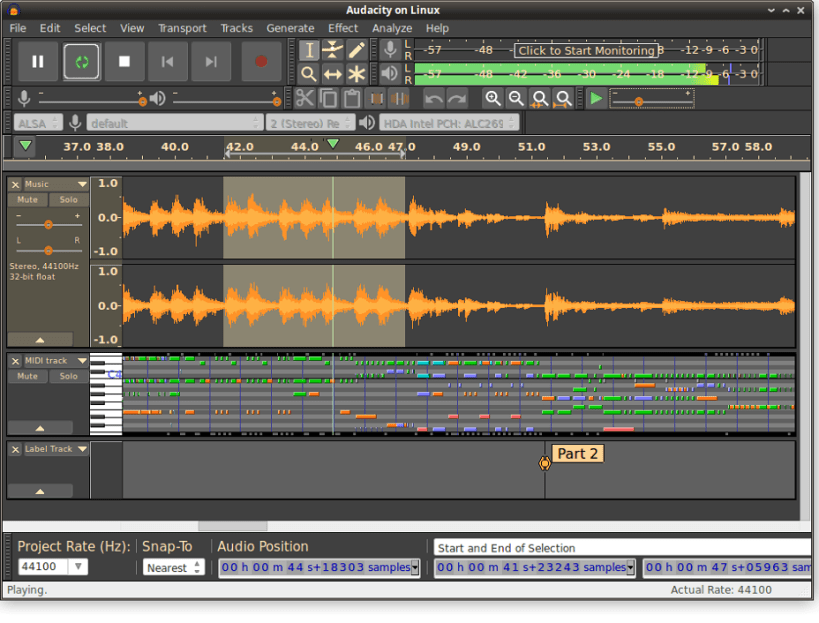
Audacity Record Computer Audio and Microphone on Linux
On Linux, recording computer audio and microphone input is generally more flexible than on Windows or macOS. Most modern Linux distributions use PulseAudio or PipeWire, which allows Audacity to access monitor sources for system audio.
However, the exact steps can vary depending on your desktop environment and audio server configuration.
🚩Step-by-step setup on Linux:
Step 1. Open Audacity and go to Preferences > Devices.
Step 2. Set the recording device to the monitor of your output device (for system audio).
Step 3. Add a new track and select your Microphone as the input source.
Step 4. Start recording to capture both audio sources at the same time.
Step 5. Use system audio controls (PulseAudio or PipeWire tools) to verify routing.
- Editor's Insights: Is Audacity a Good Choice for Recording System Audio and Mic?
-
1. Audacity can record computer audio and microphone at the same time on Windows, macOS, and Linux, but it is not a plug-and-play solution. The setup process ranges from moderately complex on Windows to fairly technical on macOS and Linux.
2. If you're comfortable with manual audio routing and don't mind managing multiple tracks, Audacity can work. If you prefer a simpler, more stable, and lossless recording experience, you may want to consider dedicated computer audio recording tools instead.
Share this guide if you find it helpful!

Record System and Microphone Sound at the Same Time on Windows and Mac Perfectly
Unlike Audacity, which can be tricky to set up for recording system audio and microphone simultaneously, EaseUS RecExperts provides a simple, reliable way to capture both on Windows and Mac. It is ideal for tutorial creators, online educators, and content creators who want high-quality recordings without complicated configuration.
Key features:
- Cross-platform support: Works on Windows and Mac smoothly
- One-click recording: Simultaneously capture system audio and microphone without extra configuration
- Flexible audio settings: Adjust input levels for system and microphone separately to avoid clipping or imbalance
Steps for how to record system audio and microphone at the same time:
Step 1. Launch EaseUS RecExperts and choose Audio mode (looks like a speaker) from the main interface.

Step 2. Select the sound source by clicking on the speaker sign (the system sound) or the mic sign (the microphone). Or, you can record them both at the same time.
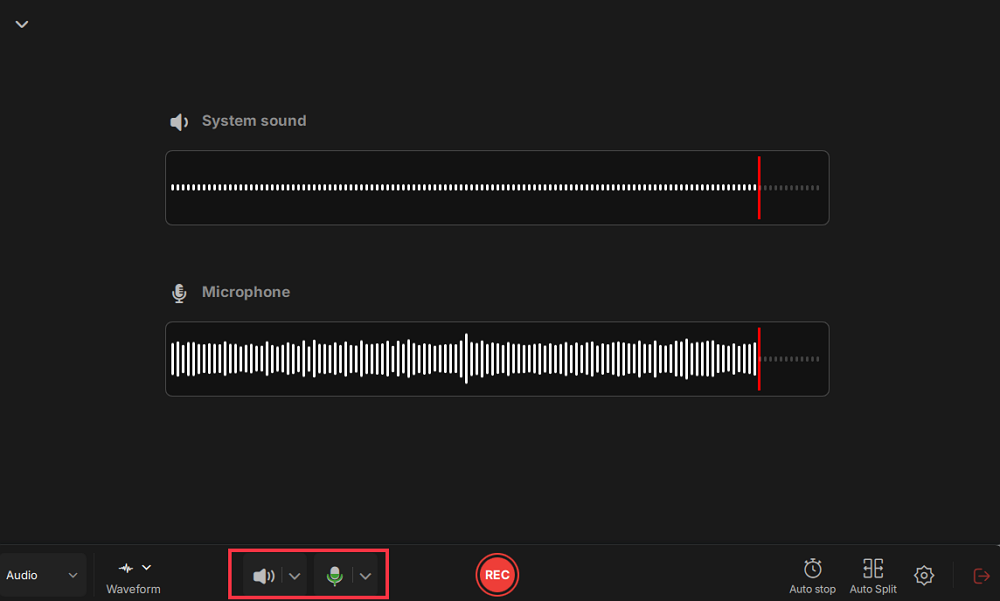
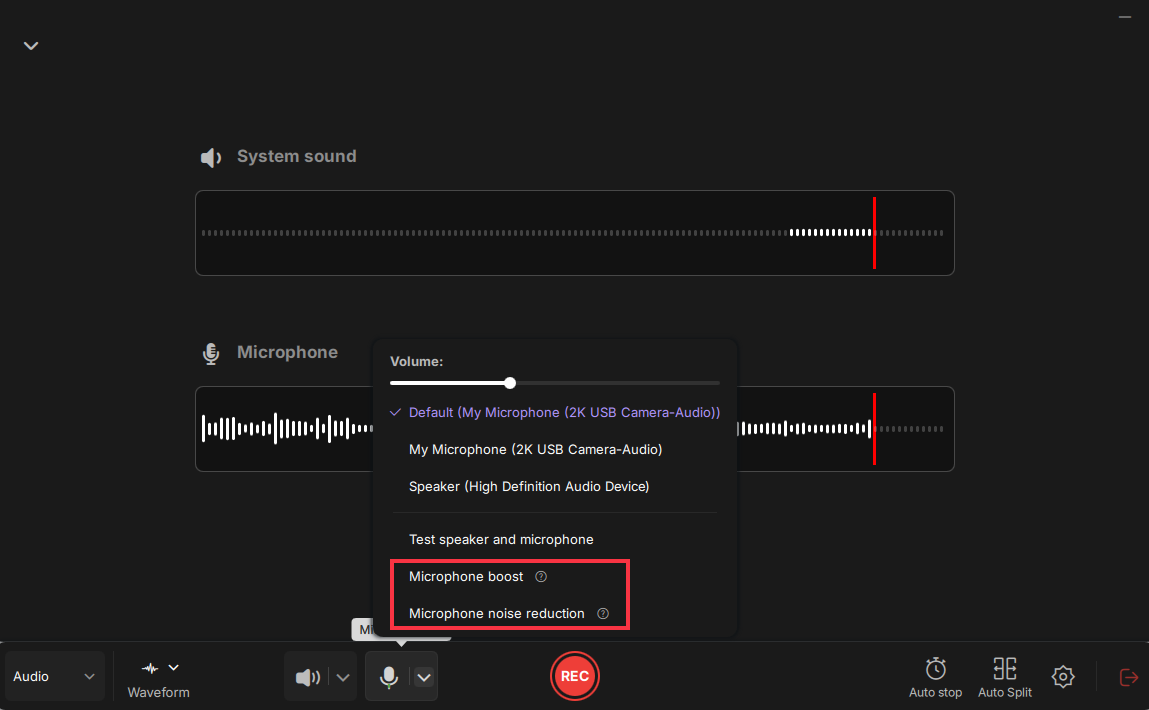
Step 3. Click the drop-down buttons next to the Speaker and Microphone to adjust the audio source settings.
- In the Speaker tab, you can adjust the volume, test the speaker and microphone, record silently, or open the volume mixer.
- In the Microphone tab, you can also enable Microphone boost and Microphone noise reduction features.
Step 4. To change the output format, bitrate, or sampling rate, you can click the Settings button in the lower right corner of the page. Of course, you can also set the automatic stop audio recording and automatic audio segmentation as needed.
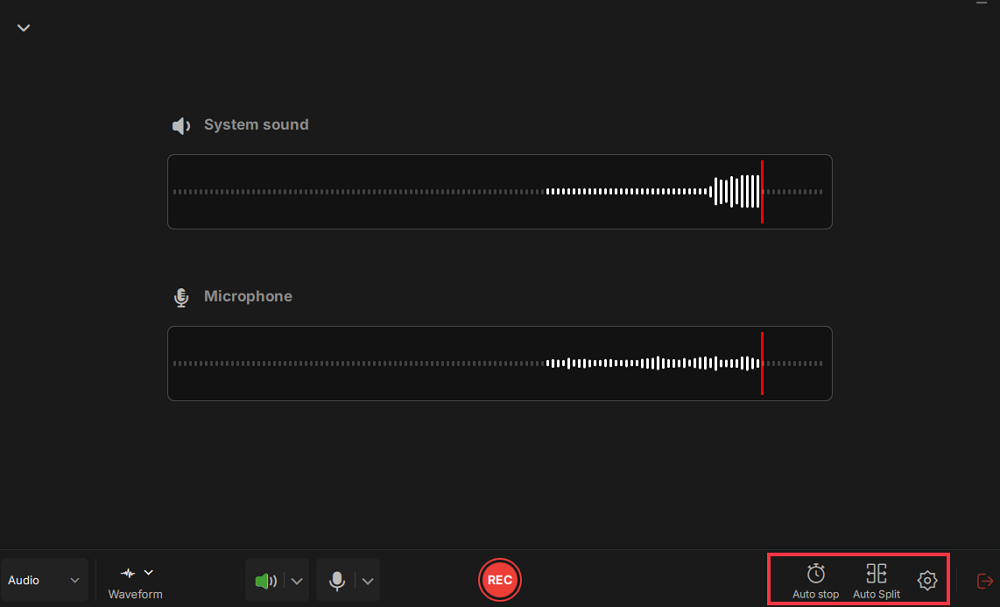
Step 5. Hit the REC button to start recording audio. To finish it, just click on the red square icon to stop the recording.
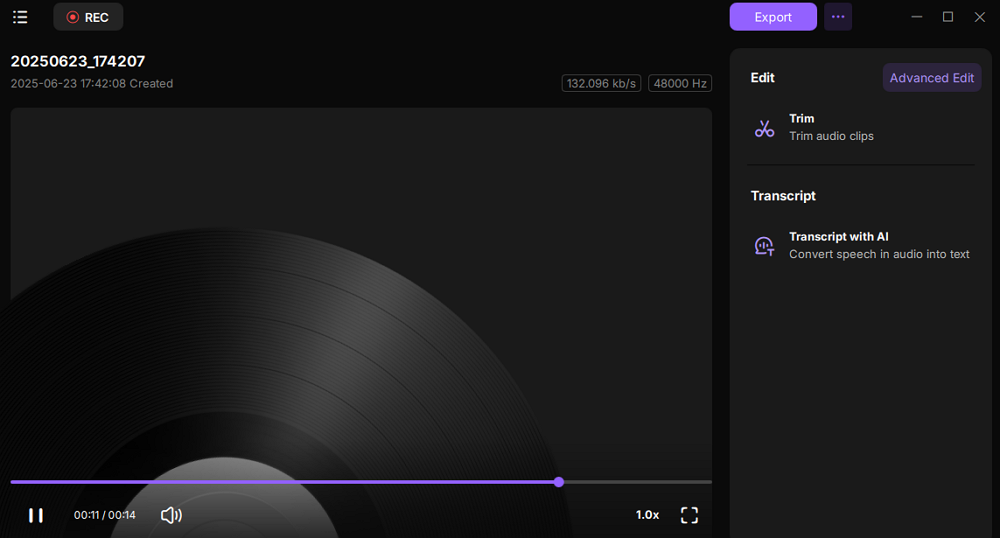
Step 6. Once finished, the audio recording will be saved automatically. You can listen to or edit the recording with built-in tools.
Share this post to help more users record system audio and microphone at the same time!
Record Audio and Microphone on Mac via QuickTime
QuickTime Player is a built-in tool on macOS that can record your screen and microphone. However, macOS does not allow direct system audio capture, so to record both system sound and microphone, a virtual audio driver like BlackHole or Loopback is required.
Step 1. Install a virtual audio driver
Download an audio driver like BlackHole or Loopback, then follow the on-screen instructions to complete the installation. In this tutorial, we take BlackHole as an example.
Step 2. Create a Multi-Output Device
- Open Audio MIDI Setip, then click + > Create Multi-Output Device
- Select both System Output (Built-in Output, Speakers, headphones) and Microphone (internal mic or external mic).
Step 3. Configure QuickTime Player
- Open this freeware, and click File > New Audio Recording
- Click the arrow next to the Record button to choose Multi-Output Device as the input.
Step 4. One done, click Record to start your recording
- Tip
-
- Use headphones to avoid echo or feedback
- Adjust system volume and microphone input levels to prevent distortion
- Ensure the virtual device includes both system audio and microphone in Audio MIDI Setup
- After recording, you can edit the audio in Audacity or other audio editors if needed
Record System Audio and Microphone at the Same Time Android
To record system audio and microphone simultaneously on Android, we recommend you use the built-in screen recording function. It allows you to record the screen of your smartphone without time limits. Besides, recording audio and microphones can also be achieved with this tool.
🚩Steps for how to record internal audio and mic in Android
Step 1. Swipe down the function tab on the top of your screen and find a tile labeled Screen recorder sitting on the second page.
Step 2. Long-press it to go to the setting tab and select System audio and microphone sound as the sound settings.
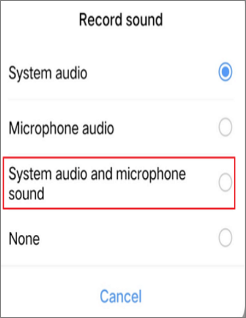
Step 3. Tap the Start recording button to record audio and mic at the same time.
- Tip: Most modern Android phones (Android 10+) have a built-in recorder with system audio support, including Samsung, Google Pixel, OnePlus, Xiaomi, Realme, OPPO/Vivo, and Huawei. If your Android device lacks the feature, try a third-party Android screen recorder instead.
Share this post to help more users record microphone and computer audio at the same time!
Record System and Mic Sounds Simultaneously on iPhone
Recording both system audio and microphone on iPhone is helpful for gameplay, tutorials, app reviews, and other content creation. Apple's built-in Screen Recording tool lets users capture both microphone and system audio, but it also records the screen.
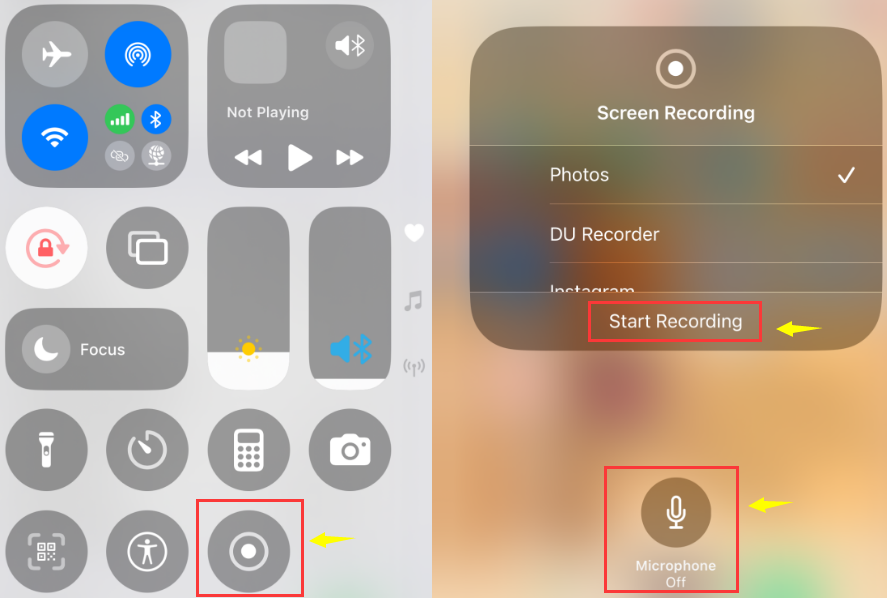
How to use the built-in screen recorder:
-
Open Control Center and tap the Screen Recording button.
-
Press and hold the button to access Microphone Audio, then enable it.
-
Start recording—both system sound and your microphone voice will be captured along with the screen.
Limitations:
-
Not all apps allow internal audio recording due to iOS privacy restrictions.
-
The built-in tool continuously records video, so you cannot capture only audio using this method.
Alternative solutions for audio-only recording:
-
Use third-party apps designed for system audio + microphone capture. These apps often allow recording just audio without the screen.
-
External audio mixers or loopback devices can also combine system audio and mic input if precise control is needed.
Troubleshooting of Internal Audio and Microphone Sound Recording
Even with the right software and setup, users may encounter issues when trying to record system audio and microphone simultaneously. Here are the most common problems and their solutions.
1. No System Audio Recorded
Windows:
- Make sure WASAPI Loopback is selected in Audacity or other software.
- Ensure "Listen to this device" is enabled for the microphone if using Audacity.
- Check system sound output is not muted.
Mac:
- Ensure the virtual audio driver (BlackHole) is installed and selected correctly.
- Verify that the Multi-Output Device includes both system output and microphone.
- Some apps (like Safari or Spotify) may require additional permissions to output audio.
2. Microphone Not Captured
Windows:
- Ensure the correct microphone is selected in your software.
- Check that the microphone is not muted or disabled in system settings.
Mac:
- Verify the microphone is included in the Aggregate Device or Multi-Output Device.
- Give necessary microphone permissions in System Preferences > Security & Privacy > Microphone.
3. Echo or Feedback
- Use headphones to prevent system audio from being picked up by the microphone.
- Reduce system volume or microphone gain if necessary.
- On Windows, avoid enabling multiple input sources that duplicate sound.
4. Audio Out of Sync or Lagging
- Close unnecessary applications to reduce CPU load.
- On Windows, use software that supports multi-track recording to separate system audio and mic.
- On Mac, ensure virtual devices are configured correctly and no extra monitoring loop is causing delay.
5. Software Crashes or Audio Not Detectable
- Update your recording software to the latest version.
- Update OS audio drivers (Windows) or reinstall virtual audio driver (Mac).
- Restart your computer or mobile device and try again.
Conclusion
Recording system audio and microphone together can feel tricky since Audacity and mobile devices don't natively support it. But with the right setup—whether using Stereo Mix, WASAPI loopback, BlackHole on Mac, or screen recorder apps on Android/iPhone - you can capture both sources smoothly.
For those who want an easier option without complex settings, tools like EaseUS RecExperts provide a one-click solution. Choose the method that best fits your device and workflow to create clear, professional-quality recordings.
Record Microphone and Computer Audio FAQs
Check the frequently asked questions related to this topic below.
1. How do I record my microphone and desktop audio separately?
You can use Audacity to record desktop audio and mic sound separately.
✅Record system audio only in Audacity:
- Set Audio Host to Windows WASAPI.
- Under Recording Device, select your Speaker/Headphone (loopback).
- Click Record and capture system sounds.
- Stop recording when done.
✅Record microphone only in Audacity:
- Set Audio Host to Windows WASAPI.
- Change Recording Device to your microphone.
- Press Record and speak into the mic.
2. Is it better to record in mono or stereo in Audacity?
It depends on your recording source:
✅Record in MONO if:
- Using a single microphone (most mics record in mono).
- Recording a podcast or voiceover.
- You want a consistent voice in both left & right speakers.
✅Record in STEREO if:
- Recording music or a stereo microphone.
- Capturing ambient sounds with directionality.
- Recording system audio (stereo mix, WASAPI loopback).
3. How do I connect my microphone to my computer to record?
🔹For USB Microphones (Plug & Play)
- Connect the mic to a USB port.
- Set it as default:
- Go to Sound Settings > Input > Select Microphone.
- Open Audacity and select the mic as Recording Device.
🔹For 3.5mm (Analog) Microphones
- Plug into the microphone jack (pink port).
- Go to Sound Settings and ensure it's detected.
- Use an audio interface if needed for better quality.
🔹For XLR Microphones
- Use an audio interface like Focusrite Scarlett.
- Connect XLR cable from mic to interface.
- Set the interface as the recording device in Audacity.
4. How do I record both internal and external audio on my computer?
You can do it with Audacity. Just follow the steps below.
Step 1. Launch the app and choose "Windows WASAPI" from the audio host drop-down menu and "Speakers" from the audio input drop-down menu.
Step 2. To record external audio, open "Windows Voice Recorder" and click on the blue-and-white microphone to start recording.
5. How do I record system audio and microphone at the same time bandicam?
To record computer sound and your voice at the same time, you can launch Bandicam, go to "Video", and "Settings", and choose "Default Sound Device and Microphone" at the "Recording" settings. Then, check the "Two Sound Mixing" option.
6. Can Audacity record desktop audio and microphone at the same time?
Yes, you can record your system audio and microphone at the same time on Win 8 or 10 using Audacity.
🚩Article update log:
1️⃣Reorganized the article by moving the Audacity section to the front, reflecting higher user interest in this tool.
2️⃣Added detailed guidance for Mac and Linux, making the instructions more comprehensive across platforms.
3️⃣Presented Audacity's advantages and limitations objectively, providing users with clear insights to decide if it meets their needs.