-
![]()
Daisy
Daisy is the Senior editor of the writing team for EaseUS. She has been working in EaseUS for over ten years, starting from a technical writer to a team leader of the content group. As a professional author for over 10 years, she writes a lot to help people overcome their tech troubles.…Read full bio -
Jane is an experienced editor for EaseUS focused on tech blog writing. Familiar with all kinds of video editing and screen recording software on the market, she specializes in composing posts about recording and editing videos. All the topics she chooses …Read full bio
-
![]()
Melissa Lee
Alin is an experienced technical blog writing editor. She knows the information about screen recording software on the market, and is also familiar with data cloning and data backup software. She is expert in writing posts about these products, aiming at providing users with effective solutions.…Read full bio -
Jean is recognized as one of the most professional writers in EaseUS. She has kept improving her writing skills over the past 10 years and helped millions of her readers solve their tech problems on PC, Mac, and iOS devices.…Read full bio
-
![]()
Jerry
Jerry is a fan of science and technology, aiming to make readers' tech life easy and enjoyable. He loves exploring new technologies and writing technical how-to tips. All the topics he chooses aim to offer users more instructive information.…Read full bio -
Larissa has rich experience in writing technical articles. After joining EaseUS, she frantically learned about data recovery, disk partitioning, data backup, screen recorder, disk clone, and other related knowledge. Now she is able to master the relevant content proficiently and write effective step-by-step guides on various computer issues.…Read full bio
-
![]()
Rel
Rel has always maintained a strong curiosity about the computer field and is committed to the research of the most efficient and practical computer problem solutions.…Read full bio -
![]()
Gemma
Gemma is member of EaseUS team and has been committed to creating valuable content in fields about file recovery, partition management, and data backup etc. for many years. She loves to help users solve various types of computer related issues.…Read full bio
Page Table of Contents
Melissa Lee
Updated on Jun 18, 2024
0 Views |
0 min read
Working on a Mac computer, there are often times that you need to take screenshots of your screen. In this case, you can use the hotkeys. However, what if you want to record the screen as a video instead of capturing a picture? In fact, there's no shortcut on your keyboard that can screen record on Mac computers. However, you may use the hotkeys to launch the screen recorder on your device.
With this screen recorder, you can create a tutorial, make a video presentation, or even make video notes for yourself. Whatever the reason is, this screen recorder can help. In this article, we will show you how to record the screen on your Mac with this tool and a few different methods. Just read ahead to get your answers.
PAGE CONTENT:
- How to Screen Record on Mac with Shortcut
- Screen Record on Mac with EaseUS RecExperts
- Screen Record on Mac with QuickTime Player
- Screen Record on Mac with OBS Studio
How to Screen Record on Mac with Shortcut
There is a best free screen recorder Mac installed on your device called Screenshot. With this tool, you can take pictures (screenshots) or recordings (videos) of the screen on your Mac. It also provides a panel of tools to control what you capture. For example, you can set a timer delay, include the pointer or clicks, or make any other choices. Now, let's take a look at how to screen record on Mac with this tool.
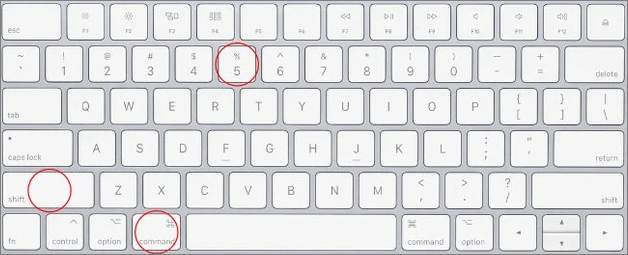
Step 1. On your Mac, press "Shift + Command + 5" to open and launch Screenshot.
Step 2. Choose whether you want to "Record Entire Screen" or "Record Selected Portion." If you choose the latter, a box will show up and you need to select the recording window.
Step 3. Click on "Options" to see what other settings you can change. For instance, set a countdown timer, choose which microphone to use, or decide where to save your recording.
Step 4. Once you've customized the options, you can click the "Record" button to start recording. To end the recording, press the "Command + Control + Esc" keys together.
Step 5. After that, you can then use the thumbnail to share, trim and save your recording as needed.
Screen Record on Mac with EaseUS RecExperts
When it comes to screen recording on Mac computers, EaseUS RecExperts is a tool you can never miss. This Mac screen recorder is capable of recording the screen with or without audio in simple steps.
Moreover, with this software on Windows, you can record a gameplay on PC along with webcam of high quality. Since nowadays many students are attending classes online, they can record a lesson for later review. For people working online, you can record Google Meet, Zoom, and other online conferences.
Mainly working as a screen and audio recorder, EaseUS RecExperts can also be used as a multimedia player. For instance, you can use it to play MOV files on Mac, play MP4, MP3, AAC, FLAC, etc. without hassle. Check more information about it below.
Main features:
- Record a Zoom meeting without permission
- Record screen and audio on your PC
- Control the playback speed of videos
- Record the microphone sound easily
- Take a screenshot during the recording
Now, download EaseUS RecExperts from the button below and follow the steps to start recording.
Download EaseUS Screen Recorder
Download EaseUS Screen Recorder
Trustpilot Rating 4.7
Step 1. Download and launch EaseUS RecExperts on your Mac. To capture the whole screen, click on the "Full Screen" button from the main interface. If you want to customize the recording area, choose the "Region" button.
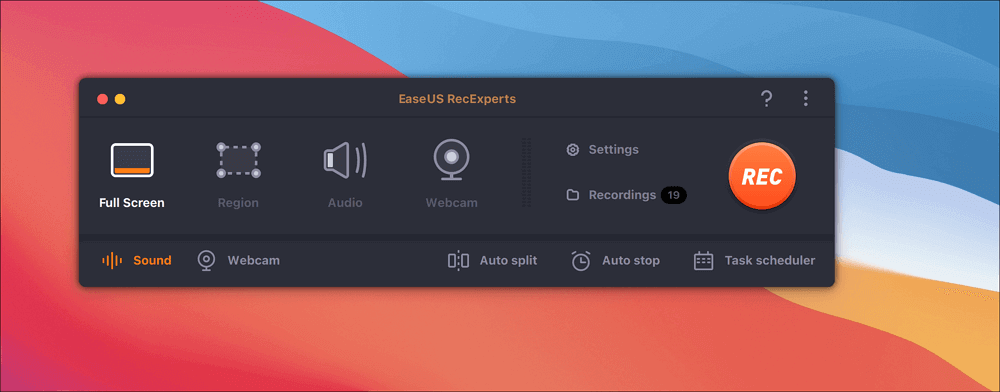
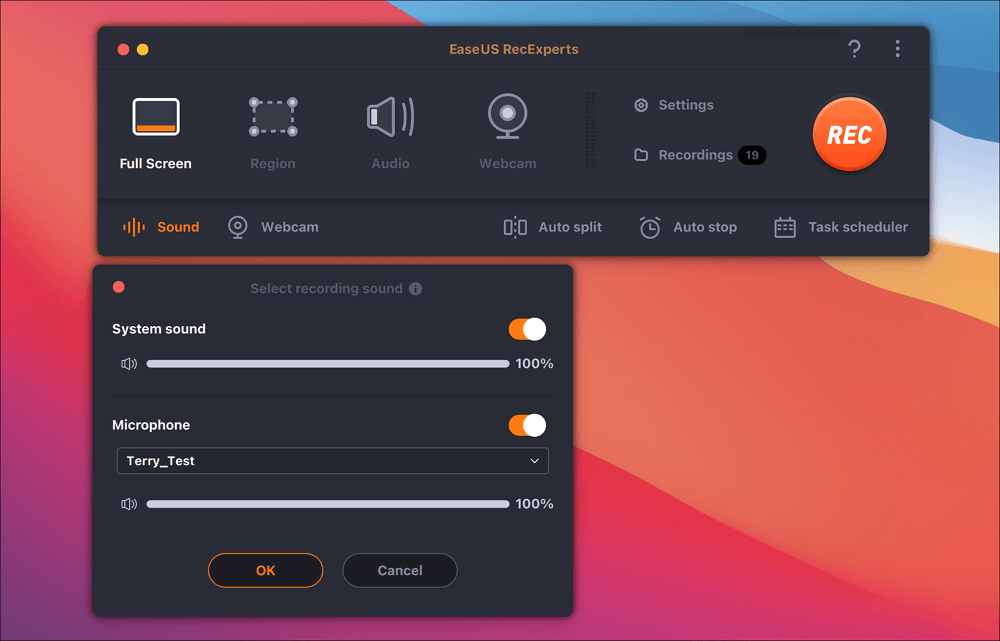
Step 2. To record the screen with audio, hit the Sound icon from the bottom left side of the toolbar. The audio resources can be your external sound or system audio. Based on your needs, enable the target option.
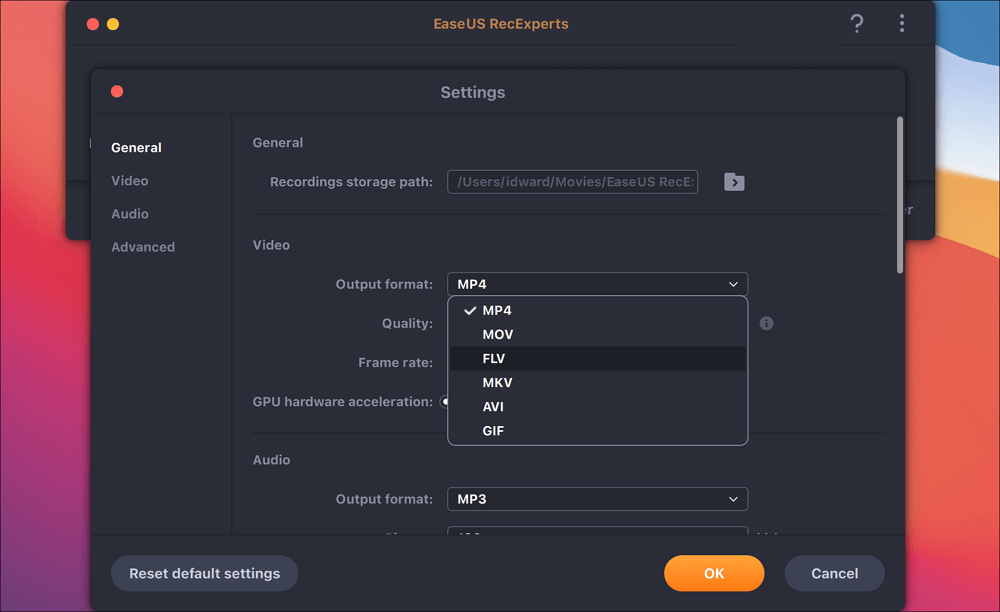
Step 3. Before capturing, you can change the output format of the recorded video by clicking "Settings" from the main interface. Then, scroll down the menu of Output format for Video. Choose the output type as you like.
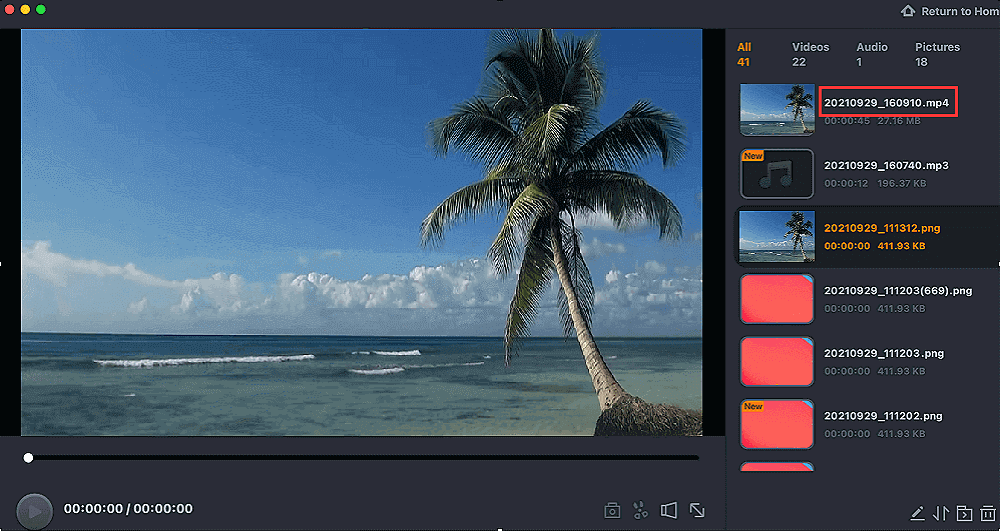
Step 4. Once done, click the REC button to begin recording. It captures anything displayed on your Mac screen. When you are done, click the Stop button. Then you can watch the recorded video from "Recordings".
Screen Record on Mac with QuickTime Player
Another alternative method to record your Mac screen is to use QuickTime Player. QuickTime Player is a popular multimedia player developed by Apple. But in fact, it can be used to record the screen on Mac.
The difference between this way and using Screenshots is that you can control everything directly from the QuickTime Player app. This may be useful for Mac computers running macOS versions earlier than macOS Mojave. Now, let's check the steps of QuickTime screen recording with audio on your Mac.
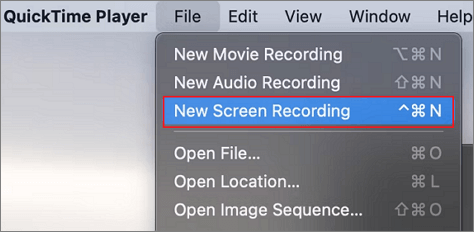
Step 1. Launch QuickTime Player and select "File" > "New Screen Recording" from the menu bar.
Step 2. Select various options to record your screen. You can choose to either "Record Entire Screen" or "Record Selected Portion".
Step 3. Start recording by clicking the "Record" button. To stop screen recording on your Mac, click on the "Stop" icon.
Step 4. The recorded video will open immediately. You can choose to edit it as you like. Once it's done, select "File" > "Save" or hit "Cmd + S" on your keyboard to save the video.
Screen Record on Mac with OBS Studio
The last method to record the screen on your Mac computer is using OBS Studio. As a freeware screen recording utility, this app offers features for both novice and advanced users. Therefore, with this tool, you are allowed to customize every aspect of your screen recording.
Since the oldest version it supports is macOS 10.13, please make sure your Mac meets the requirement. Here's a quick recap of recording screen with OBS on Mac. Let's have a look at them.
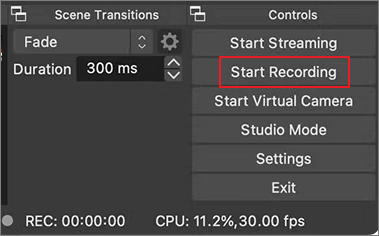
Step 1. Click the "+" icon in the "Sources" box to proceed.
Step 2. Select "Display Capture" from the options list and click "OK".
Step 3. Then, go to "Settings" > "Output", and select "Recording Path" to determine where the file will be saved.
Step 4. Hit the blue "Start Recording" button at the lower-right corner of the screen. To stop recording, click on the "Stop Recording" button.
Conclusion
After reading the content above, you can see that screen recording on Mac with a shortcut is not as difficult as you thought. Although you need an application to complete the recording process, the operation is quite simple. Moreover, if you need to record the screen of your Mac computer, we suggest you download and use EaseUS RecExperts as it is easy to use yet comprehensive in function.
Download EaseUS Screen Recorder
Download EaseUS Screen Recorder
Trustpilot Rating 4.7
EaseUS RecExperts

One-click to capture anything on screen!
No Time Limit, No watermark
Start Recording