-
![]()
Daisy
Daisy is the Senior editor of the writing team for EaseUS. She has been working in EaseUS for over ten years, starting from a technical writer to a team leader of the content group. As a professional author for over 10 years, she writes a lot to help people overcome their tech troubles.…Read full bio -
Jane is an experienced editor for EaseUS focused on tech blog writing. Familiar with all kinds of video editing and screen recording software on the market, she specializes in composing posts about recording and editing videos. All the topics she chooses …Read full bio
-
![]()
Alin
Alin is an experienced technical blog writing editor. She knows the information about screen recording software on the market, and is also familiar with data cloning and data backup software. She is expert in writing posts about these products, aiming at providing users with effective solutions.…Read full bio -
Jean is recognized as one of the most professional writers in EaseUS. She has kept improving her writing skills over the past 10 years and helped millions of her readers solve their tech problems on PC, Mac, and iOS devices.…Read full bio
-
![]()
Jerry
Jerry is a fan of science and technology, aiming to make readers' tech life easy and enjoyable. He loves exploring new technologies and writing technical how-to tips. All the topics he chooses aim to offer users more instructive information.…Read full bio -
![]()
Rel
Rel has always maintained a strong curiosity about the computer field and is committed to the research of the most efficient and practical computer problem solutions.…Read full bio -
![]()
Gemma
Gemma is member of EaseUS team and has been committed to creating valuable content in fields about file recovery, partition management, and data backup etc. for many years. She loves to help users solve various types of computer related issues.…Read full bio -
![]()
Shelly
"I hope my articles can help solve your technical problems. If you are interested in other articles, you can check the articles at the bottom of this page. Similarly, you can also check my Twitter to get additional help."…Read full bio
Page Table of Contents
Rel
Updated on Jun 09, 2026
0 Views |
0 min read
Open Broadcaster Software or OBS is a live stream and free video recording software that also allows sending high-quality video production in meeting apps like Zoom. Once you have connected OBS to Zoom, you can apply the related functions. If you choose to connect OBS Studio to Zoom, you can use advanced recording features like a virtual camera, which means you can apply various sources from OBS and display them in Zoom.
To know how to connect Zoom to OBS, look at the below chart and navigate to the target option.
| Workable Solutions | Step-by-step Troubleshooting |
|---|---|
| 1. Add Zoom virtual camera to OBS | To add a Zoom virtual camera to OBS Studio, you need to download the latest version of OBS and then...Full steps |
| 2. Add OBS to Zoom for audio | For connecting OBS and Zoom for audio, one plugin is needed...Full steps |
At the end of this post, you will find a tip for recording Zoom meetings if you are not a paid user.
Bonus Tip: How to Record Zoom Meeting Without Permission
How to Connect Zoom to OBS - Virtual Camera/Audio
When having video meetings in conference apps like Zoom, you can also connect them with streaming services like OBS. Here, this tutorial can help you with how to connect Zoom with OBS for two aspects, including audio resources and a virtual camera. It's really easy to connect Zoom with OBS virtual camera. While it's difficult to connect Zoom with OBS for audio. Never mind, follow the below part to know more information.
Below are steps for you to learn how to connect Zoom with OBS in terms of different aspects.
#1. Add Zoom Virtual Camera to OBS Studio
This method helps connect Zoom with a virtual camera from OBS Studio. In the latest version of OBS, you don't need to install any plug-in to enable this function. The OBS can apply a virtual camera directly.
😉Note: Update your OBS to the latest version before checking the following step-by-step guide.
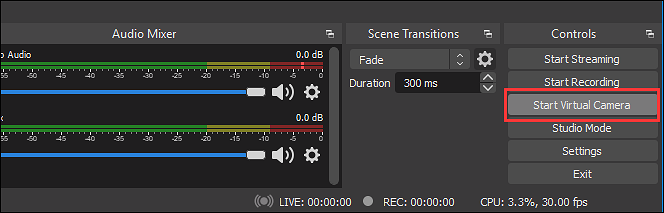
Step 1. Download and install the latest version of OBS on the computer. Open it and hit "Start Virtual Camera".
Step 2. Now, open the Zoom application and click the "Settings" icon. Choose "Video" from the left toolbar, and you need to select "OBS Virtual Camera" in the Camera option.

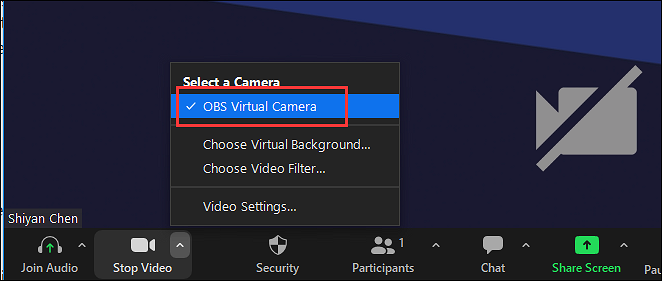
Step 3. After that, join or start a Zoom video meeting. Then, from the bottom side, you need to click the arrow up option and enable the "OBS Virtual Camera" selection.
Step 4. When you have finished adding the virtual camera option in the Zoom app, apply functions in OBS Studio. You can adjust the OBS Scenes and Sources. Meanwhile, the display could be shown on Zoom.
If you want to know how to use OBS virtual camera on the computer, look at the below post. It shows the detailed steps and also introduces what the OBS virtual camera is.
How to Use OBS Virtual Camera on Computer
Virtual camera from OBS Studio can be added to video call software like Zoom. No matter using Windows or Mac, the below post can be helpful.

#2. Connect Zoom and OBS for Audio Output:
Connecting audio resources for OBS with Zoom is not easy since you need to install two software from the website. You can follow the below information to install them.
Step 1. Download the plug-in for OBS named Audio Monitor from the website. Once you have installed the plug-in, then download the VB-Audio software for the virtual audio cable on your computer. After downloading the two software, remember to restart your computer.
- (for Audio Monitor: https://obsproject.com/forum/resources/audio-monitor.1186/)
- (for VB-Audio software: https://vb-audio.com/Cable/)
Step 2. Once you have installed these two software on your computer, choose the "Audio" option in the settings on your computer. Select Cable-A Output (VB-Audio Cable A) as the microphone and set Cable-B Input (VB-Audio Cable B) as the speaker in Zoom. After that, click "OK".
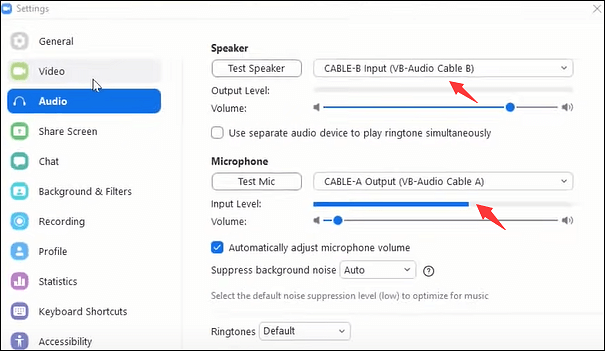
Or set the same audio option in the Zoom meeting window. Enable these functions for the microphone and speaker.
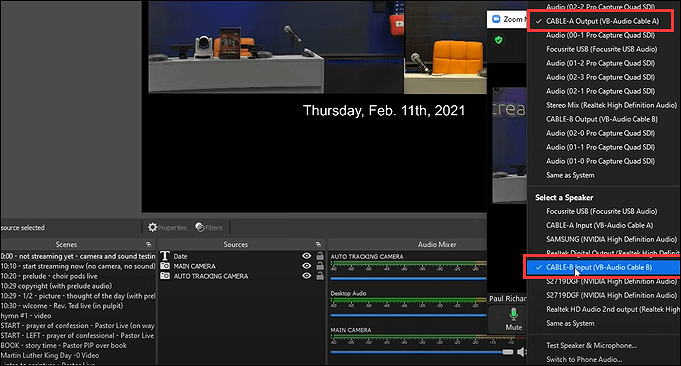
Step 3. Then, you need to open OBS Studio. Click "+" icon from the Sources dock. Then, you need to choose the "Windows Capture" option and find Zoom app. Click the settings icon from the Audio Mixer dock for a Zoom meeting. Now, use your mouse to click the "Filters" option in OBS.

Meanwhile, you need to choose "Audio Monitor" from the "+" option effectively. Then, don't forget to select the CABLE-A Input in "Device". Click "Settings" > "Audio" > "Advanced". And then select "Cable Input" in "Monitoring Device". Finally, click "OK". That's all for you to connect OBS to Zoom for audio sources.
Here, when you use OBS Studio frequently, you need to know the best settings for streaming. Knowing the best OBS settings for streaming on platforms like Twitch is what you need to guarantee the video quality of the live stream.
Related Post>> Best OBS settings for streaming
Bonus Tip: How to Record Zoom Meeting Without Permission
If you don't have recording permission, try EaseUS RecExperts. It allows capturing a set of conferencing apps like Zoom, Microsoft Teams, Webex by Cisco, etc. Meeting screen, audio, and webcam can all be captured together or separately. Download it to have a try now!
What makes EaseUS RecExperts a pro tool is that it records video with a virtual background. Users can choose from a classroom, studio, scenery, or the blur effect. After recording, you can generate a transcript for the session and save the recording as an MP3, MP4, MOV, FLV, MKV, etc.
Steps to record a Zoom meeting:
Step 1. Open the video conference you want to record, such as a meeting on Zoom, Microsoft Teams, Google Meet, or Skype. Then, launch EaseUS RecExperts and choose Full Screen, Custom, or Window mode to record the entire meeting, a selected area, or just the meeting window without distractions.

Step 2. Select your recording inputs by toggling on the Webcam, Speaker, and Microphone. You can decide whether to include your own voice, the system sound, or your video feed, depending on how you want to document the meeting.

Step 3. During the recording, you can click the Pencil icon to take notes or mark key points using the built-in annotation tools. This is especially useful for capturing highlights, action items, or speaker transitions without interrupting the meeting.

Step 4. Once everything is set, click the red REC button to begin recording. You can also use the hotkeys F10 to pause and F9 to stop for quick control during the session.
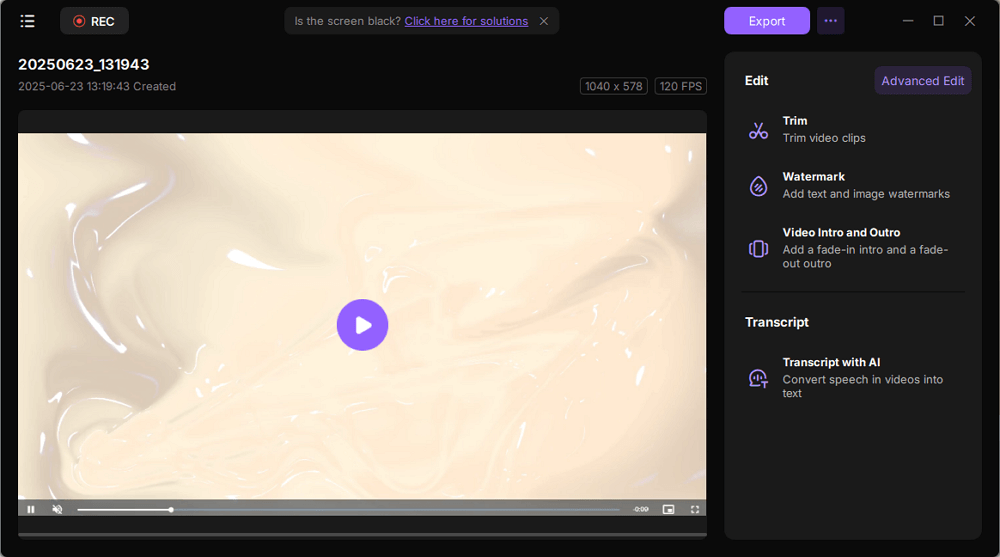
Step 5. After the meeting, the recording will appear in the pop-up preview interface. You can play back, rename, or edit the file. For efficient post-meeting follow-up, click Transcript with AI to generate an automatic text summary of what was discussed, perfect for review, sharing, or archiving.
FAQs About How to Connect OBS to Zoom
Some related questions about connecting OBS Studio to Zoom gathered from the public are listed here.
1. How do I get OBS to recognize my Zoom?
Once you have downloaded the latest version of OBS Studio, you are able to connect it with Zoom for a virtual camera. Then, click the "Start Virtual Camera" option on the bottom side of OBS. On the other side, you need to click "Settings" > "Video" > "Camera". Select OBS virtual camera under the Camera option.
2. How do you add Zoom in OBS?
From the bottom side of OBS, you need to click the "+" icon from the Sources dock. Then, choose the "Windows Capture" option. In the new window, open the scroll-down menu and choose the Zoom app. Finally, hit "OK".
3. How do I get my virtual camera to work on OBS?
Update the latest version of OBS. Then, click the "Start Virtual Camera" option on the bottom side. You don't need to install any plugins now.