-
![]()
Daisy
Daisy is the Senior editor of the writing team for EaseUS. She has been working in EaseUS for over ten years, starting from a technical writer to a team leader of the content group. As a professional author for over 10 years, she writes a lot to help people overcome their tech troubles.…Read full bio -
Jane is an experienced editor for EaseUS focused on tech blog writing. Familiar with all kinds of video editing and screen recording software on the market, she specializes in composing posts about recording and editing videos. All the topics she chooses …Read full bio
-
![]()
Melissa Lee
Alin is an experienced technical blog writing editor. She knows the information about screen recording software on the market, and is also familiar with data cloning and data backup software. She is expert in writing posts about these products, aiming at providing users with effective solutions.…Read full bio -
Jean is recognized as one of the most professional writers in EaseUS. She has kept improving her writing skills over the past 10 years and helped millions of her readers solve their tech problems on PC, Mac, and iOS devices.…Read full bio
-
![]()
Jerry
Jerry is a fan of science and technology, aiming to make readers' tech life easy and enjoyable. He loves exploring new technologies and writing technical how-to tips. All the topics he chooses aim to offer users more instructive information.…Read full bio -
Larissa has rich experience in writing technical articles. After joining EaseUS, she frantically learned about data recovery, disk partitioning, data backup, screen recorder, disk clone, and other related knowledge. Now she is able to master the relevant content proficiently and write effective step-by-step guides on various computer issues.…Read full bio
-
![]()
Rel
Rel has always maintained a strong curiosity about the computer field and is committed to the research of the most efficient and practical computer problem solutions.…Read full bio -
![]()
Gemma
Gemma is member of EaseUS team and has been committed to creating valuable content in fields about file recovery, partition management, and data backup etc. for many years. She loves to help users solve various types of computer related issues.…Read full bio
Page Table of Contents
Jane Zhou
Updated on Jun 27, 2024
0 Views |
0 min read
Nowadays, attending online meetings is very normal, especially for remote working. It helps you work or study efficiently. However, there is also an obvious issue, and that is the background noise.
Usually, there will be lots of background noise around when you are attending a Zoom meeting, like a dog barking, sounds from children, or traffic noise. All of these will affect the quality of your online meetings. Luckily, you can try some workable methods to remove the background in Zoom meeting calls to improve the sound quality. This tutorial also shows how to save a Zoom meeting without noise. Scroll down to learn more information.
PAGE CONTENT:
How to Use the Built-in Noise Gate Tool for Suppressing Noise in Zoom
While speaking of reducing background noise in Zoom calls, the first option is to use the built-in noise suppression tool. This tool can help you suppress the amount of background audio from your end and offers clean audio. Now, let's move to the tutorial:
Note: This feature requires Zoom desktop client version 5.2.0 or higher.
Step 1. Launch the Zoom app on your computer, then click "Settings" (a little gear icon) before you start a Zoom meeting.
Step 2. Next, click "Audio" on the left panel, and select the aggressiveness of noise cancellation under the Suppress Background Noise tab. You will see four options here: Auto, Low, Medium, and High.
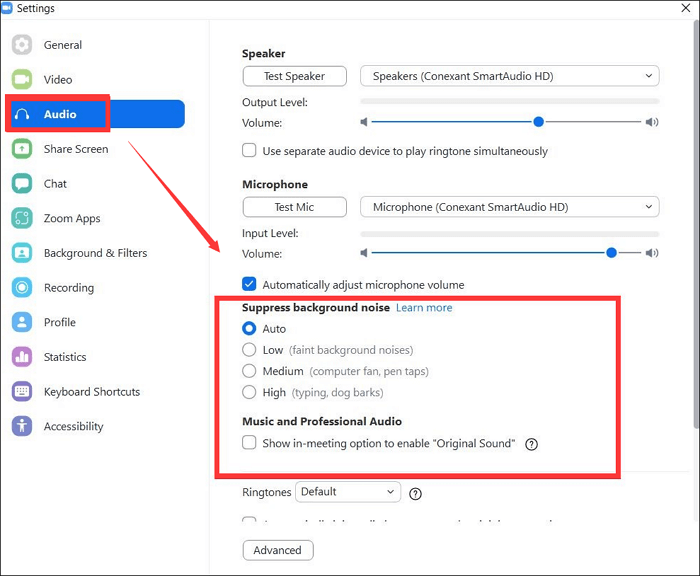
Auto: Zoom set it automatically by default. If you select this tab, you will find that Zoom will apply the background noise reduction when needed. Usually, the music won't be treated as noise.
Low: It can block the faint noise.
Medium: Best for reducing noise in a standard environment, like fans, pen tapping, and others.
High: Noise reduction will be at its most aggressive. It is usually used in the crunching of paper or wrappers, keyboard typing, etc.
Step 3. Once done, you can join or start a Zoom meeting where the background noise will be suppressed.
How to Reduce Noise in Zoom with Windows Noise Suppression Tool
If you work on a Windows PC, there is another way for Zoom noise cancellation. Windows offers its own in-built noise suppression tool, and you can find it in your system. So without wasting any more time, let's get right to the detailed guide below:
Note: It is only available on Windows 7, 8, 10, and 11.
Step 1. Click the Win icon and type "Control Panel" to open the Control Panel.
Step 2. Click "Hardware and Sound", and choose the "manage audio devices" under the "Sound" tab.
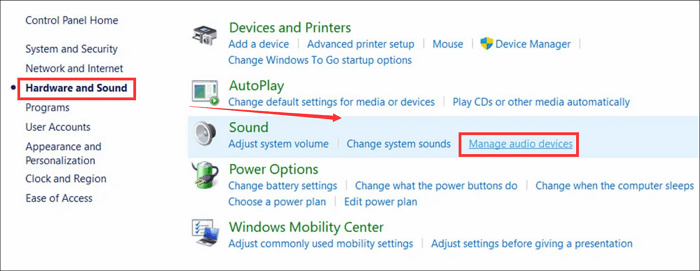
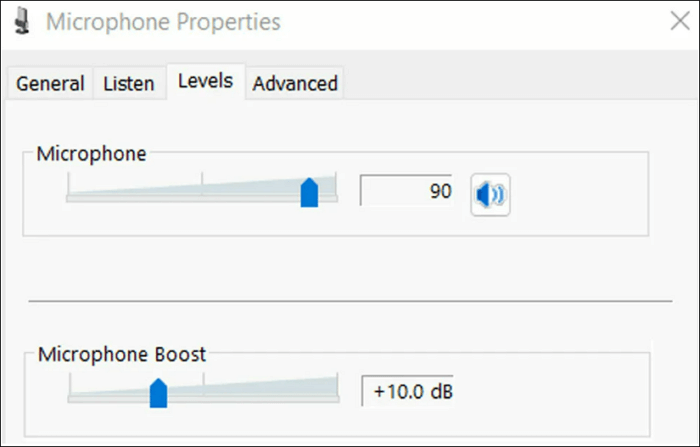
Step 3. Then click the "Recording" option. Choose the microphone that you used, and click on "Properties".
Step 4. Switch to the Level tab. Here you need to lower the microphone boost to check if it reduces the background noise. Also, you can go to the microphone effects options and enable noise reduction. After that, click "OK" to confirm all your settings.
Step 5. Finally, you can join a Zoom meeting and check if the noise is reduced.
How to Use Microphone Correctly for Zoom Noise Cancellation
If the methods mentioned above cannot work, you'd better check your microphone.
Most of you don't know where the device's microphone is placed, if they use the inbuilt microphone. You may stay too far from the mic, or some books or other items block the mic. And all of these will make your sound muffle and noisy.
So for using the built-in microphone, you need to make sure that the mics are neither blocked nor you are too far from them.
Another way is to use an external mic, and it is generally better than the onboard mics on your devices.
Bonus Tip. Record Zoom Meetings without Noise
Sometimes, you may want to capture the meetings for later checking. Then, you need an excellent Zoom recording app called EaseUS RecExperts. It lets you capture a Zoom session in full or partial screen. The Noise Reduction feature will help you record Zoom without any noise.
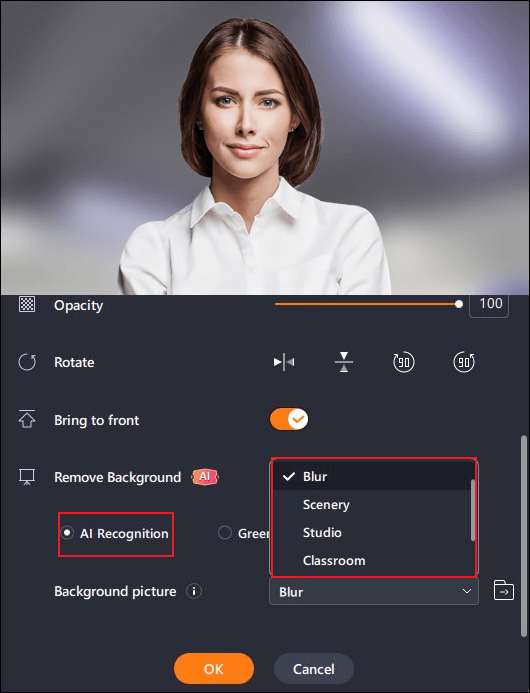
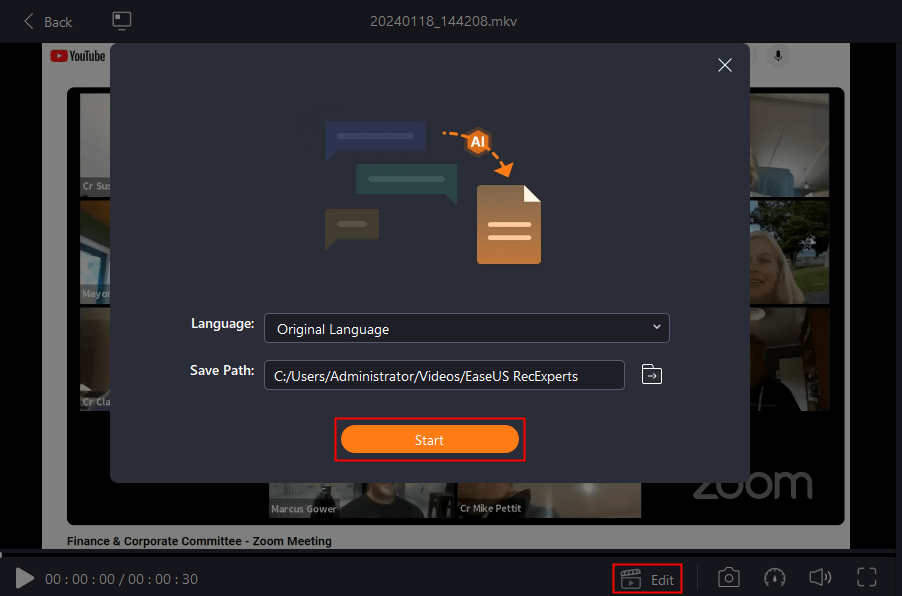
Using it, you can record videos with a virtual background. Classroom, blur, studio, scenery, etc. are all supported. You can also try the green screen feature to record with anything in the background. You can also use the AI Assistant to export a text file from the discussion when making a meeting minute. Just one click. Download it to have a try now!
A step-by-step guide to record Zoom meetings with EaseUS RecExperts:
Step 1. Go to the video meeting that you want to record and launch EaseUS RecExperts on your devices. Choose the "Full Screen" recording mode to record the whole screen or the "Region" mode to record your customized area.

Step 2. Then, choose to record the system sound, microphone sound, webcam, or none by clicking on the according buttons. You can even record webcam with AI background. When all is done, click on the red "REC" button to begin.
Step 3. The recording process will start after a three-second countdown. If you want to pause the recording, click on the white double vertical bar ("F10"). To end the recording, click on the red square sign ("F9").
Step 4. It saves your recordings in MP4, GIF, AVI, and more. After recording, you will be led to the recording list interface. Here, you can even use the AI assistant to export meeting discussions to text files.
Final Words
This post offers three easy ways to reduce the background noise in a Zoom video call, and you can choose anyone for Zoom noise cancellation tasks. Plus, at the end of the post, we also provide a solution to record Zoom calls with great screen recording software. Anyway, we hope it can be useful to you!
EaseUS RecExperts

One-click to capture anything on screen!
No Time Limit, No watermark
Start Recording