-
![]()
Daisy
Daisy is the Senior editor of the writing team for EaseUS. She has been working in EaseUS for over ten years, starting from a technical writer to a team leader of the content group. As a professional author for over 10 years, she writes a lot to help people overcome their tech troubles.…Read full bio -
Jane is an experienced editor for EaseUS focused on tech blog writing. Familiar with all kinds of video editing and screen recording software on the market, she specializes in composing posts about recording and editing videos. All the topics she chooses …Read full bio
-
![]()
Alin
Alin is an experienced technical blog writing editor. She knows the information about screen recording software on the market, and is also familiar with data cloning and data backup software. She is expert in writing posts about these products, aiming at providing users with effective solutions.…Read full bio -
Jean is recognized as one of the most professional writers in EaseUS. She has kept improving her writing skills over the past 10 years and helped millions of her readers solve their tech problems on PC, Mac, and iOS devices.…Read full bio
-
![]()
Jerry
Jerry is a fan of science and technology, aiming to make readers' tech life easy and enjoyable. He loves exploring new technologies and writing technical how-to tips. All the topics he chooses aim to offer users more instructive information.…Read full bio -
![]()
Rel
Rel has always maintained a strong curiosity about the computer field and is committed to the research of the most efficient and practical computer problem solutions.…Read full bio -
![]()
Gemma
Gemma is member of EaseUS team and has been committed to creating valuable content in fields about file recovery, partition management, and data backup etc. for many years. She loves to help users solve various types of computer related issues.…Read full bio -
![]()
Shelly
"I hope my articles can help solve your technical problems. If you are interested in other articles, you can check the articles at the bottom of this page. Similarly, you can also check my Twitter to get additional help."…Read full bio
Page Table of Contents
0 Views |
0 min read
A little over ten years after Apple introduced FaceTime into the Apple ecosystem, the video-sharing/ conference space has developed tremendously, with FaceTime leading the pack. If you're a Mac user, you may have struggled with how to share screen on FaceTime Mac. There's nothing you can't do during FaceTime on your Mac.
Whether it's showing your client a prototype of something you're working on or scrolling through memorable family photos with those you care the most about. This guide covers all you need to know regarding sharing screen FaceTime Mac. You'll also learn how to share your screen using a Mac screen recorder.
Can You Screen Share on Mac FaceTime?
Yes, you can screen share on Mac FaceTime. However, not all Macs have this screen share on FaceTime. For starters, screen sharing on FaceTime only works on macOS 12 and later versions. If your Mac is earlier than macOS 12, you can choose to screen record FaceTime for sharing.
For you to screen share on FaceTime Mac, you and anyone else participating in the call must meet the following requirements:
- Devices on the call must either be running on iOS, iPad OS, or macOS. Unfortunately, you can't screen share with an audience using non-Apple devices.
- All devices in the FaceTime call must run on the most recent firmware version.
- All participating devices must have SharePlay turned on.
Apple has a strict policy regarding copyrighted media, and you may not be able to share your screen if you'll be playing any media that requires a subscription for access.
Share this post to help others who have the same problem!
How to Start/End FaceTime Screen Sharing on Mac
It's very simple to start or end FaceTime screen sharing on Mac. Provided you have the latest version of macOS, you should be able to start and end screen sharing on FaceTime. Here's what you need to do before sharing your MacBook Air screen with FaceTime:
- Confirm all call participants have an iPhone, iPad, or Mac that meets the minimum requirements for screen share on FaceTime.
- Ensure you connect your device to a strong and reliable internet connection.
- Enable SharePlay on all devices participating in the call. You can ask other participants to do this from their end.
Read through the next sections to learn how to start or end FaceTime screen sharing. If your Mac runs the latest OS, there is something different for macOS Somoma screen sharing.
#1. Begin FaceTime Screen Sharing on Mac
Beginning FaceTime screen sharing is fairly easy. There's not much to it, but your device must meet the basic requirements for sharing screen on FaceTime. Here's how to go about it:
Step 1. Launch FaceTime on your Mac and initiate the call.
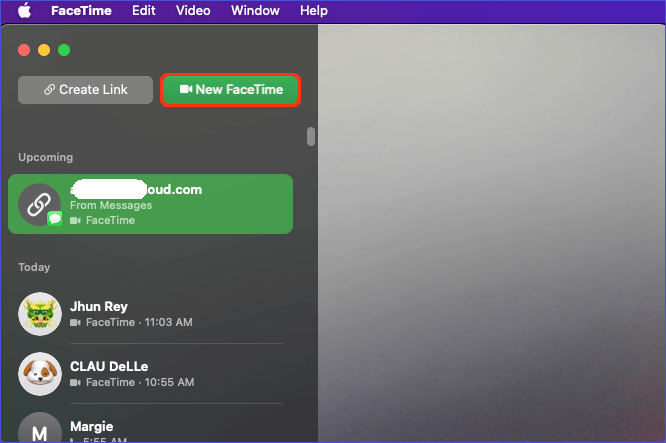
Step 2. While you wait for others to join the call, open the application with the content you want to share during the call.
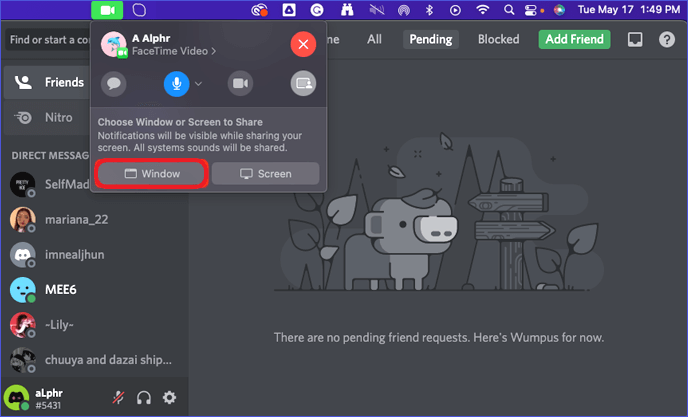
Step 3. Click the Menu bar on the top right corner of your screen, click the green/white "Video" button, then select "Screen Share."
Step 4. You can now begin sharing content on the current window or share multiple windows.
#2. Stop Sharing Mac Screen on FaceTime
Ideally, once you share your Mac screen on FaceTime, the natural impulse is to terminate the call altogether. But what if you need to deliberate on other issues, or someone else in the call wants to share their Mac screen? Fortunately, stopping screen sharing is very straightforward. Here's how to go about it:
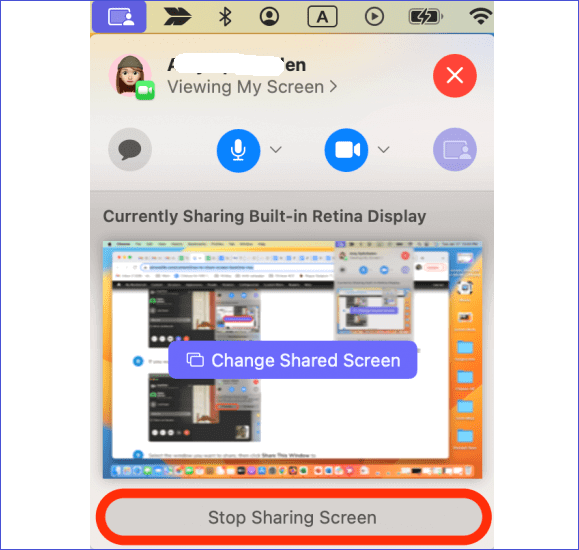
Step 1. Click the Menu bar on the top right corner of your screen, then click on "Screen Sharing."
Step 2. Select "Stop Sharing." This will end FaceTime screen sharing on your Mac.
Bonus: How to Share Mac Screen by Recording
Nothing beats the convenience and practicality of sharing your screen on FaceTime. Apple has done a great job on this, but still, sharing your screen on FaceTime could be better in many ways. You might find it easier and more convenient to share your Mac screen by recording using EaseUS RecExperts.
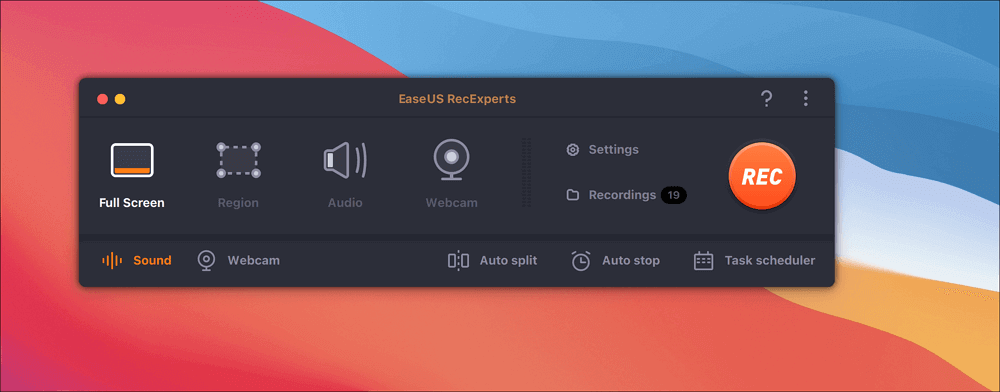
The first thing that sets EaseUS RecExperts apart is the multiple recording options. You can record your entire screen or only a select screen region. In addition to this, this best free Mac screen recorder is compatible with just about any macOS version. With it, you don't have to worry if the devices in the call are up to date or if SharePlay is enabled.
This software is easy and fun to use, and you can share your Mac screen recordings with anyone else regardless of whether or not they're a Mac or iPhone user. The key features of EaseUS RecExperts include the following:
- Multiple screen recording options, i.e., full-screen or selected region recording.
- Unlimited recording time.
- Video watermark option.
- AI-powered background noise elimination tool.
- In-built video editor and media player for an even better user experience.
EaseUS RecExperts is your go-to tool whenever you need to share a Mac screen by recording. Try it out today by downloading and installing it on your Mac.
Final Words
Learning how to share screen on FaceTime Mac can be a lifesaver. Once you know how, you can conduct effective presentations on your iPad, iPhone, or Mac. You can also help out family members, friends, and colleagues with technical assistance if they need it right from your device, no matter where you are. We really hope you can get help from this post!
Share Mac Screen in FaceTime FAQs
Below are frequently asked questions about how to share screen on FaceTime Mac:
1. Why is FaceTime Not Showing Screen Share Mac?
There are several possible reasons for this. The reason why FaceTime is not showing screen Share could be either of the following:
- Your Mac doesn't run on macOS 12 or a later/ recent version. Trying updating to the latest version.
- Share Play, a functionality that enables you to stream and share content in FaceTime, might be disabled. Try switching it on.
Also, check if you've connected your device to a strong and reliable internet connection. You can also uninstall and reinstall the FaceTime app to clear up possible configuration errors.
2. Why Can't I Share My Screen on FaceTime?
The main reason could be that your device runs on an older macOS, iOS, or iPadOS version. You can only share your screen on FaceTime if your device runs on macOS 12, iOS/iPadOS 15.1, or more recent versions.
If one or more participants on the call use a device with outdated iOS, Mac, or iPad OS firmware, you may be unable to share your screen with them on FaceTime. Another possible reason could be you're trying to share your screen on FaceTime, and the content could be a subscription service.
3. How Do I Turn on Screen Share on FaceTime?
It's easy to turn on Screen Share on FaceTime. However, a minor difference exists when doing it with an iPhone, iPad, or Mac. Here's how to go about it:
For iPhone/iPad:
Step 1. Launch the FaceTime app and initiate the call. If you'd like more convenience, open the application with the content you want to share on FaceTime.
Step 2. Tap once on your screen and select Share Content, then Share My Screen from the FaceTime controls that show up.
Step 3. Switch to the app with the content you want to share.
For Mac:
Step 1. Launch FaceTime and the application with the content you want to share.
Step 2. Click the Menu bar, then click Screen Share.
Step 3. You can now choose what you want to share on FaceTime.
EaseUS RecExperts

One-click to capture anything on screen!
No Time Limit, No watermark
Start Recording

