-
![]()
Daisy
Daisy is the Senior editor of the writing team for EaseUS. She has been working in EaseUS for over ten years, starting from a technical writer to a team leader of the content group. As a professional author for over 10 years, she writes a lot to help people overcome their tech troubles.…Read full bio -
Jane is an experienced editor for EaseUS focused on tech blog writing. Familiar with all kinds of video editing and screen recording software on the market, she specializes in composing posts about recording and editing videos. All the topics she chooses …Read full bio
-
![]()
Melissa Lee
Melissa Lee is an experienced technical blog writing editor. She knows the information about screen recording software on the market, and is also familiar with data cloning and data backup software. She is expert in writing posts about these products, aiming at providing users with effective solutions.…Read full bio -
Jean is recognized as one of the most professional writers in EaseUS. She has kept improving her writing skills over the past 10 years and helped millions of her readers solve their tech problems on PC, Mac, and iOS devices.…Read full bio
-
![]()
Jerry
Jerry is a fan of science and technology, aiming to make readers' tech life easy and enjoyable. He loves exploring new technologies and writing technical how-to tips. All the topics he chooses aim to offer users more instructive information.…Read full bio -
Larissa has rich experience in writing technical articles. After joining EaseUS, she frantically learned about data recovery, disk partitioning, data backup, screen recorder, disk clone, and other related knowledge. Now she is able to master the relevant content proficiently and write effective step-by-step guides on various computer issues.…Read full bio
-
![]()
Rel
Rel has always maintained a strong curiosity about the computer field and is committed to the research of the most efficient and practical computer problem solutions.…Read full bio -
![]()
Gemma
Gemma is member of EaseUS team and has been committed to creating valuable content in fields about file recovery, partition management, and data backup etc. for many years. She loves to help users solve various types of computer related issues.…Read full bio
Page Table of Contents
0 Views |
0 min read
Although more and more online meeting platforms are available, Zoom is undoubtedly the most popular one among all those online chat services. Zoom is widely accepted for many reasons, for instance, it allows you to share your screen with the participants so that you can show them whatever is on your screen.
In order to explain your ideas more clearly, sometimes you may need to make some annotations while sharing your screen and highlight some key points. Zoom offers users an annotating tool that allows you to take notes on your screen, but it's only accessiable if you are the host or get permission from the host. How to annotate in Zoom whenever you want? Is there any way to add annotations without permission? Yes, and this post will offer you the best solutions.
1. How to Annotate on Zoom Using the Built-in Tool
When sharing the screen with other participants of the online meeting, Zoom offers you a set of annotating tools to write on your screen or add some items. This feature is practical on many operating systems, ranging from Windows, Mac, Linux, to Android and iOS. This part will guide you through annotating on Zoom when having an online meeting. Keep reading to get the step-by-step tutorial now.
How to Use the Built-in Zoom Annotation Tools:
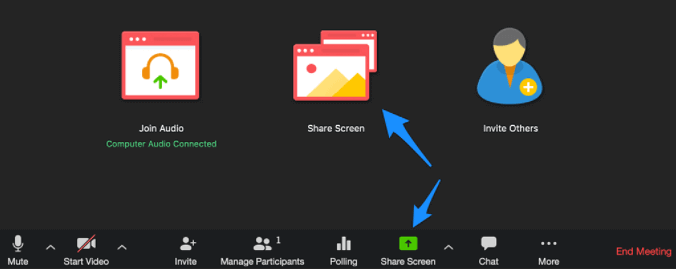
Step 1. During the meeting, there is a "Share Screen" option on the bottom of the window, and you need to click on it and choose to "Share Screen" with other people attending the meeting.
Step 2. During the process of sharing the screen, there will be a green frame around the application. An "Annotate" button is on it and you need to hit that button to activate the annotating tool.

Step 3. Then, all those annotation tools will appear on your screen. You can choose anyone from them and add annotations freely on your screen.

- Text: Add text to your screen.
- Draw: Add lines, arrows, rectangles, and many other shapes on your screen.
- Spotlight: Show the audience your mouse pointer as long as it's in the sharing region.
- Eraser: You can use this tool to erase the annotations you added.
- Format: This option enables you to change the font or color of the annotation.
Step 4. If you want to save those annotations, click on the "Save" button. Then, you can download the shared screen along with the annotations on it to your device in PNG or PDF formats.
It seems very convenient on most occasions, however, there are some exceptions. If the host of the meeting disables the function of attendee annotation, you won't get the annotation option. By the way, the "Save" option is only available for viewers when the host has allowed that operation.
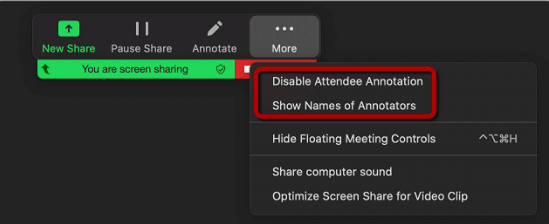
Under that circumstance, you have to find another app that allows you to save the screen as well as the annotations without getting the permission from the host. The following part will offer you one of the best solutions.
2. How to Add Annotations Along with Recording a Zoom Meeting
In order to annotate on your screen and save the annotations without any hassle, Bandicam, a versatile screen recorder, is what you can never miss. One of the most distinguished features of Bandicam is the quality of its output videos. As the resolution of the recordings can be up to 3840x2160, you won't miss any detail on your screen and all the annotations will be recorded clearly.
This screen recording not only offers you many modes to capture the Zoom meetings, but it also enables you to emphasize whatever is on your screen using the toolkit. All the annotation tools will help you add arrows and lines to the recording region, as well as highlight the important text. Besides, Bandicam also supports numbering the contents on your screen.
How to Annotate When Recording A Zoom Meeting:
Step 1. First of all, you need to download and launch Bandicam on your PC.
Step 2. Click on the button in the upper left corner and choose the "Rectangle on a screen" option. This recorder offers you some pre-set aspect ratio.
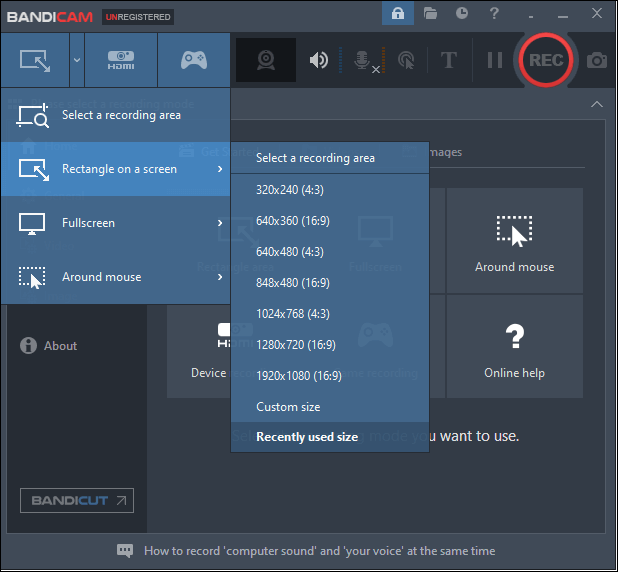
Step 3. Start the Zoom meeting on your computer and set the Zoom window as the recording region. Then, hit the "REC" button to start the recording.
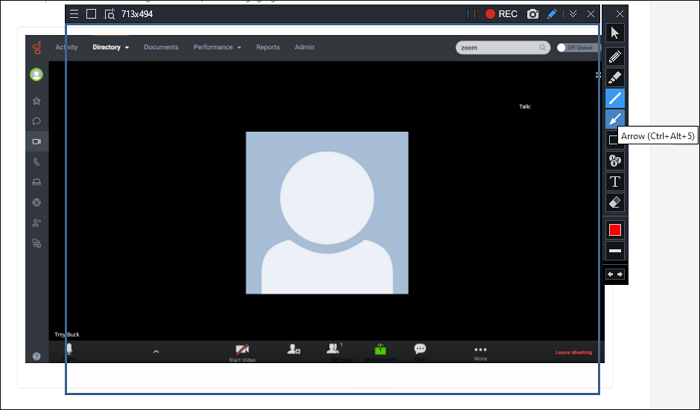
Step 4. Click on the pencil icon on the border of the window, and you can choose any tool to annotate. After capturing all the contents you need, hit the square red icon to stop the recording and save the captured video.
Bonus: A Rich-featured Recorder on Both Windows and Mac
As mentioned above, Bandicam is a powerful screen recorder that allows you to save the annotations along with capturing Zoom meetings. However, this software is only compatible with Windows OS. If you are a Mac user, EaseUS RecExperts must be a more user-friendly choice as it can run on both Windows and macOS.
In addition to its compatibility, this recorder is also popular for many other reasons. First of all, this software is lightweight so it will never slow down your device when capturing the Zoom meeting. And EaseUS RecExperts allows you to start and end the recording automatically using a Task Scheduler, and the Auto-Split feature is also available. Moreover, it even integrates with a media player that helps you preview recordings without any effort.
Detailed Steps: >> How to Record Zoom Meeting Without Permission
EaseUS RecExperts
- Capture video, audio, and webcam simultaneously
- Record full screen on Windows 10 and Mac
- Support more than 10 output formats
- The quality of recordings is outstanding
EaseUS RecExperts

One-click to capture anything on screen!
No Time Limit, No watermark
Start Recording
