-
![]()
Daisy
Daisy is the Senior editor of the writing team for EaseUS. She has been working in EaseUS for over ten years, starting from a technical writer to a team leader of the content group. As a professional author for over 10 years, she writes a lot to help people overcome their tech troubles.…Read full bio -
Jane is an experienced editor for EaseUS focused on tech blog writing. Familiar with all kinds of video editing and screen recording software on the market, she specializes in composing posts about recording and editing videos. All the topics she chooses …Read full bio
-
![]()
Melissa Lee
Alin is an experienced technical blog writing editor. She knows the information about screen recording software on the market, and is also familiar with data cloning and data backup software. She is expert in writing posts about these products, aiming at providing users with effective solutions.…Read full bio -
Jean is recognized as one of the most professional writers in EaseUS. She has kept improving her writing skills over the past 10 years and helped millions of her readers solve their tech problems on PC, Mac, and iOS devices.…Read full bio
-
![]()
Jerry
Jerry is a fan of science and technology, aiming to make readers' tech life easy and enjoyable. He loves exploring new technologies and writing technical how-to tips. All the topics he chooses aim to offer users more instructive information.…Read full bio -
Larissa has rich experience in writing technical articles. After joining EaseUS, she frantically learned about data recovery, disk partitioning, data backup, screen recorder, disk clone, and other related knowledge. Now she is able to master the relevant content proficiently and write effective step-by-step guides on various computer issues.…Read full bio
-
![]()
Rel
Rel has always maintained a strong curiosity about the computer field and is committed to the research of the most efficient and practical computer problem solutions.…Read full bio -
![]()
Gemma
Gemma is member of EaseUS team and has been committed to creating valuable content in fields about file recovery, partition management, and data backup etc. for many years. She loves to help users solve various types of computer related issues.…Read full bio
Page Table of Contents
Melissa Lee
Updated on Apr 19, 2024
0 Views |
0 min read
Undoubtedly, Zoom is one of the most used software for online meetings and webinars. Recording such meetings is as important as it is to arrange them with sufficient tools. But, it is a hectic task to record a meeting or webinar by the host.
A host can forget about the recording or quit the meeting's recording mistakenly. In such cases, the participants won't get a recording with every section recorded. To avoid such conditions, the best approach is to record Zoom meetings automatically.
In this blog, we will explore the guide about how to record Zoom meetings automatically. Using this option, you can record everything displayed in your meeting from start to end. Let's get started and learn more about the methods to complete the task.
PAGE CONTENT:
Easy Way to Automatically Record Zoom Meetings
If you want to record the entire Zoom meeting and other parts of your screen, the best approach is using EaseUS RecExperts. It is a third-party tool that you can use for this recording seamlessly. Download it to record your Zoom meetings now!
Using this advanced screen recorder, you can smartly record any part of your device's screen. Users can change their background from the actual world to a studio, blur, or landscape with this screen recorder's AI background removal feature. You can also upload any kind of picture to personalize the virtual background. All in all, it is the best approach to record your Zoom meeting automatically using the schedule recording function.
Follow the steps below to record Zoom meetings automatically:
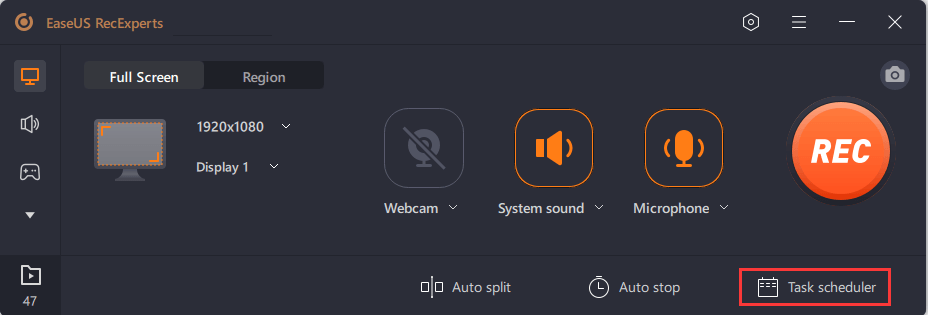
Step 1. Create a Timed Recording Task
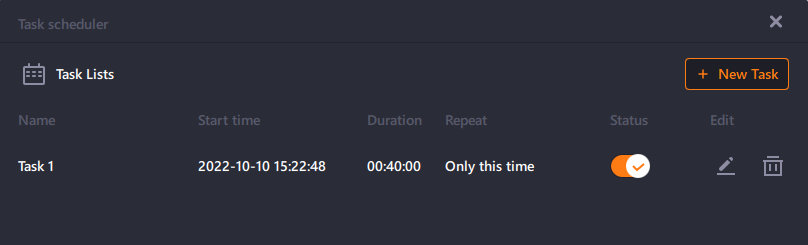
Download and launch the screen recorder on your computer. Then, click "Task Scheduler" at the bottom right of the main interface.
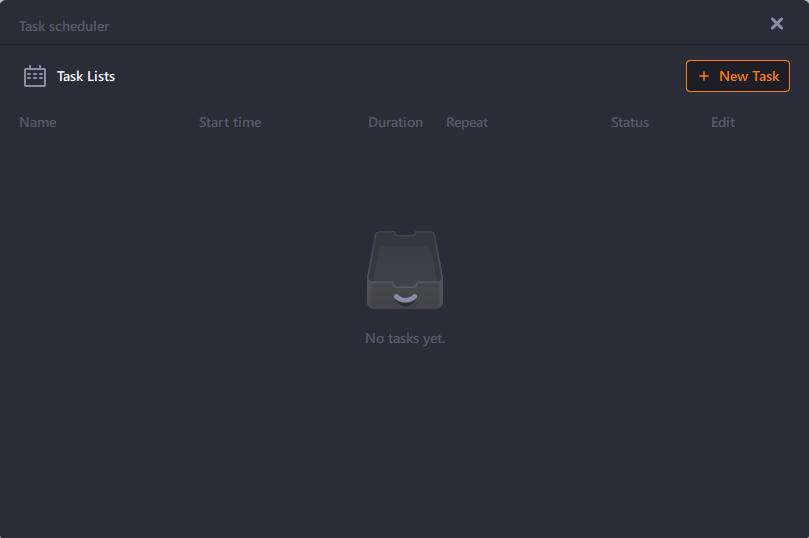
Then, select the "New Task" option to add a new schedule to the program.
Step 2. Configure the Scheduled Recording Task
On the following screen, you need to set a task name and define how your screen should be recorded.
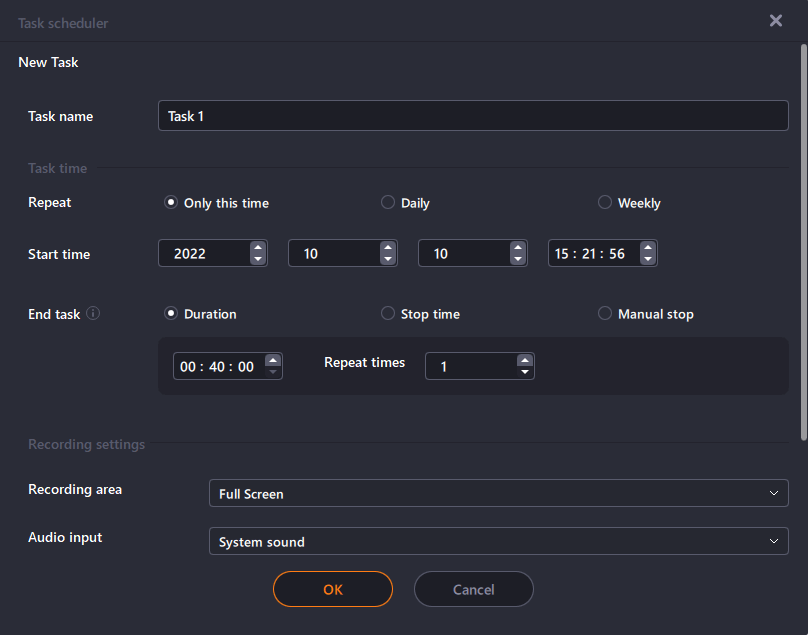
- In the "Task time" tab, specify a start time and select an end time.
- In the "Recording setting" tab, select the recording area, choose the audio input, and specify other options. Then hit "OK".
Step 3. Edit or Delete a Scheduled Recording
If you change your mind and you would like to edit the scheduled recording time or other options, or if you would like to delete the schedule altogether, you can do so easily. Get back to the "Task Scheduler" screen and click on either the "Edit" or "Delete" icon.
Step 4. View Your Scheduled Screen Recordings
Once your scheduled time has passed, the software will capture and save your screen recording video file automatically. You can access this file by clicking on the "Recordings" option on the main interface. All of the recordings that you make using this tool are saved here.

To learn more about how to record Zoom meetings automatically, you can watch this YouTube tutorial. Here are a few important notes regarding this video:
- 00:19 - Zoom Record Button
- 00:36 - Schedule Meeting Screen
- 00:46 - Advanced Options
- 00:52 - Automatically Record Meeting
- 01:35 - Pause/Stop Recording
If you find this guide informational, please share it on social media for the benefit of your friends.
How to Automatically Record a Meeting on Zoom?
If you don't want to use any additional tool to record a Zoom meeting automatically, you can use the built-in option. You only have to learn the basic settings of your Zoom account. Before doing this, keep in mind that you must be the host to use this feature.
Stage 1. Set Automatic Recording in Zoom
In the first phase, you have to set the settings for automatic recording of the meetings from your account. It doesn't matter whether you are a free or premium user. You need to follow these steps to set automatic recording in Zoom.
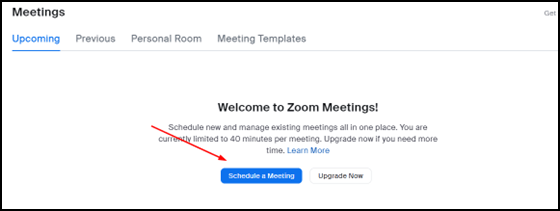
Step 1. Login to your Zoom account and click on the Schedule a Meeting option.
Step 2. Input details of the meeting as per your requirements.

Step 3. Look for the Options and click on the Show option given beside it.

Step 4. Check the box labeled Automatically record meeting on the local computer.
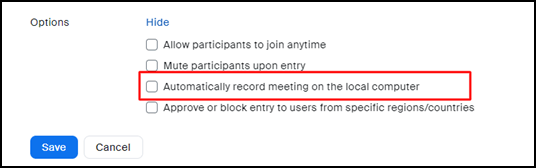
Step 5. Click on the Save button to complete the task.
By doing so, you can set your schedule meeting with automatic recording enabled. Undoubtedly, you can do this from your application, but we recommend using the Zoom web portal.
Stage 2. Start a Meeting
Once you have done with the above phase, you can start your meeting at the scheduled time. You can also disable automatic recording by clicking on the pause/stop button given on your meeting's home screen.
Things You Need to Know about Zoom Recording
By reading the above sections of the blog, you must have learned how to automatically record Zoom meetings. It is necessary to learn more about it before setting this option. That's why we are here with a few questions and their answers to let you learn more about auto-recording.
Does Zoom Record Your Screen or Just the Meeting?
The Zoom recording built-in option will only record the meeting, not your entire screen. It won't record anything when you minimize your application and open another application. If you want to record your entire screen, it is recommended to use EaseUS RecExperts instead of this option.
How do I Stop My Zoom from Automatically Recording?
If you are looking to disable automatic recording before starting the meeting, you only need to follow the above steps and un-check the box with the same label. You can also stop the automatic recording of Zoom during your meeting just by clicking on the stop button given there.
Zoom Automatic Recording not Working
Sometimes, you may be facing this error that is restricting you from automatic meeting recordings. There can be multiple reasons, some of which are discussed here.
First of all, it might be possible that your account has been restricted or limited for this option. If you are seeing a grey color on this option, it means that your account has been limited for this.
Another reason is you might be using an incompatible version of Windows. It happens with the old version of Windows users, as this option of Zoom doesn't work on such systems. That's why you should try upgrading the Windows version and check if the issue has been solved.
How to Automatically Record Zoom Meetings FAQs
1. Can you set a Zoom meeting to auto-record?
Yes, you can set a Zoom meeting to auto-record using some simple steps. Keep in mind that it is only possible when you are the host of the meeting instead of the participant.
2. How do you record a Zoom meeting when you are not the host?
If you are not the host, you won't be able to record the meeting using the built-in option. The only way to do so is to use EaseUS RecExperts. This screen recorder will enable you to record your screen, i.e., meeting.
Conclusion
We hope you have learned how to automatically record Zoom meetings using a built-in option and a third-party tool. If you want to keep your recordings saved, we recommend using EaseUS RecExperts.
It will enable you to keep your recordings safe in the cloud storage. So, there won't be any chance of losing cloud recordings, and keep your data secured. Download it right now!
EaseUS RecExperts

One-click to capture anything on screen!
No Time Limit, No watermark
Start Recording