-
![]()
Daisy
Daisy is the Senior editor of the writing team for EaseUS. She has been working in EaseUS for over ten years, starting from a technical writer to a team leader of the content group. As a professional author for over 10 years, she writes a lot to help people overcome their tech troubles.…Read full bio -
Jane is an experienced editor for EaseUS focused on tech blog writing. Familiar with all kinds of video editing and screen recording software on the market, she specializes in composing posts about recording and editing videos. All the topics she chooses …Read full bio
-
![]()
Melissa Lee
Melissa Lee is an experienced technical blog writing editor. She knows the information about screen recording software on the market, and is also familiar with data cloning and data backup software. She is expert in writing posts about these products, aiming at providing users with effective solutions.…Read full bio -
Jean is recognized as one of the most professional writers in EaseUS. She has kept improving her writing skills over the past 10 years and helped millions of her readers solve their tech problems on PC, Mac, and iOS devices.…Read full bio
-
![]()
Jerry
Jerry is a fan of science and technology, aiming to make readers' tech life easy and enjoyable. He loves exploring new technologies and writing technical how-to tips. All the topics he chooses aim to offer users more instructive information.…Read full bio -
Larissa has rich experience in writing technical articles. After joining EaseUS, she frantically learned about data recovery, disk partitioning, data backup, screen recorder, disk clone, and other related knowledge. Now she is able to master the relevant content proficiently and write effective step-by-step guides on various computer issues.…Read full bio
-
![]()
Rel
Rel has always maintained a strong curiosity about the computer field and is committed to the research of the most efficient and practical computer problem solutions.…Read full bio -
![]()
Gemma
Gemma is member of EaseUS team and has been committed to creating valuable content in fields about file recovery, partition management, and data backup etc. for many years. She loves to help users solve various types of computer related issues.…Read full bio
Page Table of Contents
0 Views |
0 min read
PAGE CONTENT:
Many people using Google Slides want to add audio, like narration or explanation, to their Slides. Those audio files will help express your intention while playing the Slides. But how to record the audio you need easily and freely?
Even though you can now add an audio file to a Google Slideshow, there isn't a simple built-in recording button in Google Slides. Instead, you need to record the audio using third-party programs, save recordings to Drive, and then add it to the slide.
This post will provide a detailed tutorial about recording the audio and adding it to the slide. You can also know various optional audio recorders and choose the most suitable one from them.
Can You Record Audio on Google Slides
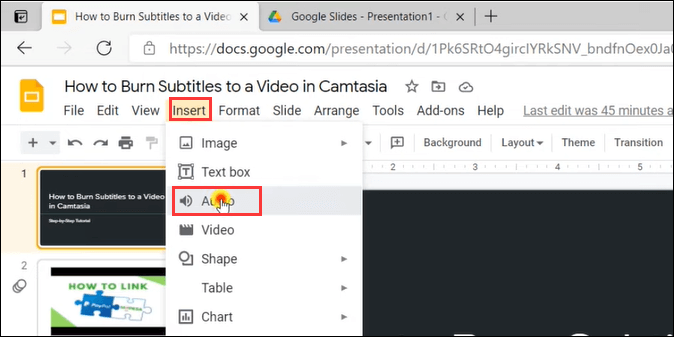
You cannot record audio directly on Google Slides because it doesn't offer a built-in audio recorder. However, you can upload audio files from your local folders to Google Drive by selecting that slide > Insert > Audio. But before inserting the file, the first thing you need to do is to record an audio file. Read along to see how to do it.
How to Record Audio for Google Slides on Mac and Windows
To record your voice, you may want to use other audio recorders that are helpful for you in adding narration to Google Slides. We give you three more options to choose from
#1. Use EaseUS RecExperts [HOT]
How to record audio for Google Slides may be the first question you have in adding audio to Google Slides. Some powerful screen capture tools can help. In this part, we will take EaseUS RecExperts as an example and teach you how to record the audio.
It's not easy to record system sound and your own voice simultaneously, but you can do that effortlessly with its help. You can choose from multiple audio sources with simple clicks and record audio on Mac or Windows computer with a built-in or external microphone.
If you are finding a powerful third-party audio recorder for recording narrations to Google Slides, this is the one you can't miss. Click on the button to download it for free.
EaseUS RecExperts
- Record computer audio and your voice easily
- Customize the format of recordings freely
- Edit the recordings with a built-in trimmer
- Record screen and Webcam simultaneously
- Export audio recordings in various formats
How to use RecExperts to capture audio for Google Slides:
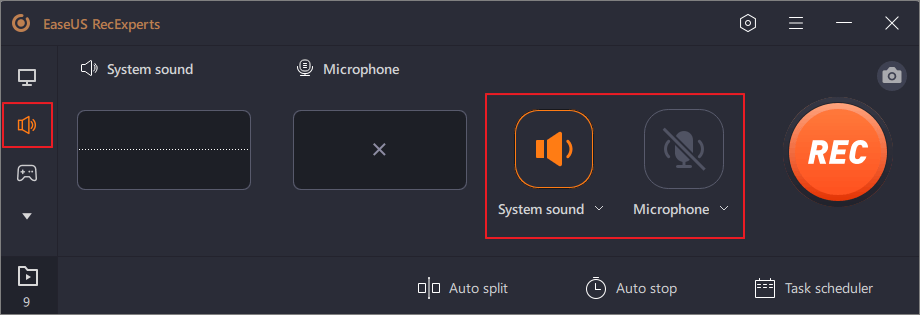
Step 1. Install and launch EaseUS RecExperts on your computer, then click "Audio" (looks like a speaker) on the left side of the main interface.
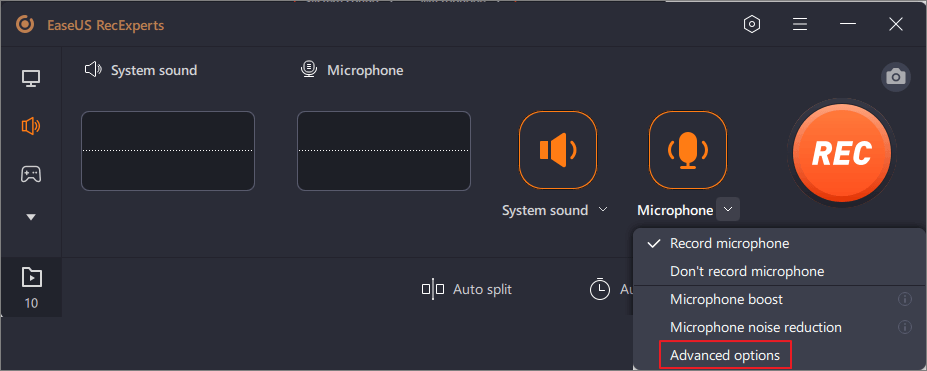
Step 2. To record the microphone sound, you need to select the "Microphone" option on the next window. You can adjust the volume and other settings by clicking on "Microphone" > "Advanced options".
Step 3. Next, click on the red "REC" button to begin your recording. To pause or stop the recording, just click on the according buttons.
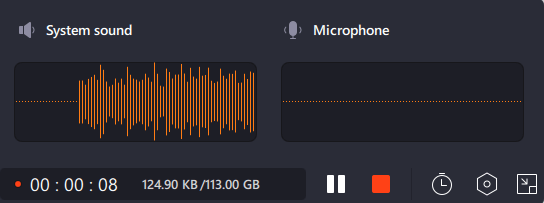
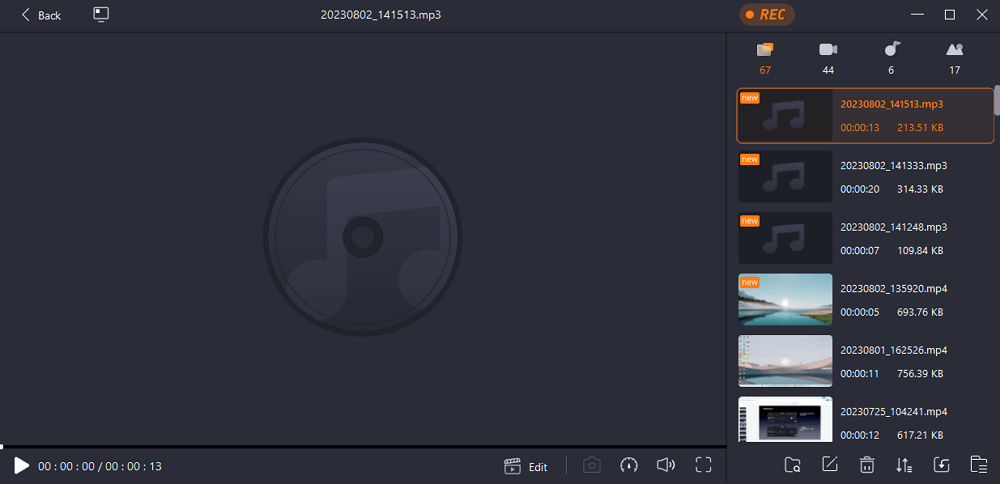
Step 4. Once done, you can find the recordings in the pop-up recording list window. Here you can listen to the recordings in the way you like.
🚩Check an intuitive video tutorial now!
- 0:00 - Launch Google Slides
- 0:45 - Start recording audio
#2. Work with Adobe Audition
Adobe Audition provides a varied array of sound and voice recording features, and everything is packed in a visually pleasing user interface. Also, it offers a fast processing speed and also a variety of other useful features. Adobe Audition is packed with a variety of sound effects that you can customize to suit your needs.
If you don't want your real voice to be heard, you may modify the original voice with sound effects.
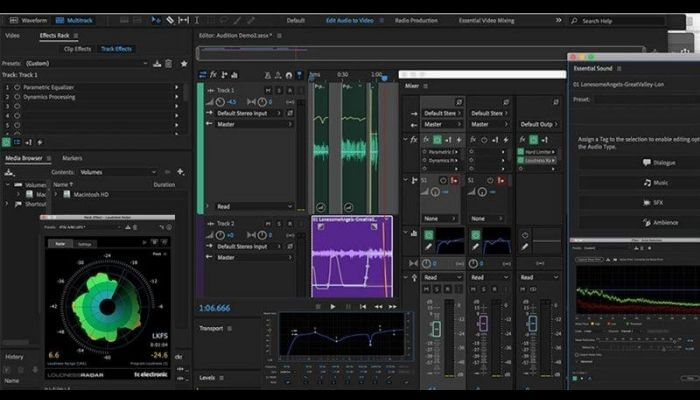
Key Features:
- A wide range of tutorials online are available
- Record audio and voice with just a few clicks
- Real-time clip stretching for fast and efficient previews
- Support adding plug-in
✅Check what Reddit users say:
New UPDATE | Insert Audio into Google Slides (Again) and Voice Narration...
byu/stewarl inteachingresources
#3. Use Online Voice Recorder
Online Voice Recorder is a convenient and simple online tool that you can use right in your browser. It allows you to record your voice using a microphone and save it as an MP3 file.
Moreover, it automatically detects silent fragments at the beginning and the end of your recording and deletes them for your convenience. After the recording is complete, you can crop it to the section you actually need.

Key Features:
- It is completely free
- No hidden payments, activation fees, or charges for extra features
- Everything recorded is accessible to the user only
- Users can adjust the microphone settings before recording
#4. TwistedWave
TwistedWave is an online audio editor. You only need a web browser to access it, and you can use it to record or edit any audio file. This tool provides other features in addition to simple editing.
For instance, in the "Effects" menu, you will find tools to increase or decrease the volume, add fade in and out effect, add silence effect, reverse the audio, change the audio's pitch and speed, and do more.
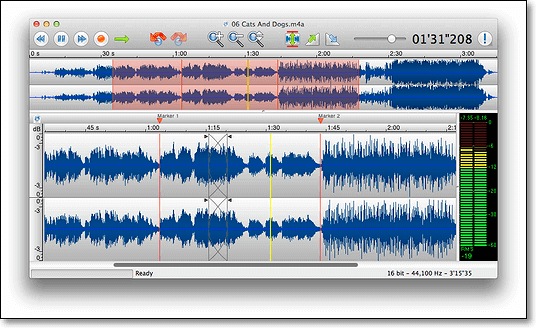
Key Features:
- No need to download anything
- Save your work automatically after closing the browser
- Users can edit mono files up to 5 minutes in length
- Allow users to record up to 5 minutes at a time
How to Add Audio to Google Slides
Now that you have recorded your audio with one of the tools described above, you need to know how to add audio to Google Slides. Just check the following tutorials:
Step 1. Move to your Google Drive, click "New" > "Folder" to create a location for saving the audio.
Step 2. Right-click on the folder created before and select the "Share" option. The audio files need to be shared so anyone with a link can play them.
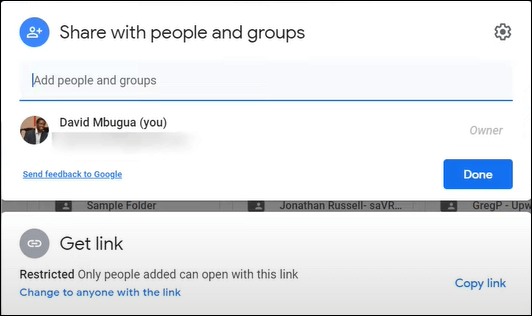
Step 3. Click on the previous folder, and drag and drop the recorded audio into it.
Step 4. Click "Insert" in the top menu bar in Google Slides. Then Choose "Audio" from the drop-down menu and browse for or search for the audio files saved in your Google Drive.
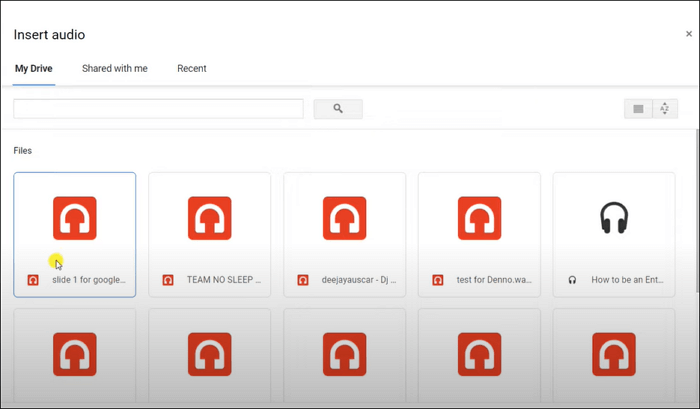
Step 5. Choose the file you want and then click "Select" to insert it into your slide. After the audio file has been added to your slide, you can edit it.
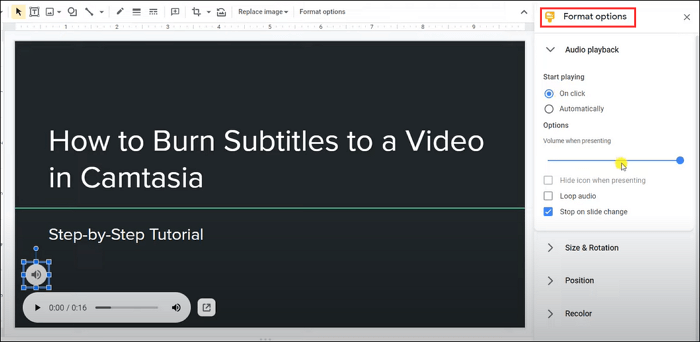
Step 6. Click on the "Audio file" icon to select it. Then click the "Format Options" button in the top toolbar. Finally, click "Audio playback" in the side panel that opens. Now, edit it as you like.
How to Record Audio on Google Slides FAQs
1. Does Google have an audio recorder?
No, there's no official audio recorder from Google. You can try a third-party app from Google Play or use third-party software like EaseUS RecExperts.
2. How do I record audio on my Chromebook?
There are many audio recorders that can be used on Chromebooks. But we suggest you try EaseUS Free Online Screen Recorder. It is rated 4.7 out of 5 by 12,249 users. It records audio on your Chromebook with downloading and installing.
3. How do I record audio files?
It depends on which device you use. Windows PC has a Voice Recorder. Mac offers Audacity. The iPhone and Android phones enable users to record audio with a built-in audio recorder.
Conclusion
In this tutorial, we give you 4 audio recorders for you to choose from. Moreover, we give you detailed steps to record voice for Google Slide with EaseUS RecExperts and add the audio to your slides.
This recorder is full-featured yet lightweight. Also, it is quite simple to use. Therefore, it is suitable for users who have no experience recording and editing an audio file. Click the button below to download and install it on your computer.
EaseUS RecExperts

One-click to capture anything on screen!
No Time Limit, No watermark
Start Recording
