-
![]()
Daisy
Daisy is the Senior editor of the writing team for EaseUS. She has been working in EaseUS for over ten years, starting from a technical writer to a team leader of the content group. As a professional author for over 10 years, she writes a lot to help people overcome their tech troubles.…Read full bio -
Jane is an experienced editor for EaseUS focused on tech blog writing. Familiar with all kinds of video editing and screen recording software on the market, she specializes in composing posts about recording and editing videos. All the topics she chooses …Read full bio
-
![]()
Alin
Alin is an experienced technical blog writing editor. She knows the information about screen recording software on the market, and is also familiar with data cloning and data backup software. She is expert in writing posts about these products, aiming at providing users with effective solutions.…Read full bio -
Jean is recognized as one of the most professional writers in EaseUS. She has kept improving her writing skills over the past 10 years and helped millions of her readers solve their tech problems on PC, Mac, and iOS devices.…Read full bio
-
![]()
Jerry
Jerry is a fan of science and technology, aiming to make readers' tech life easy and enjoyable. He loves exploring new technologies and writing technical how-to tips. All the topics he chooses aim to offer users more instructive information.…Read full bio -
![]()
Rel
Rel has always maintained a strong curiosity about the computer field and is committed to the research of the most efficient and practical computer problem solutions.…Read full bio -
![]()
Gemma
Gemma is member of EaseUS team and has been committed to creating valuable content in fields about file recovery, partition management, and data backup etc. for many years. She loves to help users solve various types of computer related issues.…Read full bio -
![]()
Shelly
"I hope my articles can help solve your technical problems. If you are interested in other articles, you can check the articles at the bottom of this page. Similarly, you can also check my Twitter to get additional help."…Read full bio
Page Table of Contents
Alin
Updated on Jun 09, 2026
0 Views |
0 min read
Key Takeaways
EaseUS RecExperts provides a straightforward way to record audio on Windows 7 with simple clicks:
- Step 1. Download and launch this EaseUS voice recorder for Windows 7 PC.
- Step 2. Select the Audio mode and choose the sound source, like system sound, microphone, or both.
- Step 3. Click the REC button to start recording.
Recording audio on Windows 7 is essential for tasks like creating podcasts, recording online meetings, and capturing lectures. Yet, the built-in Sound Recorder is often inadequate due to its basic settings and limited functionality. Professional audio recorders like EaseUS RecExperts provide a more user-friendly option, offering advanced features and simplicity for smooth audio recording. Let's delve into these methods.
Part 1. Best Way to Record Audio on Windows 7
Ideal for Windows 7 users aiming to record system audio, microphone sound, or both with no distortion.
The easiest way to record audio on Windows 7 is to use a powerful audio recorder called EaseUS RecExperts. You don't need to change any settings on your computer, just customize audio-recording settings on this program with one click. With this Windows 7 sound recorder, you can also screen record in Windows 7 with audio and webcam on your computer.
Also want to record Zoom meeting or other online meetings without notification on your PC? That may be a troublesome problem for business people. EaseUS RecExperts helps you record high-quality online meetings without notifying.
Features:
- Run smoothly on 32-bit or 64-bit Windows 7 laptops
- Record audio in MP3, OGG, WAV, FLAC, etc., formats
- Trim audio recording with in-built editor or transcribe text with its AI feature
- Start or stop recording with hotkey
Steps on how to record system audio and microphone on Windows 7 with EaseUS voice recorder:
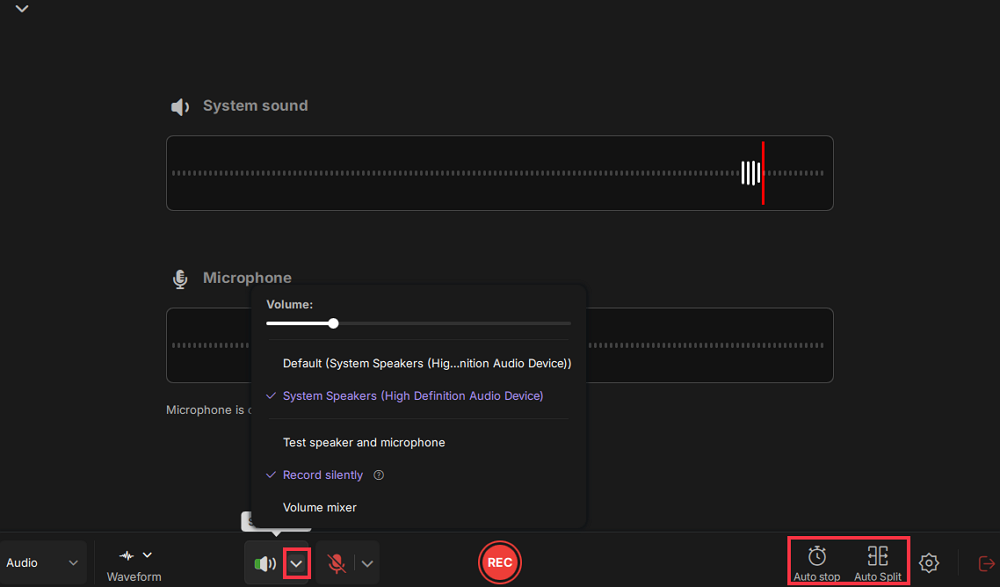
Step 1. Install and open EaseUS RecExperts on your computer, and click the Audio icon (which looks like a speaker) on the main interface.

Step 2. Click the Speaker icon to turn it on to record the internal audio. You need to turn off the microphone if you don't want to capture audio from the microphone.
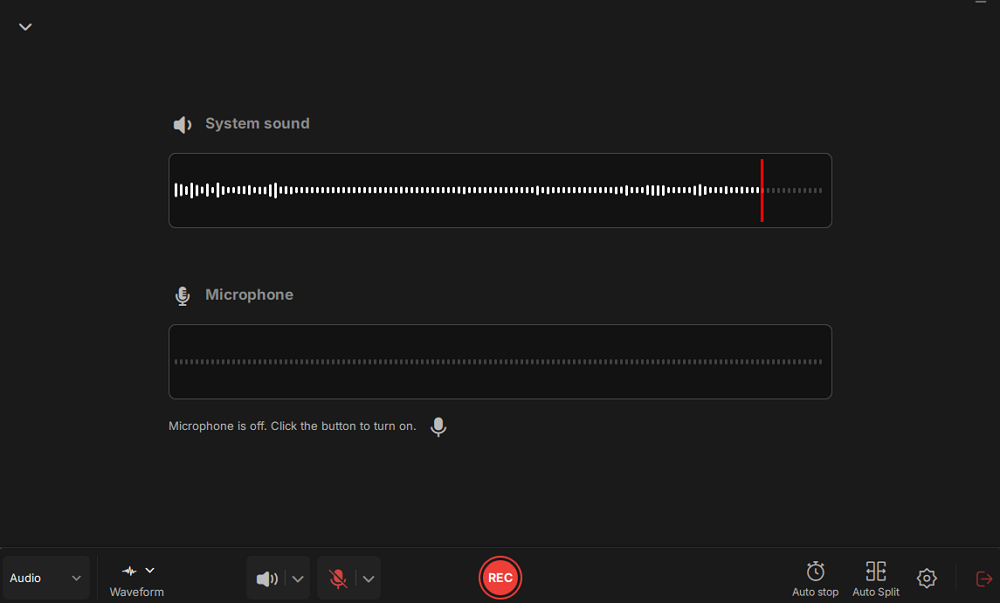
Step 3. Click the dropdown button next to Speaker to adjust the system volume and select the appropriate system speaker. You can also check the Record silently option, which allows you to record system sounds even when your computer is muted. If you need to adjust the volume further, click the Volume mixer option.
Next, click on the REC button to begin your recording.
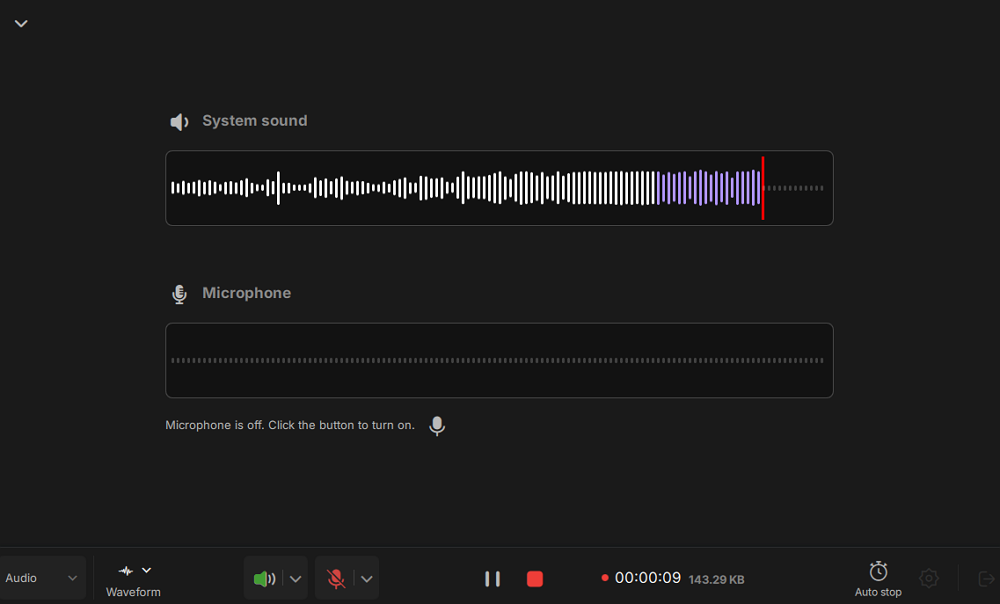
Step 4. While recording, you can pause or stop the recording by clicking on the appropriate buttons.
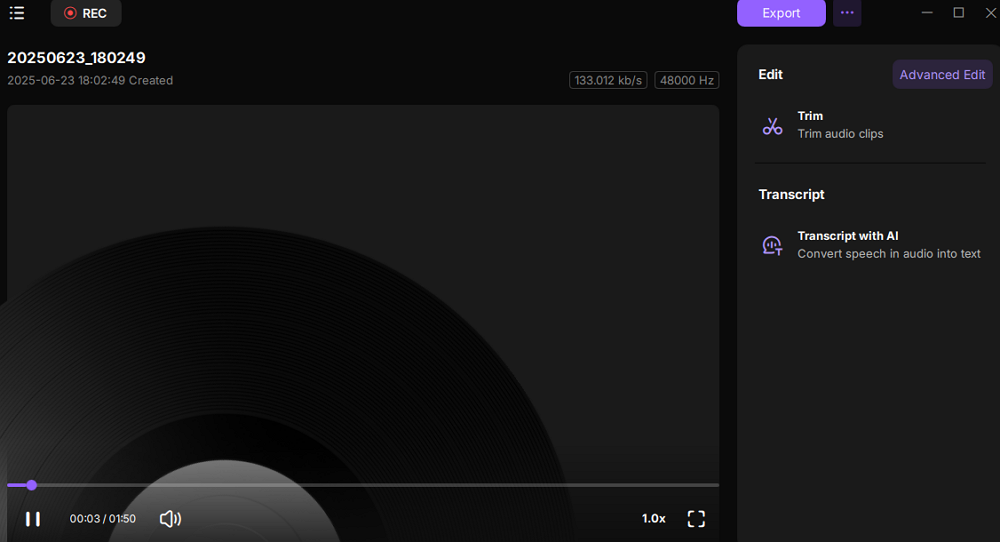
Step 6. Once you have completed the recording, you can click on the audio recording file that appears in the Recent recordings section. You can then listen to the audio using the built-in player. Additionally, you have the option to trim the audio or transcribe it into text.
Share this post now to help more people.

Part 2. Record Audio on Windows 7 with Built-in Sound Recorder
Best for users who just need basic recording and don't want to install extra software on their Windows 7 laptops.
Windows 7 comes pre-installed with an audio capture tool called Sound Recorder. All you need is a sound card and a microphone plugged in, or a webcam with a microphone built in. Your recordings are saved as Windows Media Audio files and can be played by any media player.
However, we have to say that Windows 7 Sound Recorder is just suitable for basic audio recording. It only records an audio file up to 3 hours and saves recordings in .wma. For more advanced audio recording, like various formats and post-editing, use EaseUS RecExperts.
Learn how to use this built-in Windows 7 voice recorder to record sound:
Step 1. To record system sound and microphone audio in Windows 7, you need to set up the following:
- Open the "Start Menu" and click on "Control Panel". Then, click "Sound".
- Later, go to the "Recording" tab and right-click in the empty space and select "Show Disabled Devices" and "Show Disconnected Devices"
- Look for "Stereo Mix" and right-click it to enable it.
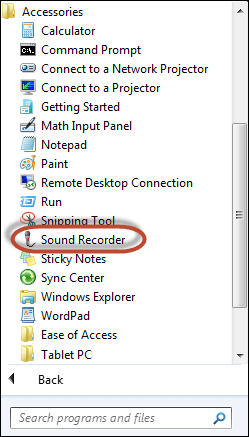
Step 2. Find Sound Recorder on your computer. You may use the two ways listed below to do so:
- Go to "Start > All programs > Accessories > Sound Recorder";
- Type the word "sound" in the "Start Menu" search box. In the "Programs" list of search results, click "Sound Recorder".
Step 3. As soon as you start the Sound Recorder, you will see the green sound bar moving according to the strength of the sound.
Step 4. When you want to finish the recording, press the "Stop Recording" button.
Step 5. If you press the "Stop Recording" button, a new window pops up. You need to choose where to put the file. The file will be saved in WMA format by default.
Share this post now to help more people.
Part 3. Audacity Sound Recorder for Windows 7 Free Download
Best for advanced recording for professionals.
Audacity is a free and open source audio recorder software for Windows 7 32-bit and 64-bit. In addition to recording audio from multiple sources, Audacity can be used for post-processing of all types of audio, including podcasts, by adding effects such as normalization, trimming, and fading in and out.
Audacity has a useful feature that can record the audio coming out of your computer—even without Stereo Mix. In Audacity, you need to choose the "Windows WASAPI" audio host and then choose an appropriate loopback device, such as "Speakers (loopback)" or "Headphones (loopback)".
Steps on how to record audio on Windows 7 with Audacity for free:
Step 1. Open the Start Menu and click "Control Panel".
Step 2. Click "Sound" and under "Recording", right-click and choose "Show Disabled Devices".
Step 3. Right-click "Stereo Mix" and choose "Enable". After that, right-click "Stereo Mix" again and choose "Set as Default Communication Device".
Step 4. Open Audacity, go to "Audio Setup > Host > Windows WASAPI".
Step 5. Click the red "Record" button to start recording. You may click the "Stop" button again to finish the recording.

Step 6. Click "File">"Export audio" or press hotkeys "Ctrl+Shift+E" to save the recorded audio file to your computer.
Part 4. How to Record Audio on Windows 7 Without a Microphone
Sometimes we don't want the recorder to record the microphone for various reasons: we don't want others to hear us, the voice from the microphone is too loud, or there is simply no need to record the microphone. Then, what should we do to let the recorder record only system sound? In fact, with only a few clicks, you can make the recorder record without a microphone.
Step 1. Click the "Headphone" button on the downright corner of your screen. It looks like a loudspeaker.
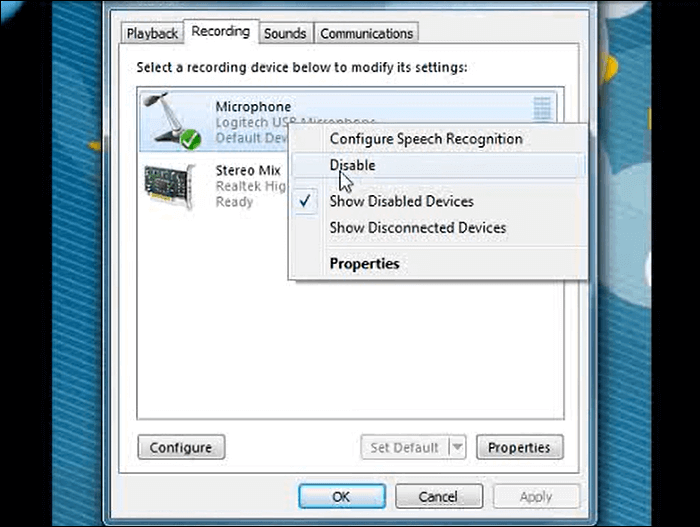
Step 2. Choose "Recording devices". In the next window, right-click Microphone and choose "Disable".
Step 3. If you see other microphones here, also right-click to disable them. Then, you may open an inbuilt audio recorder and start recording.
Share this post now to help more people.
Conclusion
The following is a comparison table of information about several solutions, hoping to help you choose the appropriate Windows 7 sound recording software.
| Features | Windows 7 Sound Recorder | EaseUS RecExperts | Audacity |
| Ease of Use | Very easy for basic tasks | User-friendly interface | More complex |
| Recording | Basic recording from microphone or headphones | Records system audio, microphone, or both |
Internet Access |
| Time Limit | Limited to 3 hours | No time limit | No time limit |
|
Formats |
WMA only | MP3, FLAC, WAV, OGG, M4A, WMV | WAV, MP3, OGG, etc. |
| Editing | No editing features | Basic editing (trim, split, convert) | Advanced editing (trim, mix, effects) |
| Price | Free | Free/Paid | Free and open-source |
EaseUS RecExperts offers a simple way to record Windows 7 audio with only one click. Therefore, we strongly recommend you download this software from the blue button below.
FAQs on How to Record Audio on Windows 7
1. Does Windows 7 have an audio recorder?
Yes, Windows 7 has a built-in audio recorder called "Sound Recorder." It allows you to record audio from a microphone or other input/output devices with some settings.
2. What is the best professional recording studio software free download Windows 7?
EaseUS RecExperts is a top audio recorder software for windows 7 free download. Other options include Audacity, OBS, and Bandicam.
3. Where are the audio files stored in Windows 7?
The default sound file path in Windows 7 is C:\Windows\Media. To change Windows 7 sound files:
Step 1. Type "change system sounds" in the Start search box and hit Enter.
Step 2. Click the "Sound" dropdown, then "Browse", select the new file, and click "Apply".