-
![]()
Daisy
Daisy is the Senior editor of the writing team for EaseUS. She has been working in EaseUS for over ten years, starting from a technical writer to a team leader of the content group. As a professional author for over 10 years, she writes a lot to help people overcome their tech troubles.…Read full bio -
Jane is an experienced editor for EaseUS focused on tech blog writing. Familiar with all kinds of video editing and screen recording software on the market, she specializes in composing posts about recording and editing videos. All the topics she chooses …Read full bio
-
![]()
Alin
Alin is an experienced technical blog writing editor. She knows the information about screen recording software on the market, and is also familiar with data cloning and data backup software. She is expert in writing posts about these products, aiming at providing users with effective solutions.…Read full bio -
Jean is recognized as one of the most professional writers in EaseUS. She has kept improving her writing skills over the past 10 years and helped millions of her readers solve their tech problems on PC, Mac, and iOS devices.…Read full bio
-
![]()
Jerry
Jerry is a fan of science and technology, aiming to make readers' tech life easy and enjoyable. He loves exploring new technologies and writing technical how-to tips. All the topics he chooses aim to offer users more instructive information.…Read full bio -
![]()
Rel
Rel has always maintained a strong curiosity about the computer field and is committed to the research of the most efficient and practical computer problem solutions.…Read full bio -
![]()
Gemma
Gemma is member of EaseUS team and has been committed to creating valuable content in fields about file recovery, partition management, and data backup etc. for many years. She loves to help users solve various types of computer related issues.…Read full bio -
![]()
Shelly
"I hope my articles can help solve your technical problems. If you are interested in other articles, you can check the articles at the bottom of this page. Similarly, you can also check my Twitter to get additional help."…Read full bio
Page Table of Contents
Rel
Updated on Jun 09, 2026
0 Views |
0 min read
Sometimes you don't need to capture the whole screen, but just a specific part. For example, you might want to highlight a section of a presentation, focus on one window during a meeting, or show only the important area in a tutorial. Recording part of the screen on Windows helps keep your video clear, concise, and easy to follow. Many users search for simple ways to select and record a region without extra editing. In this guide, you'll learn step-by-step methods to capture only the portion you need, quickly and effectively.
How to Freely Record Part of Screen on Windows
- Applies to: Windows 11/10/8/7
- Ease of Use: Easy for beginners, intuitive interface
- Key Features: Full-featured (audio, editing, scheduled recording), full version requires payment
EaseUS RecExperts is an all-in-one screen recorder that supports recording full screen as well as recording a portion of the screen. And that's why we put it first.
It lets you freely select any region of your desktop, so you can focus only on the content you want to capture without distractions. Unlike basic partial screen recording tools, it supports both system sound and microphone input, and offers extra features such as scheduled recording, automatic stop, and built-in video editing. Whether you are on Windows 10 or Windows 11, this screen recorder provides a simple interface that beginners can use easily, while still delivering the flexibility advanced users expect.
🚩How to record part of the screen on Windows PC (Windows 11/10/7):
Step 1. Install and launch this screen recorder, and select Custom on the main interface.

Step 2. Your mouse pointer will turn into a crosshair. Hold down the left mouse button to select the area you want to record. If you need to adjust the recording region, simply drag the small circles on the border of the frame.
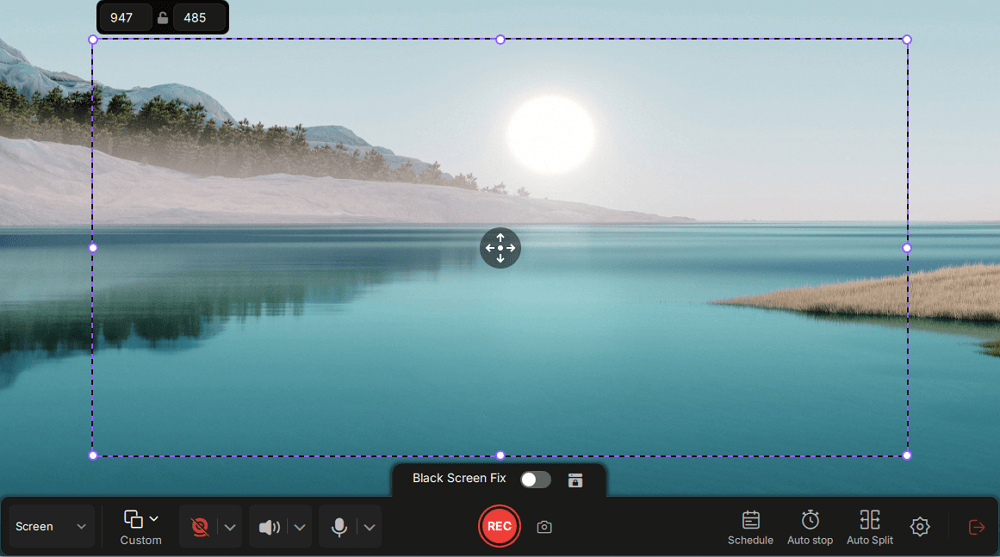
Step 3. On the recording panel, decide whether you also want to capture your webcam or audio. Once you've set your preferences, click the red REC button to start.

Step 4. After a three-second countdown, the recording will begin automatically. During the process, you can pause the recording or add annotations.

Step 5. When you're finished, click the red square button to stop the recording.
🚩Here is a YouTube video tutorial on how to record part of the screen on Windows 10:
TIME STAMP
- 00:00 Intro
- 00:51 Method 1. Use EaseUS RecExperts
- 02:10 Method 2. Record with OBS Studio
Share this post to help more users Windows record part of screen!

How to Record A Specific Part of Windows 10 Screen with OBS
- Applies to: Windows 11/10/8/7
- Ease of Use: Advanced, steeper learning curve
- Key Features: Highly customizable, region selection, professional-level controls
For users who need maximum control over recording, OBS Studio is a professional solution to record part of the screen on Windows. This open-source screen recorder allows you to capture any portion of your desktop or a specific application window, while also offering advanced features such as multiple audio tracks, scene switching, and high-quality encoding.
OBS works on both Windows 10 and Windows 11, making it versatile across systems. While it is more powerful than most built-in or lightweight tools, it has a steeper learning curve, so it’s best suited for users who are comfortable exploring detailed settings and customizing their recording workflow.
🚩How to record specific part of the screen in Windows 10 or 11 using OBS Studio:
Step 1. Download and install OBS Studio from https://obsproject.com/ if you haven't already. Launch the program.
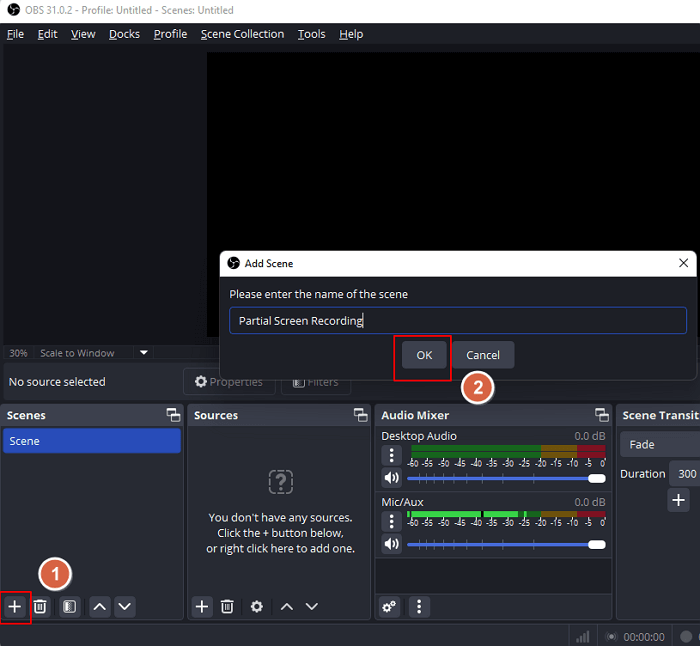
Step 2. In the Scenes box (bottom left), click the + button to create a new scene. Name it something like "Partial Screen Recording" and click OK.
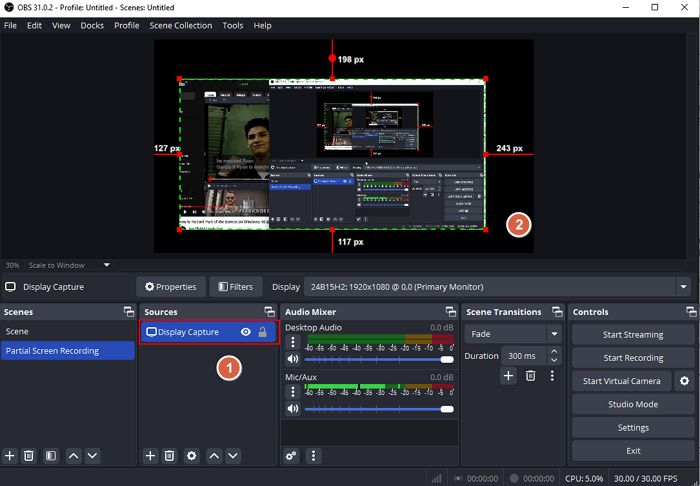
Step 3. Under the Sources box, click the + button and choose Display Capture. Name it or leave the default name, then click OK. Choose the Display you want to capture and hit OK.

Step 4. Click the source you just added to highlight it. Hold down Alt on your keyboard, then drag the red bounding box edges to crop the area you want to record. You'll see the edges turn green as you crop. Resize and position as needed.
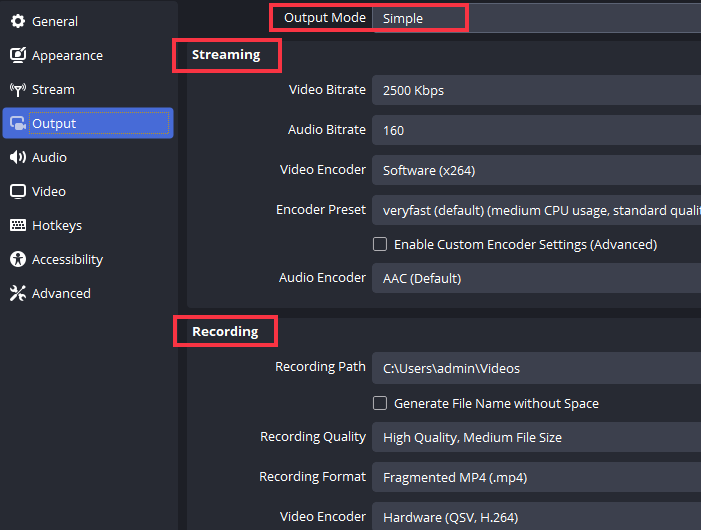
Step 5. Go to Settings > Output > Recording. Here, you can choose the recording format (MP4, MKV, etc.), recording path, bitrate, and more. Click Apply > OK to save changes.
Step 6. Click Start Recording to capture a certain section of the Windows screen. When done, click Stop Recording and find your file in the output folder you chose.

- Extra tip: If your target area is a fixed window (e.g. a browser or app), you can:
-
Add a Window Capture source instead of Display Capture.
Select the app window you want to record.
Resize/crop as needed.
Share this post to help more users Windows record part of screen!
How to Exclusively Record Selected Area Windows 11 via Snipping Tool
- Applies to: Windows 11
- Ease of Use: Very easy, beginner-friendly
- Key Features: Free and no watermark, simple region recording
The Snipping Tool is a built-in screenshot and screen recording utility in Windows 11. Originally designed just for capturing screenshots in Windows 10, it was updated in Windows 11 (22H2 and later) to support screen recording.
The updated capabilities make it super handy for quick video captures - especially if you want to record only a specific area of the screen without third-party software or screenshot Windows 11 no print screen button.
🚩How to record a specific part of screen in Windows 11 using Snipping Tool:
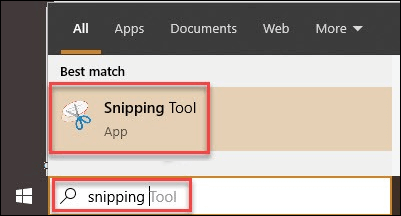
Step 1. Search for Snipping Tool in the Start menu and open the app manually.
- Tip: If you want to record video, you must launch the app manually from the Start menu (the Windows Key + Shift + S shortcut only works for screenshots).
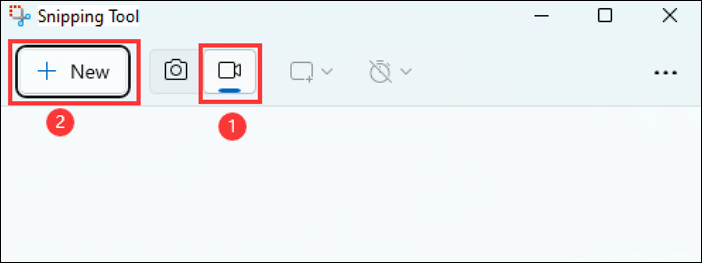
Step 2. Inside the Snipping Tool, click the video camera icon on the top toolbar to switch from screenshot mode to record mode. Then click the + New button.
Step 3. Click and drag to select the exact part of the screen you want to record. Once you let go of the mouse, a small recording toolbar will appear.
Step 4. Click the Start button on the recording toolbar. When done, click Stop.
Step 5. A preview window will open. Click Save (floppy disk icon) to choose a folder and file name for your video (saved in MP4 format).
- Important: Snipping Tool's video recording feature is only available for Windows 11 22H2 and newer versions.
Share this post to help more users record part of the screen on Windows!
How to Record a Portion of Screen in Windows 10 with Bandicam
- Applies to: Windows 11/10
- Ease of Use: Easy, beginner-friendly
- Key Features: Custom region recording, free version limited by watermark and recording time
Bandicam is a well-known screen recorder for Windows that allows users to capture a selected portion of their screen. It works on both Windows 10 and Windows 11 and provides options for recording system audio and microphone input. While popular among many users, it is a commercial tool with a free version that includes limitations such as watermarks and recording time restrictions.
How to Record a Partial Area of Screen with Bandicam:
Step 1. Launch Bandicam.
Step 2. Click on the button on the left side of the interface. And click Select a recording area or Rectangle on a screen from the drop-down menu.

Step 3. Select an appropriate recording area and click on the REC button to start recording.
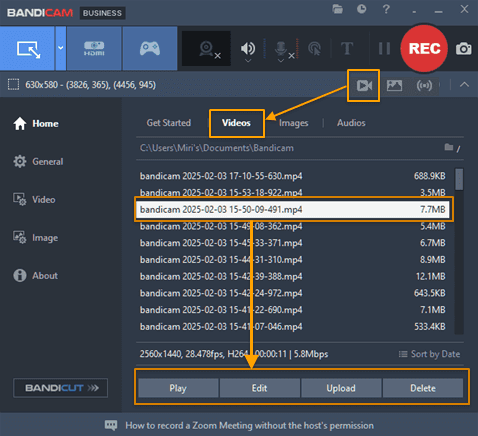
Step 4. When you want to stop recording, click on the red button again. And you can go to Home > Video to find your recordings. You can play, edit, and upload them to some websites.
Share this post to help more users Windows record part of screen!
Conclusion
To help you quickly choose the right tool for recording part of your screen on Windows, the following table summarizes the most popular options. It compares each solution based on typical use cases, ease of use, recording flexibility, and cost or free version limitations. By scanning this overview, you can easily identify which tool best fits your workflow, whether you’re a beginner looking for simplicity or an advanced user needing full customization.
| Tool | Ease of use | Flexibility |
Cost |
Scenario |
| EaseUS RecExperts | Easy | Region, audio, scheduled recording | Free/Paid | Teaching, presentations, semi-professional |
| OBS | Difficult | Multi-source, scene switching | Free | Professional tutorials, streaming |
| Snipping Tool | Very Easy | Region only, no multi-source | Free | Quick captures |
| Bandicam | Moderate | Custom region, window capture | Free/Paid | Gaming, casual recording |
FAQs About Partial Screen Recording
If you want to know more about recording a section of the screen on Windows or finding the questions quickly, these FAQs may help you.
1. How do I record only part of my screen?
Step 1. Launch EaseUS RecExperts and select "Region."
Step 2. Drag your mouse to select the recording area freely.
Step 3. Select the suitable audio source by clicking the "Sound" button.
Step 4. Click on the "REC" button to start the recording.
2. How do I record a screen section in Windows?
First of all, you need to install a screen recorder that supports freely choosing the recording region. Then, launch the recording software on your computer and select the recording area in the screen recording mode. After you adjust the settings, click on the "REC" button to start recording your screen.
3. Does Windows 10 have a screen recording tool?
Windows 10 computers are built with a screen recording tool called Xbox Game Bar. This Windows screen recorder allows users to take screenshots and create a screencast video in MP4 format. However, Game Bar only supports recording the entire screen on Windows.
4. What is the shortcut for screen recording in Windows 10?
You can press the Windows + G shortcut to open the Windows 10 screen recorder - Xbox Game Bar.
5. How do you snip a screen recording?
To snip a screen recording on Windows, you can use Snipping Tool to capture a specific part of the screen on Windows 10; or use Game Bar to record the entire screen on Windows 10 and 11.
Share this post to help more users Windows record part of screen!