-
![]()
Daisy
Daisy is the Senior editor of the writing team for EaseUS. She has been working in EaseUS for over ten years, starting from a technical writer to a team leader of the content group. As a professional author for over 10 years, she writes a lot to help people overcome their tech troubles.…Read full bio -
Jane is an experienced editor for EaseUS focused on tech blog writing. Familiar with all kinds of video editing and screen recording software on the market, she specializes in composing posts about recording and editing videos. All the topics she chooses …Read full bio
-
![]()
Alin
Alin is an experienced technical blog writing editor. She knows the information about screen recording software on the market, and is also familiar with data cloning and data backup software. She is expert in writing posts about these products, aiming at providing users with effective solutions.…Read full bio -
Jean is recognized as one of the most professional writers in EaseUS. She has kept improving her writing skills over the past 10 years and helped millions of her readers solve their tech problems on PC, Mac, and iOS devices.…Read full bio
-
![]()
Jerry
Jerry is a fan of science and technology, aiming to make readers' tech life easy and enjoyable. He loves exploring new technologies and writing technical how-to tips. All the topics he chooses aim to offer users more instructive information.…Read full bio -
![]()
Rel
Rel has always maintained a strong curiosity about the computer field and is committed to the research of the most efficient and practical computer problem solutions.…Read full bio -
![]()
Gemma
Gemma is member of EaseUS team and has been committed to creating valuable content in fields about file recovery, partition management, and data backup etc. for many years. She loves to help users solve various types of computer related issues.…Read full bio -
![]()
Shelly
"I hope my articles can help solve your technical problems. If you are interested in other articles, you can check the articles at the bottom of this page. Similarly, you can also check my Twitter to get additional help."…Read full bio
Page Table of Contents
Jerry
Updated on Jun 09, 2026
0 Views |
0 min read
Key Takeaways
Windows 7 doesn't provide a built-in tool for screen and audio recording. To capture screen on Windows 7 with audio, you can use EaseUS RecExperts:
- Step 1. Download and launch this tool on Windows 7 PC.
- Step 2. Select your desired recording area and audio source.
- Step 3. Click REC to begin your recording.
Do you know how to screen record on Windows 7? Windows 7 computers don't offer a direct option to record the computer screen, unlike Windows 10 PCs. You may have been looking for a powerful and user-friendly screen recorder that works flawlessly with Windows 7. You're lucky since we've gathered many workable solutions that mix usefulness and usability. Continue reading to learn how to use these Windows 7 screen recorders. To help you find the right method quickly, you can check out the editor's viewpoint for each solution below:
Screen Record Windows 7 with Audio Perfectly
Best for Windows 7 users who need a simple, high-quality screen recording solution for capturing desktop activities and webcam footage
EaseUS RecExperts is the best Windows 7 screen recorder we have ever used. This screen recorder can run smoothly on either 32-bit or 64-bit Windows 7 laptops. With its help, you are able to capture Windows 7 desktops with the audio or even a webcam simply. Whether you're recording tutorials, webinars, or streaming videos, this tool provides flexible options to record the full screen, a specific window, or a custom area.
What we like about this tool is that it supports many advanced recording features, including schedule recording, unlimited time recording, etc. Besides, it is lightweight, easy to use, and doesn't consume excessive system resources, making it ideal for older Windows 7 laptops. It provides a free trial, but some functions are only available in the Pro version.
You can perform the following steps to screen record your Windows 7 computer.
Step 1. Launch EaseUS RecExperts. You'll see six recording modes available. Choose Full Screen to capture everything on your display, Custom to record a selected area, Window to record a specific app window, Game for optimized gameplay recording, Audio to capture system or microphone sound only, and Webcam to record your webcam feed.

Step 2. Select your input sources. You can freely enable or disable the Webcam, Speaker, or Microphone depending on your needs. If you only want to record a silent screen, simply turn all of them off.

Step 3. Click the red REC button to start recording. A floating control bar will appear on your screen. To pause the recording, click the Pause button (white); to stop it, click the Stop button (red).
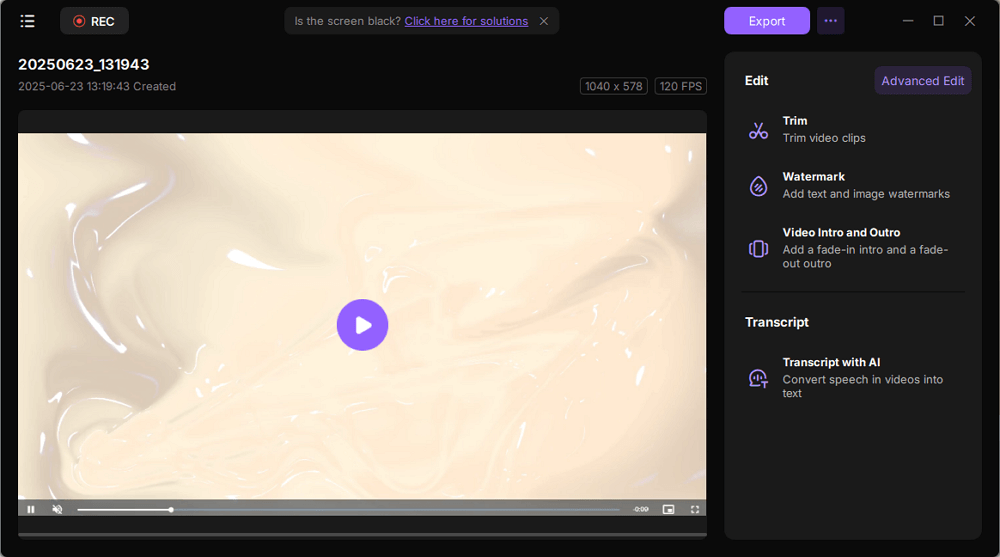
Step 4. After recording, you'll be taken to the preview window, where you can watch, trim, or edit your recording with ease.
Spread out this post to help more users now!
Record Screen in Windows 7 Free via PowerPoint
Best for Windows 7 users who need a simple, built-in way to record presentations or tutorials (without sound)
Besides using a professional Windows 7 screen recorder, you can also use a tool you frequently use in your daily or work life. It is PowerPoint. In fact, PowerPoint can also be used as a screen recorder to capture a computer's display. You can also save the recording as a distinct video file in PowerPoint. However, you need to keep in mind that the screen recording feature is limited to PowerPoint 2013 and later versions, and it cannot capture your system sound. If you need to capture your Windows 7 screen with system sound, you'd better try EaseUS RecExperts.
Here's how to use Microsoft PowerPoint to record a Windows 7 computer screen.
Step 1. Open PowerPoint, and then create a new slide.
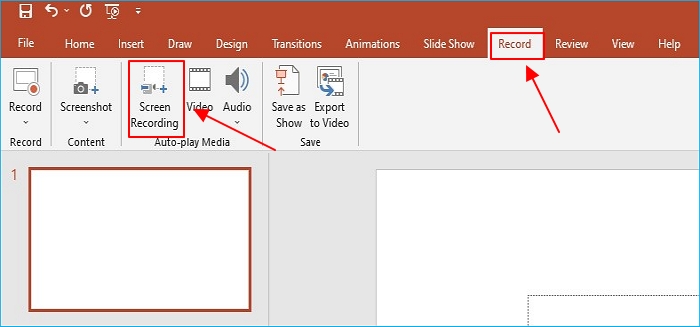
Step 2. Then head for the Record tab and click on Screen Recording.
Step 3. You may select a particular area to record by clicking the Select Area button in the newly revealed screen recording dock. Your system audio and cursor movement will automatically be recorded as well. Switch between these settings, or if you prefer, use the Windows + Shift + U keys to deselect Audio and the Windows + Shift + O keys to turn off the option to record the pointer.
Step 4. The recording will be kept and embedded on the slide you open when you click the Stop to end it. Right-click the preview image and choose Store Media to save the recording as a separate file. Next, name your recording and select an output location. Finally, click the Save option to store your recording successfully.
Record Screen in Windows 7 with Shortcut Key Directly
Best for Windows 7 users who want to capture step-by-step actions for troubleshooting or creating basic tutorials
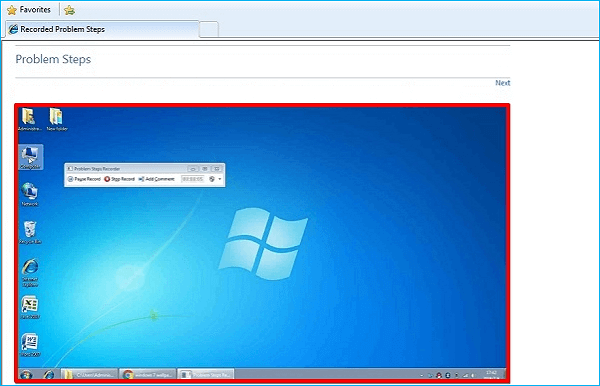
Despite not having built-in screen recorders, Windows 7 PC is designed with a hidden screen recorder called Problem Steps Recorder that allows you to record screenshots of your computer actions. The recording is, however, saved as an HTML file. Therefore, Problem Steps Recorder is NOT a screen recorder that can record video of a computer screen. Still, it comes in handy when you need to record a computer issue or show how to use a program or game on a computer.
If you want to record a video of your screen on Windows 7, you will need to use a third-party screen recording tool, like EaseUS Windows 7 screen recorder.
Step 1. Click on Start > Accessories > Problem Steps Recorder.
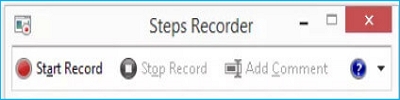
Step 2. When you see the Steps Recorder window, click on Start Record.
Step 3. You can select Add Comment, highlight the area you wish to annotate, then type in your comments as you go through each step you want to record.
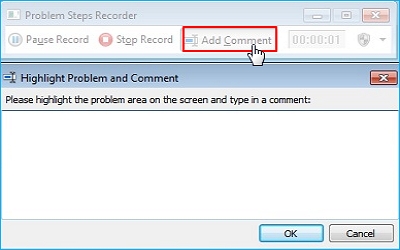
Step 4. Click on Stop Record when you're done. The recording will be saved as a .zip file, which a web browser can unzip and view.
Record Screen in Windows 7 Without Any Software
Best for Windows 7 users who want to capture Windows 7 screen without downloading any software
Is it possible to record Windows 7 screen without any software? The answer is YES. You can complete the task with EaseUS Online screen recorder. This online service lets you start capturing your Windows 7 laptop screen directly in your browser. All you need to do is just to open the tool, choose recording source, and click REC. That's it! But compared other offline software, it will export recording in a lower quality.
Step 1. Open this online Windows 7 screen recorder, and click Start Recording.

Step 2. Choose your recording source, like a Tab, Window, or entire screen. Once selected, click Share.
Step 3. Then, it will start screen recording on your Windows 7 computer.
Share this post now!

Find the Best Way to Record in Windows 7
To help you find the method that fits your needs best, you can take a look at the following table:
| Ease of use | Very easy | Moderate | Moderate | Very easy |
| Custom Recording Area | ✅ | ❌ | ❌ | ❌ |
| Audio recording | ✅ | ✅ | ❌ | ✅ |
| High FPS Recording | ✅ | ❌ | ❌ | ❌ |
| Recording quality | Up to 4K | 720P | N/A | 720P |
| Editing features | ✅ | ❌ | ❌ | ❌ |
| Watermark | ❌ | ❌ | ❌ | ✅ |
To conclude, EaseUS RecExperts is the most comprehensive choice for high-quality screen recording on Windows 7. Just hit the below button to get it!
How to Screen Record on Windows 7 FAQs
1. Does Windows 7 have a screen recorder?
There isn't a built-in or default screen recorder in Windows 7. However, on Windows 7 devices, numerous methods exist to record your screen, such as using EaseUS RecExperts, VLC, PowerPoint, and Problem Steps Recorder. If you want more advanced options, a professional screen recorder, like EaseUS RecExperts, will be your best choice.
2. What's the best screen recorder for Windows 7?
EaseUS RecExperts is one of the most Windows 7 screen recorders for free download. Apart from that, here are some other options you can check out:
- OBS Studio
- Camstudio
- Bndicam
3. Does PC have screen recording?
To begin screen recording, press Windows + Alt + R keys. On the screen, most commonly in a corner, a tiny recording widget displays the time you've been recording. However, it is only available for Windows 10 and later version.