-
![]()
Daisy
Daisy is the Senior editor of the writing team for EaseUS. She has been working in EaseUS for over ten years, starting from a technical writer to a team leader of the content group. As a professional author for over 10 years, she writes a lot to help people overcome their tech troubles.…Read full bio -
Jane is an experienced editor for EaseUS focused on tech blog writing. Familiar with all kinds of video editing and screen recording software on the market, she specializes in composing posts about recording and editing videos. All the topics she chooses …Read full bio
-
![]()
Melissa Lee
Melissa Lee is an experienced technical blog writing editor. She knows the information about screen recording software on the market, and is also familiar with data cloning and data backup software. She is expert in writing posts about these products, aiming at providing users with effective solutions.…Read full bio -
Jean is recognized as one of the most professional writers in EaseUS. She has kept improving her writing skills over the past 10 years and helped millions of her readers solve their tech problems on PC, Mac, and iOS devices.…Read full bio
-
![]()
Jerry
Jerry is a fan of science and technology, aiming to make readers' tech life easy and enjoyable. He loves exploring new technologies and writing technical how-to tips. All the topics he chooses aim to offer users more instructive information.…Read full bio -
Larissa has rich experience in writing technical articles. After joining EaseUS, she frantically learned about data recovery, disk partitioning, data backup, screen recorder, disk clone, and other related knowledge. Now she is able to master the relevant content proficiently and write effective step-by-step guides on various computer issues.…Read full bio
-
![]()
Rel
Rel has always maintained a strong curiosity about the computer field and is committed to the research of the most efficient and practical computer problem solutions.…Read full bio -
![]()
Gemma
Gemma is member of EaseUS team and has been committed to creating valuable content in fields about file recovery, partition management, and data backup etc. for many years. She loves to help users solve various types of computer related issues.…Read full bio
Page Table of Contents
Melissa Lee
Updated on Jun 20, 2024
0 Views |
0 min read
Some Mac users complain that they can't enjoy high quality when using conferencing apps with the inbuilt Mac camera. The situation is changed now. With the release of macOS Ventura, or macOS 13.0, a new feature called Continuity Camera is offered to users.
With this new feature, users can enjoy better quality in apps like FaceTime, Zoom, and even QuickTime, etc. When using QuickTime screen recording with audio, this feature will also give users a better experience. In this article, we will show you how to do macOS Ventura Screen Recording with this new feature.
🍏We tested and compared the inbuilt and some third-party screen recorders for macOS Ventura. And EaseUS RecExperts is testified as the best choice for most people. Download it and check the comparison information below.
Download EaseUS Screen Recorder
Download EaseUS Screen Recorder
Trustpilot Rating 4.7
| 🗂️Methods | ⏱️Effectiveness | 😁Difficulty |
|---|---|---|
| EaseUS RecExperts | High - Record macOS Ventura screen with internal/external audio. | ⭐ |
| QuickTime Player | Medium - Need an extension to record the internal audio. | ⭐⭐⭐ |
| VLC Media Player | Medium - Record different parts of the screen on Mac. | ⭐⭐ |
| OBS Studio | High - Record multiple windows on your Mac. | ⭐⭐⭐⭐ |
macOS Ventura Screen Recording with EaseUS RecExperts for Mac
The recordings quality captured by QuickTime on earlier versions is not so satisfying. Therefore, macOS Ventura allows users to use their iPhone as the camera when taking a recording. However, this makes the operation even more complicated.
In this case, a third-party Windows and Mac screen recorder, EaseUS RecExperts, seems a better choice. It allows users to capture any area of the screen, along with the internal audio, microphone sound, and even the webcam.
Besides, it supports screen recording with audio on Mac without a time limit or lag, which is best for gameplay and streaming video recording. Check more features of it below.
Main features:
- Record streaming video and audio as you like
- Deal with gaming videos and online discussion
- Schedule recording to set the duration of recording time
- Record and save the recorded videos in HD quality
- Record Google Meet, Zoom, and other conferences
Now, download the tool from the button below and follow the tutorial to record the screen on Mac.
Download EaseUS Screen Recorder
Download EaseUS Screen Recorder
Trustpilot Rating 4.7
Step 1. Download and launch EaseUS RecExperts on your Mac. To capture the whole screen, click on the "Full Screen" button from the main interface. If you want to customize the recording area, choose the "Region" button.
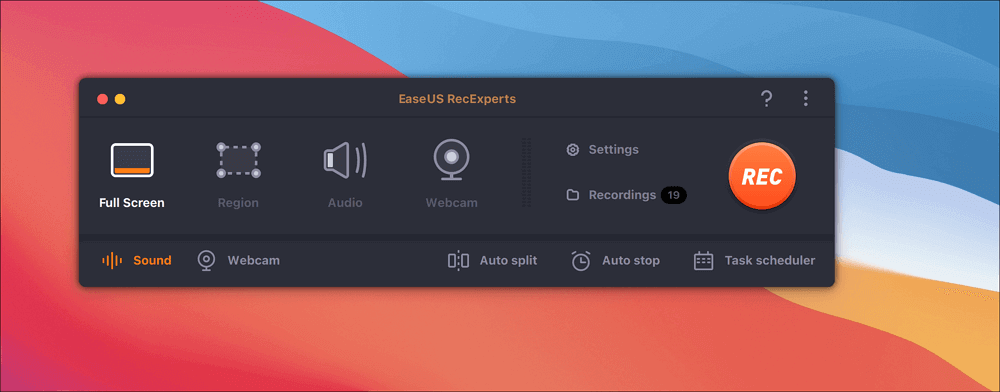
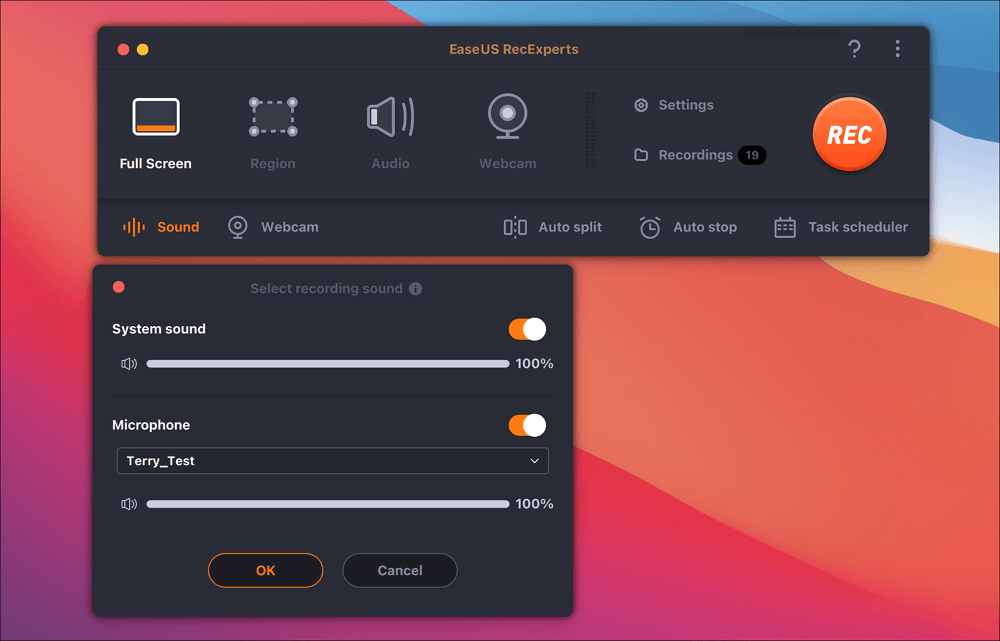
Step 2. To record the screen with audio, hit the Sound icon from the bottom left side of the toolbar. The audio resources can be your external sound or system audio. Based on your needs, enable the target option.
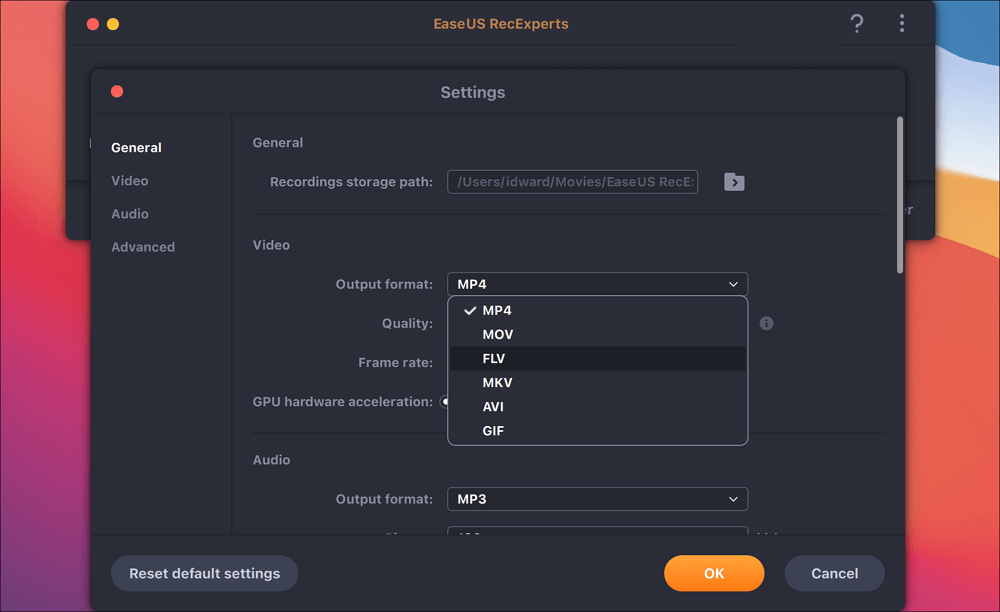
Step 3. Before capturing, you can change the output format of the recorded video by clicking "Settings" from the main interface. Then, scroll down the menu of Output format for Video. Choose the output type as you like.
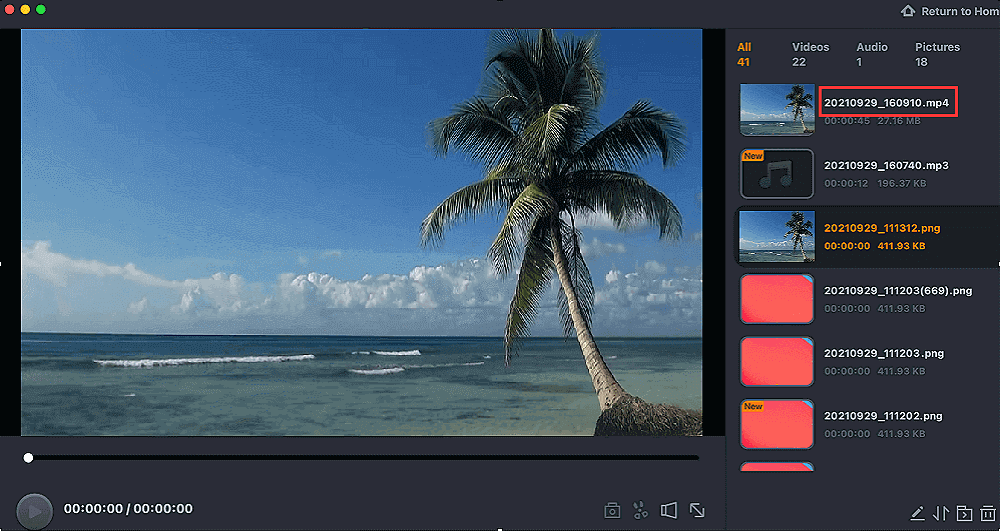
Step 4. Once done, click the REC button to begin recording. It captures anything displayed on your Mac screen. When you are done, click the Stop button. Then you can watch the recorded video from "Recordings".
macOS Ventura Screen Recording with QuickTime Player
The operation of screen recording on macOS Ventura is generally the same as that of other system versions. The only difference is that you can get better quality with the Continuity Camera feature. With this new feature, you can use phone as webcam when screen recording with a webcam on a Mac computer.
Of course, if you want to use this feature, the iPhone and Mac computers must both meet some requirements. And you need to change the settings before starting recording. But no worries, we will show you what you need to do in the following content. All you need to do is to follow the steps below.
The requirements for your devices:
- Mac running macOS Ventura;
- iPhone 8 or later running iOS 16.
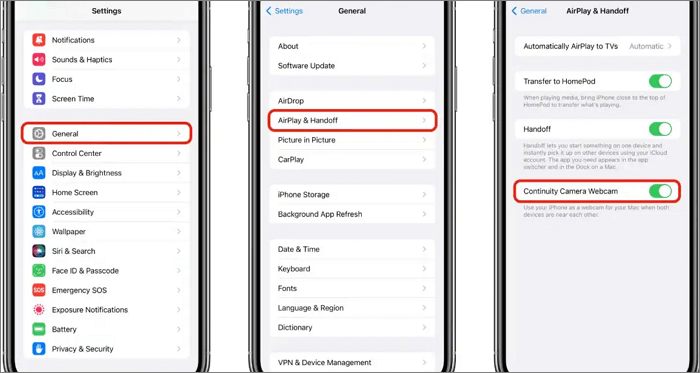
Change settings in your iPhone:
- 1. Open the "Settings" app on your iPhone.
- 2. Tap "General" and then "AirPlay & Handoff".
- 3. Flip the switch on for the "Continuity Camera Webcam".
Now, you can start macOS Ventura Screen Recording by following the steps below.
Step 1. In QuickTime Player, click on "File" and "New Movie Recording".
Step 2. The recording window will appear with the camera view. There's a menu next to the "Record" button and the name of your iPhone should appear in the list of available cameras. You need to tick your iPhone as your webcam.
Step 3. Click the "Record" button next to the down arrow to begin recording. Click it again to stop recording.
Step 4. After recording, you can edit the video by clicking on "Edit" at the top of the window. For instance, you can rotate or cut it if you like.
Step 5. When finished, the recorded video will be saved as a MOV file by default.
Record Screen on Mac with VLC Media Player
VLC Media Player is a popular open-source and cross-platform tool to record, edit, convert, and play media files. With this Mac recorder, you can record the screen with easy operation. Recording streaming audio on Mac will be super easy.
Apart from capturing video, this tool can convert your audio files to video or vice versa. After converting file formats, you can preview the converted media files with one click. Here is a list of steps on how to screen capture on a Mac with VLC Media Player.
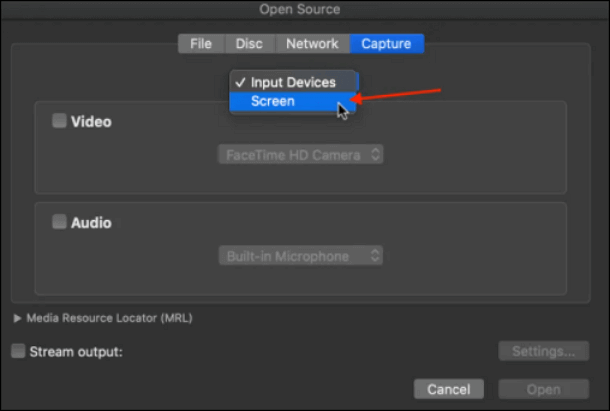
Step 1. Download VLC Media Player and launch it. Choose "Media" > "Stream" and select "Capture Device".
Step 2. In a new window, find "Capture mode" and select "Desktop". This will allow the tool to record the screen. You are also allowed to choose the desired frame rate if you want.
Step 3. Click "Stream" and then "Next". Here you can choose the saving path in the "New destination". After that, you can start recording by clicking on the "Record" button. The recorded video will be saved to where you just appointed.
Record Screen on Mac with OBS Studio
The last method we give you to record the Mac screen is using OBS Studio. As an open source screen recorder for Mac users, this app is popular among many users, especially among those experienced ones.
Even so, this software actually offers features for both novice and advanced users. If you have no experience in screen recording on Mac, you don't have to worry about anything.
Note that it supports macOS 10.13 and after, please make sure your Mac meets the requirement. Below are the quick steps for recording the screen with OBS on Mac.
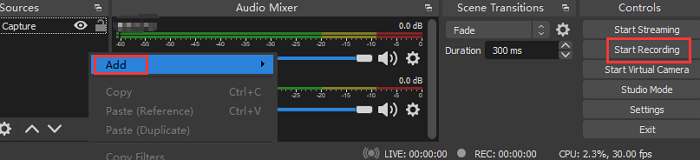
Step 1. Launch the software, and click the "+" icon in the "Sources" box to proceed.
Step 2. Select "Display Capture" from the options list and click "OK".
Step 3. Go to "Settings" and then "Output", and select "Recording Path" to determine where the file will be saved.
Step 4. Hit the blue "Start Recording" button to start recording. To stop recording, click on the "Stop Recording" button.
FAQs about macOS Ventura Screen Recording
In this part, we gathered some frequently asked questions relating to the macOS Ventura screen recording. Let's have a look at them together.
1. Does macOS have screen recording?
Yes, you can still use the QuickTime Player app to record the screen on your Mac. Plus, with the Continuity Camera feature, you can use your iPhone as the webcam to get better quality.
2. How do I turn on screen recording on Mac?
Just follow the steps here.
Step 1. On your Mac, choose the "Apple" menu and then "System Preferences".
Step 2. Click "Security & Privacy" then click "Privacy".
Step 3. Select "Screen Recording". Tick the checkbox next to an app to allow it to record your screen.
3. How to screen record on MacBook Monterey?
Follow the steps below:
Step 1. On your Mac, press Shift-Command-5 (or use Launchpad) to open "Screenshot" and display the tools.
Step 2. Click a tool to select what you want to capture or record.
Step 3. Start the screenshot or screen recording in different modes:
- To capture the entire screen or a portion of it: Click "Capture".
- To capture a window: Move the pointer to the window, then click the window.
- To record recordings: Click "Record". To stop recording, click the "Stop Recording" button in the menu bar.
Conclusion
In this article, we showed you how to do macOS Ventura screen recording with QuickTime, using iPhone as your webcam with the new Continuity Camera feature. Also, we give you some other ways to screen record on Mac computers with easy steps.
Among all the methods, we suggest you download EaseUS RecExperts for Mac and use it to record the screen on macOS Ventura as it is newly updated to adapt to this new system. It will offer you a smooth recording, viewing, and editing process only if you choose it.
Download EaseUS Screen Recorder
Download EaseUS Screen Recorder
Trustpilot Rating 4.7
EaseUS RecExperts

One-click to capture anything on screen!
No Time Limit, No watermark
Start Recording