-
![]()
Daisy
Daisy is the Senior editor of the writing team for EaseUS. She has been working in EaseUS for over ten years, starting from a technical writer to a team leader of the content group. As a professional author for over 10 years, she writes a lot to help people overcome their tech troubles.…Read full bio -
Jane is an experienced editor for EaseUS focused on tech blog writing. Familiar with all kinds of video editing and screen recording software on the market, she specializes in composing posts about recording and editing videos. All the topics she chooses …Read full bio
-
![]()
Alin
Alin is an experienced technical blog writing editor. She knows the information about screen recording software on the market, and is also familiar with data cloning and data backup software. She is expert in writing posts about these products, aiming at providing users with effective solutions.…Read full bio -
Jean is recognized as one of the most professional writers in EaseUS. She has kept improving her writing skills over the past 10 years and helped millions of her readers solve their tech problems on PC, Mac, and iOS devices.…Read full bio
-
![]()
Jerry
Jerry is a fan of science and technology, aiming to make readers' tech life easy and enjoyable. He loves exploring new technologies and writing technical how-to tips. All the topics he chooses aim to offer users more instructive information.…Read full bio -
![]()
Rel
Rel has always maintained a strong curiosity about the computer field and is committed to the research of the most efficient and practical computer problem solutions.…Read full bio -
![]()
Gemma
Gemma is member of EaseUS team and has been committed to creating valuable content in fields about file recovery, partition management, and data backup etc. for many years. She loves to help users solve various types of computer related issues.…Read full bio -
![]()
Shelly
"I hope my articles can help solve your technical problems. If you are interested in other articles, you can check the articles at the bottom of this page. Similarly, you can also check my Twitter to get additional help."…Read full bio
Page Table of Contents
0 Views |
0 min read
Streaming audio has become part of our daily life, whether it's music on Spotify, a live podcast, or an online lecture. The problem? Most streaming platforms don't let you download audio directly, which makes it hard to save your favorite tracks or listen offline. That's where recording comes in.
By using the right streaming audio recorder, you can capture streaming audio on Windows, Mac, mobile, or even directly from your browser. In this guide, we'll walk you through the best methods to ensure you get clear, high-quality recordings.
Is It Legal to Record Streaming Audio?
The short answer: yes, but only for personal use. Streaming platforms like Spotify, YouTube, and Apple Music hold strict copyright licenses, which means the content is intended for streaming, not redistribution.
If you record audio for private reasons, such as listening offline, keeping a backup of an online lecture, or saving a podcast to review later, that's usually considered acceptable. However, once you start sharing those files with friends, uploading them online, or using them for commercial purposes, you risk violating copyright laws and the platform's terms of service.
To stay safe, always treat your recordings as personal copies only. Think of it like making a note for yourself, practical and legal, privately, but not something to pass around.
Easiest Way to Record Stream Music on Windows and Mac
👍Best for: Beginners and professionals who want a reliable, no-lag streaming audio recorder with system and microphone support.
EaseUS RecExperts is an all-in-one screen and audio recorder that lets you capture streaming audio from any website, app, or media player. It supports both system sound and microphone recording, so you can even add voiceovers to your clips if needed. Its clean interface and powerful features make it a top choice for both casual and advanced users.
This internal sound recorder allows you to choose an audio output format to select the suitable format that meets your demands. For instance, it can be an MP3 recorder as the MP3 format is universal and compatible with most communication software, so that you can share it easily. FLAC is also appropriate for obtaining high-fidelity audio.
You can capture streaming music easily with this rich-featured sound recording tool! To get it done, free download this powerful audio recorder first.
🚩How to Record Streaming Audio on Windows 10 or 11:
Step 1. Launch EaseUS RecExperts and choose Audio mode (looks like a speaker) from the main interface.
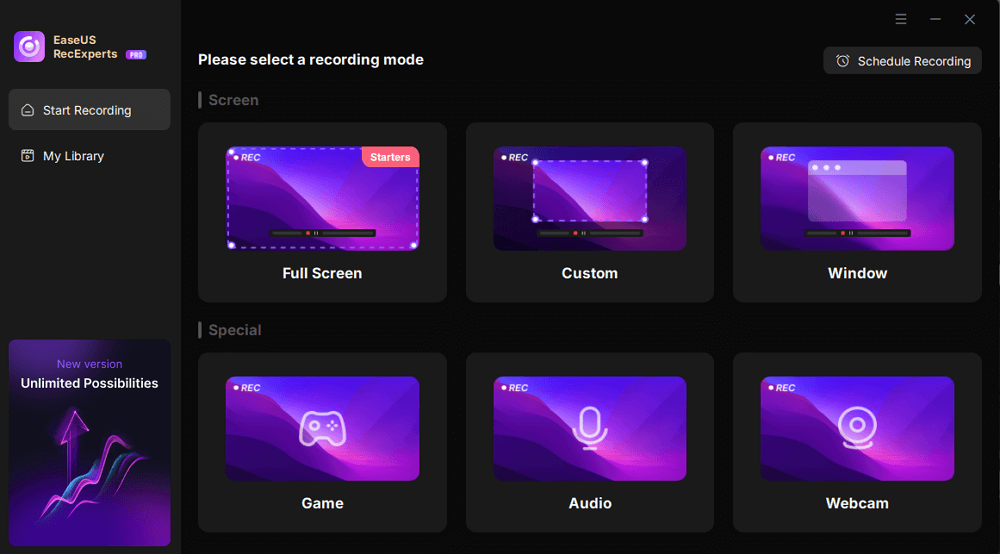
Step 2. Select the sound source by clicking on the speaker sign (the system sound) or the mic sign (the microphone). Or, you can record them both at the same time.
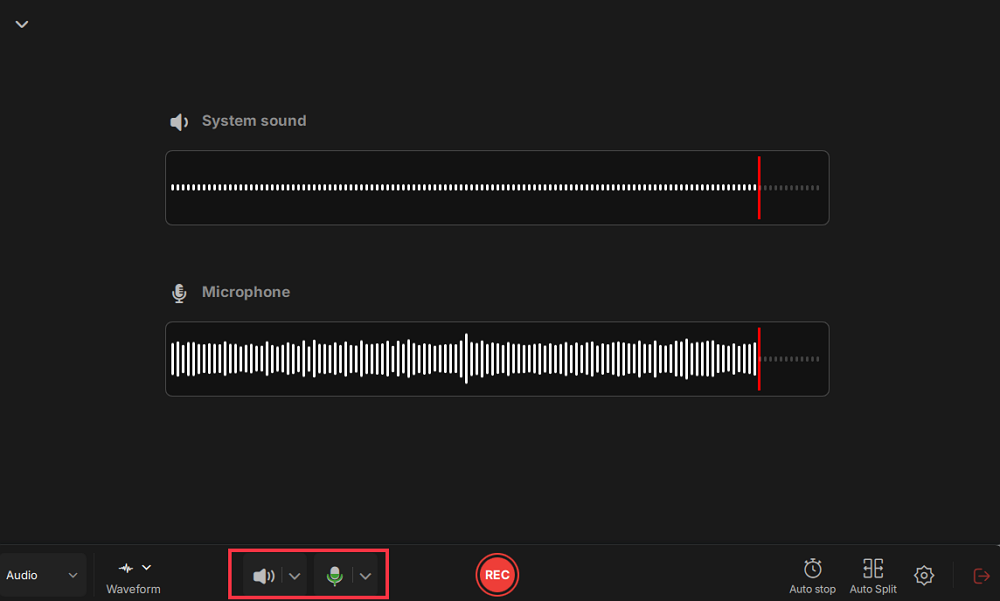
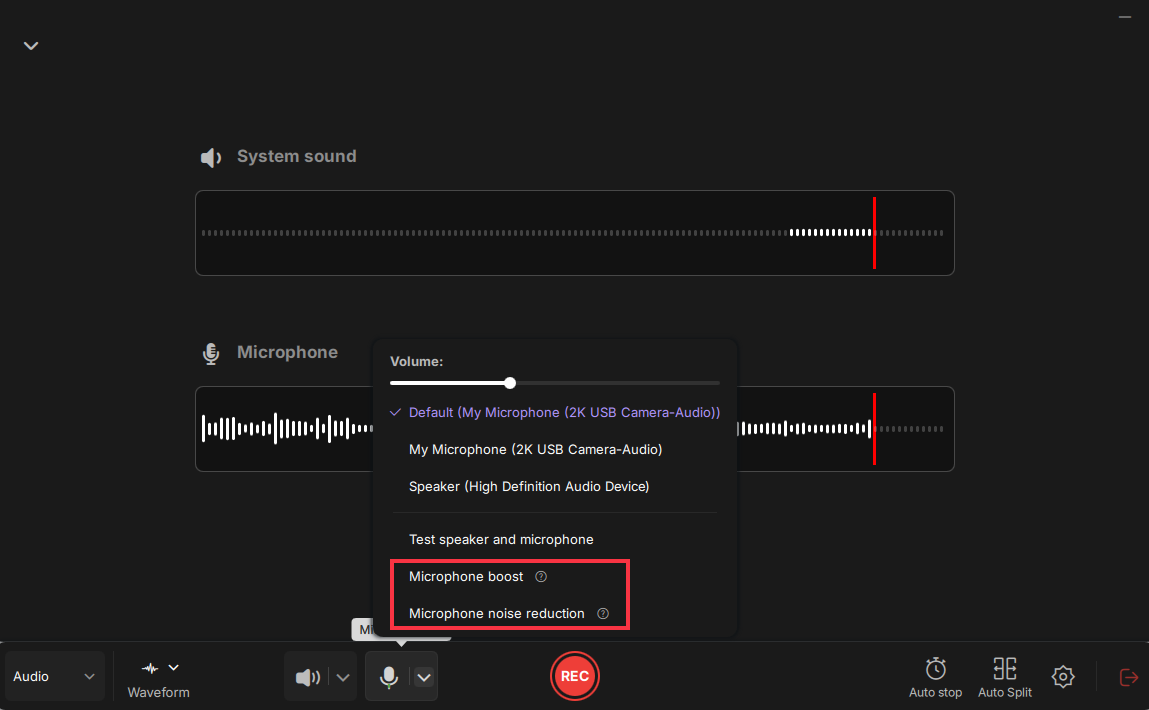
Step 3. Click the drop-down buttons next to the Speaker and Microphone to adjust the audio source settings.
- In the Speaker tab, you can adjust the volume, test the speaker and microphone, record silently, or open the volume mixer.
- In the Microphone tab, you can also enable Microphone boost and Microphone noise reduction features.
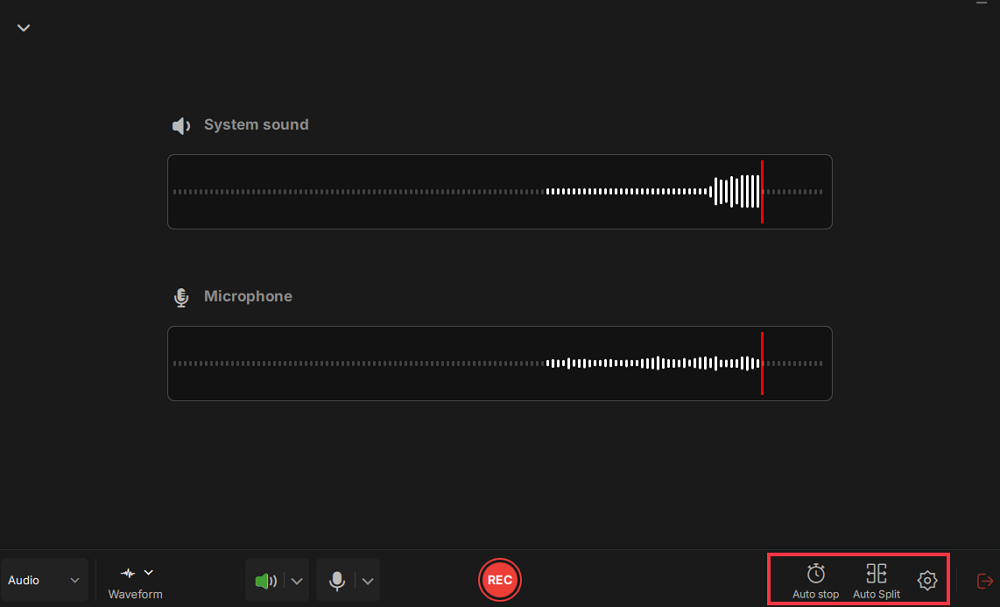
Step 4. To change the output format, bitrate, or sampling rate, you can click the Settings button in the lower right corner of the page. Of course, you can also set the automatic stop audio recording and automatic audio segmentation as needed.
Step 5. Hit the REC button to start recording audio. To finish it, just click on the red square icon to stop the recording.
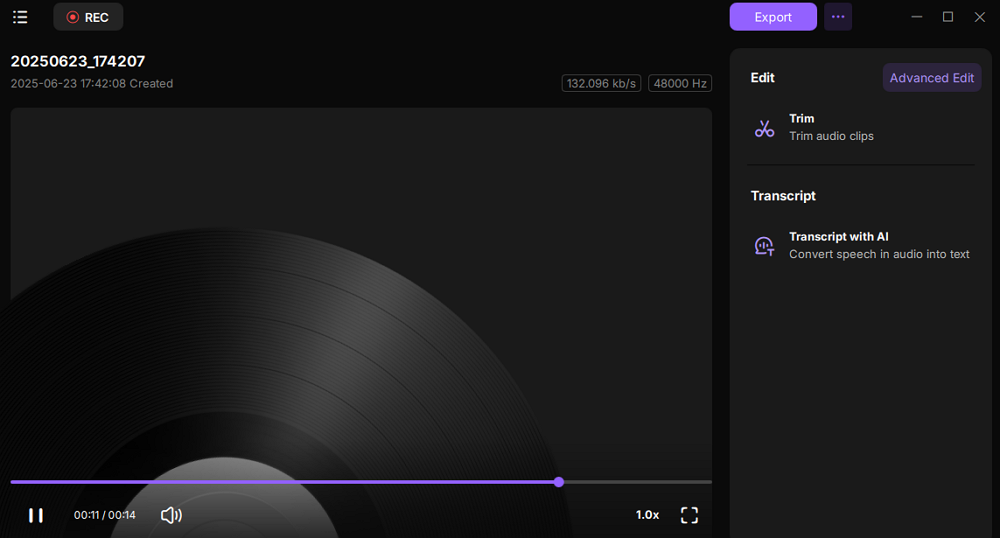
Step 6. Once finished, the audio recording will be saved automatically. You can listen to or edit the recording with built-in tools.
How to Capture Streaming Audio Free on Mac and Windows
Recording streaming audio doesn't have to be complicated, and you don't need to spend money to get high-quality results. Two popular free tools that work on both Mac and Windows are Audacity and VLC Media Player. Here's how to use each of them.
1. Audacity
👍Best for: Users who need a free tool with advanced editing features and don't mind a complex setup.
Audacity is a free, open-source audio recording and editing software available on both Mac and Windows. It's popular among podcasters, musicians, and educators because it combines recording, editing, and exporting all in one tool. While it doesn't capture system audio by default, pairing it with a virtual audio device (BlackHole on Mac or Stereo Mix on Windows) makes internal audio recording possible.
Step 1. Install Audacity and set the audio input.
- For Mac: Install BlackHole (2-channel) and select it as your system audio output in Audio MIDI Setup.
- For Windows: Select Windows WASAPI as the audio host and choose your playback device (speakers or headphones) as the recording source.
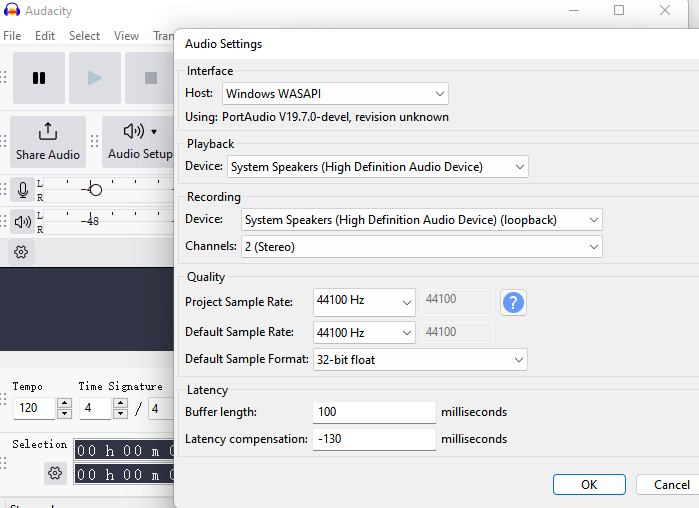
Step 2. Open Audacity, select the virtual device as the recording source.
- Mac: Choose BlackHole 2ch
- Windows: confirm WASAPI: [Your Playback Device] is selected
Step 3. Click Record and play your streaming audio.
Step 4. Stop and export your recording (MP3, WAV, or FLAC).
2. VLC Media Player
👍Best for: Tech-savvy users who prefer an open-source, free method to capture basic streaming audio.
VLC Media Player isn't just a video player; it's also a hidden gem to record audio from website. Though the interface is a bit dated, VLC allows users to convert and stream audio input, making it a good no-cost option if you're comfortable with a few advanced settings.
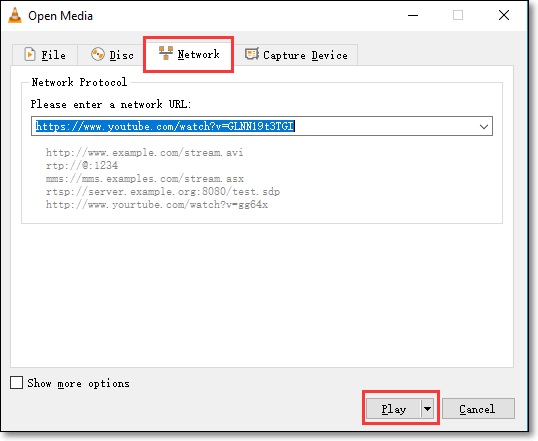
🚩How to Record a Streaming Audio with VLC Media Player:
Step 1. Launch VLC and click Media > Open Network Stream... to open the online streaming audio that you are going to record. In the following dialog box, paste the streaming music URL.
Step 2. Click the arrow beside "Play" to bring up the streaming option. Select the Stream and Next options.
Step 3. In the following window, choose File followed by Add. Then, you can choose a location to save your recorded streaming audio file by clicking Browse.
Step 4. After that, in the Stream Output window, uncheck the check box of Active Transcoding and click Next. Once done, click on the Stream button to begin capturing streaming music.
🔍Share this post about how to record streaming audio!
How to Record Streaming Audio on iPhone/Android
Mobile phones don't support direct system audio recording due to privacy restrictions, but there are a few workarounds. Here's how to record streaming music, podcasts, or voice chats on iPhone and Android using built-in or third-party apps.
1. Voice Memo [iPhone]
👍Best for: iPhone users who want a built-in and easy way to record external streaming audio via speaker playback.
The Voice Memos app on iPhone can't record internal audio directly due to iOS limitations. However, if you're playing streaming audio on speaker, it can record it through the built-in microphone. This is useful for capturing lectures, streaming radio, or voice content when quality isn't your top concern.
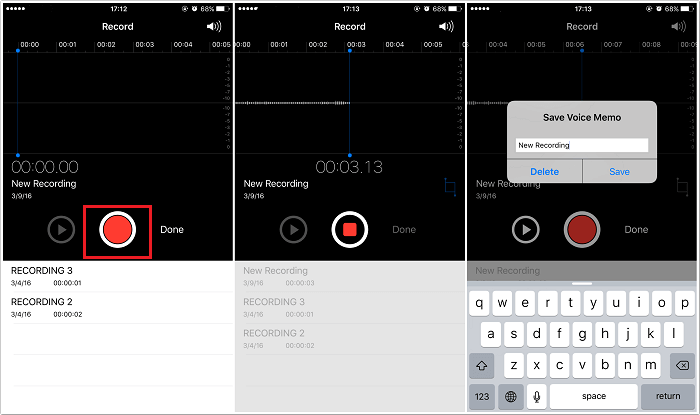
🚩Steps to Record Streaming Audio on iPhone using Voice Memos:
Step 1. Open the Voice Memos app from your iPhone's home screen.
Step 2. Tap the red Record button to start recording.
Step 3. Play the streaming audio from your phone speaker or an external device.
Step 4. Tap Stop when you're done.
Step 5. You can rename, trim, or share the audio file directly within the app.
🔍Share this post about how to record streaming audio!
2. Smart Audio Recorder [Android]
👍Best for: Android users who want a lightweight and accurate voice recording app for capturing streaming audio from speakers or surroundings.
Smart Voice Recorder is a well-reviewed Android app designed for long-term, high-quality sound capture. While it doesn't offer internal audio recording (unless rooted), it performs exceptionally well when recording external audio like streaming content played aloud.
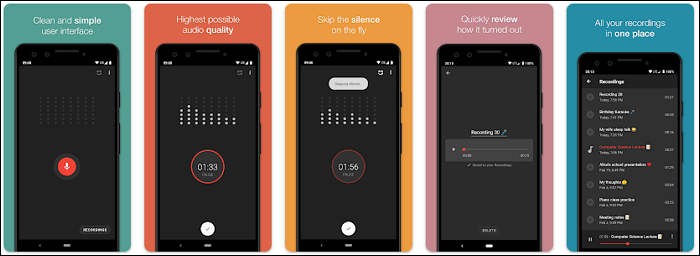
🚩Steps to Record Streaming Audio on Android with Smart Voice Recorder:
Step 1. Download Smart Voice Recorder from the Google Play Store.
Step 2. Launch the app and tap the Start Recording button.
Step 3. Play the streaming audio through your phone speaker or external speaker.
Step 4. Tap Stop once you're finished.
Step 5. Rename or share the recording as needed.
🔍Share this post about how to record streaming audio!
How to Record Streaming Sound Online
👍Best for: Users who need a free, no-installation tool to record audio from their browser using a microphone.
If you don't want to install any software, browser-based streaming audio recorders are a convenient solution. They work directly in Chrome, Firefox, or Safari and are great for quick, lightweight tasks like recording audio from YouTube, webinars, or internet radio.
Online Voice Recorder by EaseUS is a widely used browser-based tool that lets you capture sound via your microphone. While it can't record internal system audio directly (due to browser security limitations), it works perfectly for voiceovers or recording streaming sound played through speakers.
🚩Steps to Record Streaming Audio Using Online Voice Recorder:
Step 1. Go to its official website, and click Start Recording.
Step 2. Then, after a 3-second countdown, play your steaming audio, and it will capture the sound automatically.
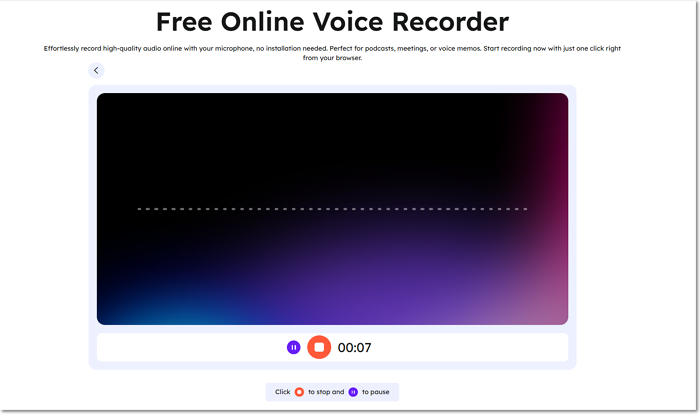
Step 3. Click Stop when finished, and you can hit Save recordings to download and keep it on your local device.
🔍Share this post about how to record streaming audio!
Tips for High-Quality Streaming Music Recording
Capturing streaming audio at its best quality depends on proper setup and careful configuration. Follow these essential tips to ensure clear, distortion-free recordings:
1. Optimize system audio levels
- Avoid setting the volume too low (which can introduce noise) or too high (which can cause distortion or clipping).
- Maintain consistent playback volume during recording for even sound quality.
2. Select high-quality output formats
- Use WAV or FLAC for lossless, high-fidelity recordings.
- Use MP3 for smaller files without significant loss in quality.
3. Configure your recording software properly
- Make sure the correct audio source (system audio/virtual device) is selected.
- Enable stereo channels if available to capture richer, more detailed sound.
Conclusion
Whether you're capturing audio from YouTube, Spotify, Zoom meetings, or any livestream, the right tool depends on your operating system, quality requirements, and how much control you want. Here's a quick summary of the top streaming audio recording software we covered.
- EaseUS RecExperts stands out for its balance of power and simplicity, especially on Windows.
- Audacity is a great free option for those needing post-recording audio edits.
- On mobile, built-in voice recorders do well for mic-based tasks, but can't grab internal audio unless jailbroken or rooted.
- Online tools are perfect for casual use, but have limitations in capturing system sound due to browser sandboxing.
🔍Share this post about how to record streaming audio!
FAQs About Recording Streaming Audio
Some related issues gathered from the public are listed here.
1. How do I record a streaming audio?
Follow steps to record audio on Mac/Windows. Choose EaseUS RecExperts as audio recording software.
1. Download EaseUS RecExperts and choose the "Audio" option.
2. Turn on the two buttons to choose a suitable audio source. Then play the streaming music you want to record and click "REC" to begin the recording.
3. Once done, the recorded file can be saved to your PC.
2. Which is the best streaming audio recorder?
The 5 best streaming audio recorders are:
- EaseUS RecExperts
- Audacity
- VLC Media Player
- QuickTime Player
- OBS Studio
3. How to record audio from computer on Mac?
There are many ways to record streaming music on Mac. For the detailed tutorials, you can move to Part 2 to get more information.
4. Can Audacity record streaming audio?
Yes, it can. Audacity comes with audio recording capability. You can get the details from the guide above.
5. Can I record streaming audio legally?
Yes, but it depends on your location and how you intend to use the recording. In general, personal use (such as recording a lecture or a music stream to listen offline privately) is tolerated under fair use in many countries. However, sharing, distributing, or monetizing recorded content without permission can violate copyright laws. Always check local regulations and respect platform terms of service.
6. Why can't I record internal audio on iPhone or Android?
Both iOS and Android restrict access to internal audio recording for privacy and DRM reasons. Most built-in or third-party apps can only record microphone input. To record system sound, you'd typically need a workaround like using a PC to mirror and capture the audio output, or specialized hardware. Some Android devices running older versions or rooted firmware may allow internal recording with apps like ScreenCam or ADV Screen Recorder, but this is not recommended for most users.
7. What format should I save streaming audio in?
MP3 is the most universal and widely supported audio format, suitable for music, podcasts, and voice recordings. If you want higher quality and don't mind larger file sizes, consider WAV or FLAC. Tools like EaseUS RecExperts let you choose your preferred format when exporting your recording.
🔍Share this post about how to record streaming audio!
EaseUS RecExperts

One-click to capture anything on screen!
No Time Limit, No watermark
Start Recording
