-
![]()
Daisy
Daisy is the Senior editor of the writing team for EaseUS. She has been working in EaseUS for over ten years, starting from a technical writer to a team leader of the content group. As a professional author for over 10 years, she writes a lot to help people overcome their tech troubles.…Read full bio -
Jane is an experienced editor for EaseUS focused on tech blog writing. Familiar with all kinds of video editing and screen recording software on the market, she specializes in composing posts about recording and editing videos. All the topics she chooses …Read full bio
-
![]()
Alin
Alin is an experienced technical blog writing editor. She knows the information about screen recording software on the market, and is also familiar with data cloning and data backup software. She is expert in writing posts about these products, aiming at providing users with effective solutions.…Read full bio -
Jean is recognized as one of the most professional writers in EaseUS. She has kept improving her writing skills over the past 10 years and helped millions of her readers solve their tech problems on PC, Mac, and iOS devices.…Read full bio
-
![]()
Jerry
Jerry is a fan of science and technology, aiming to make readers' tech life easy and enjoyable. He loves exploring new technologies and writing technical how-to tips. All the topics he chooses aim to offer users more instructive information.…Read full bio -
![]()
Rel
Rel has always maintained a strong curiosity about the computer field and is committed to the research of the most efficient and practical computer problem solutions.…Read full bio -
![]()
Gemma
Gemma is member of EaseUS team and has been committed to creating valuable content in fields about file recovery, partition management, and data backup etc. for many years. She loves to help users solve various types of computer related issues.…Read full bio -
![]()
Shelly
"I hope my articles can help solve your technical problems. If you are interested in other articles, you can check the articles at the bottom of this page. Similarly, you can also check my Twitter to get additional help."…Read full bio
Page Table of Contents
Jane Zhou
Updated on Jun 09, 2026
0 Views |
0 min read
Recording audio on a Mac might seem simple, but many users often run into problems. The system doesn't allow direct recording of internal audio, and recordings can end up with unwanted noise. Forums are full of similar questions: some users on the Apple Community complain that QuickTime cannot capture system sound, others on the OBS forum share how they use virtual audio drivers to record internal Mac audio, and some on MacRumors describe spending hours just to figure out a setup that actually works.
These discussions show that recording audio smoothly on a Mac is not always easy. In this article, we'll draw on real forum experiences to explore common issues, present practical solutions, and share tips to help you record Mac sound efficiently in various scenarios.
Pain Points Users Face When Recording on a Mac
Capturing audio on a Mac might seem straightforward, but many users quickly run into unexpected problems. Forum discussions reveal that most frustrations fall into a few key areas:
1️⃣Unable to Record System Audio on Mac Directly
Many users assume that simply opening QuickTime or another recording app, such as Voice Memo, will capture all sounds on their Mac, but macOS does not provide native support for internal audio recording.
2️⃣Inconsistent Audio Quality
Even when recording just the microphone, users frequently report problems such as noise or latency. OBS and Audacity forums are full of users sharing failed recording attempts and discussing tweaks, like adjusting sample rates, audio interfaces, or software settings, to improve quality.
3️⃣Installation and Setup Issues
To capture internal audio coming from Mac, users often need to install virtual audio drivers (like BlackHole or Soundflower). System security settings can block or complicate the installation and authorization process. Many users on MacRumors or OBS forums recount spending hours troubleshooting before finally finding a combination that works.
From these forum discussions, it's clear that the challenges Mac users face when recording audio go beyond mere software issues. The difficulties stem from a combination of system limitations, diverse recording needs, and complex setup requirements.
Proven Ways Mac Users Rely on for Audio Recording
Browsing through major forums, it's clear that Mac users tend to rely on three main approaches for audio recording: the built-in system tools, virtual audio driver setups, and professional recording or screen capture software. Each option suits different needs and reflects what users value most, whether it's simplicity, advanced features, or overall stability.
Way 1. QuickTime or VoiceMemo (Built-in Tools)
Best for: Recording microphone input (lectures, interviews, voice notes)
The biggest advantage of macOS's built-in audio recording software is that it's secure, stable, and ready to use right away. On the Apple Community forum, many users mention that QuickTime is perfectly adequate when they only need to record their own voice, for example, when taking lecture notes or preparing podcast drafts.
Here's how to record Mac sound with QuickTime:
- Open QuickTime, then click File > New Audio Recording.
- Before recording, click the small arrow next to the record button and select your input device, like a built-in microphone or an external mic.
- Once done, hit the record button to start and save your file when finished.

Summary:
This option requires no setup and works reliably for quick voice recordings. However, it cannot capture internal system audio, making it less ideal for users who need to record application sound or system playback. It's best suited for those who just want to "get the recording done" without dealing with extra configurations.
Way 2. Virtual Audio Driver with Free Recording Software
Typical setup: BlackHole or Soundflower + QuickTime (Audacity, or OBS Studio)
Best for: Recording system audio, such as music, browser sound, or streaming audio, and for users who want to mix system and microphone input without a bit of setup.
macOS doesn't allow direct internal audio recording by default, which is why forum discussions are full of users turning to virtual audio drivers. Tools like BlackHole or Soundflower create a "virtual channel" that routes your system sound to the recording app. This setup is widely shared across Reddit and OBS forums as a flexible and free solution that works once configured correctly. As one user put it:
After pairing BlackHole with OBS, I can finally record Chrome's audio without delay — it just works.
r/MacOS
Here's the setup guide for Mac system sound recording:
- Install BlackHole (2ch version is enough for most users).
- Open Audio MIDI Setup > create a new "Multi-Output Device".
- Check both your regular output (e.g., Mac speakers) and BlackHole.
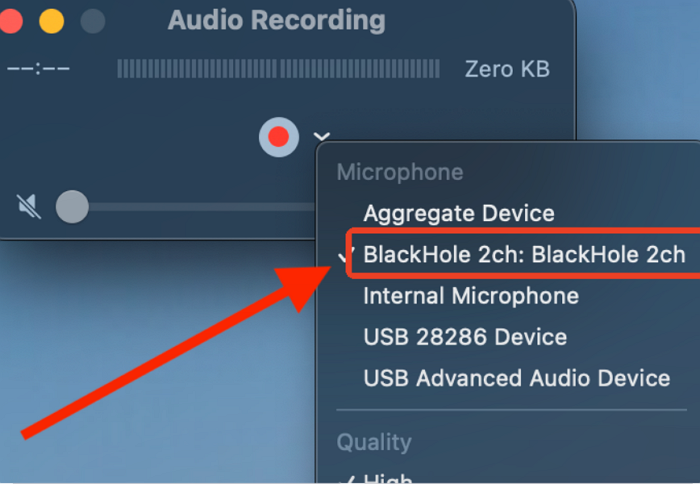
- In QuickTime, go to File > New Audio Recording, then select BlackHole as the input source.
- Start recording, and now both system sound and mic input can be captured.
Summary:
The virtual driver setup offers maximum flexibility and is entirely free, but it does require some technical patience. Once configured, it's a reliable way to capture any sound your Mac plays, and a favorite among power users who record meetings, streaming audio, or game soundtracks.
Way 3. Professional Recording Software - EaseUS RecExperts
Best for: Users who want an all-in-one solution to record both system and microphone audio with minimal setup.
After trying several tools on macOS, I found EaseUS RecExperts to be one of the easiest and most stable options for recording system sound without additional setup. Unlike virtual drivers that require manual routing, RecExperts lets you capture system and mic audio simultaneously with just one click. The recording stays in sync and clear even during long sessions or multitasking.
Key highlights from testing:
- Captures system and mic audio simultaneously
- Records screen and audio together for meetings or demos
- Auto-stop and schedule recording features make unattended recording easy
- Basic noise reduction and trimming are built in
- Exports recordings instantly in MP3, MP4, or MOV formats
Here's how to record sound on your Mac with RecExperts:
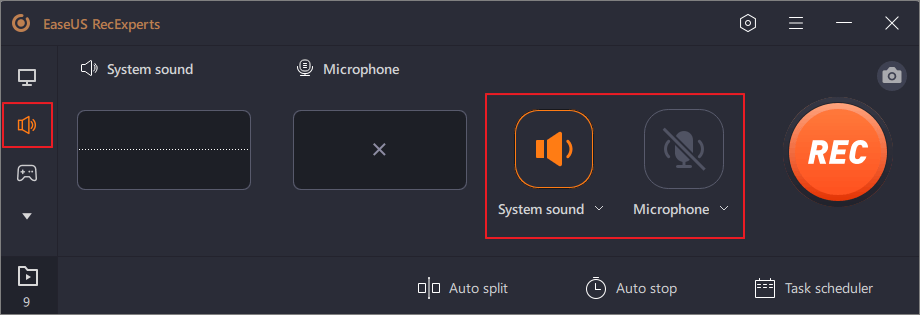
Step 1. Launch EaseUS RecExperts and choose "Audio" (looks like a speaker) from the left side of the interface. Select the sound source by clicking on the speaker sign (the system sound) or the mic sign (the microphone). Or, you can record them both at the same time.
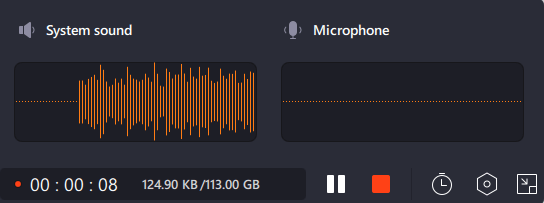
Step 2. Hit "REC" button to start recording audio. To finish it, you just click on the red square icon to stop the recording.
Step 3. After that, the recording list window will pop up automatically. You can listen to or edit the recording with built-in tools.

Summary:
From personal testing, RecExperts strikes a good balance between ease of use and recording quality. It's ideal for users who don't want to deal with audio drivers but still need professional results for meetings, tutorials, or music capture on Mac.
Practical Tips for Better Mac Sound Recording
Even with the right setup, Mac audio recording can have small hiccups. Here are some quick tips:
✅Reduce noise: Use an external mic if possible, enable noise reduction in your software, and record in a quiet space.
✅System audio issues: Make sure virtual drivers are installed and selected correctly; match sample rates; check microphone and screen permissions in System Settings.
✅Long recordings: Schedule recording when possible, save to an external drive, and split long sessions into smaller clips.
✅Software tips: Adjust input gain in QuickTime, test audio levels before recording with OBS or virtual driver setups, and use EaseUS RecExperts' one-click system and mic recording for convenience.
Conclusion
Recording audio on a Mac can be challenging due to system limits and diverse user needs. Built-in tools like QuickTime are simple and reliable for microphone input, virtual audio driver setups capture both system and mic audio with more flexibility, and EaseUS RecExperts offers an all-in-one, stable solution for screen recording or multi-source projects.
No matter which method you choose, testing before recording, adjusting settings, and managing long sessions carefully can prevent common issues. Pick the approach that fits your scenario: quick voice notes, try built-in tools; record system or app audio, use virtual drivers; capture high-quality multi-source recording, get EaseUS RecExperts.
FAQs About How to Record Sound on Mac
1. Does Mac have a built-in audio recorder?
Yes. macOS includes QuickTime Player and Voice Memos, which can record microphone input without any additional software. However, they cannot capture system audio (the sound your Mac produces internally).
2. Can you just record audio on a Mac?
Yes, you can record audio using built-in tools for microphone input. For recording system or app audio, you need either a virtual audio driver (like BlackHole or Soundflower) or a third-party recording app such as EaseUS RecExperts or OBS.
3. How do I turn on recording on my Mac?
- Open QuickTime Player > select File > New Audio Recording.
- Choose your input device (built-in or external microphone).
- Click the record button to start and stop when finished.
- Make sure your Mac has microphone permissions enabled in System Settings > Privacy & Security.
4. Why does my Mac recording have noise or echo?
Common reasons include:
- Background noise or poor microphone quality
- Incorrect input/output settings or mismatched sample rates
- Software settings (e.g., lack of noise reduction)
- Acoustic issues in the recording environment
- Solutions include using a quality mic, enabling noise reduction, checking levels before recording, and recording in a quiet space.