-
![]()
Daisy
Daisy is the Senior editor of the writing team for EaseUS. She has been working in EaseUS for over ten years, starting from a technical writer to a team leader of the content group. As a professional author for over 10 years, she writes a lot to help people overcome their tech troubles.…Read full bio -
Jane is an experienced editor for EaseUS focused on tech blog writing. Familiar with all kinds of video editing and screen recording software on the market, she specializes in composing posts about recording and editing videos. All the topics she chooses …Read full bio
-
![]()
Alin
Alin is an experienced technical blog writing editor. She knows the information about screen recording software on the market, and is also familiar with data cloning and data backup software. She is expert in writing posts about these products, aiming at providing users with effective solutions.…Read full bio -
Jean is recognized as one of the most professional writers in EaseUS. She has kept improving her writing skills over the past 10 years and helped millions of her readers solve their tech problems on PC, Mac, and iOS devices.…Read full bio
-
![]()
Jerry
Jerry is a fan of science and technology, aiming to make readers' tech life easy and enjoyable. He loves exploring new technologies and writing technical how-to tips. All the topics he chooses aim to offer users more instructive information.…Read full bio -
![]()
Rel
Rel has always maintained a strong curiosity about the computer field and is committed to the research of the most efficient and practical computer problem solutions.…Read full bio -
![]()
Gemma
Gemma is member of EaseUS team and has been committed to creating valuable content in fields about file recovery, partition management, and data backup etc. for many years. She loves to help users solve various types of computer related issues.…Read full bio -
![]()
Shelly
"I hope my articles can help solve your technical problems. If you are interested in other articles, you can check the articles at the bottom of this page. Similarly, you can also check my Twitter to get additional help."…Read full bio
Page Table of Contents
0 Views |
0 min read
Key Takeaways for recording FaceTime with audio:
✅ Audio FaceTime calls: You might be able to record both sides of the conversation if your device and region support Apple's call recording feature.
❌ Video FaceTime calls: There's still no reliable built-in way to record video calls with full audio using FaceTime alone.
Because of these limitations, many users turn to third-party tools or computer-based screen recorders to capture sound from FaceTime calls.
When you record a FaceTime call, you'll often encounter a problem: why doesn't FaceTime record audio? That's because Apple's native screen recorder cannot capture system audio. Is it possible to record FaceTime calls? Good news, it absolutely can be done! This step-by-step guide will show you how to record a FaceTime call with sound, including the voices of all participants.
Can You Record FaceTime Calls with Sound?
The short answer: it depends on the type of FaceTime call and where you live.
It is possible to record FaceTime calls with sound on your iPhone, Mac, and even Android device. Always obtain consent from all participants before recording, as required by law in many jurisdictions.
Historically, FaceTime audio or video did not include a built-in recording feature because Apple avoided integrating call recording for privacy and legal reasons.
Starting with iOS 18.1 and later (including iOS 26), Apple added a new call recording option for one-to-one audio FaceTime calls in select regions. If your device and region support it, you can record FaceTime audio calls with the built-in feature, and both parties will hear a notification that the call is being recorded. However, this feature is not available everywhere. In many regions, including parts of Europe, the option doesn't appear at all.
For FaceTime video calls, there's still no reliable built-in record button that captures both video and internal audio. Apple's iOS screen recorder can capture video, but internal audio (the other caller's voice) usually isn't captured during screen recording.
Third-party screen recorders like EaseUS RecExperts exist. They help users record a FaceTime video or audio call without notifying others.
Share this guide if you find it helpful!
How to Screen Record FaceTime with Sound on iPhone/iPad
As mentioned above, the way you record a FaceTime call depends entirely on whether it's an audio or video call on iPhone and iPad. Apple treats these two scenarios very differently, mainly due to privacy and legal restrictions. Below are the two methods explained step by step.
Method 1: Record a FaceTime Audio Call Using Apple's Built-in Call Recording
If you're on iOS 18.1 or later and your region allows it, FaceTime audio calls may include a native recording option. This method helps you record your voice and the other person's voice.
🚩How to record a FaceTime audio call on iPhone:
Step 1. Start a one-to-one FaceTime audio call.
Step 2. During the call, tap the More (⋯) button.
Step 3. If supported in your region, select Call Recording.
Step 4. A notification sound plays, informing both participants that the call is being recorded.
Step 5. End the call when finished.
Step 6. The recording is saved automatically in the Notes app, usually under a Call Recordings section.
- Important notes
-
1. This feature does not appear in all countries.
2. Group FaceTime calls are not supported.
3. You cannot record silently; the other party is always notified.
4. Check the official Apple Support document if needed.

Method 2: Screen Record a FaceTime Video Call on iPhone/iPad
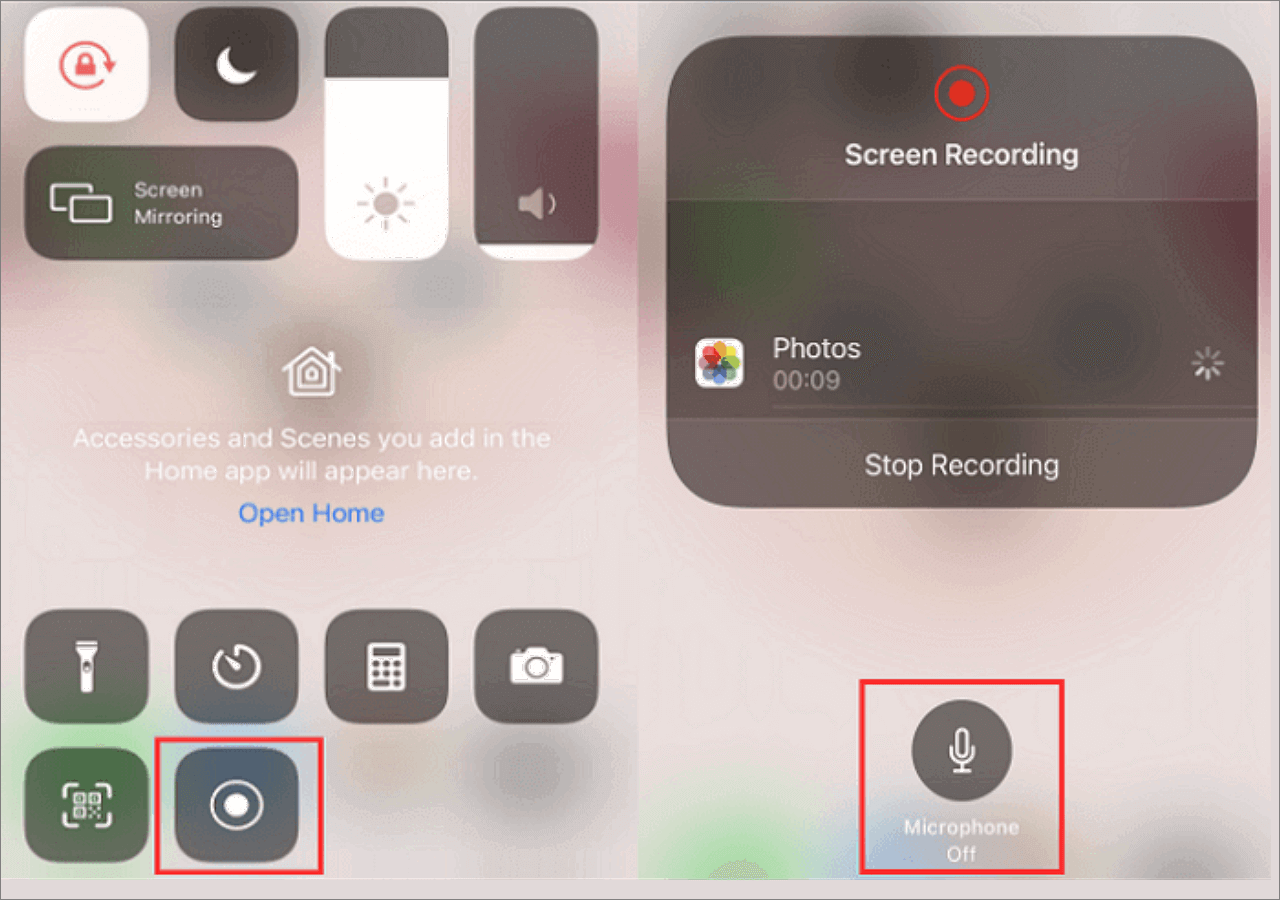
For FaceTime video calls, the only native option is iOS Screen Recording. However, this method has clear limitations. You can record FaceTime video with your own voice only. The other person's internal audio in most cases is not included. It will not notify the other party.
🚩How to screen record a FaceTime video call on iPhone:
Step 1. Start a FaceTime video call.
Step 2. Swipe down from the top-right corner to open Control Center.
Step 3. Long-press Screen Recording (two circles within a dot). Turn on Microphone.
Step 4. Tap Start Recording.
Step 5. When finished, stop the recording from Control Center.
Step 6. The video is saved to the Photos app.
Share this guide if you find it helpful!
How to Record FaceTime with Audio on Mac - With Both Sides' Audio
EaseUS RecExperts offers a professional and easy-to-use solution to record FaceTime calls with both internal audio and your voice. This is one of the advantages compared to macOS's built-in tools. No additional plugins or complicated settings are required; you can start recording with just one click.
You can also hear sound while screen recording FaceTime with this Mac call recorder. With system audio and microphone recording, you'll get a complete conversation, not just your side. In addition, this FaceTime call recorder provides:
- Noise reduction for clearer voice quality
- Record internal audio on Mac with a simple click
- Save high-quality video and audio files separately for easier post-processing
- Supports long-term recording without frame drops
Whether you're saving important discussions or recording for reference (with everyone's consent), this video call recorder ensures your FaceTime call is captured smoothly and in high quality.
Here are the detailed steps to screen record FaceTime with sound on Mac:
Step 1. Open the FaceTime video call that you want to capture and launch EaseUS RecExperts. Choose "Full Screen" to record the whole screen. To customize the recording area, hit "Region" and select the recording area with your mouse.
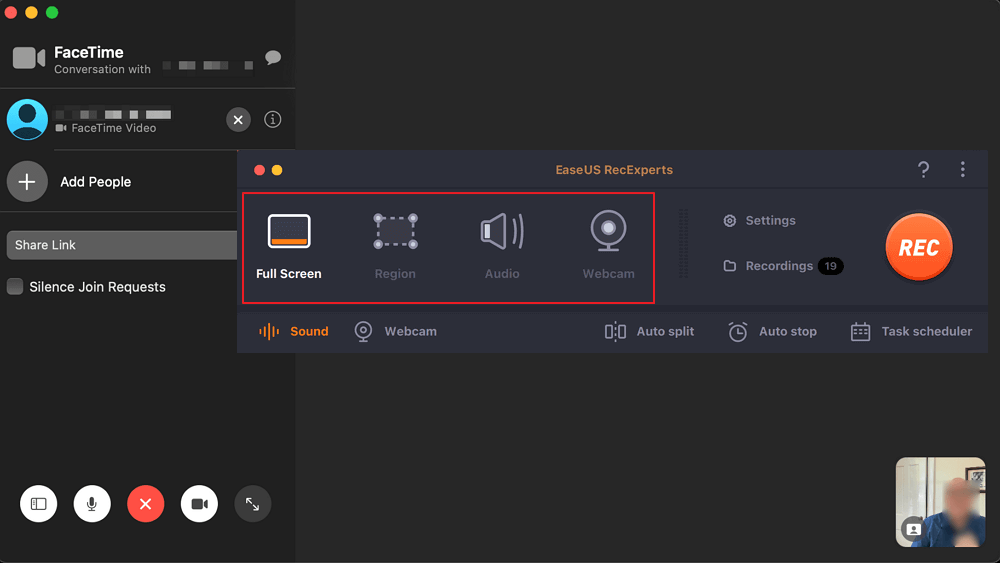
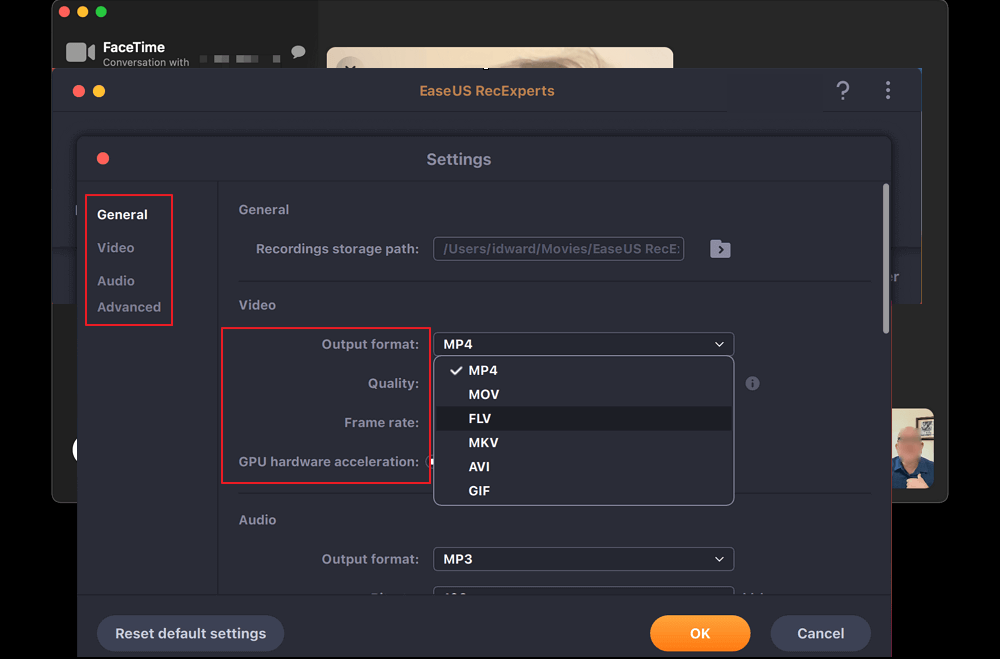
Step 2. Click "Settings" to apply more options, including changing the output format of the video, customize the quality, adjust frame rate, etc. Click "OK" to save the changes.
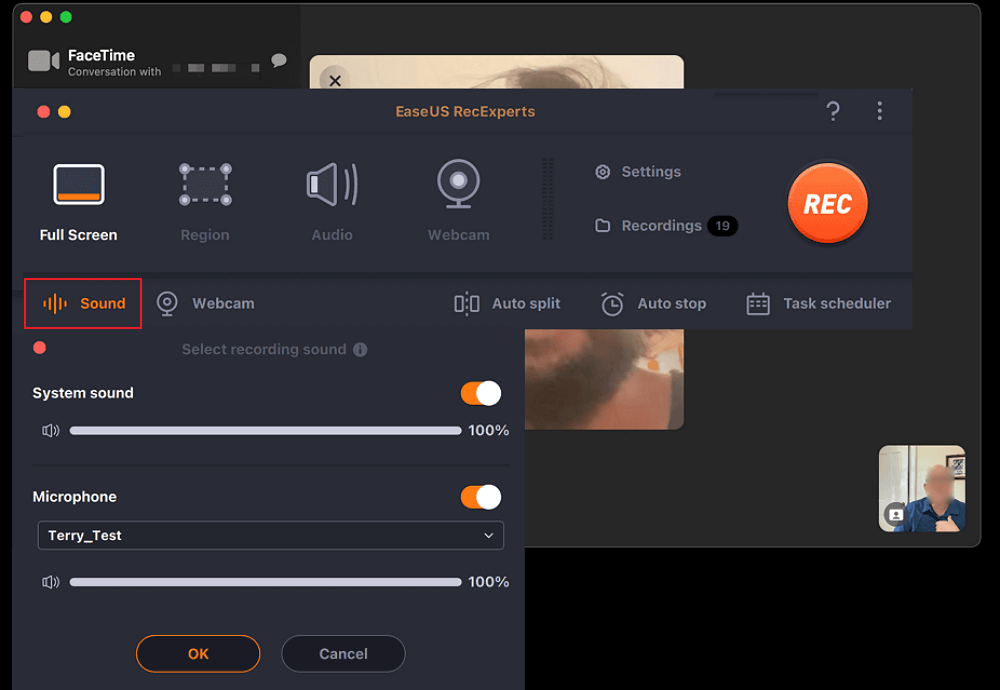
Step 3. Then, go back to the main screen and click the "Sound" icon. Enable "System sound" or "Microphone" if you want to record them, too. Then, click "OK" to continue. After that, hit the "REC" button to start recording.
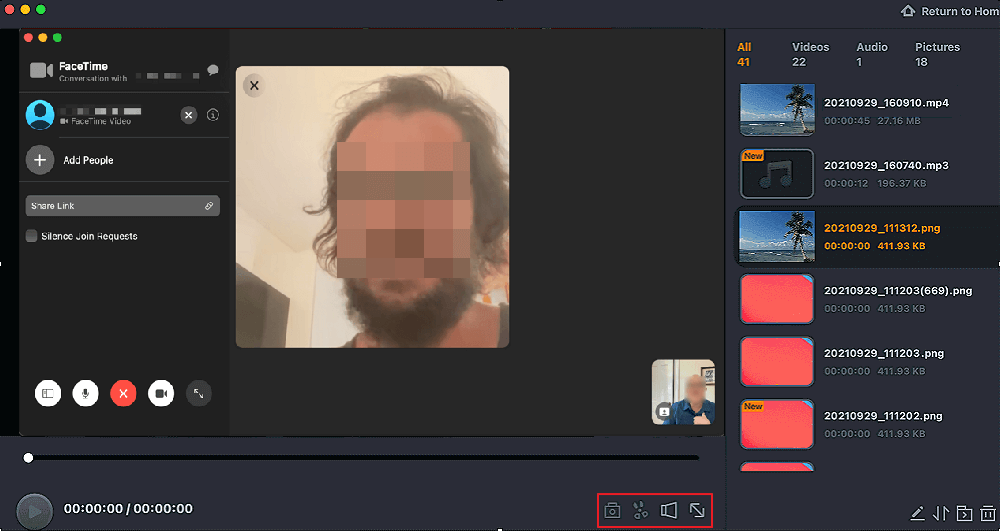
Step 4. Hit the "Stop" icon to end the recording task. Then, you will be led to the "Recordings" interface. You may review, edit, or manage your recordings here.
🎈Watch a complete video guide here, or check the text guide directly to follow the steps to record FaceTime calls with all methods:
- 0:00 Introduction
- 0:22 Record FaceTime on your iPhone
- 1:50 Record FaceTime with your Mac
- 3:23 Record FaceTime call with QuickTime

Share this guide if you find it helpful!
How to Record a Facetime Call on Mac Free - With Only Your Voice
Note: This method will not capture internal audio from the other participant directly unless a loopback tool is used.
QuickTime Player comes pre-installed on your macOS. This freeware can assist you in recording almost anything on your screen, including capturing FaceTime calls. However, it can only capture the screen with your microphone during FaceTime recording.
In the following, we will walk you through the steps to get on how to record a FaceTime call on Mac with your voice:
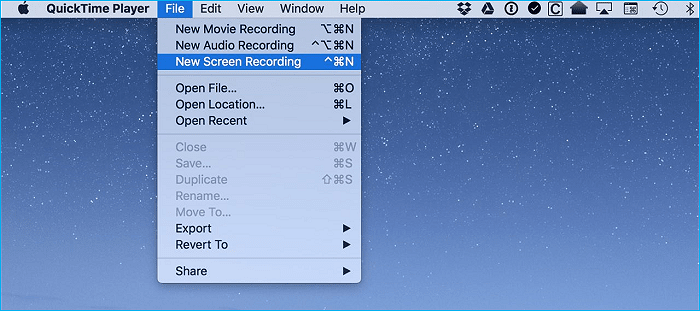
Step 1. Open the QuickTime Player. At the top menu bar, click "File" > "New Screen Recording."
Step 2. Perform FaceTime and start a call on your Mac. Then, in the QuickTime Player, you click on the red button to start capturing. To end the mission, click on the Stop button.
Step 3. After that, the recorded video is saved on your Mac.
If you want to screen record on Mac with internal audio simultaneously, it seems impossible unless you download and install the Loopback tool like BlackHole or Soundflower.
- Notice:
- Soundflower officially supports macOS up to Catalina 10.15 with full features; on Big Sur 11 it works only after extra tweaks, while Monterey 12 and later are not supported and Apple-Silicon Macs (M1/M2) are completely incompatible - no build exists yet.
How to Use FaceTime on Android and Record with Audio
- Notice:
- Android can't start a FaceTime call directly, but you can join one via the Chrome link an iPhone/Mac friend sends you. And you can capture both video + internal audio in one go.
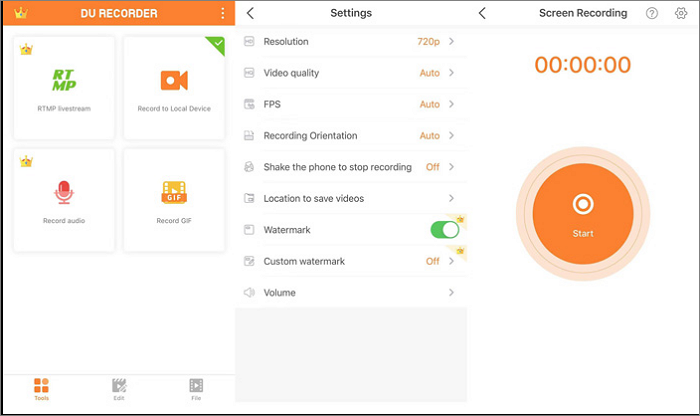
Can you record a FaceTime call on Android? Yes. We all know that FaceTime is no longer limited to iOS devices, and Android users can also join a FaceTime call with a link in Google Chrome. So, if you are an Android user who wants to record a FaceTime call, you can easily do so with an Android screen recorder, like AZ Screen Recorder, DU Recorder, etc.
Stage 1. Get Face Time on Android
Step 1. Ask the iOS or macOS caller to text/mail you the invite.
Step 2. Open the link in Google Chrome on your Android device.
Stage 2. Record FaceTime on Android
Here, we take the DU Recorder as an example:
Step 1. Install and open DU Recorder on your Android phone and enable the permission features.
Step 2. Join a FaceTime session. Next, go back to the DU Recorder and choose your preferred call recording option.
Step 3. When you are ready, press the REC button to start your recording.
Legal and Ethical Considerations About FaceTime Call Recording
Before you hit "record" on a FaceTime call, it's essential to understand the legal and ethical boundaries. Not every region allows call recording without permission, and overlooking this could lead to serious consequences. Here are a few key points to keep in mind:
- Know the Law: Recording laws vary by country and U.S. state. Some areas allow one-party consent, meaning you can record if you're part of the call. Others require two-party consent, where everyone must agree. Always check your local regulations before recording.
- Always Get Consent: Regardless of the legal requirement, it's best to inform all participants that the call is being recorded. This helps avoid misunderstandings and builds trust.
- Respect Privacy: Avoid recording calls that involve personal, sensitive, or confidential information without explicit permission. In workplace settings, follow your company's policies on call recording.
- Store Recordings Responsibly: Once recorded, keep the file secure and private. Don't share it without the knowledge and approval of those involved in the call.
Share this guide if you find it helpful!
Conclusion
After reading, you know how to record FaceTime with audio in different ways.
- For macOS users, try EaseUS RecExperts for Mac to get the job done.
- For iOS users, the built-in screen recorder is the best choice.
No matter what tool you want to choose, make sure to select the suitable one based on your device.
FAQs about How to Record FaceTime with Audio
Check the frequently asked questions related to this topic below.
1. Why can't I record FaceTime with audio?
Maybe it's because you didn't allow the function. To record the audio from your FaceTime video, hold the "screen recording" option in your control center until the option to turn on the microphone appears on the screen. Then, you need to adjust volume settings for a better audio output.
2. Why does my FaceTime screen recording have no sound?
Here are some common reasons:
- The FaceTime cannot access to your microphone
- You have turned off the volume
- The microphone has not been chosen as the primary input channel
- There is something wrong with your sound card
3. Can you screen record a FaceTime call with audio?
Yes, you can screen record FaceTime on different devices. FaceTime calls on Windows, Mac, Android, and iPhone can all be recorded for later viewing. Here, we give you the steps to screen record a FaceTime call on a Mac.
- 1. Open FaceTime on your phone. Connect your phone to your Mac.
- 2. In Quicktime, click the "Record" button.
- 3. After recording, click "File" and then click "Save" to keep the file on your device.
4. Is it legal to record a FaceTime call?
Recording a FaceTime call's legality depends on your location and local laws. Some places allow recording with your consent only, while others require everyone's permission. Always get consent before recording.
5. Can FaceTime calls be recorded?
Yes. A FaceTime call can be recorded with built-in or third-party tools. Apple's built-in tool can record video directly, but it will mute the other person's voice. Third-party call recorders like EaseUS RecExperts can capture both participants' audio and your voice.
Article update log
This update focuses on recording FaceTime on iPhone, with a more apparent distinction between audio and video calls. A new section was added for FaceTime audio call recording, covering supported iOS versions, regional availability, step-by-step instructions, and key limitations. Overall, this revision improves the article's accuracy, completeness, and practical reliability.
EaseUS RecExperts

One-click to capture anything on screen!
No Time Limit, No watermark
Start Recording
