-
![]()
Daisy
Daisy is the Senior editor of the writing team for EaseUS. She has been working in EaseUS for over ten years, starting from a technical writer to a team leader of the content group. As a professional author for over 10 years, she writes a lot to help people overcome their tech troubles.…Read full bio -
Jane is an experienced editor for EaseUS focused on tech blog writing. Familiar with all kinds of video editing and screen recording software on the market, she specializes in composing posts about recording and editing videos. All the topics she chooses …Read full bio
-
![]()
Melissa Lee
Melissa Lee is an experienced technical blog writing editor. She knows the information about screen recording software on the market, and is also familiar with data cloning and data backup software. She is expert in writing posts about these products, aiming at providing users with effective solutions.…Read full bio -
Jean is recognized as one of the most professional writers in EaseUS. She has kept improving her writing skills over the past 10 years and helped millions of her readers solve their tech problems on PC, Mac, and iOS devices.…Read full bio
-
![]()
Jerry
Jerry is a fan of science and technology, aiming to make readers' tech life easy and enjoyable. He loves exploring new technologies and writing technical how-to tips. All the topics he chooses aim to offer users more instructive information.…Read full bio -
![]()
Rel
Rel has always maintained a strong curiosity about the computer field and is committed to the research of the most efficient and practical computer problem solutions.…Read full bio -
![]()
Gemma
Gemma is member of EaseUS team and has been committed to creating valuable content in fields about file recovery, partition management, and data backup etc. for many years. She loves to help users solve various types of computer related issues.…Read full bio -
![]()
Shelly
"I hope my articles can help solve your technical problems. If you are interested in other articles, you can check the articles at the bottom of this page. Similarly, you can also check my Twitter to get additional help."…Read full bio
Page Table of Contents
Jean
Updated on Apr 11, 2025
0 Views |
0 min read
When you screen record on Mac, there are many situations in which you need to record part of screen Mac: focus on specific content, reduce file size, enhance clarity, maintain privacy, and more. Follow this guide to learn four ways to capture a selected area on your macOS screen.
How Do I Record Only Part of My Screen Mac?
To record only part of your screen on Mac, you have four options:
1️⃣Record part of screen on Mac devices with the screenshot tool: Shift + ⌘ (Command) + 5. However, this screenshot toolbar is only available in macOS Mojave or later and the only supported file format is .mov.
2️⃣Capture Mac partial screen with QuickTime Player. This Mac recording software supports older OS versions. However, if you want to record internal audio Mac, you need to install and configure a plug-in. The only supported file format is .mov.
3️⃣Record partial screen or full screen with a free Mac screen recorder, like EaseUS RecExperts. It lets you capture any region of the macOS screen with internal and external audio in just a few clicks.
Share this post on your social platform to help more users!
Mac Record Part of Screen with Sound via EaseUS Screen Recorder
EaseUS RecExperts is the best way to record screen on Mac. It does not restrict your macOS versions, audio recording requirements, or other features.
Whatever the operating system of your MacBook Air, MacBook Pro, or other Mac OS X device is, you can record screen Mac with internal audio, microphone sound, and external voice.
With no time limit, lag, or watermark, you can record part of screen Mac, full screen, and multiple screens on your Mac computer. Then, you can Mac screen recording to MP4, MOV, AVI, FLV, MKV, MP3, AAC, WAV, OGG, WMA, FLAC, and more file formats.
Download EaseUS Screen Recorder
Download EaseUS Screen Recorder
Trustpilot Rating 4.7
See how to screen record on Mac.
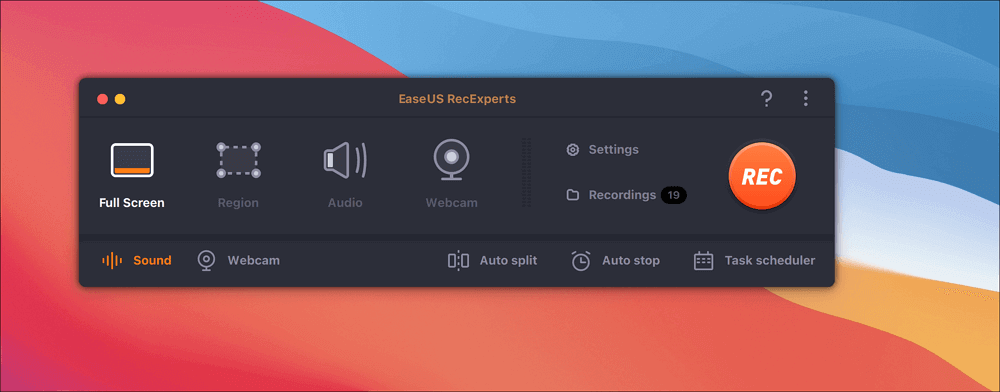
Step 1. Download and launch EaseUS RecExperts on your Mac. To capture the whole screen, click on the "Full Screen" button from the main interface. If you want to customize the recording area, choose the "Region" button.
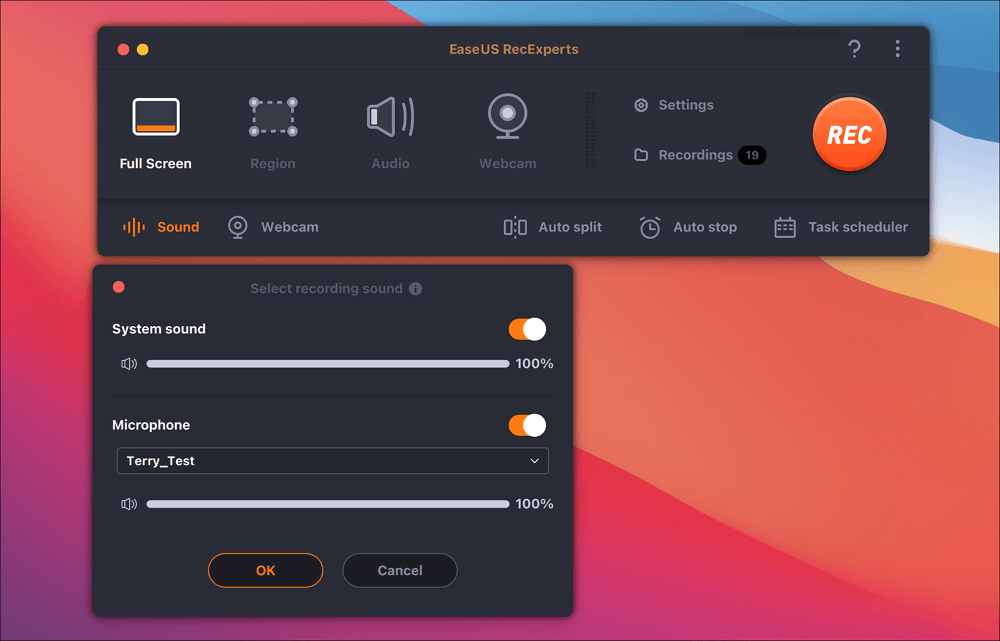
Step 2. To record the screen with audio, hit the Sound icon from the bottom left side of the toolbar. The audio resources can be your external sound or system audio. Based on your needs, enable the target option.
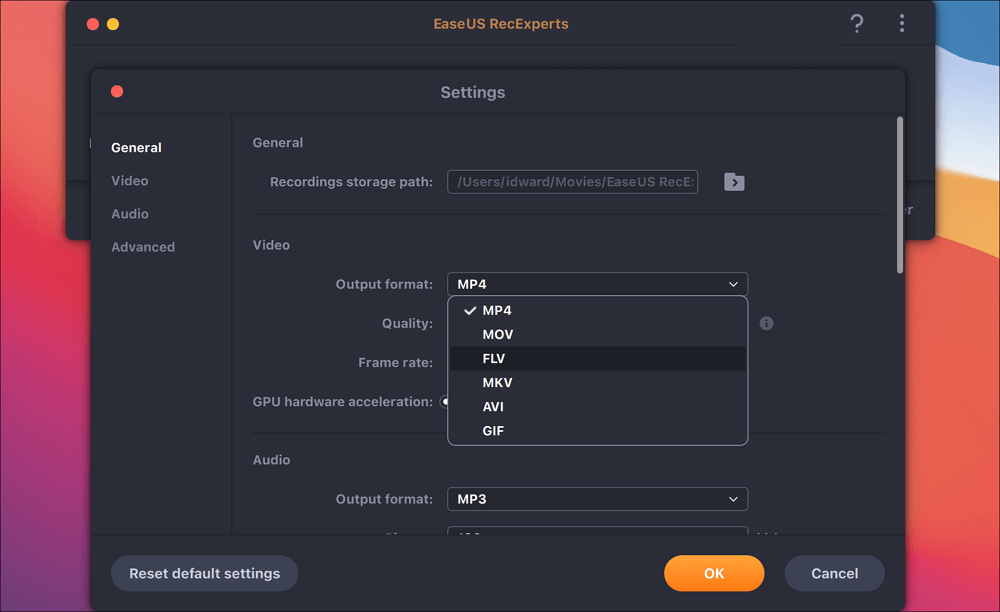
Step 3. Before capturing, you can change the output format of the recorded video by clicking "Settings" from the main interface. Then, scroll down the menu of Output format for Video. Choose the output type as you like.
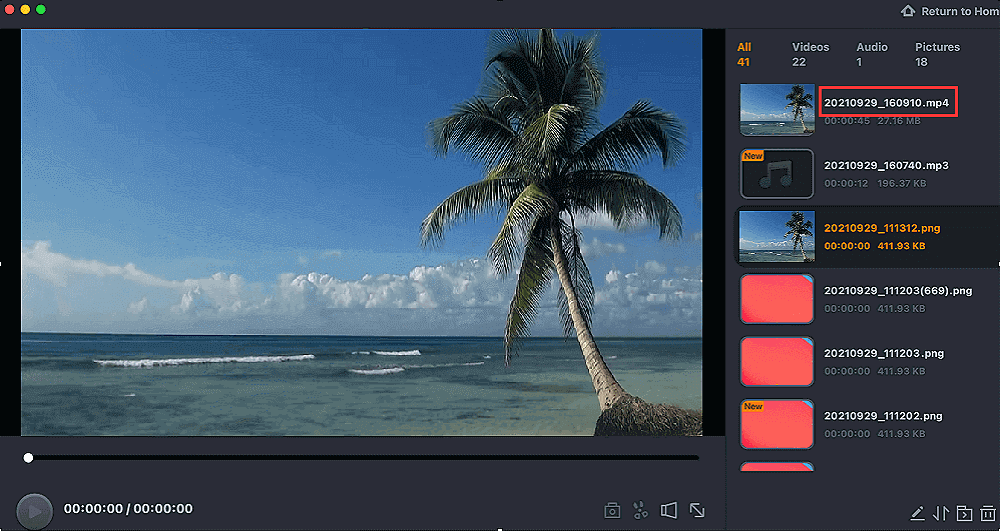
Step 4. Once done, click the REC button to begin recording. It captures anything displayed on your Mac screen. When you are done, click the Stop button. Then you can watch the recorded video from "Recordings".
Capture Part of Screen on Mac with Built-in Screenshot Toolbar
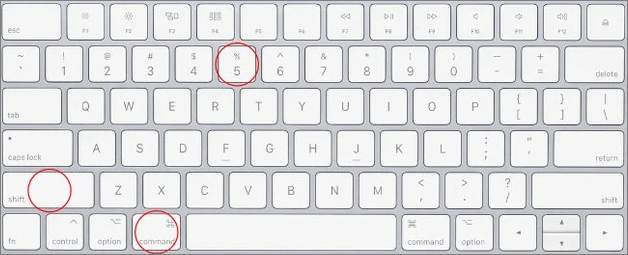
If your MacBook runs macOS Mojave or later and you only need a .mov video file format, you can use the pre-installed Mac screen recording shortcut: Shift + ⌘ (Command) + 5 without installing an extra program.
This Mac's built-in recorder lets you screen record a partial screen, full screen, and specific window. Both system audio and microphone sound can be captured.
Let's see how to record part of screen on Mac with the keyboard shortcuts:
Step 1. Press the Shift + ⌘ (Command) + 5 on the keyboard to launch the recording app.
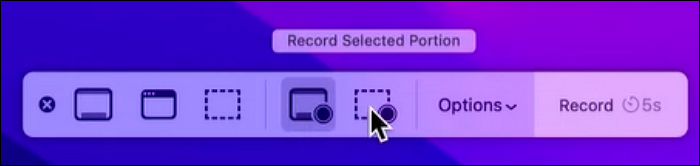
Step 2. In the pop-up recording panel, click Record Selected Portion. You can drag around to customize the area you want to record.
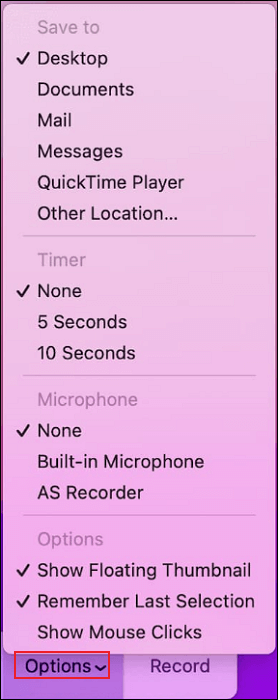
Step 3. Click Options to set up the record-saving location, countdown timer, and microphones.
Step 4. Click Record. The recording begins now.

Step 5. To stop recording on Mac, click the Stop button at the top of the screen or use the Command + Control + Esc shortcut. You can trim the video if you need to.
🔗You may be interested in: how to screenshot on a MacBook.
Share this post on your social platform to help more users!
Mac OS Record Part of Screen Using QuickTime Player
For Mac computers running an OS earlier than Mojave, capture screen recording on a Mac with QuickTime player. QuickTime is a multimedia framework that not only allows users to play, edit, and share but also record audio and video files.
However, it cannot be used as Mac audio recording software, and the video file can only be saved in MOV format.
For QuickTime screen recording with audio, install and configure a plugin like Soundflower and Black Hole.
Let's see how to screen record part of the screen on Mac.
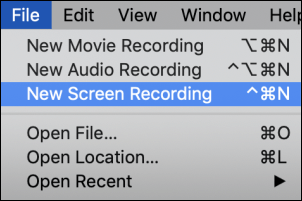
Step 1. Launch QuickTime Player. Go to File > New Screen Recording from the toolbar menu.
Step 2. In the screen recording popup window, click the arrow next to the red record button to change the recording settings.
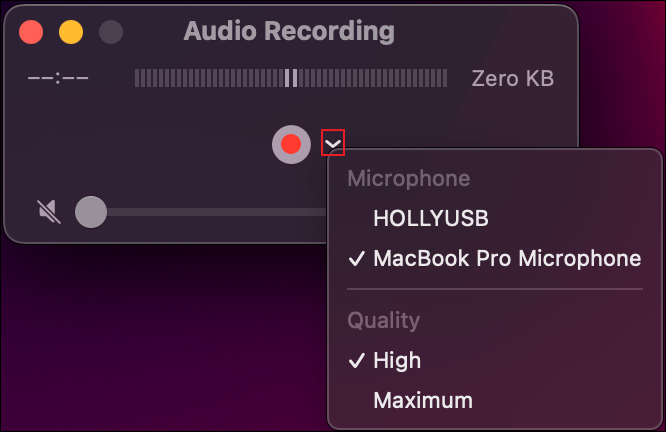
Step 3. Choose Record Selected Portion and drag to select an area to record.
Step 4. Click Record. The recording begins now.
Step 5. To end this recording process, click the Stop button in the menu bar or the Command + Control + Esc shortcut.
Step 6. The recording file will be opened automatically. You can play, edit, or share this video.
Step 7. To save this Mac screen capture, go to File > Save or hit Command + S shortcut on your keyboard.
Record Selected Area Screen on Mac with Camtasia
Camtasia is a free screen recorder for Mac. This robust video recording tool enables users to record, edit, and share clips easily. It is embedded with many video editing functions, and you can use the timeline to stimulate your creativity.
Let's see how to record on Mac with Camtasia.
Step 1. Download and launch it on your Mac computer.
Step 2. Click Record at the top of the toolbar panel. This will hide the editor and open the recorder.
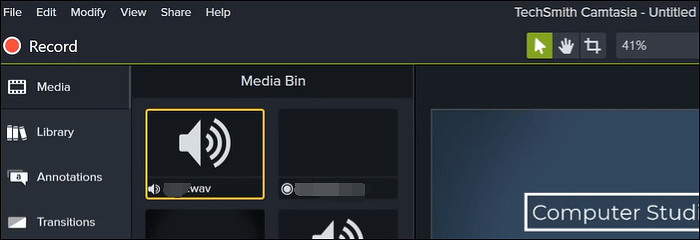
Step 3. Here, you can see the screen, webcam, microphone, and system audio settings. Toggle them on according to your needs.
To record part of screen Mac, you need to toggle off the screen option and click the dropdown arrow to select a recording area option.
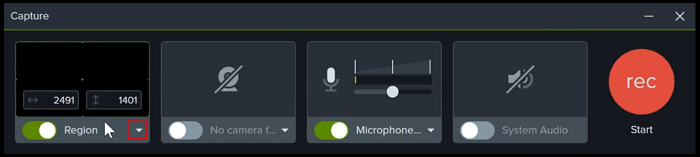
Step 4. Click the red rec button to start recording.
Step 5. When you have finished recording, click the Stop button on the top of the screen and select Stop Recording to end this task.
Step 6. Now, you can edit and share this recording clip.
Conclusion
You have now learned the complete guide on how to record part of screen Mac. If your Mac is running macOS Mojave or later, use the built-in screenshot toolbar; if your Mac runs an OS earlier than macOS Mojave, use the preinstalled QuickTime Player.
However, both of these tools have some limitations. If you want an easier-to-use Mac screen recorder, try EaseUS RecExperts. It supports almost all old and new MacOS and lets you capture internal sound for free.
Download and give the EaseUS screen recorder a shot!
Download EaseUS Screen Recorder
Download EaseUS Screen Recorder
Trustpilot Rating 4.7
Screen Recording Mac FAQs
Still, have doubts? Check the frequently asked questions and answers below to solve your problem.
1. How do you split screen recording on a Mac?
To split screen recordings on your Mac, you can use QuickTime Player, a built-in tool for screen recording. However, to cut the recording into individual segments, you may need to use another application, such as iMovie or a video editing tool.
2. Do Macs have a snipping tool?
Yes, the Mac has a built-in screenshot tool that functions similarly to the clipping tool. You can use the following shortcuts:
- Take a screenshot of the entire screen: Press Command (⌘) + Shift + 3.
- To take a screenshot of a selected part: Press Command (⌘) + Shift + 4.
- Intercepting a Specific Window: Press Command (⌘) + Shift + 4 and then press the space bar.
Additionally, starting with macOS Mojave (10.14), you can press Command (⌘) + Shift + 5 to bring up the on-screen menu with more screenshot options and settings.
3. How do I cut out an image on a Mac?
Cutting an image on a Mac can be done using the Preview function. This is done as follows:
Step 1. Right-click on the image file and choose Open With > Preview.
Step 2. Use the Selection Tool (Rectangle, Ellipse, or Lasso) on the toolbar to select the portion of the image you want to keep.
Step 3. Click Edit in the menu bar and select Copy or press Command + C.
Step 4. Click File in the menu bar and select New from Clipboard or press Command + N.
Step 5. Click File > Save, select the desired format and location, and then click Save.
Share this post on your social platform to help more users!
EaseUS RecExperts

One-click to capture anything on screen!
No Time Limit, No watermark
Start Recording