-
![]()
Daisy
Daisy is the Senior editor of the writing team for EaseUS. She has been working in EaseUS for over ten years, starting from a technical writer to a team leader of the content group. As a professional author for over 10 years, she writes a lot to help people overcome their tech troubles.…Read full bio -
Jane is an experienced editor for EaseUS focused on tech blog writing. Familiar with all kinds of video editing and screen recording software on the market, she specializes in composing posts about recording and editing videos. All the topics she chooses …Read full bio
-
![]()
Alin
Alin is an experienced technical blog writing editor. She knows the information about screen recording software on the market, and is also familiar with data cloning and data backup software. She is expert in writing posts about these products, aiming at providing users with effective solutions.…Read full bio -
Jean is recognized as one of the most professional writers in EaseUS. She has kept improving her writing skills over the past 10 years and helped millions of her readers solve their tech problems on PC, Mac, and iOS devices.…Read full bio
-
![]()
Jerry
Jerry is a fan of science and technology, aiming to make readers' tech life easy and enjoyable. He loves exploring new technologies and writing technical how-to tips. All the topics he chooses aim to offer users more instructive information.…Read full bio -
![]()
Rel
Rel has always maintained a strong curiosity about the computer field and is committed to the research of the most efficient and practical computer problem solutions.…Read full bio -
![]()
Gemma
Gemma is member of EaseUS team and has been committed to creating valuable content in fields about file recovery, partition management, and data backup etc. for many years. She loves to help users solve various types of computer related issues.…Read full bio -
![]()
Shelly
"I hope my articles can help solve your technical problems. If you are interested in other articles, you can check the articles at the bottom of this page. Similarly, you can also check my Twitter to get additional help."…Read full bio
Page Table of Contents
Alin
Updated on Jun 09, 2026
0 Views |
0 min read
QuickTime Player allows macOS users to record their screen only in the MOV format, which often results in very large file sizes. This happens because Apple prioritizes image quality in its recording settings, resulting in larger files. Some users have even reported that a 2.5-hour Zoom meeting recorded with QuickTime can reach around 15 GB. In addition, certain Windows media players cannot open MOV files at all.
For these reasons, many users want to know how to record MP4 on Mac, since MP4 offers a better balance between quality and file size and provides much broader device and platform compatibility. This detailed guide offers practical methods and tools for recording the Mac screen as an MP4 video.
Key Takeaways
Here is a quick summary of how to record screen in MP4 on macOS:
- 1. EaseUS RecExperts provides an easy, all-in-one solution to capture screen, system audio, and microphone simultaneously, exporting videos directly as MP4 without extra conversion.
- 2. QuickTime Player is a convenient native tool for simple recordings, but it saves in
.movformat, requiring manual conversion to MP4 afterward. - 3. EaseUS Online Screen Recorder allows hassle-free, browser-based MP4 recording with both system and microphone sound — no installation required.
- 4. OBS Studio offers advanced, customizable recording features with MP4 export, best suited for experienced users comfortable with setup and configuration.
How to Record MP4 on Mac with EaseUS RecExperts
✅Ideal for: users who want to record high-quality MP4 videos on Mac with both system and microphone audio in one click, without complex setup or file conversion.
EaseUS RecExperts is a powerful yet easy-to-use screen recorder built for Mac. With a single click, it lets you capture your screen, system audio, and microphone - and export your recordings directly as MP4, so you don't need any extra conversion or complicated setup. Since MP4 files are much smaller than MOV and more widely compatible, it's ideal for sharing online, uploading to YouTube, or archiving your content.
Whether you're recording gameplay, online classes, business meetings, or software tutorials, RecExperts ensures smooth, high-quality output. You can choose to record your full screen, a specific window, or a custom area, depending on your needs. Beyond that, RecExperts supports webcam-in-picture (for tutorials or commentary), scheduled recordings, flexible audio source selection, and basic video trimming. The interface is intuitive and streamlined, perfect for Mac users who want to record MP4 video easily and efficiently without sacrificing quality.
🚩Here are the steps to record Mac screen and audio in MP4 format:
Step 1. Launch EaseUS RecExperts. Choose a recording mode from "Full Screen" or "Region". To get a better experience, we suggest you choose recording the full screen.

Step 2. Mostly, you will need to record the system sound when recording a video. Just click on the speak sign to select it. You can also tick the "Record silently" function, so that the recording process will be muted without muting the recorded video.
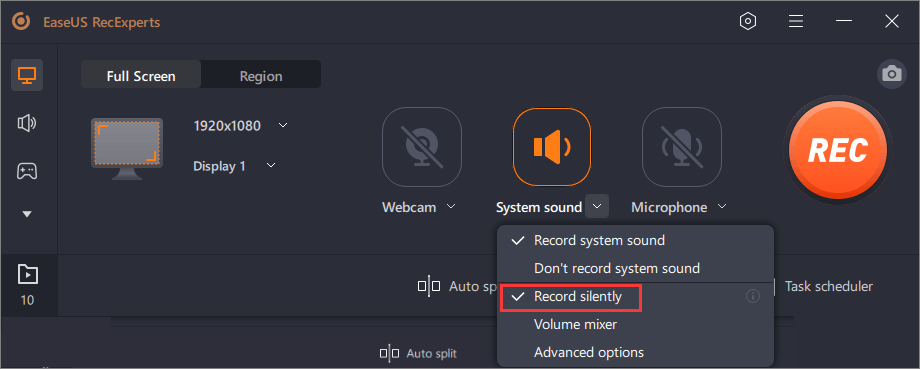
Step 3. After these settings, you can press the red "REC" button to start recording. If you want to pause the recording, click on the white "Pause" button; to end the recording, click on the red "Stop" button.
Step 4. After recording, the recording list window will open. Here you can view, split, delete, manage your recorded videos.

- Tip
- RecExperts record video in mp4. format by default. If you need to capture a screen on a Mac in other containers such as FLV, MKV, AVI, and MOV, change it in Settings > Video > Output format.
Share this post with more people if you find it helpful.

How to Record MP4 on Mac with QuickTime Player
✅Ideal for: users who want to quickly record screen and microphone audio on Mac using native tools and don't mind converting the recording from MOV to MP4 afterward.
QuickTime Player is the built-in screen recording tool on macOS, allowing users to easily capture their screen and microphone audio with a simple and intuitive interface. It supports recording the full screen, a selected window, or a custom area, delivering smooth video and clear microphone sound, ideal for tutorials, meetings, and software demos. However, QuickTime saves recordings by default in the .mov format and does not support direct MP4 export, meaning users need to convert .mov screen recordings to MP4 on Mac using third-party software or built-in tools like iMovie or HandBrake after recording.
Despite this extra step, QuickTime remains a reliable and convenient choice for users seeking quick screen capture without installing additional apps.
🚩Here's the detailed guide to record MP4 on Mac
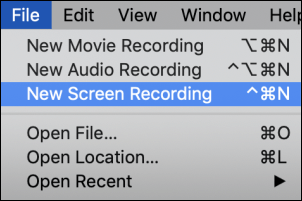
Step 1. Launch QuickTime Player and go to File > New Screen Recording.
Step 2. In the next window, you can choose the microphone source to capture.
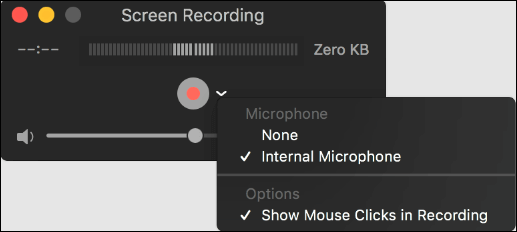
- Notice:
- QuickTime Player doesn't record the system sound by default. If you want to record the internal audio, use BlackHole screen recording instead
Step 3. After setup, click the red Record button to start capturing. When you're finished, click the Stop button.
Step 4. Now you can convert Mac screen recordings to the MP4 format. Here, we use the built-in iMovie utility.
- Open iMovie on your Mac and click Create New > Movie.
- Click Import, find your MOV file, and select Import Selected.
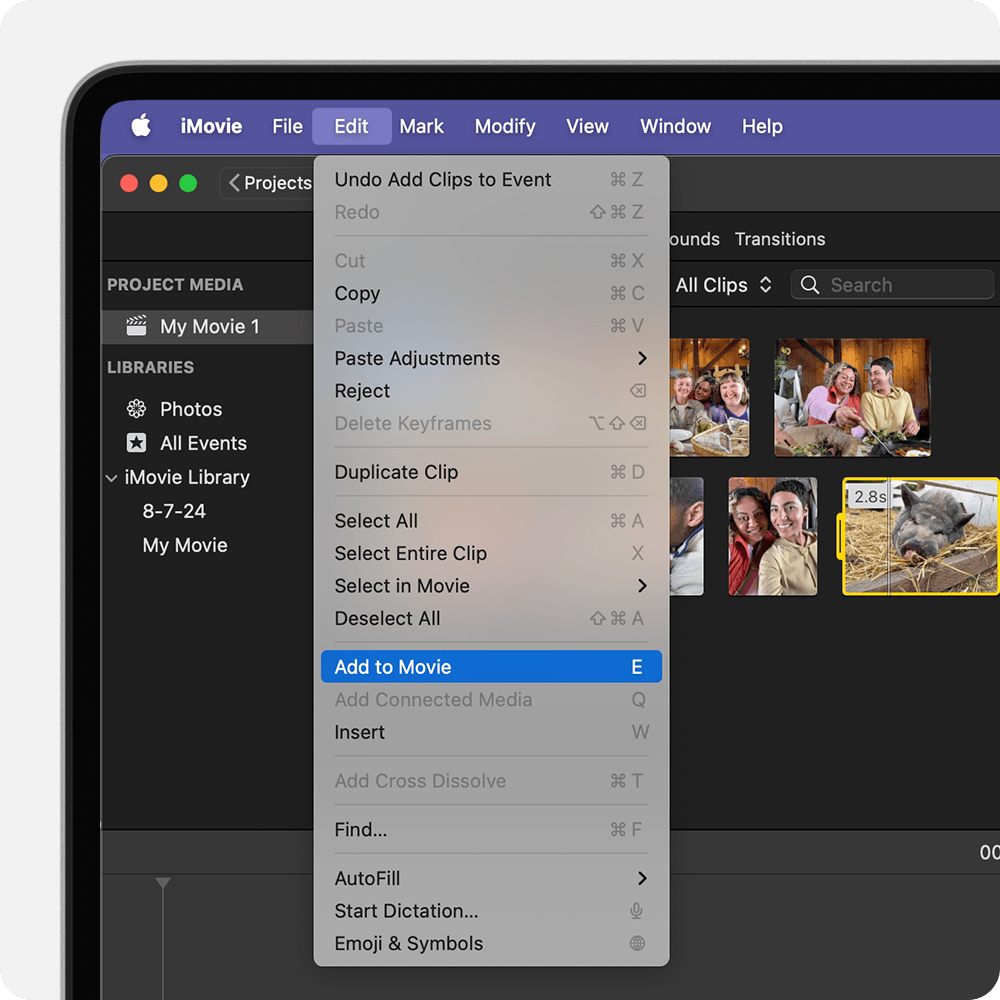
- Select the mov. file in the browser and choose Edit > Add to Movie.
- Click the Share button (top-right), then choose Export File.
- Adjust the Resolution or Quality to get a smaller file size.
- Click Next, choose where to save the MPV file, and click Save.
(Image from Apple Support)
- Pro tips for converting MOV to MP4 on Mac:
-
There is a quicker conversion way: rename the file extension from .mov to .mp4.
To do so, locate the .mov in Finder, right-click the file and choose Rename, change the file extension from .mov to .mp4, and confirm the change in the pop-up window.
If the video won't upload to the website or app after changing the file extension, use iMovie to convert the original MOV file.
Share this post with more people if you find it helpful.
How to Capture Mac Screen with Sound in MP4 Directly Online
✅Ideal for: Mac users who want to quickly record MP4 videos with both system and microphone audio directly online, without the need to install any software.
EaseUS Online Screen Recorder is a browser-based screen recording tool designed for Mac users who want to quickly capture their screen along with system audio and microphone sound without installing any software. It allows you to record your screen in high quality and directly export videos in MP4 format, eliminating the hassle of post-recording conversion.
Whether you're capturing online courses, meetings, live streams, or gameplay, this online recorder makes the process simple and efficient. With just a few clicks in your browser, you can select the recording area and audio sources to start recording instantly. Its cross-platform compatibility and ease of use make it an excellent choice for Mac users seeking a fast, hassle-free way to record screen and sound.
🚩Check out how to record Mac screens in MP4 online below:
Step 1. Open the EaseUS Online Screen Recorder webpage in your preferred browser (Safari, Chrome, etc.).
Step 2. Click Start Recording and follow the prompt to choose your recording areas, like a tab, window, or the entire screen.
Step 3. Once done, click Share. After sharing your screen, locate and click the small round Record button at the bottom-left corner to begin recording.
Step 4. Click Stop sharing when finished, and click Save Video to download the MP4 recordings to your Mac.
How to Record MP4 on Mac Free with OBS Studio
✅Ideal for: Mac users seeking a free, highly customizable screen recorder that captures system and microphone audio simultaneously and exports directly to MP4.
OBS Studio is a free, open-source screen recorder widely used by Mac users who need flexible and powerful recording features. It supports full-screen capture, window capture, custom region recording, system audio (with virtual audio drivers), and microphone input, allowing you to produce high-quality tutorials, gameplay videos, online class recordings, and more.
By default, OBS saves recordings in MKV because MKV is a crash-safe container that preserves your file even if OBS or macOS unexpectedly freezes or closes. MP4, on the other hand, requires a finalization step — if the system crashes before that step is completed, the entire MP4 file may become corrupted and unrecoverable. For users who still prefer MP4 for better compatibility, OBS offers two ways to record in MP4 on Mac.
Option 1. Change the Recording Format to MP4 Directly
Recording directly in MP4 is quick and convenient because you get an export-ready file without extra steps. The drawback is that MP4 isn't crash-safe—if OBS or macOS freezes before the file is finalized, the entire recording may become unusable. This makes the direct MP4 method better for short, low-risk recordings.
🚩To record MP4 directly on Mac in OBS Studio:
- Open OBS Studio on your Mac.
- Click Settings (bottom-right).
- Go to Output > Recording.
- Find Recording Format and select MP4 from the dropdown menu.
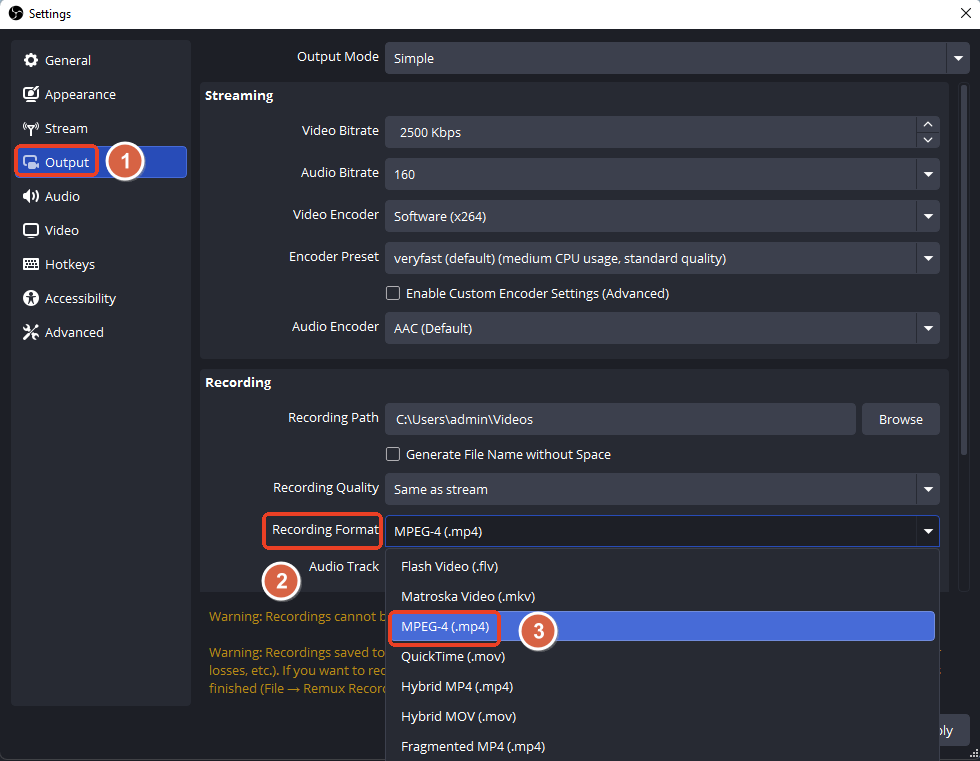
- Click Apply > OK to save the changes.
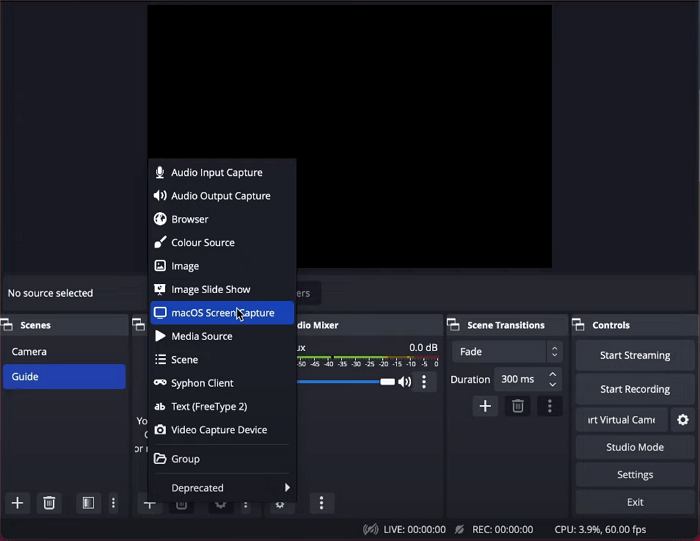
- Go to the Sources panel, click +, and add macOS Screen Capture.
- Click Start Recording to begin recording your screen in MP4 format.
Option 2. Record in MKV and Remux to MP4 (Recommended)
Recording in MKV and remuxing later is a safer and more reliable workflow. MKV protects your file even if OBS or your system crashes, making it ideal for long or important sessions. The only trade off is an additional remux step, but it's fast, lossless, and can be automated, giving you both file safety and MP4 compatibility.
🚩To record in MKV and remux to MP4 on Mac:
Keep OBS's Recording Format set to MKV (default).
Record your video typically by clicking Start Recording.
After finishing, go to the top menu:
- File > Remux Recordings.
- Click … to select your MKV recording.
- Click Remux and OBS will automatically convert it to MP4 without re-encoding.
- Your MP4 file will appear in the same folder.

Share this post with more people if you find it helpful.
Conclusion
Recording MP4 videos on a Mac is achievable with various tools and methods, each catering to different user needs and technical levels. Many users want a solution that enables direct MP4 recording with both system audio and microphone sound without complex setups or post-recording conversions. This guide has introduced several options—from native macOS tools to online and professional screen recorders—to help you find the best fit.
- EaseUS RecExperts offers an all-in-one, user-friendly experience, enabling you to record your screen and audio simultaneously and export directly to MP4 without requiring any additional conversion. It is ideal for users who want efficiency and high-quality output with minimal effort.
- QuickTime Player is a convenient built-in choice for basic screen recording with microphone audio, but it saves files in .mov format by default, requiring conversion to MP4 afterward. It’s suitable for users who prefer native tools and don’t mind an extra step.
- For those seeking a no-installation, browser-based option, EaseUS Online Screen Recorder lets you record high-quality MP4 videos with system and microphone audio directly online, making it perfect for quick, hassle-free recordings.
- OBS Studio offers a powerful, free, and highly customizable solution for advanced users who want more control over recording settings, including simultaneous system and microphone audio capture and direct MP4 export. However, it requires a steeper learning curve and some setup time.
Choosing the right tool depends on your priorities, whether it's ease of use, advanced features, free access, or the ability to record internal system sound seamlessly. By selecting the best fit, you can confidently create professional-quality MP4 screen recordings on your Mac to meet your work, study, or creative needs.
How to Record MP4 on Mac FAQs
1. How do I record my screen as an MP4?
Well, it depends on what device you use.
- For Windows computers: Use Xbox Game Bar;
- For Mac computers: Use EaseUS RecExperts.
2. How do I change my screen recording to MP4 on a Mac?
You can't do it without downloading other software. Therefore, you can screen-record on Mac as an MP4 in two ways:
- 1. Record the screen as a MOV video with Quick Time Player and convert it to MP4 with a file converter;
- 2. Record the Mac screen as MP4 with a program supporting MP4 format.
3. Can QuickTime export to MP4?
No. According to Apple, your movie will be exported as a QuickTime movie (.mov) using the H.264 or HEVC codec. And movies that are exported as audio-only are exported as MPEG4 audio files. All in all, QuickTime Player doesn't export movies as MP4 videos.
✅ Article Update Log (2025, November)
1️⃣Expanded the section on using OBS to record MP4 on Mac, including two detailed methods along with their pros and cons.
2️⃣Improved the explanation of recording in MOV with QuickTime and converting it to MP4, and added clear step-by-step instructions for the conversion process.
3️⃣Updated the introduction with insights from Reddit and other forums to make the content more relatable and aligned with real user experiences.