-
![]()
Daisy
Daisy is the Senior editor of the writing team for EaseUS. She has been working in EaseUS for over ten years, starting from a technical writer to a team leader of the content group. As a professional author for over 10 years, she writes a lot to help people overcome their tech troubles.…Read full bio -
Jane is an experienced editor for EaseUS focused on tech blog writing. Familiar with all kinds of video editing and screen recording software on the market, she specializes in composing posts about recording and editing videos. All the topics she chooses …Read full bio
-
![]()
Melissa Lee
Alin is an experienced technical blog writing editor. She knows the information about screen recording software on the market, and is also familiar with data cloning and data backup software. She is expert in writing posts about these products, aiming at providing users with effective solutions.…Read full bio -
Jean is recognized as one of the most professional writers in EaseUS. She has kept improving her writing skills over the past 10 years and helped millions of her readers solve their tech problems on PC, Mac, and iOS devices.…Read full bio
-
![]()
Jerry
Jerry is a fan of science and technology, aiming to make readers' tech life easy and enjoyable. He loves exploring new technologies and writing technical how-to tips. All the topics he chooses aim to offer users more instructive information.…Read full bio -
Larissa has rich experience in writing technical articles. After joining EaseUS, she frantically learned about data recovery, disk partitioning, data backup, screen recorder, disk clone, and other related knowledge. Now she is able to master the relevant content proficiently and write effective step-by-step guides on various computer issues.…Read full bio
-
![]()
Rel
Rel has always maintained a strong curiosity about the computer field and is committed to the research of the most efficient and practical computer problem solutions.…Read full bio -
![]()
Gemma
Gemma is member of EaseUS team and has been committed to creating valuable content in fields about file recovery, partition management, and data backup etc. for many years. She loves to help users solve various types of computer related issues.…Read full bio
Page Table of Contents
Rel
Updated on May 09, 2024
0 Views |
0 min read
OBS is open-source software for video capturing. It is often used for capturing YouTube and other popular platforms. Also, it's a professional utility as it has advanced settings for adjusting the quality of video and audio. Like setting the proper frame rate of a video and bitrate of audio. Therefore, you can deliver a satisfied video.

Here, this post provides you with the best recording settings for OBS and the guide to use it. Meanwhile, you can view one OBS alternative, which is simple for beginners to capture screen, audio, webcam, and gameplay.
| Workable Solutions | Step-by-step Troubleshooting |
|---|---|
| Fix 1. Adjust Video Bitrate | If you want medium quality, then change the bitrate to 800 Kbps...Full steps |
| Fix 2. Set Audio Bitrate | You need to know that the higher the bitrate of audio, the clearer the sound can be...Full steps |
| Fix 3. Hidden Advanced Settings | In OBS, you need to find the Advanced options from the Output...Full steps |
| Fix 4. Set the Hotkey for Your Habit | OBS allows you to change the hotkey to operate the related task...Full steps |
- Part 2. How to Capture Screen and Audio with OBS
- Part 3. Alternative to OBS - Easy for Screen Capturing
OBS Best Recording Settings
Everyone wants to get a video of better quality. Do you know how? Actually, you need to set some options like bitrate, frame rate, etc. The values vary for many reasons, such as the upload time, computer storage, etc.
The information provided below can only be used as a recommendation. Change it based on your actual situation. It mainly introduces the suggestive bitrate for video and audio, and other advanced settings.
1. Adjust Video Bitrate
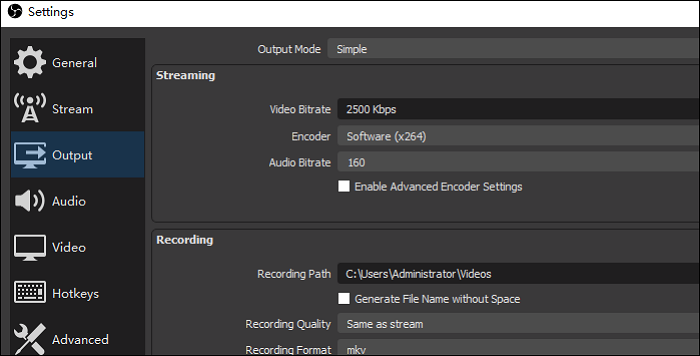
It especially depends on the upload speed. In the default setting, it should be 2500 Kbps. Adjust it in terms of the quality of the video. If you apply the maximum value, it meets your special needs. Here, see the below recommendation.
- Poor Quality: Bitrate is around 400 Kbps
- Medium Quality: Bitrate is about 800 Kbps
- High Definition: Bitrate is more than 1200 Kbps
2. Set Audio Bitrate
The higher the bitrate of audio, the clearer the sound can be. This factor is related to the Internet connection and the external equipment like the microphone. To get the ideal project, refer to the below suggestion.
- Low Quality: Bitrate is below 70 Kbps
- Medium Quality: Bitrate is around 100 Kbps
- High Quality: Bitrate is from 200 to 250 Kbps
- Tip
- For professional users, find a tool named OBS Bitrate Settings Calculator. As requirements from the public are different, it's better to calculate it yourself. It provides you with the solution, and you need to change the value yourself.
3. Apply Hidden Advanced Settings
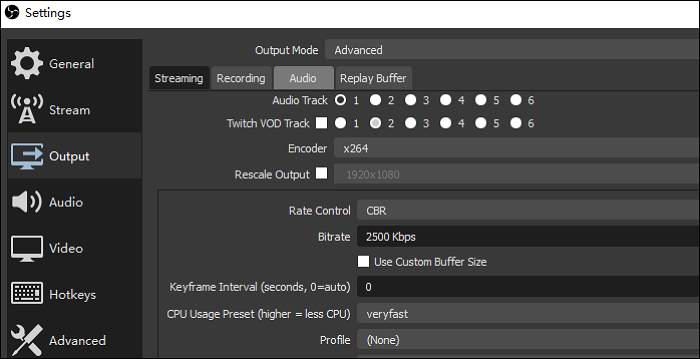
Find the Advanced options from the Output. The benefit of OBS is its advanced settings, and you will have more options. It is one of the best recording settings for OBS, which is also a hidden option.
4. Set the Hotkey for Your Habit
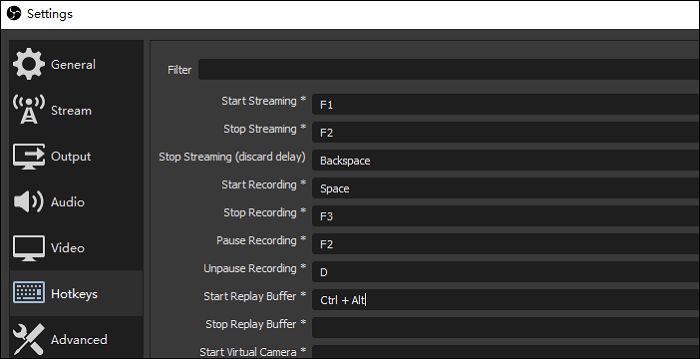
To meet your custom, OBS allows changing the hotkey options to operate the related task. Press your keyboard to set it. For example, let the Space button start capturing and F3 stop it. Remember to change it before recording.
Have to say that there are many options in OBS, the obvious or hidden features. Therefore, it's quite suitable for professional users to explore more features. To begin your task, better follow the below guide.
How to Capture Screen and Audio with OBS
After adjusting some options in this software, follow the below guide to start capturing.
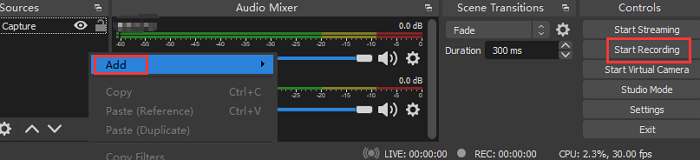
Step 1. Download OSB and open it. In its main interface, find "Source" and then right-click your mouse at the box. Then, choose "Add". Based on your need to record screen on PC or capture audio, choose it correctly.
To capture the screen, select "Display capture". For audio, hit "Audio Input/Output Capture". Type the name on the box.
Step 2. To start the mission, click "Start Recording" from the left bottom toolbar. You can see the time of "REC" is changing.
Step 3. If you want to stop it, click "Stop Recording". From the bottom toolbar, the saved location shows. Find it in that file.
Alternative to OBS - Easy for Screen Capturing
Believe that you are clear about the best recording settings for OBS. If you think OBS is difficult to operate, try the alternative tool, EaseUS RecExperts. This Windows screen recorder is commonly accepted by the public for its simple interface and easy operations. It can deal with your screen, audio, webcam, and gameplay.
The obvious advantage is its Settings for video, audio, and other advanced options. Unlike other professional tools, it is especially for common users. You can change the related settings easily. Such as changing the output format of audio, including MP3, AAC, WAV, OGG, etc. Also, set the bitrate and sampling rate of audio.
To explore more useful functions of this helpful screen and audio recorder, try it yourself!
Main features of this tool:
- Record screen and webcam at the same time
- Capture the whole screen or selected area of the display
- Record Zoom meeting without permission
- Task schedule function to start the mission automatically
- Effectively record desktop audio to meet a special requirement
Look at the simple guide to help you deliver the best project:
Step 1. Launch EaseUS RecExperts on your computer. Before recording, you can choose from two recording modes. To record the whole screen, choose the "Full Screen" mode; to record a part of the screen, select "Region".

Step 2. You can also choose to record the screen with your webcam, system sound, microphone. Just click to select them. You can also set auto split, auto recording with various functions on the interface.
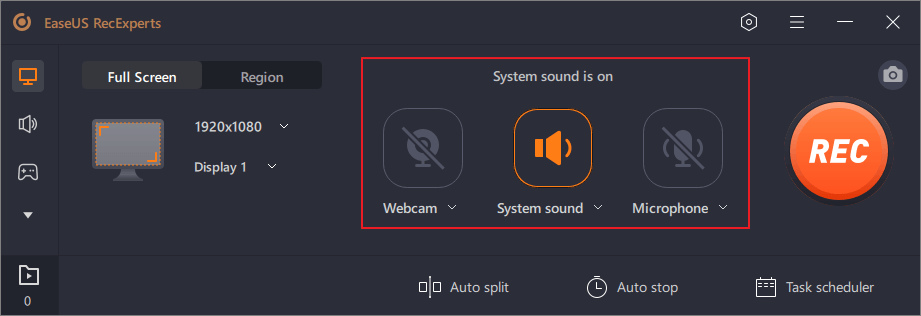
Step 3. Then, click on the red "REC" button to start recording. To pause the recording, click on the white double vertical bar; to end the recording, click on the red square sign. They are located on the menu bar appearing on your screen.
Step 4. After recording, you will be led to the recording list. Here you can view, split, extract audio, take screenshots, delete, and manage your recordings, etc. To start a new recording with previous settings, click on the "REC" button on the top of the window.

EaseUS RecExperts

One-click to capture anything on screen!
No Time Limit, No watermark
Start Recording