-
![]()
Daisy
Daisy is the Senior editor of the writing team for EaseUS. She has been working in EaseUS for over ten years, starting from a technical writer to a team leader of the content group. As a professional author for over 10 years, she writes a lot to help people overcome their tech troubles.…Read full bio -
Jane is an experienced editor for EaseUS focused on tech blog writing. Familiar with all kinds of video editing and screen recording software on the market, she specializes in composing posts about recording and editing videos. All the topics she chooses …Read full bio
-
![]()
Melissa Lee
Melissa Lee is an experienced technical blog writing editor. She knows the information about screen recording software on the market, and is also familiar with data cloning and data backup software. She is expert in writing posts about these products, aiming at providing users with effective solutions.…Read full bio -
Jean is recognized as one of the most professional writers in EaseUS. She has kept improving her writing skills over the past 10 years and helped millions of her readers solve their tech problems on PC, Mac, and iOS devices.…Read full bio
-
![]()
Jerry
Jerry is a fan of science and technology, aiming to make readers' tech life easy and enjoyable. He loves exploring new technologies and writing technical how-to tips. All the topics he chooses aim to offer users more instructive information.…Read full bio -
Larissa has rich experience in writing technical articles. After joining EaseUS, she frantically learned about data recovery, disk partitioning, data backup, screen recorder, disk clone, and other related knowledge. Now she is able to master the relevant content proficiently and write effective step-by-step guides on various computer issues.…Read full bio
-
![]()
Rel
Rel has always maintained a strong curiosity about the computer field and is committed to the research of the most efficient and practical computer problem solutions.…Read full bio -
![]()
Gemma
Gemma is member of EaseUS team and has been committed to creating valuable content in fields about file recovery, partition management, and data backup etc. for many years. She loves to help users solve various types of computer related issues.…Read full bio
Page Table of Contents
0 Views |
0 min read
We all know that it is easy to screen record on Windows 10 as it has a built-in screen recorder. However, some of you, still using a lower operating system, like Windows 8, may feel difficult in doing screen recording activities. Fortunately, there are many screen recording software designed for Windows 8 that can help you get the work done without effort.
We have collected plenty of Windows 8 screen capture and picked the top 8 ones to share with you on this page. In addition, for each software, we provide a detailed tutorial about how to record screen on Windows 8. Read to find more information.
PAGE CONTENT:
Part 1. How to Record Screen on Windows 8 with EaseUS RecExperts
EaseUS RecExperts is the best choice for Windows 8 users when recording the screen. As one of the best free screen recorders, it can capture anything on your screen, like movies, live streaming, gameplay, etc. While recording, you can choose the recording area, capture the screen with or without audio flexibly.
This screen recorder for Windows 8 is user-friendly for people who are not familiar with recording video and audio on their PC, as its simple and concise interface makes operations more straightforward. After capturing what you need, a built-in media player will appear and help you preview the recording. To remove some unnecessary images, you can use the basic trimming tool offered by this software to edit the recording directly.
Key Features:
- Friendly to all levels of users, especially the beginners
- Allow recording screen, audio, webcam separately or simultaneously
- The best game recorder to capture various gameplay
- Export the recorded files in more than ten formats
- Record videos in 1080P/4K
Now check the following button to download this Windows 8 screen recorder and capture your screen freely.
The tutorial below will show you how to use this powerful Windows 8 screen recorder. Keep reading to know the detailed steps.
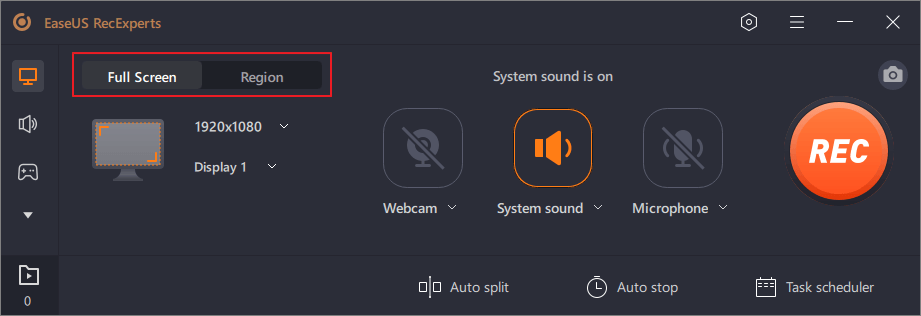
Step 1. Launch EaseUS RecExperts on your computer. Before recording, you can choose from two recording modes. To record the whole screen, choose the "Full Screen" mode; to record a part of the screen, select "Region".
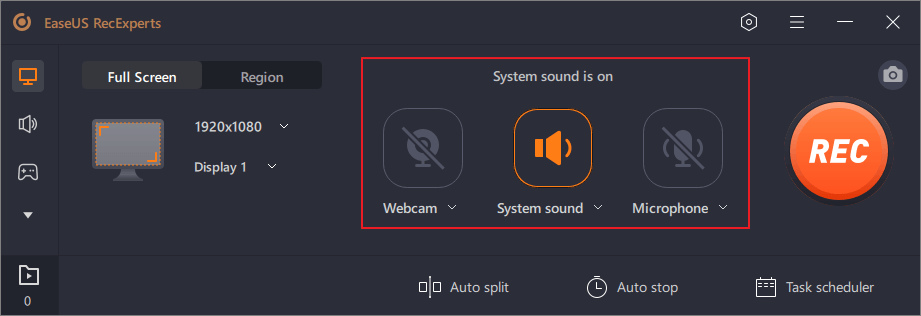
Step 2. You can also choose to record the screen with your webcam, system sound, microphone. Just click to select them. You can also set auto split, auto recording with various functions on the interface.
Step 3. Then, click on the red "REC" button to start recording. To pause the recording, click on the white double vertical bar; to end the recording, click on the red square sign. They are located on the menu bar appearing on your screen.
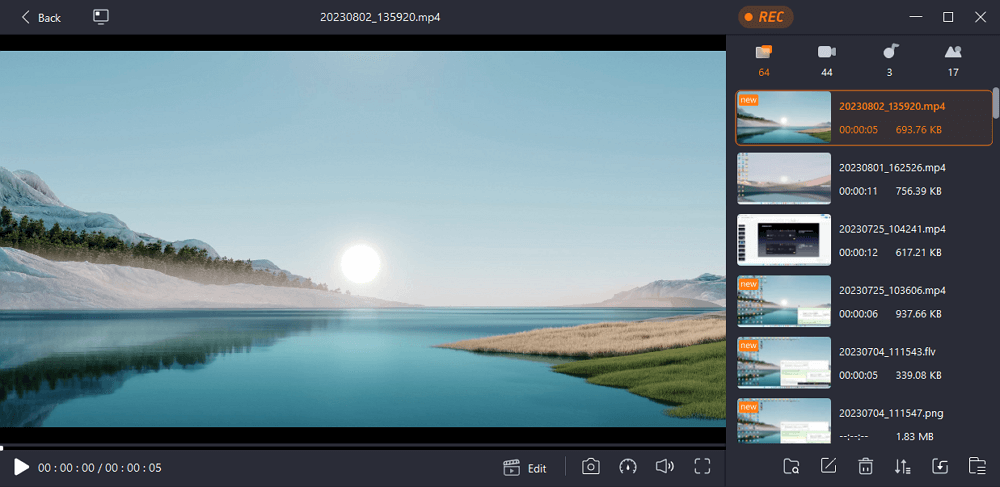
Step 4. After recording, you will be led to the recording list. Here you can view, split, extract audio, take screenshots, delete, and manage your recordings, etc. To start a new recording with previous settings, click on the "REC" button on the top of the window.
Part 2. How to Screen Record on Windows 8 PC with VLC
If you want to record a screen on Windows 8 without downloading any software, you can try VLC Media Player. This versatile video tool can do what you want. It can record your screen without any extra software. Here's how it works.
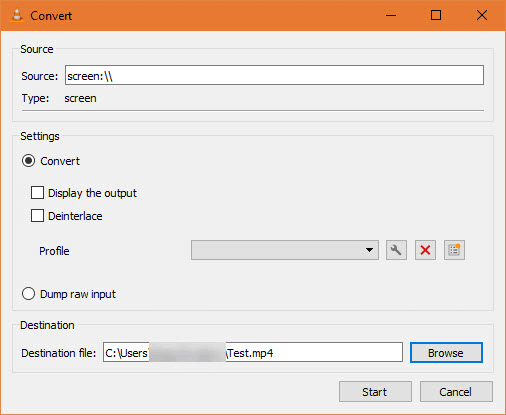
Step 1. Open VLC Media Player by searching for it in the "Start Menu," then click the "Media" > "Convert/Save."
Step 2. Switch to the "Capture Device" tab. Here, you need to change the "Capture" mode to "Desktop" to let VLC capture your desktop.
Step 3. Set the frame rate in the "Desired" frame rate box. For basic screen recordings, 15FPS should work fine. If you need a high-quality recording, try 30 FPS.
Step 4. Click the "Convert/Save" button to open the next dialog box. Select "Browse" next to the "Destination" file box and choose a place to save the recording. After that, click "Start" to start the recording.
Part 3. How to Record the Screen on Windows 8 with OBS
Open Broadcaster Software Studio, more commonly known as OBS, is a video streaming and recording program. It is free, open-source, and fully cross-platform - Mac, Windows, and Linux are all compatible with this software. Combined with solid audio and video editing software, it is a powerful and flexible screencast video production tool. To show you how to use this tool, we offer you the tutorial below.
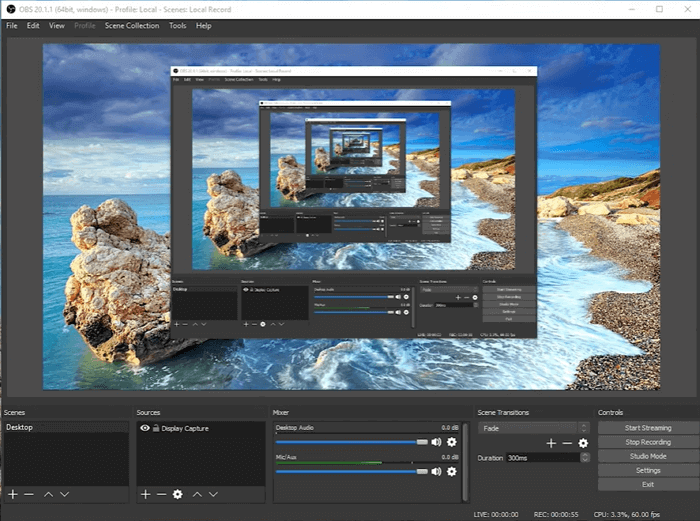
Step 1. Launch OBS Studio, click the "+" sign. Note that the default setting is recording the screen with audio.
Step 2. Click "Display capture," name the new recording under "Create new."
Step 3. Customize the aspect ratio of the video to be recorded on the next page.
Step 4. Let the program record the screen for you. When the process is completed, you can find the video by clicking "File."
Part 4. How to Record Screen on Windows 8 No Download
For those who don't want to download any software, we give you a list of online screen recorders for Windows 8. You may choose one tool to record the screen for you.
#1. Online Screen Recorder
ScreenApp.IO is one of the simplest and fastest ways to capture your screen on a Windows 8 PC. Since it functions fully online, there are no downloads or extensions required. With this online program, you are able to record, edit, and share your screen on the web instantly. Want to know how to record the screen with Online Screen Recorder? Just follow the steps below.

Step 1. Visit screenapp.io and click on the "Get Started" button.
Step 2. When the "Share Your Screen" window pops up, select from Record Your Entire Screen, Record an Application Window, and Record a Browser Tab.
Step 3. If you are all set, click "Start Recording," and the recording will start immediately.
Step 4. Once you are done, click "Stop Recording," and it will stop instantly.
#2. Clipchamp
This online Windows 8 screen recorder captures video and audio to enhance your video projects. With Clipchamp, you can record the screen and edit and export the recorded file in simple steps.
There is no more downloading or switching between programs. You may trim and clip your recordings, add fun filters and overlay motion text to produce great videos. Also, you can turn up/down the volume on your screen recordings with sound.

Step 1. Select the area you want to record and start recording.
Step 2. Complete your screen recording, and the file recorded will appear in the editor.
Step 3. Edit the screen recording with the functions it offers.
Step 4. When you're satisfied, you can export and share the recorded file.
#3. Nimbus Capture
You can use Nimbus Capture as a Windows 8 screen recorder to capture photos and screenshots, or you can go the whole hog and use it for video. It also lets you annotate, making it one of the best free online screen recording programs available on the market. If you are a student, it saves your time taking notes in lectures.
Also, it is capable of recording videos of your entire desktop or browser tabs, creating videos using your webcam, or taking screenshots to capture entire web pages (or part of a web page). Follow the steps of recording the screen below.
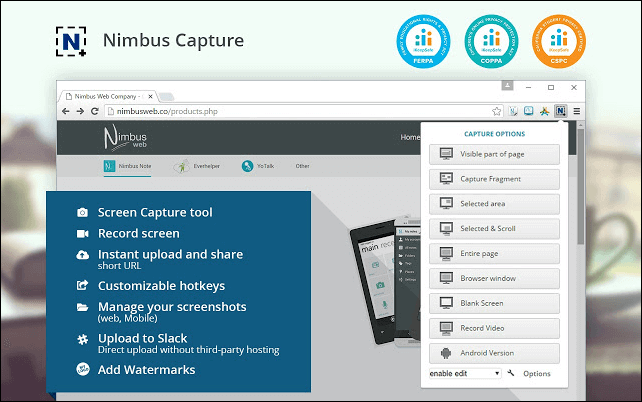
Step 1. Search Nimbus Capture on Google and get Nimbus Capture for Chrome.
Step 2. Click "Add to Chrome" so that you can find it on Chrome whenever you need it.
Step 3. Click Nimbus Capture and customize the capture options.
Step 4. Choose to record with the audio or not on the next page.
Step 5. Click "Start Record," and the tool will record the screen for you.
Conclusion
This post answered the question: how to record screen on Windows 8 and offers you many optional Windows 8 screen recorders to capture whatever is on your screen.
All in all, many programs can help you record the screen on Windows. However, EaseUS RecExperts is undoubtedly the best choice for ordinary users. It is full-featured but lightweight, powerful but easy-to-use in the meantime. If you don't have much experience in choosing screen recorders, this is what you need.
EaseUS RecExperts

One-click to capture anything on screen!
No Time Limit, No watermark
Start Recording