-
![]()
Daisy
Daisy is the Senior editor of the writing team for EaseUS. She has been working in EaseUS for over ten years, starting from a technical writer to a team leader of the content group. As a professional author for over 10 years, she writes a lot to help people overcome their tech troubles.…Read full bio -
Jane is an experienced editor for EaseUS focused on tech blog writing. Familiar with all kinds of video editing and screen recording software on the market, she specializes in composing posts about recording and editing videos. All the topics she chooses …Read full bio
-
![]()
Alin
Alin is an experienced technical blog writing editor. She knows the information about screen recording software on the market, and is also familiar with data cloning and data backup software. She is expert in writing posts about these products, aiming at providing users with effective solutions.…Read full bio -
Jean is recognized as one of the most professional writers in EaseUS. She has kept improving her writing skills over the past 10 years and helped millions of her readers solve their tech problems on PC, Mac, and iOS devices.…Read full bio
-
![]()
Jerry
Jerry is a fan of science and technology, aiming to make readers' tech life easy and enjoyable. He loves exploring new technologies and writing technical how-to tips. All the topics he chooses aim to offer users more instructive information.…Read full bio -
![]()
Rel
Rel has always maintained a strong curiosity about the computer field and is committed to the research of the most efficient and practical computer problem solutions.…Read full bio -
![]()
Gemma
Gemma is member of EaseUS team and has been committed to creating valuable content in fields about file recovery, partition management, and data backup etc. for many years. She loves to help users solve various types of computer related issues.…Read full bio -
![]()
Shelly
"I hope my articles can help solve your technical problems. If you are interested in other articles, you can check the articles at the bottom of this page. Similarly, you can also check my Twitter to get additional help."…Read full bio
Page Table of Contents
Alin
Updated on Jun 09, 2026
0 Views |
0 min read
Video conferencing and recording software like Google Meets, Zoom, and Microsoft Teams are becoming popular, especially after COVID. However, Teams is preferred because of its valuable functionalities, Office 365 collaboration, and integration with third-party apps like Slack.
Whether there is an official meeting or a class recording, it's being recorded for later use or sharing with others. However, people want to free up the storage space when these recordings are no longer helpful. Plus, you might have recorded a meeting accidentally, and it got posted on Microsoft Teams channel posts.
In this scenario, you will surely ask how to delete the Teams recording. Since these recordings are saved in OneDrive or SharePoint instead of Microsoft Stream, the below information will be helpful for you. Let's walk into the details!
PAGE CONTENT:
Will Teams Delete Recording Automatically?
No doubt, only the person who has started the recording or the one with the permission can delete the recording. However, these recordings also get deleted in the updated Microsoft Teams app after a specific time.
The maximum period is of 20 days for the newly created recordings of the meetings (TMRs) while 21 days in the Teams' conversations. However, the duration is 60 days from the creation date to access and download recordings via OneDrive and SharePoint. After this period, the recordings will be deleted automatically from everywhere.
But remember that the admins can set the meetings recordings' expiration time to never auto-expire. This way, you can access the recordings anytime, and admins can delete them at their convenience!
How to Delete Teams Recording
Microsoft Teams is a comprehensive video conferencing platform that helps you to collaborate even in real-time, thus enabling you to share content for multiple purposes. Though there are other software available in the market, its preference is because of the extra efficiency and collaboration functions. You can use the other Microsoft apps to share documents and other files to increase your work productivity. This ultimately leads to a boost in team productivity.
Moreover, you can communicate at an advanced level using emoticons, gifs, and links. Even it is possible to provide the users with a fabulous online meeting experience. No doubt people may encounter some issues but deleting the Teams recording is at the top. Therefore, you must follow precise steps to get the desired results.
Features:
- Increase focus with its professional interface
- Unable to replicate the team or channel
- Offer the easy & quick web-based processing
Here is a step-by-step tutorial on how to easily delete the Teams Recording:
Step 1. Firstly, you have to either download and install the team and then open your account or simply sign up/in on its web portal. Now, select the "Chat" option from the left-column menu to check the recording. In another case of channel recordings, click "Teams" and then the "General" > "Posts" tab under the desired channel.

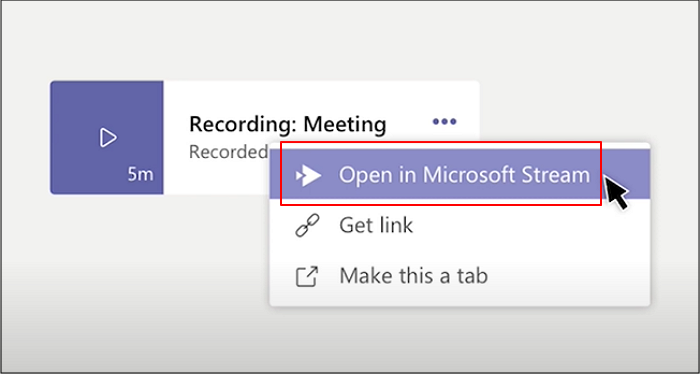
Step 2. Whether you find the recording in the "Posts" section or "Chats", press it to get the option of "Open in Microsoft Stream". Clicking this option will lead you to the streaming option.
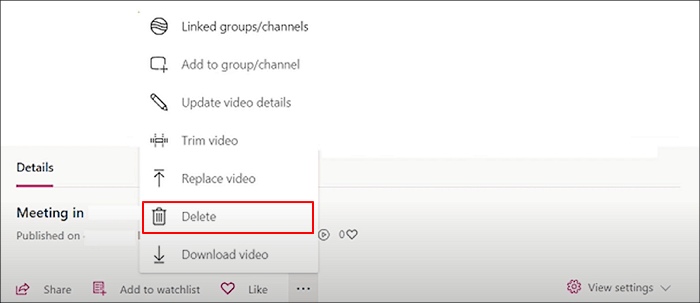
Step 3. In the final step, you need to click the "Three dots" menu and then the "Delete" button. From the confirmation message, choose "Delete the video". You are all done!
Record and Manage Teams Meeting with EaseUS RecExperts
Though you can stream and record on Microsoft Teams, choosing another screen recording software is wise if you want to overcome all the issues before, during, and after the recording. And for the high quality and improved efficiency, EaseUS RecExperts must be your way to go.
It is coherent and comprehensive software to help you with better recordings. It lets you record full screen on windows 10 or record a particular area of the screen/window. You can easily schedule the recordings via its Task scheduler feature by mentioning the recording's starting time, duration, and name. Plus, its Auto split and Auto stop functions help you split and stop the recordings at the given time.
Even you can turn on the GPU hardware acceleration for better quality recordings by using the minimum system resources. Furthermore, controlling the audio and video parameters is all in your control. Even you can adjust the volume and choose quality as standard, high, or original. In case of recording a lecture or tutorial, you can quickly use the feature of a webcam to record your live video along with the screen. Plus, it is possible to record system audio and microphone at the same time.
Check the video tutorial below:

Features:
- Support multiple audio and video output formats
- Adjust the frame rate, bitrate, and sampling rate
- Capture the screenshot while recording
- Let you play the videos with its in-built media player
- Keep the history of your video/audio/picture recordings
Here is a step-by-step text tutorial:
Step 1. Launch EaseUS RecExperts and select your preferred mode: Full Screen, Custom, Window, Game, Audio, or Webcam, depending on what you want to capture. For example, if you're recording a tutorial or walkthrough, the Full Screen or Window mode may work best.

Step 2. Use the toolbar to toggle on the Speaker, Microphone, or Webcam. This is useful if you're explaining something and want your voiceover or facecam included in the recording. You can also turn them off for a clean, silent screen capture.

Step 3. Click the red REC button to begin. While recording, you'll see a floating control bar on your screen. Click the pencil icon to activate annotation features. These tools allow you to highlight areas, draw arrows, underline key content, or write directly on the screen.

Step 4. You can click the Pause button to temporarily stop recording if you need to adjust your content, or click the Stop button to finish. If you want to remove annotations while recording, use the clear option in the drawing toolbar.
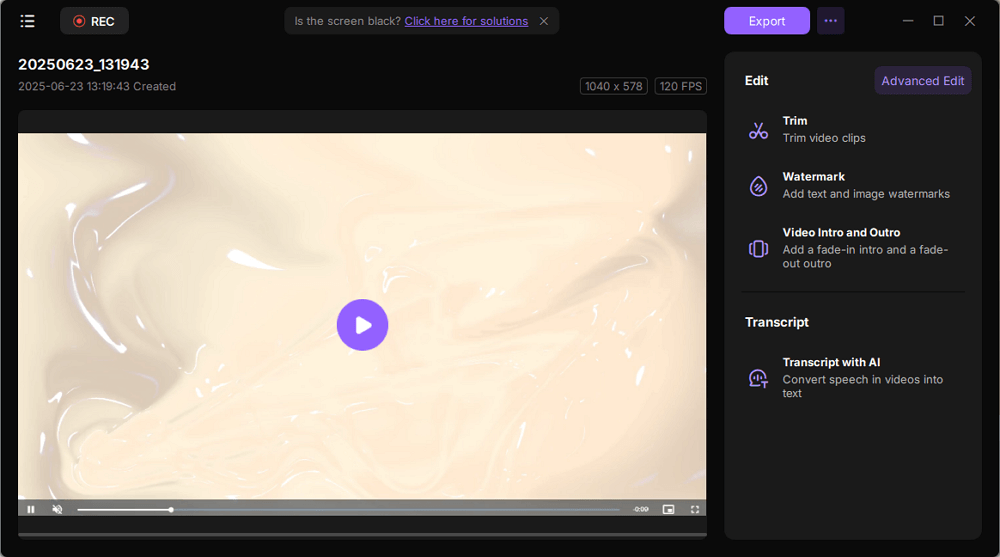
Step 5. Once the recording ends, you'll be taken to the preview window where you can edit or manage your files. The annotations you made will be preserved in the final video.
Conclusion
Now, it's time to conclude the guide about how to delete the Teams recording after providing you with all the relevant information. Indeed, it's easier to carry out this task, but you may find it complex. So you should start using an ideal recording software that does not give rise to any issues while deleting the recordings. EaseUS RecExperts proves to be the best partner in this regard. It does not only help you in recording efficiently but also managing the relevant tasks, be it editing or deletion.