-
![]()
Daisy
Daisy is the Senior editor of the writing team for EaseUS. She has been working in EaseUS for over ten years, starting from a technical writer to a team leader of the content group. As a professional author for over 10 years, she writes a lot to help people overcome their tech troubles.…Read full bio -
Jane is an experienced editor for EaseUS focused on tech blog writing. Familiar with all kinds of video editing and screen recording software on the market, she specializes in composing posts about recording and editing videos. All the topics she chooses …Read full bio
-
![]()
Melissa Lee
Alin is an experienced technical blog writing editor. She knows the information about screen recording software on the market, and is also familiar with data cloning and data backup software. She is expert in writing posts about these products, aiming at providing users with effective solutions.…Read full bio -
Jean is recognized as one of the most professional writers in EaseUS. She has kept improving her writing skills over the past 10 years and helped millions of her readers solve their tech problems on PC, Mac, and iOS devices.…Read full bio
-
![]()
Jerry
Jerry is a fan of science and technology, aiming to make readers' tech life easy and enjoyable. He loves exploring new technologies and writing technical how-to tips. All the topics he chooses aim to offer users more instructive information.…Read full bio -
Larissa has rich experience in writing technical articles. After joining EaseUS, she frantically learned about data recovery, disk partitioning, data backup, screen recorder, disk clone, and other related knowledge. Now she is able to master the relevant content proficiently and write effective step-by-step guides on various computer issues.…Read full bio
-
![]()
Rel
Rel has always maintained a strong curiosity about the computer field and is committed to the research of the most efficient and practical computer problem solutions.…Read full bio -
![]()
Gemma
Gemma is member of EaseUS team and has been committed to creating valuable content in fields about file recovery, partition management, and data backup etc. for many years. She loves to help users solve various types of computer related issues.…Read full bio
Page Table of Contents
Crystal Chen
Updated on Apr 19, 2024
0 Views |
0 min read
Now, many people use Chromebook to start the Zoom online conference. Here comes the question, how to record a Zoom meeting on Chromebook? This post here introduces the detailed methods for recording it on Chromebook. You only need to prepare your Zoom account and then follow the below steps.
| Workable Solutions | Step-by-step Troubleshooting |
|---|---|
| 1. Enable Automatic Recording | Hit "Settings" in Zoom to enable local recording... Full steps |
| 2. Start or Join Zoom Meeting | For a host, start the Zoom recording mission...Full steps |
| 3. Record Zoom Meeting | Click the Record button from the bottom side...Full steps |
| 4. View Recorded Zoom Meetings | You can view the recordings from your local...Full steps |
Bonus Tips>> How to Record Zoom Meeting Without Permission
How to Record a Zoom Meeting on Chromebook
For recording Zoom meetings on Chromebook, just follow the below guide. Before starting, remember to create an account for Zoom and log into it. The whole process is easy.
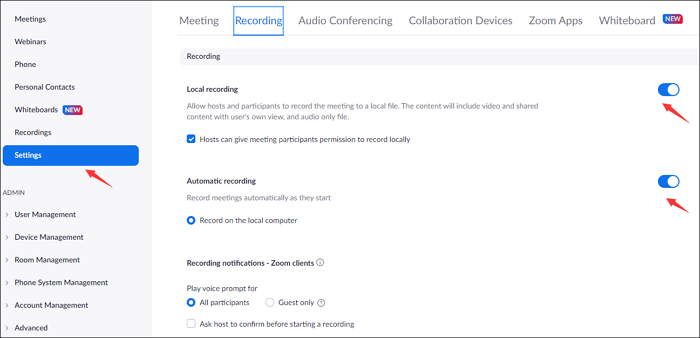
1. Enable Automatic Recording in Settings
Go to the Zoom website with your browsers. Log into your account and move to the Profile. Then, click "Settings" > "Recording". Here, you can set local recording, automatic recording, and also adjust recording notification.
- Local recording: The host can grant permission for all participants to record the video meeting in Zoom.
- Automatic recording: Enable it to record Zoom meetings automatically when it starts. Also, you can check the option "Record on the local computer".
- Recording notification: All participants or guests will ask for your permission if they want to record the meeting.
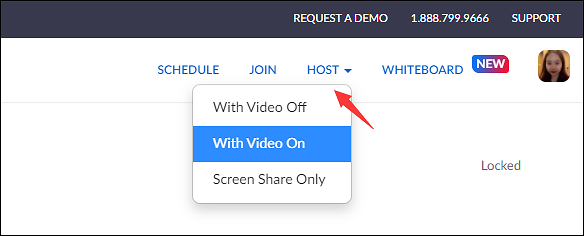
2. Start or Join Zoom Meeting in the Chromebook
Go back to the dashboard and start the Zoom meeting. For recording meetings as participants, you may need permission from the host after joining the meeting. If you are a host, click "HOST" > "With Video Off/On".
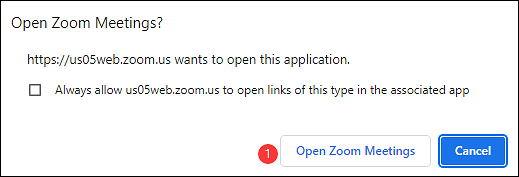
Here, it asks if you want to open Zoom meetings on a web page. If so, click "Open Zoom Meetings".
The Zoom functional window shows and you need to start a video meeting.
3. Record Zoom Meeting in Chromebook
Here, from the bottom toolbar, you need to click "Record" to start the Zoom recording mission. Or you can hold down Alt + R on the keyboard.
If you have enabled the option to start recording automatically, then it will record.

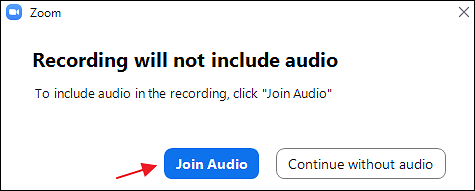
When you click the "Record" button, it also asks you whether to include the audio. Hit "Join Audio".
Once done, it turns your Zoom meeting recordings into required formats and saves them on local files.

4. View Recorded Zoom Meetings - Two Methods
If you want to view the recorded videos for the Zoom meetings, there are two ways to access the recordings.
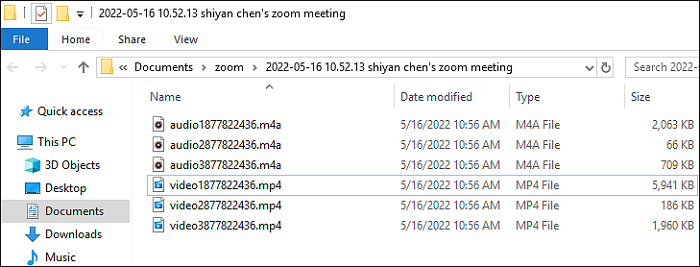
Method 1. Access Recordings from Local Files
On your computer, open "Documents" > "Zoom". Find the recordings you need.
Method 2. Check them from Zoom Website
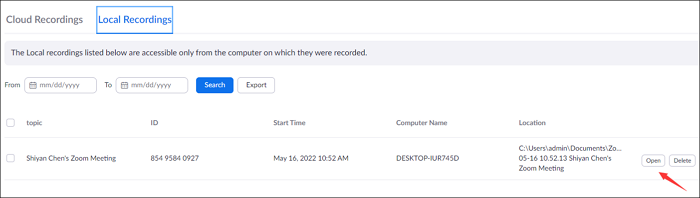
Open the Zoom website again, and click "Recordings" > "Local Recordings". Click "Open" to perform the Zoom recorded video. Here, you can also manage the recordings by deleting some unwanted files.
Believe that you know how to record a Zoom meeting on Chromebook from the above steps. While it's suitable for the host or receives permission from the host. So what if you don't have permission? Below is a solution.
Bonus Tips: How to Record Zoom Meeting Without Permission
For Windows and Mac users, do you know how to record online meetings like Zoom meetings without permission? The answer is using EaseUS RecExperts. This comprehensive screen recorder records meeting screen, audio, and webcam with simple clicks.
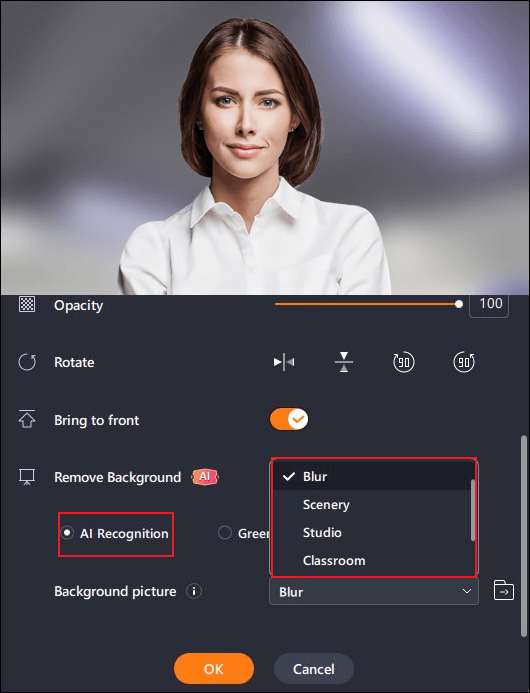
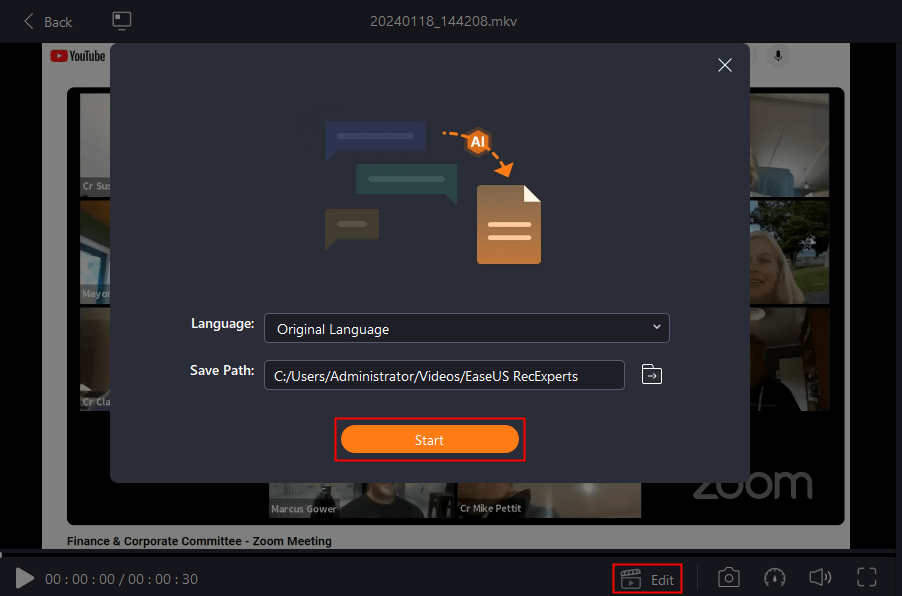
The best thing is that you can change the original background with a virtual one. You can choose from a classroom, studio, scenery, or more. After recording, you can let it generate a transcript for the meeting. Then, save it in MP4, AVI, MKV, etc. formats. You can even schedule recording tasks to record automatically. Download it to have a try now!
Steps for recording Zoom meetings using EaseUS RecExperts:
Step 1. Go to the video meeting that you want to record and launch EaseUS RecExperts on your devices. Choose the "Full Screen" recording mode to record the whole screen or the "Region" mode to record your customized area.

Step 2. Then, choose to record the system sound, microphone sound, webcam, or none by clicking on the according buttons. You can even record webcam with AI background. When all is done, click on the red "REC" button to begin.
Step 3. The recording process will start after a three-second countdown. If you want to pause the recording, click on the white double vertical bar ("F10"). To end the recording, click on the red square sign ("F9").
Step 4. It saves your recordings in MP4, GIF, AVI, and more. After recording, you will be led to the recording list interface. Here, you can even use the AI assistant to export meeting discussions to text files.
EaseUS also offers a free online screen recorder that lets you record Zoom meetings on Chromebooks. It is a simple and effective utility for recording your computer screen. This program is excellent for generating an instructional video, presentation, or game recording.
You can record your screen, audio, and camera at the same time and store your recordings in a variety of formats. One of the most notable benefits of EaseUS Free Online Screen Recorder is that it is completely free with no software installation required.
It does, however, offer certain limitations, such as limited editing choices and occasional recording errors. This program is a fantastic choice for anyone looking for a simple and rapid screen recording solution.
If you like, you can use it to record Zoom meetings on your Chromebook without permission.
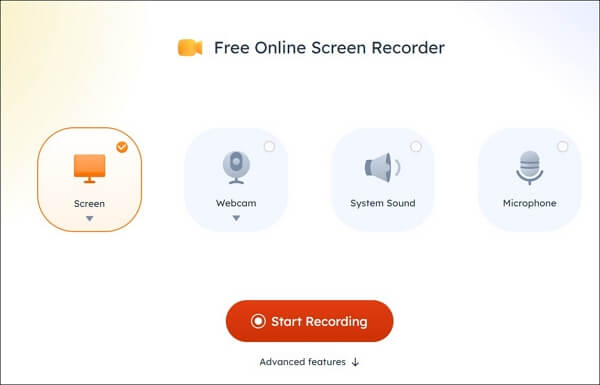
Step 1. Open EaseUS Online Screen Recorder on your Chromebook.
Step 2. Check the Screen option and other options as needed.
Step 3. Click Start Recording to record your Chromebook screen.
Step 4. Tap Stop Recording when you finish the recording.
FAQs About How to Record a Zoom Meeting on Chromebook
Some related information collected from the public is listed here.
1. Why can't I record my Zoom meeting on Chromebook?
If you want to capture Zoom meetings on Chromebook, the right method is to go to the Zoom website and change the recording settings. Enable the local recording option from the Settings. Depending on whether you are a host or participant, the permission for a Zoom meeting is different. For a host, you can record it directly. For participants, you may need permission from the host.
2. Where is the Zoom recorder on Chromebook?
Zoom has a built-in recording method. So, you only need to open the app and enable the recording feature during or before the recording. Besides, you can use third-party recording software to record Zoom videos.
EaseUS RecExperts

One-click to capture anything on screen!
No Time Limit, No watermark
Start Recording