-
![]()
Daisy
Daisy is the Senior editor of the writing team for EaseUS. She has been working in EaseUS for over ten years, starting from a technical writer to a team leader of the content group. As a professional author for over 10 years, she writes a lot to help people overcome their tech troubles.…Read full bio -
Jane is an experienced editor for EaseUS focused on tech blog writing. Familiar with all kinds of video editing and screen recording software on the market, she specializes in composing posts about recording and editing videos. All the topics she chooses …Read full bio
-
![]()
Melissa Lee
Melissa Lee is an experienced technical blog writing editor. She knows the information about screen recording software on the market, and is also familiar with data cloning and data backup software. She is expert in writing posts about these products, aiming at providing users with effective solutions.…Read full bio -
Jean is recognized as one of the most professional writers in EaseUS. She has kept improving her writing skills over the past 10 years and helped millions of her readers solve their tech problems on PC, Mac, and iOS devices.…Read full bio
-
![]()
Jerry
Jerry is a fan of science and technology, aiming to make readers' tech life easy and enjoyable. He loves exploring new technologies and writing technical how-to tips. All the topics he chooses aim to offer users more instructive information.…Read full bio -
![]()
Rel
Rel has always maintained a strong curiosity about the computer field and is committed to the research of the most efficient and practical computer problem solutions.…Read full bio -
![]()
Gemma
Gemma is member of EaseUS team and has been committed to creating valuable content in fields about file recovery, partition management, and data backup etc. for many years. She loves to help users solve various types of computer related issues.…Read full bio -
![]()
Shelly
"I hope my articles can help solve your technical problems. If you are interested in other articles, you can check the articles at the bottom of this page. Similarly, you can also check my Twitter to get additional help."…Read full bio
Page Table of Contents
0 Views |
0 min read
A Snipping Tool is the default program for capturing screenshots on Windows. This built-in feature lets you capture a full screen, an open window, or a rectangular area. The tool also supports image editing. The shortcut for accessing this feature is Windows + Shift + S. Sometimes, however, it's possible to encounter the "Snipping Tool shortcut not working error."
What stops the tool from working correctly? How can you solve this issue? This article is the right destination if you're asking the same questions. We'll discuss the reasons for this error and describe nine solutions. Keep reading and stay informed.
Fixes to Snipping Tool Shortcut Not Working
This section will discuss nine fixes to the problem, including the use of alternative software. Keep reading as we examine each method in detail.
Fix 1. Try Alternative - EaseUS RecExperts
The best fix if the Snipping Tool shortcuts stop working is using a Snipping Tool alternative approach. EaseUS RecExperts is the most recommended option. It has a "Screen Capture" feature that lets you record any section of your PC screen. You can screenshot an entire screen or only a section of it. This screen recorder is quite reliable and fast, unlike the Snipping Tool.
It supports the use of hotkey shortcuts to capture your screen, making it convenient to take screenshots when scrolling a webpage or a window. The system will save your screenshots automatically upon capture using EaseUS RecExperts. The tool also supports screen, webcam, and audio recording.
Try out this professional screenshot tool today for all your screen recording needs.
Fix 2. Enable Notifications
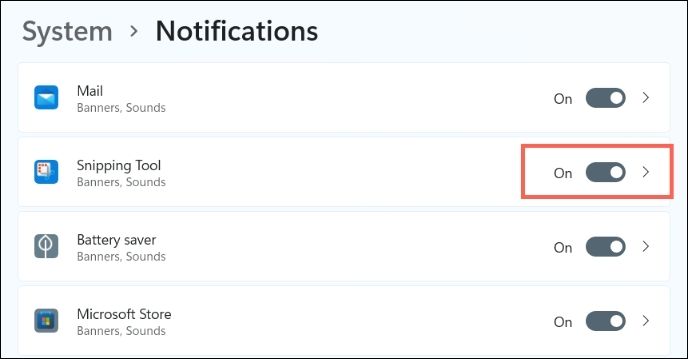
Sometimes, the Snipping Tool could work correctly (the problem is that you've disabled notifications). This implies that you won't receive any prompts to save your screenshot. You can try fixing this issue by enabling the notifications as follows:
Step 1. Go to Settings and click on "System."
Step 2. Click on "Notifications."
Step 3. Navigate to "Snipping Tool" and turn on the button next to it.
Have you solved your problem already? Just share this guide with others in need!
Fix 3. Restart PC
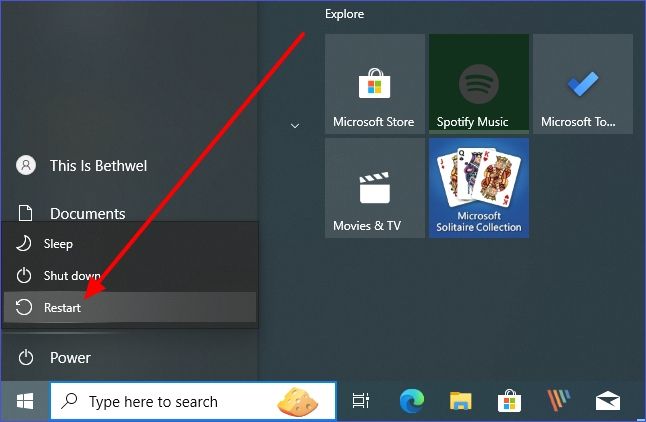
Performing a simple restart helps to fix different issues on your computer. This is also one of the remedies to the Snipping Tool shortcut not working correctly. A small bug or software issue may prevent the tool from working as expected. The system can easily fix this through a reboot. You can retry using the shortcut after the restart to check if the error has disappeared.
Fix 4. Uninstall and Reinstall the Snipping Tool
You can try uninstalling the tool if you suspect program corruption. This gives you the room to start afresh by reinstalling the Snipping Tool. You can follow the steps below to apply this fix:
Step 1. Open Settings.
Step 2. Click "Apps" then "Apps and Features."
Step 3. Click on "Snipping Tool" and select the "Uninstall" option.
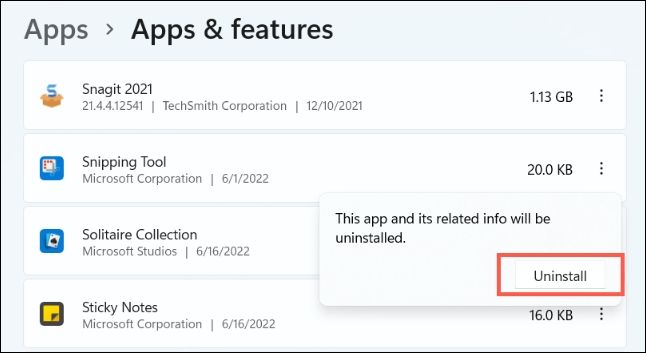
Step 4. Restart your PC and perform a Snipping Tool download from the Microsoft Store. You can then reinstall the application.
Fix 5. Run the Troubleshooter
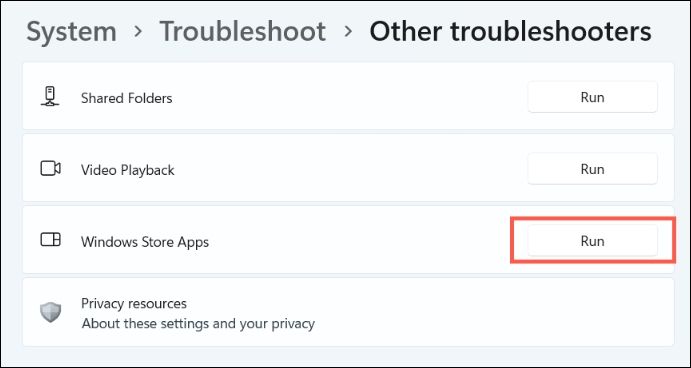
This feature scans and fixes common errors with the Microsoft Store apps. You can apply it to address the Windows Shift + S not working problem as follows.
Step 1. Open Windows Settings. Click on "System."
Step 2. Select the "Troubleshoot">"Other troubleshooters."
Step 3. Click "Windows Store Apps." Select the "Run" button next to it. This will launch the troubleshooter. It will then scan for possible issues on your system and fix them.

Windows 11 Snipping Tool Missing? Solved!
This article discusses 5 tested fixes to help you solve the error - Windows 11 Snipping Tool missing. Check them out and apply instantly. Read more >>
Fix 6. Repair and Reset the Snipping Tool
A repair or a reset can help fix your Snipping Tool if it isn't working correctly. You can apply this fix using the following steps:
Step 1. Right-click the Start Menu. Choose "Apps and Features."
Step 2. Click on "Snipping Tool" and select "Advanced options."
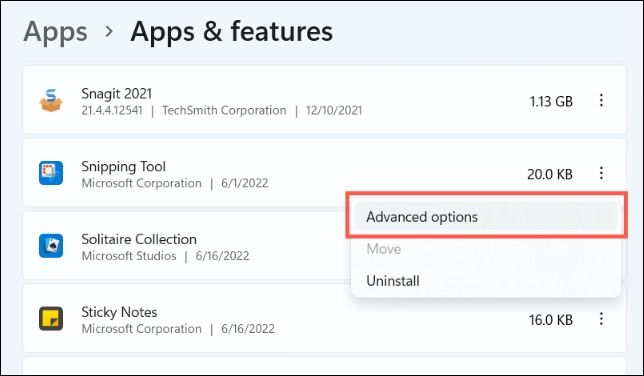
Step 3. Choose "Repair" or "Reset" to fix the issue. The latter option will wipe out all data.
Fix 7. Update Windows
The Snipping Tool shortcut feature may not work with an outdated OS. Check these steps to update Windows:
Step 1. Open Settings and click on "Windows Update."
Step 2. Select the "Check for updates" button. This system will scan for any updates that your device needs.
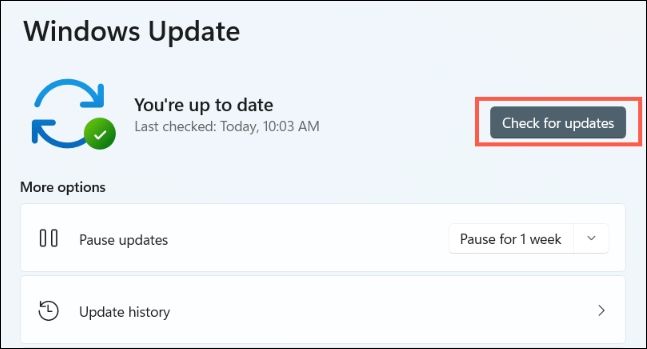
Step 3. When you find updates, download and install them on your PC. You can then restart your device and check whether the Snipping Tool works correctly.
Fix 8. Set the PrtScn Key to Open the Snipping Tool
The Snipping Tool shortcut feature may also fail to work because of conflicts with other similar apps. We recommend that you bind the PrtScn Key to your Snipping Tool so that the Windows + Shift + S shortcut works effectively. Check these steps:
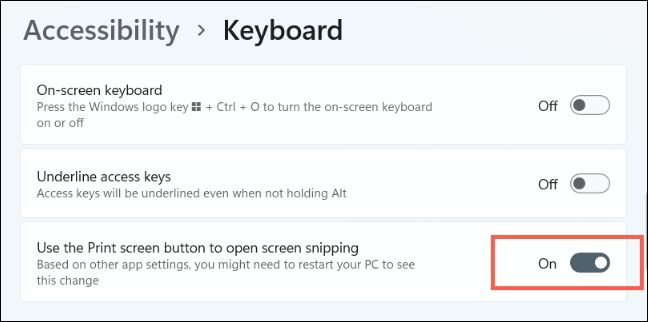
Step 1. Open Settings. Choose "Accessibility."
Step 2. Click on "Keyboard."
Step 3. Navigate to the "Use the Print screen button to open screen snipping" option and turn it on.
Fix 9. Run SFC & DISM Scans
Your Snipping Tool shortcut may also fail to work correctly due to some corrupted files on your system. Running an SFC scan helps to identify these files. The DISM scan removes the corrupted files.
Step 1. Open CMD as an administrator.
Step 2. Paste the following SFC command and hit Enter:
sfc /scannow
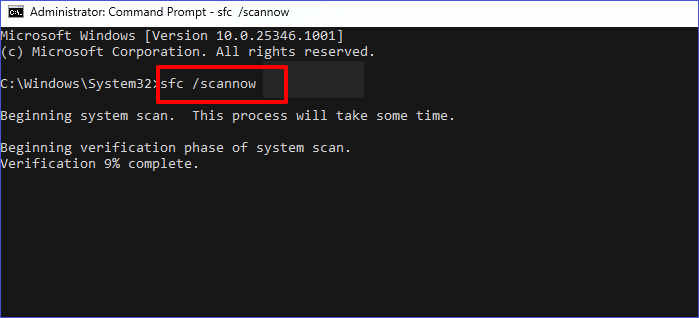
Step 3. Once the above command finishes running, you can type the following DISM command to fix any file issues:
DISM /Online /Cleanup-Image /ScanHealth
Why Is Your Snipping Tool Shortcut Not Working
You may encounter the above error because of the following reasons:
Corrupted application: the Snipping Tool may fail to work if corrupted.
Outdated drivers: the tool may fail to work correctly if your PC runs on outdated graphic drivers.
Focus Assist is on: this may prevent the Snipping Tool from working.
App interferences: apps running on your PC may inhibit the tool from working correctly.
Expired certificate: this happens when upgrading to Windows 11 from Windows 10. It may affect how programs run on your new OS.
Ensure you fix these issues so the Snipping Tool works as expected.
The Bottom Line
This article has discussed how to effectively fix the "Snipping Tool shortcut not working error." We've looked at nine common fixes to the problem. It's best to use an alternative option for capturing screenshots on your Windows 7/8/10/11 PC when this error occurs frequently.
EaseUS RecExperts is the best alternative in this scenario. You can apply it to a screen, webcam, or audio recording. Download EaseUS RecExperts now to record/capture your screen conveniently.
Snipping Tool Shortcut Not Working FAQs
The common FAQs for this topic include the following.
1. How Do I Enable Snipping Tool Shortcuts?
You can achieve that by hitting Windows + Shift + S. This is the shortcut for taking screenshots on your PC.
2. Why Is My Screenshot Shortcut Not Working?
This may happen due to outdated keyboard drivers. It would help if you tried updating this driver to fix the issue. You can also update your entire operating system to increase the chances of all drivers getting updated.
3. How Do I Unblock the Snipping Tool?
You can use the following steps to enable the tool on your PC:
Step 1. Open the Local Policy Editor.
Step 2. Next, click Computer Configuration>Administrative Templates> Windows Components> Tablet PC> Accessories.
Step 3. Click on Do not allow Snipping Tool to run.
Step 4. Select Disabled, click Apply, and then OK.
EaseUS RecExperts

One-click to capture anything on screen!
No Time Limit, No watermark
Start Recording


