-
![]()
Daisy
Daisy is the Senior editor of the writing team for EaseUS. She has been working in EaseUS for over ten years, starting from a technical writer to a team leader of the content group. As a professional author for over 10 years, she writes a lot to help people overcome their tech troubles.…Read full bio -
Jane is an experienced editor for EaseUS focused on tech blog writing. Familiar with all kinds of video editing and screen recording software on the market, she specializes in composing posts about recording and editing videos. All the topics she chooses …Read full bio
-
![]()
Alin
Alin is an experienced technical blog writing editor. She knows the information about screen recording software on the market, and is also familiar with data cloning and data backup software. She is expert in writing posts about these products, aiming at providing users with effective solutions.…Read full bio -
Jean is recognized as one of the most professional writers in EaseUS. She has kept improving her writing skills over the past 10 years and helped millions of her readers solve their tech problems on PC, Mac, and iOS devices.…Read full bio
-
![]()
Jerry
Jerry is a fan of science and technology, aiming to make readers' tech life easy and enjoyable. He loves exploring new technologies and writing technical how-to tips. All the topics he chooses aim to offer users more instructive information.…Read full bio -
![]()
Rel
Rel has always maintained a strong curiosity about the computer field and is committed to the research of the most efficient and practical computer problem solutions.…Read full bio -
![]()
Gemma
Gemma is member of EaseUS team and has been committed to creating valuable content in fields about file recovery, partition management, and data backup etc. for many years. She loves to help users solve various types of computer related issues.…Read full bio -
![]()
Shelly
"I hope my articles can help solve your technical problems. If you are interested in other articles, you can check the articles at the bottom of this page. Similarly, you can also check my Twitter to get additional help."…Read full bio
Page Table of Contents
0 Views |
0 min read
Takeaways
- 📱For iPhone users, they can choose an easy method to screen record on iPhone 15. You just need to access the Control Center by swiping down from the top-right corner to open it. After that, click on the screen recording button to start recording the screen as you like.
- 📱Another method is to use the Siri to help you achieve screen recording without lifting a finger. Of course, if you want to record the screen with a microphone, you can read the following steps.
- 📱You can also use EaseUS RecExperts to screen record on a Mac or PC, like recording game chats, online meetings, and courses, or streaming videos on YouTube or Netflix.
How to Screen Record on iPhone 15 With 2 Methods
Many iPhone 15 users are looking for a helpful and effective method to help them record the screen on iPhone, like videos, guides, or Skype chat. This article will suggest two ways for you to learn about. Now, let's get started!
Method 1: Use the Screen Recording Button
The first method is to use the screen recording button. Now, it is time for you to check if there is a button on the Control Center of your iPhone. If not, you can follow these steps to add the screen recording button to the panel.
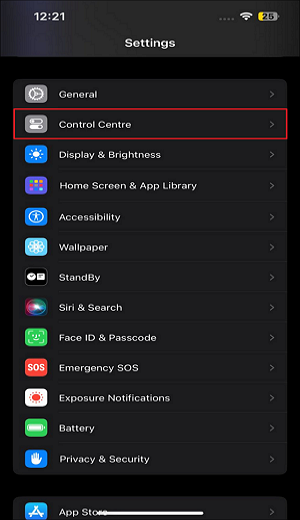
Step 1. Open the Settings menu on your iPhone 15 and scroll down until you find the "Control Center" option to begin the procedure. When you locate and tap it, the screen that appears will have two separate sections: "Included Controls" and "More Controls."
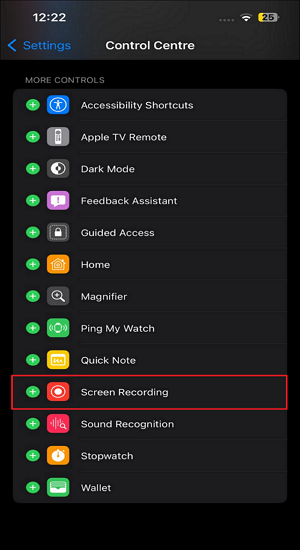
Step 2. Select "More Controls" and "Screen Recording" to begin recording on the iPhone. Click the "+" symbol in green to include it in the list of "Included Controls."
Step 3. After it's added, use the three horizontal lines to reposition it in the "Included Controls" area. You can assign it any position by adjusting the arrows.
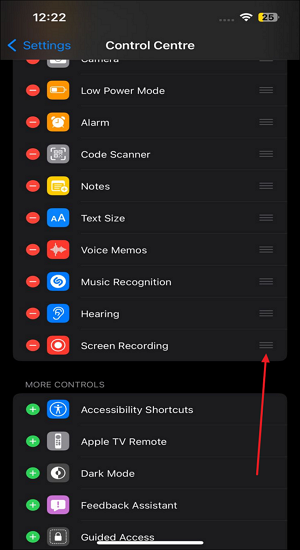
Now, you have succeeded in adding the screen recording button to the iPhone Control Center. When you need to record the screen, you just need to learn about the following steps.
Step 1. The first thing you should do is go to the Control Center. You can accomplish this by swiping downward on your iPhone 15, beginning in the upper right corner. When you go there, look for the "Screen Recording" button that you added in the previous phase.
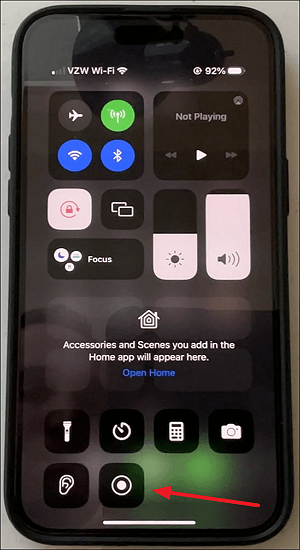
Step 2. To begin screen recording, press this button. There will be a countdown of three seconds to get your screen recorder ready when you tap.
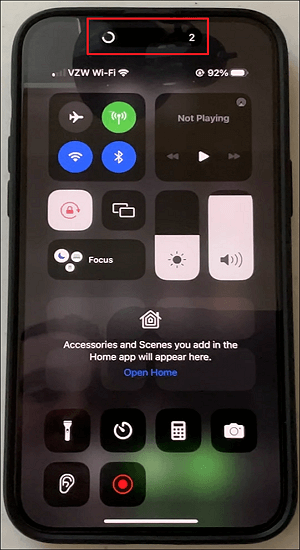
Step 3. Your iPhone 15 will start screen recording as soon as the countdown hits zero, capturing everything that is visible on the screen. On the dynamic island, a large "Red" dot will be clearly visible, signifying that recording is now underway. You may always see this status bar in all applications to be aware of when recording is taking place.
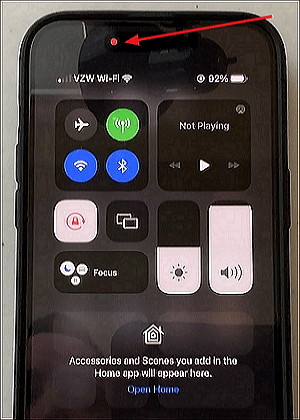
Step 4. After the recording is complete, hit the "Red" signal and choose "Stop." Your screen capture will instantly be stored in your Photos app.

People Also Read:
Method 2: Activate Siri to Screen Record on iPhone 15
It is believed that you have mastered how to use the first method to screen record on iPhone 14 or 15. But if you think it is a little complex, there is another easier way for you to consider. It is to use the Siri to help you record the screen. Now, you can follow the steps.
Step 1. You can activate Siri by saying "Hey Siri" (the precondition is that you have this feature enabled) or by pressing and holding the side button (suitable for iPhone X or later) or the home button (available on iPhone 8 or earlier).

Step 2. After activating Siri, you can say, "Start screen recording" or "Record my screen." Then, your Siri will confirm that the screen recording has started and display a red status bar at the top of the screen to indicate that the screen recording is in process.
Step 3. If you want to stop the screen recording, you can directly ask Siri to "Stop screen recording," or you can also tap on the red button to stop the process. After screen recording, the recorded files will be saved to your Photos app. You can access it there to view, edit, or share it as needed.
In a word, keep in mind that Siri commands may vary slightly depending on your iPhone model and the version of iOS you're using, but these steps should work for most recent iPhone models with Siri capabilities.
If you find this method helpful, share this article with more iPhone users.
Bonus Tip: Record Videos on PC/ Mac With EaseUS RecExperts
After learning about how to screen record on iPhone 15, there is a bonus tip for you to know how to screen record on PC or Mac. EaseUS RecExperts is an excellent screen recorder for Windows and macOS systems. Using this screen recording program, you can freely record whatever you want, like streaming videos, game videos, chat messages, or even online classes.
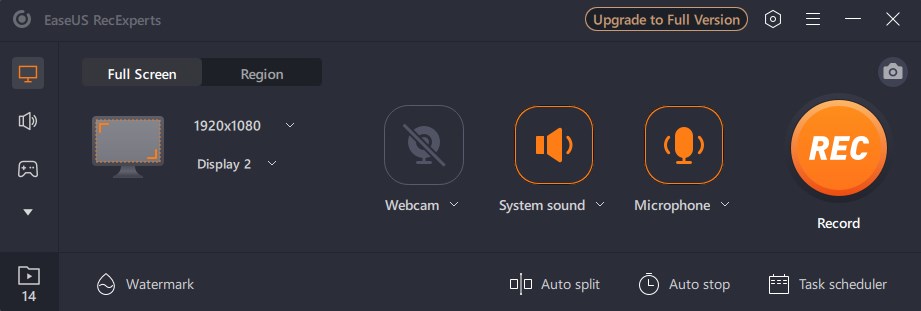
EaseUS RecExperts or its online version: EaseUS Online Screen Recorder can help users record the full screen or partial screen. You can also choose to record the webcam and the screen at the same time. Therefore, it is a good alternative to the Xbox Game Bar to help users record game videos and webcams simultaneously, as the latter can not help gamers record webcams.
More importantly, when you are recording webcam videos on Windows 11 for online courses or meetings, you can use its newly released AI function to help you remove the background by using some effects, like a blur, scenery, studio, or classroom. Besides, you can also use the AI speech-to-text feature to transcribe the long-time video to help you quickly grasp the topic of this video. In a word, this screen recorder with a highlighter can help you accomplish high-quality screen recording in different situations. You can consider downloading this screen recorder.
Conclusion
In a word, this article has talked about two effective methods to screen record on iPhone 15 with detailed steps. It is believed that you have grasped them, and now you can have a try! Besides, it also provides a perfect and powerful screen recorder: EaseUS RecExperts for you to screen record on your laptop or desktop devices, whether on Windows or macOS systems.
You can download EaseUS RecExperts to help you record YouTube, Netflix, Hulu, or Disney videos, as well as game videos. In addition, Zoom meetings can also be recorded in high resolution. Now, let's download this software to have a try.
FAQs About How to Screen Record on iPhone 15
After learning about how to record a screen on an iPhone 15, there are some related questions for you to learn, as follows.
1. How do I screen record with the microphone on my iPhone 15?
Before pressing the screen recording on the Control center, you need to enable the microphone. Then, the external sound will be recorded in your videos.
2. Can you record calls on your iPhone?
In other words, you cannot press "record" while on the phone. A third-party app with distinct call software is required, or you need an extra iOS device with microphone and audio recording capabilities. Remember that there can be a subscription cost associated with certain third-party apps.
3. Do all iPhones have screen recording?
The best part is that this function has been available since iOS 11, so it will be difficult to find an iPhone that doesn't support screen recording.
EaseUS RecExperts

One-click to capture anything on screen!
No Time Limit, No watermark
Start Recording

