-
![]()
Daisy
Daisy is the Senior editor of the writing team for EaseUS. She has been working in EaseUS for over ten years, starting from a technical writer to a team leader of the content group. As a professional author for over 10 years, she writes a lot to help people overcome their tech troubles.…Read full bio -
Jane is an experienced editor for EaseUS focused on tech blog writing. Familiar with all kinds of video editing and screen recording software on the market, she specializes in composing posts about recording and editing videos. All the topics she chooses …Read full bio
-
![]()
Alin
Alin is an experienced technical blog writing editor. She knows the information about screen recording software on the market, and is also familiar with data cloning and data backup software. She is expert in writing posts about these products, aiming at providing users with effective solutions.…Read full bio -
Jean is recognized as one of the most professional writers in EaseUS. She has kept improving her writing skills over the past 10 years and helped millions of her readers solve their tech problems on PC, Mac, and iOS devices.…Read full bio
-
![]()
Jerry
Jerry is a fan of science and technology, aiming to make readers' tech life easy and enjoyable. He loves exploring new technologies and writing technical how-to tips. All the topics he chooses aim to offer users more instructive information.…Read full bio -
![]()
Rel
Rel has always maintained a strong curiosity about the computer field and is committed to the research of the most efficient and practical computer problem solutions.…Read full bio -
![]()
Gemma
Gemma is member of EaseUS team and has been committed to creating valuable content in fields about file recovery, partition management, and data backup etc. for many years. She loves to help users solve various types of computer related issues.…Read full bio -
![]()
Shelly
"I hope my articles can help solve your technical problems. If you are interested in other articles, you can check the articles at the bottom of this page. Similarly, you can also check my Twitter to get additional help."…Read full bio
Page Table of Contents
Jane Zhou
Updated on Jun 09, 2026
0 Views |
0 min read
| Workable Solutions | Step-by-step Troubleshooting |
|---|---|
| Method 1. Opening Snipping Tool Using Windows.old Folder | Start by pressing the Windows+E keys to open 'File Explorer...Full steps |
| Method 2. Making Changes in Date and Time | Start by opening Settings by pressing the Windows+I keys. Then from...Full steps |
| Method 3. Making Modifications in the Group Policy | Press the 'Windows+R' keys to open 'Run,'...Full steps |
| Method 4. Download from Microsoft Store | Tap the 'Windows+S' keys to open the Search option...Full steps |
|
Method 5. Install Snipping Tool Without Microsoft Store |
Launch PowerShell and enter the command to install...Full steps |
| Method 6. Using Snipping Tool Alternative Windows 11 | Launch this software and choose the area you want to capture...Full steps |
Microsoft enables Windows users with a built-in tool for taking screenshots and recording screens, and it is called the Snipping tool. However, due to a recent upgrade, many users started complaining about the Windows 11 Snipping Tool missing issue. It happened due to a trigger of a bug in the OS, whereas some faced the problem because of system files that turned corrupt.
Here, we are helping you by suggesting valuable ways to fix the issue. Besides, we are also assisting you with an alternative snipping tool for Windows that can eradicate the problem as an instant solution. So keep reading and find out all the possible fixes right away.
Also read:
Reasons for Windows 11 Snipping Tool Missing
There can be many reasons triggering the snipping tool disappeared Windows 11 issue. Some of them are;
- Users are reporting a bug in the OS
- System files turning corrupt fail the pre-installed tools like the Snipping tool failing at times
- Sometimes there are specific settings that get disabled and lead to the malfunctioning of the snipping tool
To solve the Snipping tool missing issue, you can continue reading to find the solutions. If the Windows 11 snipping tool not working well, you can also find the solutions in the related post.
Do not hesitate to share this article about Snipping Tool disappeared on social platforms!

How to Fix Windows 11 Snipping Tool Missing Issue
Before trying complex solutions, restart your PC and check if the Snipping Tool occurs. Alternatively, you can update to the latest OS or scan for malware on your PC. However, if the Windows 11 snipping tool missing issue still exists, try any of the fixes given below as solutions.
Method 1. Opening Snipping Tool Using Windows.old Folder
In case you have recently upgraded to Windows 11, you may find the issue of the Windows 11 snipping tool missing and need to be addressed. For this, you must check the Windows.old Folder wherein the Snipping tool's older version must still be intact. Once you launch Windows 11, the older version of the tool may crash it.
Step 1. Start by pressing the Windows+E keys to open 'File Explorer.' Then by navigating to the C: drive, open the directory for Windows.old.
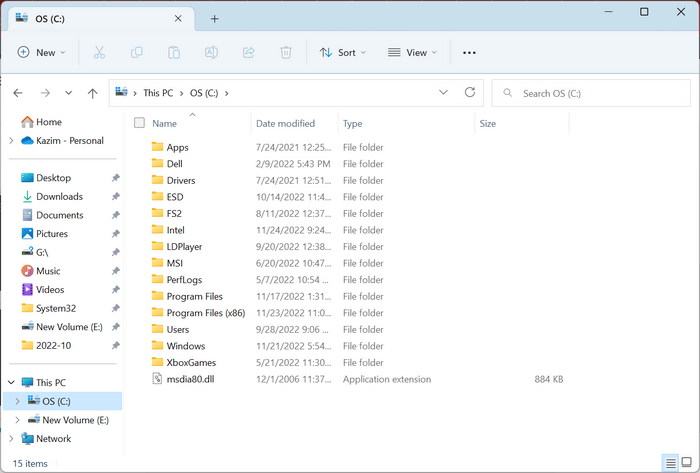
Step 2. Make a selection of Windows folders and go ahead with opening the Folder named 'System 32.'
Step 3. Now go on searching for 'snippigtool.exe' and launch the program.
In case you have recently upgraded to Windows 11, you will find a folder named Windows.old with the shortcut for Snipping Tool. Then you can go running directly from this place. If you find that the Folder is not existing or gets deleted, you can try the fix ahead.
Method 2. Making Changes in Date and Time
Microsoft advises the suggested method, and a particular date is indicated because of the digital certificate owned by the app. The certification holds validity till the date of 31st October 2021. If you get a new update, then it will solve the issue related to the Snipping Tool Windows 11 missing. However, if the update does not work for you, change the date and fix the problem.
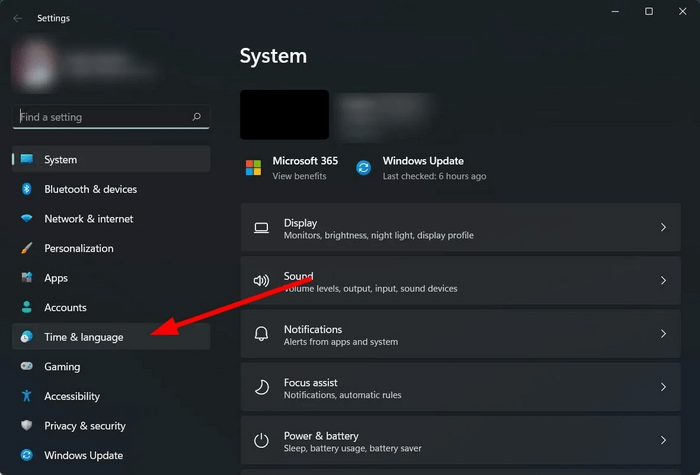
Step 1. Start by opening Settings by pressing the Windows+I keys. Then from the navigation pane, select 'Time and language.'
Step 2. Now choose 'date and Time.' Then go for the toggle off the 'Set Time automatically' switch.
Step 3. Then go tap on the 'Change button.' It will be present beside the option 'Set the date and time manually.'
Step 4. Now, you can set the time before 30th October 2021.
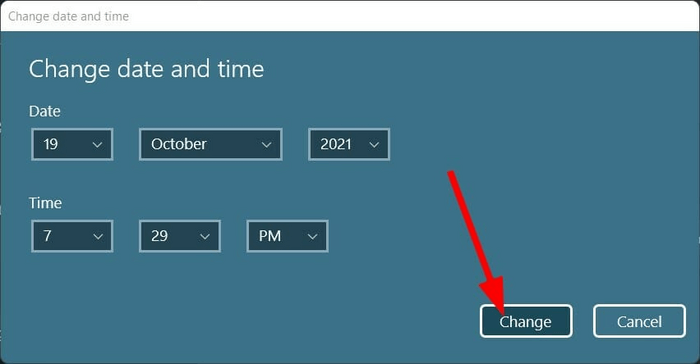
Step 5. Then tap on the 'Change' option to ensure the problem gets fixed.
Do not hesitate to share this article about Snipping Tool disappeared on social platforms!
Method 3. Making Modifications in the Group Policy
If you are experiencing Windows 11 snipping tool missing issues, it may be because of a policy that needs to be configured. However, if you follow the given steps, you may notice that the problem gets fixed.
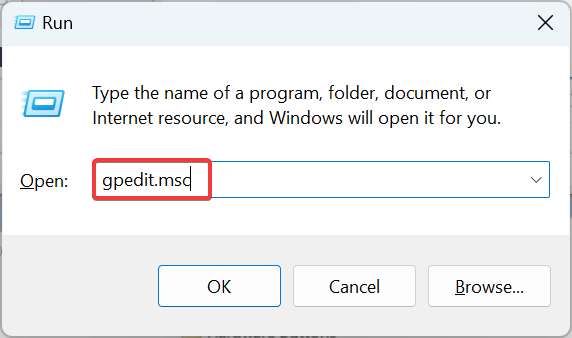
Step 1. Start by pressing the 'Windows+R' keys to open 'Run,' then type 'gpedit.msc' in the given space. Then press Enter key.
Step 2. Now expand 'Administrative Templates' given under the User Configuration option. Then make a selection for Windows Components. After that, choose 'Tablet PC' from the section on the right.
Step 3. Now make a selection of 'Accessories.'
Step 4. Then double tap on the option of the 'Do not allow Snipping Tool to run' policy.
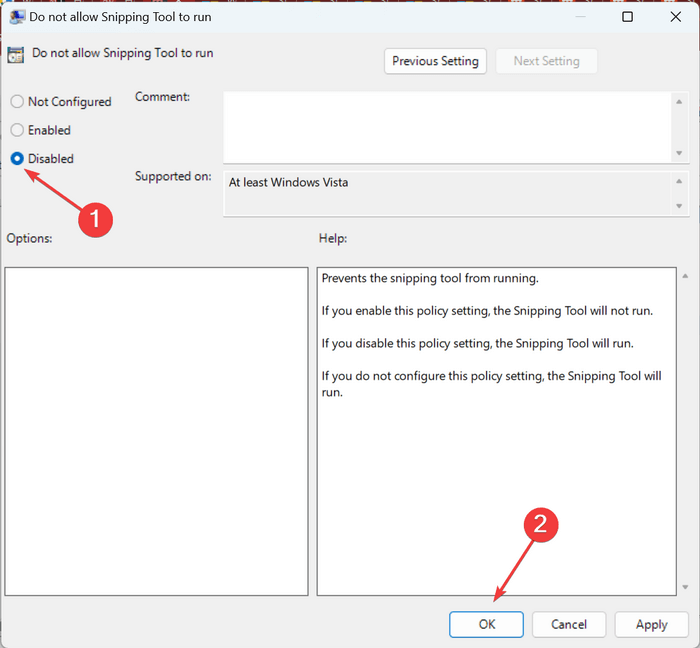
Step 5. Now, from the choices in the top section, choose the 'Disabled' option. Then tap on the 'Ok' option to save the changes.
Method 4. Download from Microsoft Store
If you are facing an issue of no snipping tool in Windows 11, try searching for the option of 'Snipping Tool.' However, you will find the integration of the two options already embedded in Windows 11 and then search for a snipping tool.
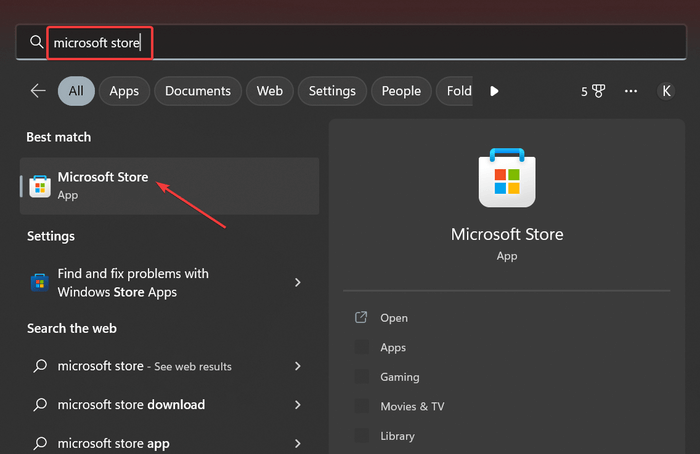
Step 1. Tap the 'Windows+S' keys to open the Search option. Then start typing Microsoft Store. Then tap on the search result with relevance.
Step 2. Search for the 'Snipping Tools' option and tap on the 'Install' option to get it.
Step 3. Now, if you see the installation completed, you can open it seamlessly and access the Snipping tool.
Method 5. How to Install Snipping Tool Without Microsoft Store
If you find Snipping Tool missing after Windows 11 upgrade and can't download Snipping Tool in Microsoft Store, you can try other methods to install it. This part will show you how to install Snipping Tool Windows 11 without Store by using PowerShell.
Here are the steps on install Snipping Tool Without Microsoft Store:
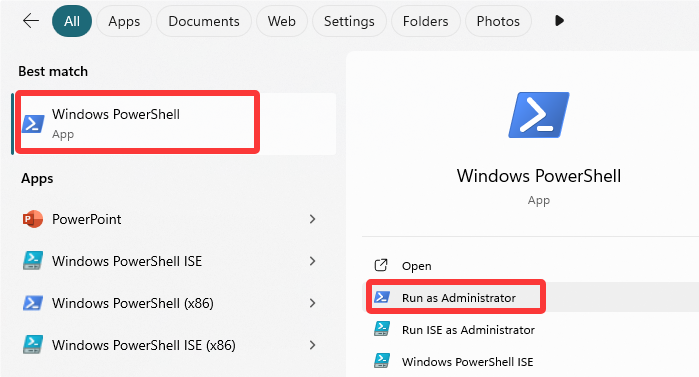
Step 1. Type PowerShell in the Search box. Then, choose Run as administrator to run Windows PowerShell.
Step 2. If you need to uninstall the Snipping Tool first, execute the following command:
- Remove-AppxPackage Microsoft.ScreenSketch_11.2209.2.0_x64__8wekyb3d8bbwe
Step 3. To reinstall the Snipping Tool, use the following command:
- Add-AppxPackage -Register "C:\Program Files\WindowsApps\Microsoft.ScreenSketch_10.1907.2391.0_x64__8wekyb3d8bbwe\AppxManifest.xml" -DisableDevelopmentMode
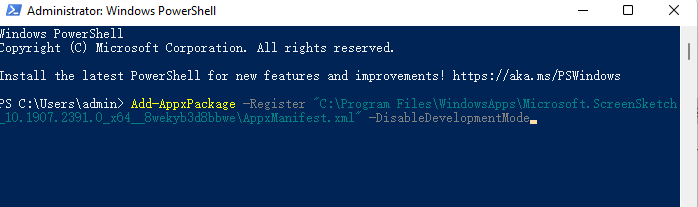
Step 4. If the above command does not work, ensure you have the correct Snipping Tool ID. You can view the list of installed apps and their IDs by running:
- Get-AppxPackage -AllUsers
Look for the Snipping Tool entry and note its exact ID. Use this ID in the Add-AppxPackage command.
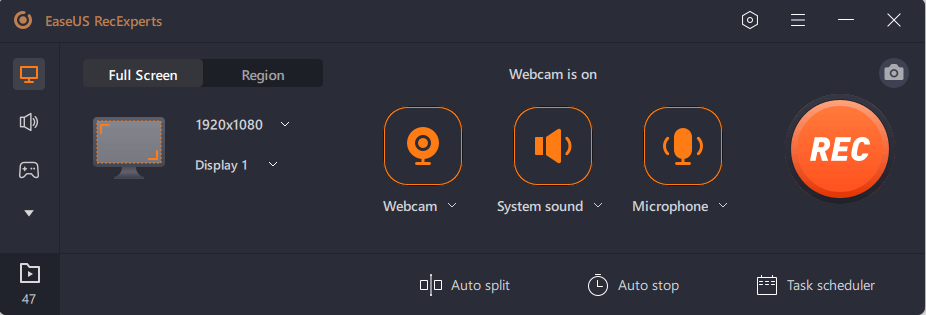
Method 6. Using Snipping Tool Alternative Windows 11
EaseUS RecExperts is a professional Windows screen recorder that can perfectly work as an alternative if you find Windows 11 snipping tool missing. It helps capture any area on a PC screen besides the webcam and audio. You can also get recordings of all highlights of gameplay, whether it seamlessly is in 2D or 3D without a lag. Finally, you get an enhanced experience with media player and video editor facilities.
Do not hesitate to share this article about Snipping Tool disappeared on social platforms!
Final Words
We hope you can resolve the Windows 11 snipping tool missing issue with our suggested fixes. If you need help with the fixes, do not get upset. Instead, we recommend EaseUS RecExperts as a professional tool to help you with the issue. You can use its fantastic features of all-around screen recording in top-notch quality. It also helps with voice recording and a built-in screen-grabbing capability of full or any part of the screen.
FAQs About Windows Snipping Tool Missing
Check out the following FAQs for further questions about the Snipping tool.
1. How do I get the Snipping Tool back in Windows 11?
You can go for resetting or repairing the Snipping tool by following the steps:
- Tap on Settings.
- Make a selection of Apps and tap on Apps and features.
- Locate the Snipping device and tap on the three-dot menu.
- Tap on the Repair or 'Reset' option.
2. Why can't I find a Snipping Tool on Windows 11?
You may find the Snipping tool not working if its installation gets corrupted. It may also happen because of a glitch when you plan to upgrade to Windows 11. It may also occur when you try to perform a clean installation of an OS. In such a case, you can try reinstalling the snipping tool by following the given steps:
- Go to Start > Settings > Apps > Apps & features > and search Snipping tool.
- Tap on the three dots icon and choose Uninstall option.
- Confirm your action and restart the PC.
- Tap on Windows icon and look for the Microsoft Store.
- Start locating Snipping Tool.
- Tap on the Get option and then on Install.
- Wait for results and tap the Open option to see if the issue is resolved.
3. Where is the Snipping Tool exe in Windows 11?
The Snipping tool exe occurs in the Windows folder in the C>Program Files>WindowsApps location. This Folder is highly protected and ensures that all store apps are free from any malware.
If you want to open the exact path of the Snipping tool, follow the steps below to get where is Snipping Tool located in Windows 11:
- Tap on the Task Manager.
- Make a selection from the 'Processes' tab.
- Right-click on the Snippind Tool column.
- Choose Open file location to get the Windows 11 Snipping Tool file location.