-
![]()
Daisy
Daisy is the Senior editor of the writing team for EaseUS. She has been working in EaseUS for over ten years, starting from a technical writer to a team leader of the content group. As a professional author for over 10 years, she writes a lot to help people overcome their tech troubles.…Read full bio -
Jane is an experienced editor for EaseUS focused on tech blog writing. Familiar with all kinds of video editing and screen recording software on the market, she specializes in composing posts about recording and editing videos. All the topics she chooses …Read full bio
-
![]()
Alin
Alin is an experienced technical blog writing editor. She knows the information about screen recording software on the market, and is also familiar with data cloning and data backup software. She is expert in writing posts about these products, aiming at providing users with effective solutions.…Read full bio -
Jean is recognized as one of the most professional writers in EaseUS. She has kept improving her writing skills over the past 10 years and helped millions of her readers solve their tech problems on PC, Mac, and iOS devices.…Read full bio
-
![]()
Jerry
Jerry is a fan of science and technology, aiming to make readers' tech life easy and enjoyable. He loves exploring new technologies and writing technical how-to tips. All the topics he chooses aim to offer users more instructive information.…Read full bio -
![]()
Rel
Rel has always maintained a strong curiosity about the computer field and is committed to the research of the most efficient and practical computer problem solutions.…Read full bio -
![]()
Gemma
Gemma is member of EaseUS team and has been committed to creating valuable content in fields about file recovery, partition management, and data backup etc. for many years. She loves to help users solve various types of computer related issues.…Read full bio -
![]()
Shelly
"I hope my articles can help solve your technical problems. If you are interested in other articles, you can check the articles at the bottom of this page. Similarly, you can also check my Twitter to get additional help."…Read full bio
Page Table of Contents
Jane Zhou
Updated on Jun 09, 2026
0 Views |
0 min read
Some users have encountered Snipping Tool not working Windows 11 issues frequently in recent days, especially after update. Symptoms may include Win + Shift + S shortcut not working, Snipping Tool crashing, Snipping Tool failing to screenshot on multiple monitors, and so on. If you are on the same boat, don't worry. Follow this guide to understand why the Snipping Tool doesn't work on Windows 11/10 and how to fix it.
| Methods | Effectiveness | Time Cost | Difficulty |
| Fix 1. Update Windows 11 [Microsoft Officially Recommend] | High | 3 Minutes | ⭐⭐ |
| Fix 2. Change the Default App in Settings | High | 1 Minutes | ⭐⭐ |
| Fix 3. Disable Focus Assist | High | 30 Seconds | ⭐ |
| Fix 4. Restart Windows Explorer | High | 30 Seconds | ⭐ |
| Fix 5. Try Snipping Tool Alternative ❤ | High | 1 Minutes | ⭐ |
| Fix 6. Repair and Reset Snipping Tool App | High | 2 Minutes | ⭐ |
| Fix 7. Perform a Clean Boot of the System | Medium | 2 Minutes | ⭐⭐⭐ |
| Fix 8. Turn Background App Permissions | High | 30 Seconds | ⭐ |
| Fix 9. Disable Auto Copy to Clipboard Feature | High | 30 Seconds | ⭐ |
| Fix 10. Disable Automatic Time Temporarily | Medium | 2 Minutes | ⭐⭐ |
| Fix 11. Uninstall and Reinstall Snipping Tool | Medium | 5 Minutes | ⭐⭐ |
Fix 1. Update Windows 11 [Microsoft Officially Recommend]
Microsoft regularly releases patches for known issues, including problems with built-in apps like Snipping Tool. In Windows 11, built-in apps (like Snipping Tool) are sometimes updated through Windows Update, especially if tied to system features like screen capture. Updating ensures all system apps run on secure, compatible libraries.
In the January 28, 2025—KB5050094 update, Microsoft fixed an issue where Snipping Tool screenshots might be distorted when using multiple monitors with different display scaling settings. -From Microsoft Support
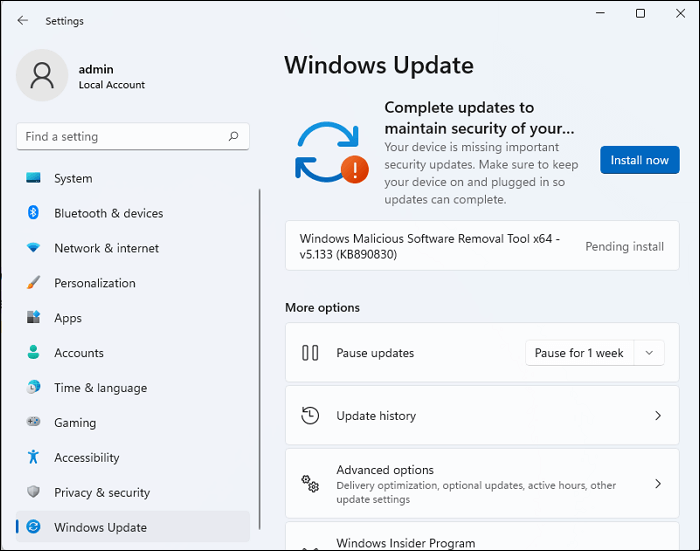
🚩How to update Windows 11 system:
Step 1. Click Start > Settings (gear icon).
Step 2. Go to Windows Update (bottom left panel).
Step 3. Click Check for updates.
Step 4. If updates are available, click Download and Install now.
Step 5. Restart your PC when prompted.
Share this post to help more users solve Windows 11 Snipping Tool not working!

Fix 2. Change the Default App from Snipping Tool to Screen Snipping
This works because "Screen Snipping" is a lighter, more stable built-in tool that uses the snip bar (the overlay that appears when you press Win + Shift + S). By switching the default, you tell Windows to use the simpler tool instead of the full Snipping Tool app, which may be buggy or outdated after a Windows update. This fix avoids app crashes and still lets you take screenshots easily.
Screen Snip (Win+Shift+S) Not Working (fixed!) -From Reddit
🚩How to switch the Default App from Snipping Tool to Screen Snipping:
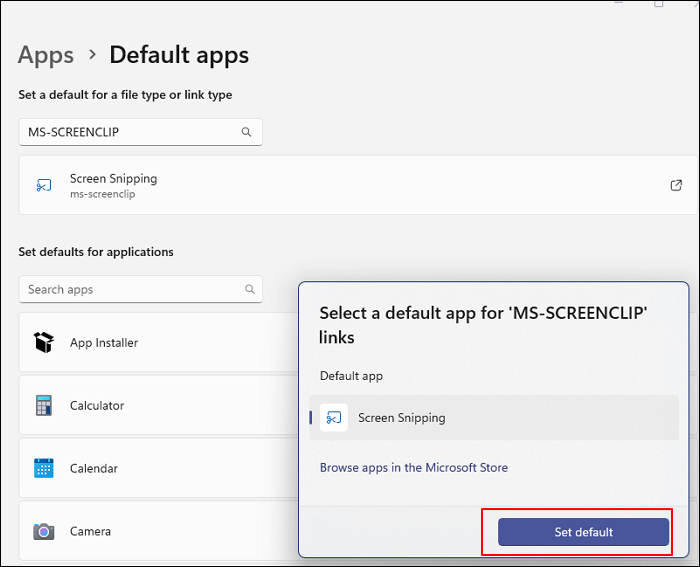
Step 1. Open Settings > Apps > Default Apps.
Step 2. In the search bar, type Snipping Tool and click it.
Step 3. Scroll to the bottom where it says: MS-SCREENCLIP.
Step 4. Click on it and change the default app from Snipping Tool → Screen Snipping.
Share this post to help more users solve Windows 11 Snipping Tool not working!
Fix 3. Disable Focus Assist
Sometimes, the Snipping Tool works, but you don't see any notification after taking a screenshot using Win + Shift + S. This can make it seem like the tool isn't working. The reason? Focus Assist might be turned on.
Focus Assist is a Windows feature that blocks notifications to avoid distractions, especially during gaming, meetings, or using full-screen apps. But when it's enabled, it can silently block the Snipping Tool's pop-up notification, so you don't get the usual editing prompt after a snip.
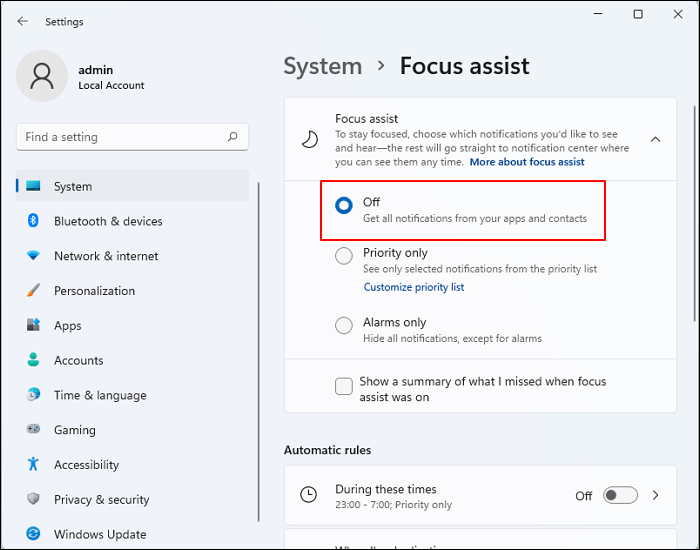
🚩How to turn off Focus Assist:
Step 1. Press Windows + I to open Settings.
Step 2. Go to System > Focus Assist (or Notifications > Focus Assist depending on your version).
Step 3. Set it to Off.
Step 4. Restart the Snipping Tool and try Win + Shift + S again.
Share this post to help more users solve Windows 11 Snipping Tool not working!
Fix 4. Restart Windows Explorer
If your Snipping Tool won't open at all or becomes unresponsive, restarting Windows Explorer can help. That's because Windows Explorer isn't just for browsing files; it also controls important parts of the desktop like the taskbar, Start menu, and system tray. When Explorer is glitchy or stuck, it can silently block apps like Snipping Tool from opening or displaying properly.
By restarting Windows Explorer, you're refreshing the entire desktop environment, which often clears out background bugs and lets the Snipping Tool work again without needing a full reboot.
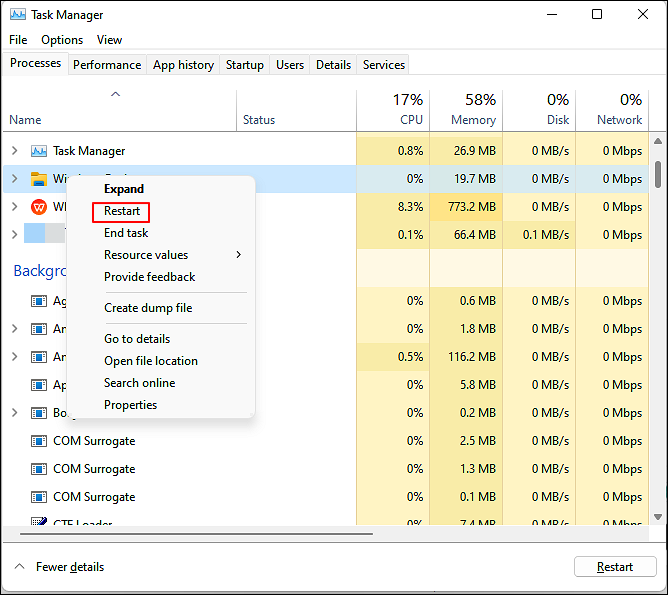
🚩How to restart Windows Explorer:
Step 1. Press Ctrl + Shift + Esc to open Task Manager.
Step 2. Find Windows Explorer in the list (under the Processes tab).
Step 3. Right-click it and select Restart.
Step 4. Wait a few seconds, and your screen may flash briefly, and the taskbar will reload.
Share this post to help more users solve Windows 11 Snipping Tool not working!
Fix 5. Try Snipping Tool Alternative
If none of the fixes work or you're just tired of dealing with Snipping Tool bugs, consider switching to a more stable and feature-rich screen capture tool like EaseUS RecExperts.
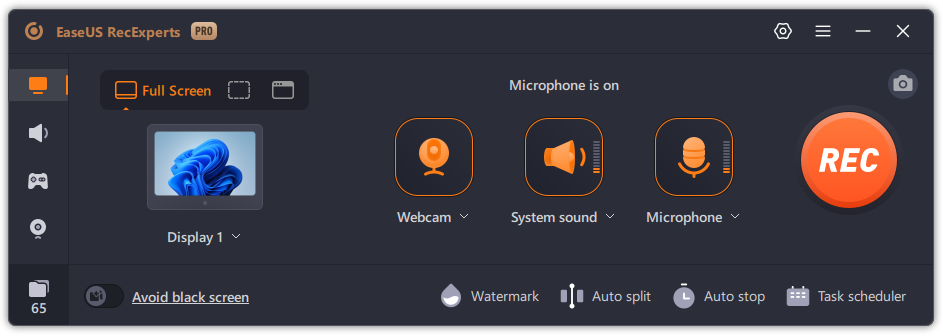
Unlike the default Snipping Tool, EaseUS screen recorder is designed for users who want more control, higher quality, and added flexibility when capturing anything on their screen.
👉Why Use EaseUS RecExperts Instead of Snipping Tool?
- No glitches or app crashes – RecExperts is more reliable and regularly updated.
- Supports both screenshots and screen recording – perfect if you need video and audio capture.
- Built-in editor – instantly annotate, crop, blur, or highlight screenshots.
- Multiple screen support – easily record multiple monitors.
- Custom shortcuts – you can set hotkeys that work every time.
- Auto-save & organize – no more lost screenshots or missing files.
Share this post to help more users solve Windows 11 Snipping Tool not working!
Fix 6. Repair and Reset Snipping Tool App
Another method is to repair and reset the Snipping Tool app by following the below guide:
Step 1. Move to Settings > Apps > Snipping Tool > Advanced options to open the Apps & features menu.
Step 2. Go to the Reset menu and click Repair. Then, wait a few seconds for it to be repaired.
Step 3. Once done, you will see a checkmark next to the Repair button, as shown below.
Step 4. Repeat the same procedure for the Reset button.
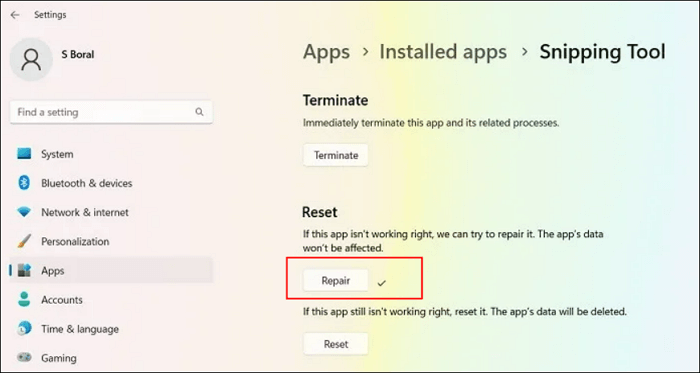
Share this post to help more users solve Windows 11 Snipping Tool not working!
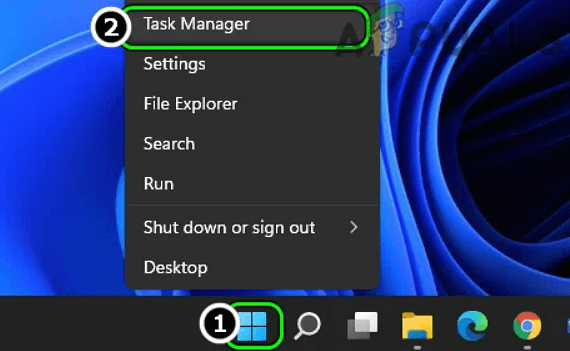
Fix 7. Perform a Clean Boot of the System
If another utility or program on the system is interfering with the operation of the Snipping Tool, then the Windows 11 Snipping Tool might also not work. In that case, ending the conflicting program in the system's task manager may solve the issue about Snipping Tool.
Step 1. Right-click on the Windows icon on your desktop and select Task Manager.
Step 2. Find and end the non-essential processes, like Explorer Patcher, Winaero Tweaker, Winaero, etc.
Step 3. Once done, you can reopen the Snipping Tool and check if it is working fine.
Step 4. If not, check if performing a clean boot of the system solves the problem.
Share this post to help more users solve Windows 11 Snipping Tool not working!
Fix 8. Turn Background App Permissions
If your Snipping Tool app doesn't have access permissions to take pictures or screen cord as a background app, it might not work when you use it. So, to solve it, you can check out the following steps.
Step 1. Click Settings > Apps > Installed Apps > Snipping Tool > Advanced Settings, and then go to the Apps & Features section.
Step 2. Make sure the app permissions for the pictures are turned on. Next, enable the background app permissions as Power optimized.
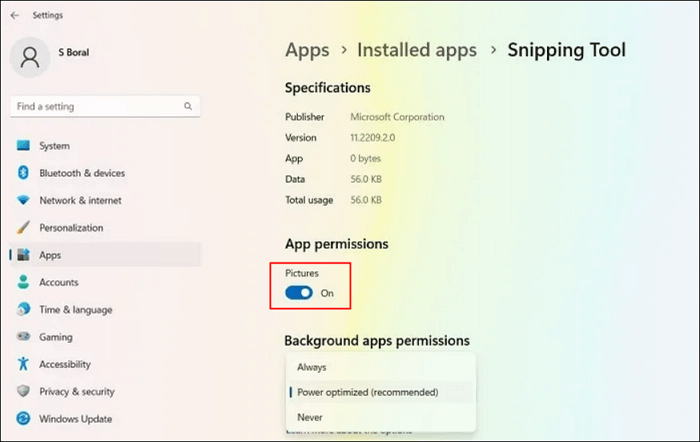
Share this post to help more users solve Windows 11 Snipping Tool not working!
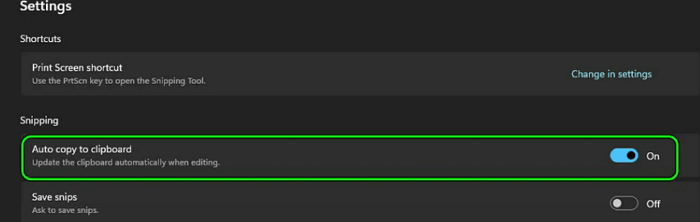
Fix 9. Disable Auto Copy to Clipboard Feature of Snipping Tool
The Auto Copy to Clipboard is a Snipping Tool feature that may break the Snipping Tools operation if it fails to copy the screenshot to the system's clipboard automatically. In such a case, disabling the Auto Copy to Clipboard in the Snipping Tool settings may solve the problem.
Step 1. Open the Snipping Tool by searching in the search box.
Step 2. Next, click the three horizontal ellipses and choose the Settings option from the drop-down menu.
Step 3. Find the Snipping section, and toggle the Auto Copy Clipboard switch to the off position to disable it.
Step 4. Finally, relaunch the Snipping Tool and click on New to check if the issue is fixed.
Share this post to help more users solve Windows 11 Snipping Tool not working!
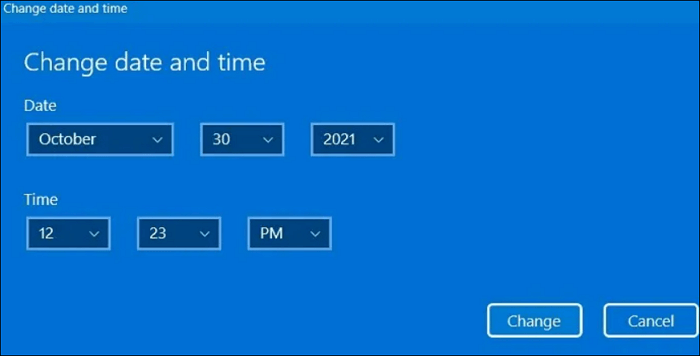
Fix 10. Disable Automatic Time Temporarily
If you may have a wrong date/time issue related to the app's digital certificates, the Snipping Tool may not work, also. You need to temporarily change your date and time from automatic to manual and go back to automatic once the error is gone.
Step 1. Click Settings > Time & Language > Date & Time.
Step 2. Turn off the toggle switch to set the time automatically.
Step 3. Then, manually set the date to October 30, 2021, and leave the time section as is.
Step 4. At last, check whether the Snipping Tool is working or not.
Share this post to help more users solve Windows 11 Snipping Tool not working!
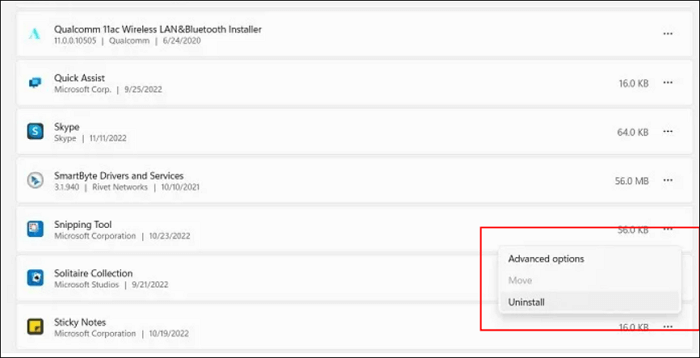
Fix 11. Uninstall and Reinstall Snipping Tool
Due to a faulty update or other reasons, your Windows 11 Snipping Tool may be improperly installed. The faulty installation can cause the program to abort and should be replaced with a new version.
Step 1. Choose Add or Remove programs from the Start menu search.
Step 2. Scroll down to find the Snipping Tool, and select the Uninstall option to proceed with the removal from its three-dot menu.
Step 3. After removing it, you can reinstall the Snipping Tool from the Microsoft Store.
Share this post to help more users solve Windows 11 Snipping Tool not working!
Windows 11 Snipping Tool Not Working FAQs
1. Why does my snip tool not work?
Snipping Tool might not work, mainly due to the following:
- Outdated graphics driver
- Interference from other Apps
- Corrupt installation of the Snipping Tool
- Expired certificate of the Snipping Tool
2. Does Snipping Tool work with Windows 11?
Yes. Snipping Tool works with Windows 11 perfectly. You can use it to record screens and also take screenshots on your Windows 11 PC.
3. How do I reset the Snipping Tool in Windows 11?
Go to Settings > Apps > Installed Apps, find Snipping Tool, click Advanced options, then choose Repair or Reset. Repair keeps your data, while Reset returns the app to its default state, which often fixes bugs.
4. Why is the Win + Shift + S shortcut not working anymore?
The shortcut may not work if the Snipping Tool isn't set as the default screen snipping app, or if Focus Assist is blocking notifications. Go to Settings > Apps > Default Apps, search for MS-SCREENCLIP, and change the default to Screen Snipping. Also, turn off Focus Assist in Settings > System.
5. Can I reinstall Snipping Tool in Windows 11?
Yes. Open Microsoft Store, search for Snipping Tool, and click Install. If it doesn't appear, run wsreset -i to reinstall the Windows Store first, then try again.
6. What's the best alternative to Snipping Tool if it keeps crashing?
If the Snipping Tool keeps freezing or crashing, a reliable alternative like EaseUS RecExperts offers more stable performance and advanced features like screen + audio recording, scheduled screenshots, and full-screen capture across multiple monitors.
Conclusion
In this article, EaseUS discusses the problem of the Windows 11 Snipping Tool not working properly and gives 7 different solutions. You can try these solutions in order to see if they work, or just use EaseUS RecExperts for the easiest and most efficient solution to the screenshot problem.