-
![]()
Daisy
Daisy is the Senior editor of the writing team for EaseUS. She has been working in EaseUS for over ten years, starting from a technical writer to a team leader of the content group. As a professional author for over 10 years, she writes a lot to help people overcome their tech troubles.…Read full bio -
Jane is an experienced editor for EaseUS focused on tech blog writing. Familiar with all kinds of video editing and screen recording software on the market, she specializes in composing posts about recording and editing videos. All the topics she chooses …Read full bio
-
![]()
Alin
Alin is an experienced technical blog writing editor. She knows the information about screen recording software on the market, and is also familiar with data cloning and data backup software. She is expert in writing posts about these products, aiming at providing users with effective solutions.…Read full bio -
Jean is recognized as one of the most professional writers in EaseUS. She has kept improving her writing skills over the past 10 years and helped millions of her readers solve their tech problems on PC, Mac, and iOS devices.…Read full bio
-
![]()
Jerry
Jerry is a fan of science and technology, aiming to make readers' tech life easy and enjoyable. He loves exploring new technologies and writing technical how-to tips. All the topics he chooses aim to offer users more instructive information.…Read full bio -
![]()
Rel
Rel has always maintained a strong curiosity about the computer field and is committed to the research of the most efficient and practical computer problem solutions.…Read full bio -
![]()
Gemma
Gemma is member of EaseUS team and has been committed to creating valuable content in fields about file recovery, partition management, and data backup etc. for many years. She loves to help users solve various types of computer related issues.…Read full bio -
![]()
Shelly
"I hope my articles can help solve your technical problems. If you are interested in other articles, you can check the articles at the bottom of this page. Similarly, you can also check my Twitter to get additional help."…Read full bio
Page Table of Contents
0 Views |
0 min read
Need to record your laptop screen with both system and microphone sound? Whether you're creating tutorials, capturing Zoom meetings, or saving online videos, finding a reliable laptop screen recorder with audio can be tricky. This guide walks you through the best tools and step-by-step solutions to how to record laptop screen with audio in Widows 10 or 11 without missing a beat.
🚩Here is a quick comparison of tools for recording on a laptop:
|
Fixes |
Price |
Effectiveness |
Difficulty |
|
Free/Paid |
High – Support all screen and audio tasks; no time limit and no watermark. |
Easy |
|
|
Free |
Moderate – Support basic recording screen with microphone; but with a time limit of up to 4 hours. |
Easy | |
|
❤️Snagit |
Free/Paid |
High - Support most screen and audio tasks; but it is pricy to use advanced features. |
Moderate |
|
Free |
High - Support all screen and audio tasks, but it requires advanced skills to use. |
Difficult |
|
|
Free |
High - Support all online screen and audio tasks; no watermark. |
Easy |
Special Pick: Best Free Laptop Recorder with Audio
✅Best for: All-level users who want to record screen + mic + internal audio
Use EaseUS RecExperts, a reliable screen recorder, to make your screen recording experience easier and more streamlined on Windows 10/11.
As one of the most powerful screen and audio recording software, this Windows recording utility allows you to capture whatever you want. You can choose to record microphone and computer audio at the same time or separately. You can even add a webcam overlay to the computer screen to create a reaction video or a step-by-step tutorial video.
⭐See what makes EaseUS RecExperts stand out:
- Record screen with audio: Screen record Windows with system audio, microphone sound, or webcam.
- Free to use: Capture clips from YouTube, Netflix, Zoom, and more platforms for free. No lag and no watermark.
- Record screens of any size: Record full screen or any part of screens on laptops and PCs.
- Easy to operate: Record or capture screen with simple clicks. Friendly for novices and professionals.
- AI-empowered features: Reduce background noise while recording, enhance videos for 4K/8K videos, and more.
🚩Here is how to record laptop screen with audio in Windows 10/11:
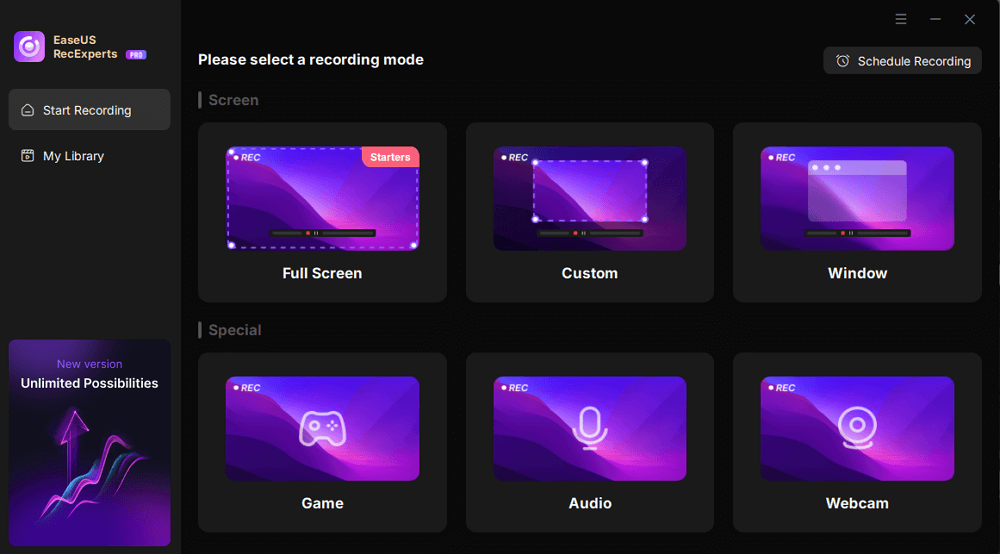
Step 1. Launch EaseUS RecExperts. Choose a screen recording mode such as Full Screen, Custom, or Window, depending on what part of the screen you want to capture.
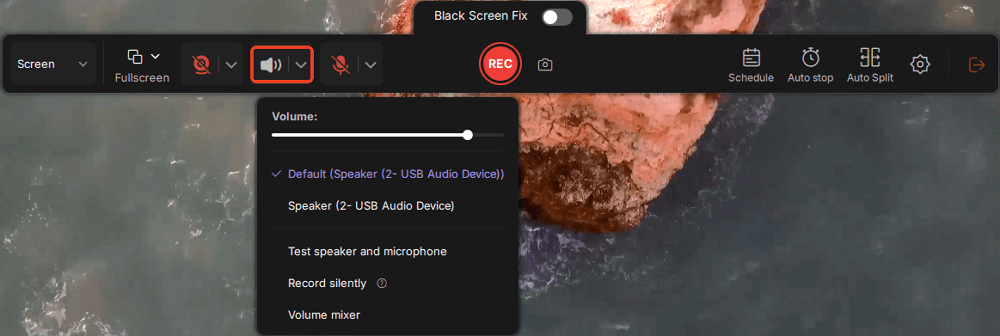
Step 2. To record system sound, toggle on the Speaker icon, then click the small arrow next to it to select your preferred audio input device. Simply choose Record silently to keep recording your screen with audio without playing the sound out.
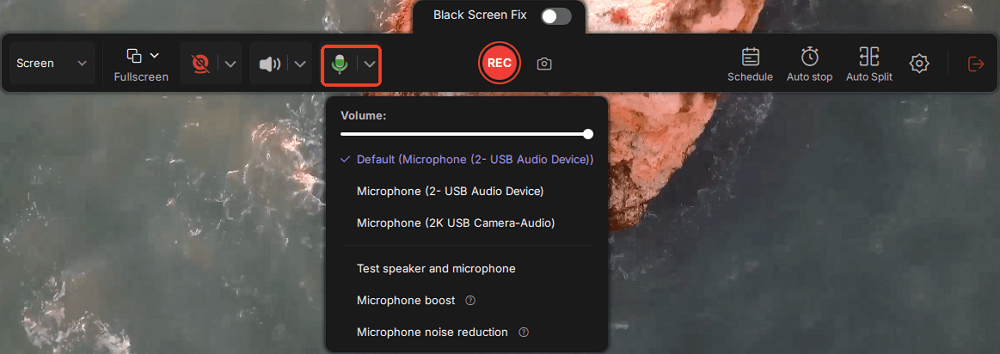
Step 3. To include microphone audio, click the Microphone icon and select your preferred input device. You can also enable Microphone boost to increase volume, or turn on Microphone noise reduction to filter out background noise for clearer voice recording.
Step 4. Click the red REC button to start recording. During the recording, click the white Pause button to pause or the red Stop button to end the session.
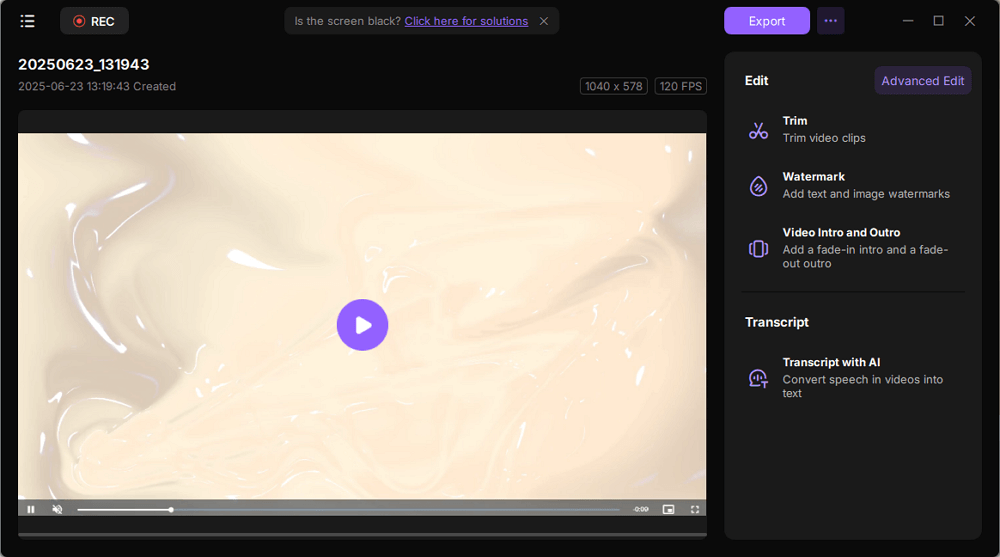
Step 5. After recording, you'll be taken to the preview window, where you can trim, edit, and organize your video. You can also enhance the result by adding watermarks, inserting intros/outros, or generating AI-powered transcripts.
Share this post to help more users!
How to Record Laptop Screen with Audio in Windows 10 with Game Bar
✅Best for: Gamers & Windows 10/11 users
Since your computer is running Windows 10, there is a built-in screen and sound recorder - Windows Xbox Game Bar. It is pre-installed on your laptop and entirely free to use. You can enable this feature and record screen on HP laptop or others.
Windows 10 has a screen recorder that you might not know, but people rarely use it. Why? Reddit
🚩See how to record screen with audio in Windows 11 and 10 with Xbox Game Bar:
Step 1. Go to the screen you want to record in advance.
Step 2. Press the Windows + G keys simultaneously to open the screen audio recorder.
Step 3. In the feature area, tap the record button to start recording. Then, click the microphone icon to record the internal sound.
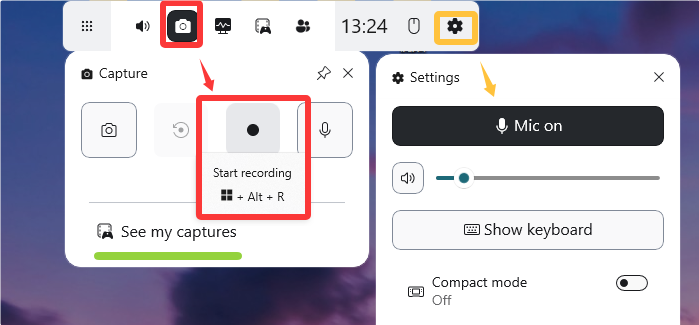
Step 4. When you finish recording, tap the Stop button or press the Windows + Alt + R keys to end the process. You can click the recorded pop-up to access the MP4 clips.
Step 5. To see all your recordings, go to File Explorer > Videos folder > Captures subfolder or See my captures in the app.
- Notice:
- According to the Microsoft Support official document, Xbox Game Bar is only available on Windows 11/10. It only supports recording full screen with microphone sound. The length of your record can be 2 hours at maximum.
Share this post to help more users!
How to Record Screen on Laptop with Snagit
✅Best for: All levels of Windows users
As an alternative to Xbox Game Bar recording, Snagit is a powerful Windows snipping tool from TechSmith. It allows you to record laptop screen with audio and trim and edit videos and screenshots. Although this screen capture and editing software only requires basic screen recording skills, it is costly.
🚩See how to screen record with audio on laptop Windows 10:
Step 1. Download Snagit from its official website.
Step 2. Open Snagit and go to the Video tab.
Step 3. Select the Region, toggle on Record Microphone and Record System Audio, and click the red Capture button. It will start recording.

Step 4. To end the recording, click the stop button (red dot).
Step 5. (optional) Edit or trim the screen record with audio if you need to.
How to Record Laptop Screen with Audio with OBS Studio
✅Best for: Advanced users who need customization
OBS Studio is an open-source screen recorder that offers a range of functions and robust features. Gamers love this Windows 10 screen recorder because it allows them to capture the screen and start a live stream. Players can capture and record screen, audio, and webcam simultaneously or separately.
However, this complicated snipping tool requires sophisticated skills. If you're a recording pro, try this PC and laptop display recorder to explore how to screen record on Windows.
🚩See how to record on laptop with audio using OBS Studio:
Step 1. Download OBS Studio and install it on your Lenovo or HP laptop.
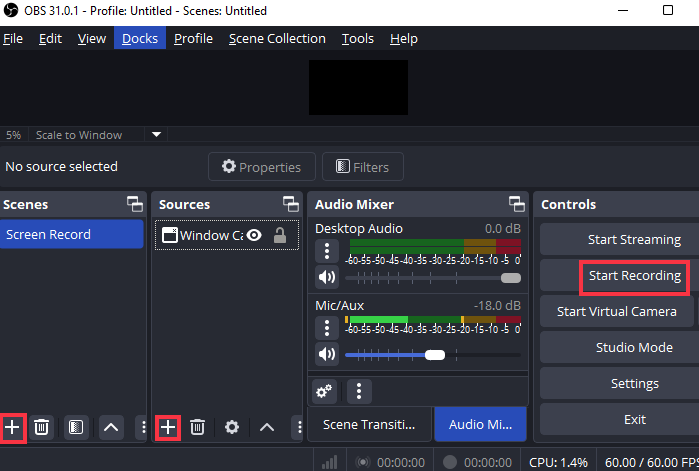
Step 2. Launch this laptop screen recorder, locate the Scenes box, and click + to add a scene.
Step 3. Click the + button in the Sources box and choose Display Capture.
Step 4. Tap Settings to adjust output recording parameters.
Step 5. Back to the main interface and click Start Recording.
Share this post to help more users!
Laptop Screen Recording with Audio Free Online
✅Best for: Record videos with audio without installing additional software
Some users or gamers may find that installing software to record a screen on a PC or laptop takes up disk space, so how to record screen in Windows 10 with audio without any software?
In this case, you can use an online screen recorder. You can record a video on Chrome, Firefox, and other browsers without watermarks, installations, signups, downloads, or extensions.
🚩See how to screen record on Windows 10 with audio with EaseUS Online Screen Recorder:
Step 1. Open your Preferred Browser, such as Google Chrome, Firefox, or Microsoft Edge. Launch the screen you want to record.
Step 2. Visit the EaseUS Online Screen Recorder website.
Step 3. Turn on the system audio or microphone. Click Start Recording.
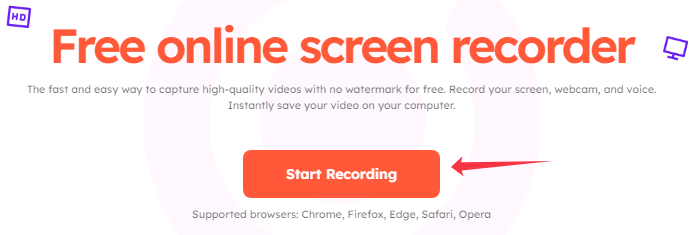
Step 4. Go back to the previous tab to capture the laptop screen. Click Share.
Step 5. To end the recording, click the Stop sharing button. Then, you can download the screen captures.
Share this post to help more users!
Conclusion
You have now learned how to record laptop screen with audio in Windows 10. Each method has is advantages and limitations, you can pick one based on your needs.
However, a free third-party screen recorder is the best choice for beginners or users who want a quick, easy-to-operate approach. It lets you record laptop audio and screen with simple clicks, greatly enhancing efficiency.
Don't hesitate to download EaseUS RecExperts and try it.
FAQs on How to Screen Record with Audio in Laptop
Want to know more about Windows 10 record screen with audio? Read the following questions and answers.
1. What are the best laptop screen recorders with audio?
- EaseUS RecExperts: ideal for all types of screen and audio recording tasks
- Game Bar: suitable for recording gameplay on Windows 10 and 11 computers
- Snipping Tool: best for basic and easy recording and screenshotting sessions
- EaseUS Online Screen Recorder: perfect for capturing audio, screen, and webcam with web browsers only
2. Why is my laptop not recording sound?
There are many reasons why a microphone may not work, including an outdated audio driver, wrong audio recording settings, no microphone on the laptop, faulty microphone, or software glitches.
The easiest way is to use a third-party screen and audio recorder like EaseUS RecExperts. It can record Windows 10 sound and screen with ease.
3. How do I turn on sound recorder in Windows 10?
To turn on sound recorder in Windows 10, you can:
Step 1. Press the Windows + G keys to launch the Xbox Game Bar.
Step 2. Press the Windows + Alt + R keys to start recording.
Step 3. Click the microphone icon (or click the microphone icon and select Enable Microphone) to record the sound.
4. Does Windows 10 screen recorder capture audio?
Yes, Windows 10 has a built-in screen recorder called Xbox Game Bar. It helps you record gameplay and other types of videos with audio.
You can launch this tool by pressing the Windows + G keys and then clicking the recording button (red circle) to start recording.
EaseUS RecExperts

One-click to capture anything on screen!
No Time Limit, No watermark
Start Recording
