-
![]()
Daisy
Daisy is the Senior editor of the writing team for EaseUS. She has been working in EaseUS for over ten years, starting from a technical writer to a team leader of the content group. As a professional author for over 10 years, she writes a lot to help people overcome their tech troubles.…Read full bio -
Jane is an experienced editor for EaseUS focused on tech blog writing. Familiar with all kinds of video editing and screen recording software on the market, she specializes in composing posts about recording and editing videos. All the topics she chooses …Read full bio
-
![]()
Alin
Alin is an experienced technical blog writing editor. She knows the information about screen recording software on the market, and is also familiar with data cloning and data backup software. She is expert in writing posts about these products, aiming at providing users with effective solutions.…Read full bio -
Jean is recognized as one of the most professional writers in EaseUS. She has kept improving her writing skills over the past 10 years and helped millions of her readers solve their tech problems on PC, Mac, and iOS devices.…Read full bio
-
![]()
Jerry
Jerry is a fan of science and technology, aiming to make readers' tech life easy and enjoyable. He loves exploring new technologies and writing technical how-to tips. All the topics he chooses aim to offer users more instructive information.…Read full bio -
![]()
Rel
Rel has always maintained a strong curiosity about the computer field and is committed to the research of the most efficient and practical computer problem solutions.…Read full bio -
![]()
Gemma
Gemma is member of EaseUS team and has been committed to creating valuable content in fields about file recovery, partition management, and data backup etc. for many years. She loves to help users solve various types of computer related issues.…Read full bio -
![]()
Shelly
"I hope my articles can help solve your technical problems. If you are interested in other articles, you can check the articles at the bottom of this page. Similarly, you can also check my Twitter to get additional help."…Read full bio
Page Table of Contents
Jean
Updated on Jun 09, 2026
0 Views |
0 min read
Using a professional cursor recorder to track and record mouse movements can significantly improve the clarity of your recordings. Whether you're a content creator, educator, or IT professional, knowing how to capture mouse recording in Windows 10, Windows 11, and Mac can greatly enhance your workflow.
Scenario: How to Show Cursor in Screen Recording?
"Does anybody know if some software exists that allows you to record mouse movements and clicks and replay them? ---Reddit User"
If you are creating tutorials, software demos, bug reports, or video presentations, capturing mouse movements and clicks is essential. It improves clarity, guides viewers through each step, and makes your content more engaging.
To show mouse clicks on screen in Windows 10 or 11 computer, you have three main options:
1️⃣Use an AI-powered screen recorder (Recommended). Tools like EaseUS FocalFlow go beyond basic cursor recording. Instead of just capturing mouse movements, it automatically zooms into important actions and highlights key areas, making your recordings easier to follow and more professional. This is the best option for tutorials, demos, and content creation where clarity and visual focus matter.
2️⃣Use Xbox Game Bar recording to capture mouse activity on Windows 10 PCs. This built-in tool is primarily used for gaming but can also capture recordings in a full-screen mode, including mouse navigation. However, it does not highlight mouse clicks or movements.
3️⃣Use the Snipping Tool to capture mouse gestures on Windows 11 computers. This built-in screen recording utility lets users perform mouse cursor tracking without highlighting. However, you can install the Windows-developed PowerToys from the Microsoft Store for free to emphasize mouse paths.
Move to the next part if you need a step-by-step guide.
Share this post to help more users record mouse clicks in Windows 10!

Way 1. Capture and Highlight Mouse Movements with AI (EaseUS FocalFlow
🖥️Supported OS: Windows 11, 10
💰Price: Free trial available; Paid plans from $6.67/mo available
📃Supported file format: MP4
👌Best for: Creating clear, professional recordings with automatic cursor focus and zoom effects
EaseUS FocalFlow is an AI-driven screen recorder that captures mouse movements and automatically enhances them for better clarity. Instead of manually adding cursor effects, this Loom alternative intelligently zooms into key actions and smooths cursor movement, making your recordings easier to follow
It combines recording and editing in one workflow, helping creators produce polished tutorial videos, product demos, and training content without complex setup or time-consuming editing.
⭐Some key features you may need:
- AI auto zoom to follow cursor clicks and highlight important areas automatically
- Smooth motion effects for both cursor and screen transitions.
- Customizable cursor styles, size, and visual effects
- Built-in editing tools to refine zoom, trim videos, and adjust animations
- Screen, webcam, and audio recording in one place
- Automatic subtitle generation for better accessibility
⛳See how to capture and enhance mouse recording on Windows:
Step 1. Launch EaseUS FocalFlow and Set Up Recording
Open EaseUS FocalFlow and select a recording mode (full screen, custom region, or specific window). Enable webcam, microphone, and system audio if needed. This helps you create more engaging tutorial videos, presentations, or demo recordings with both visuals and sound.

Step 2. Start Screen Recording with Cursor Tracking
Click Start Recording to capture your screen activity. FocalFlow records mouse movements and clicks in real time, ensuring accurate cursor tracking for software tutorials, walkthroughs, and training videos.
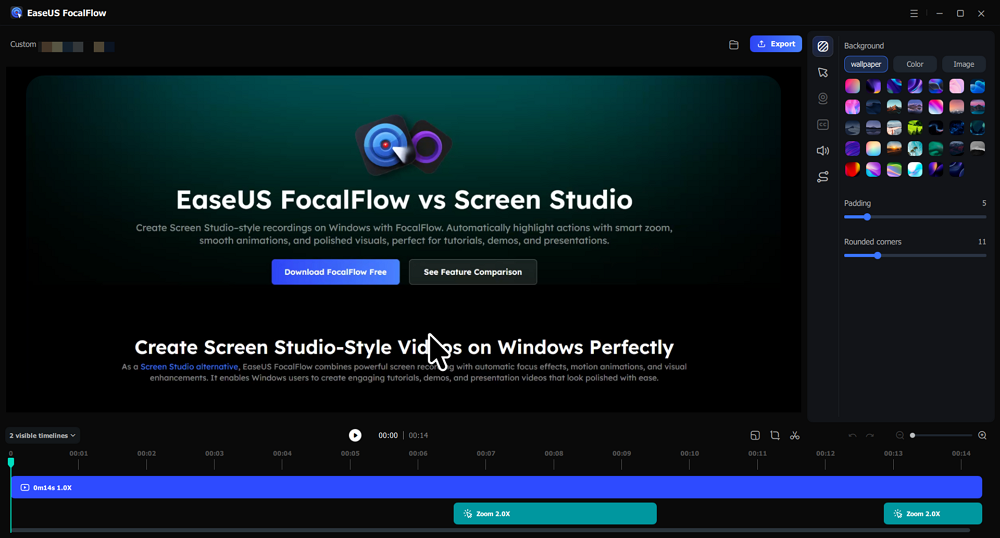
Step 3. Edit and Enhance Your Recording
Use the built-in editor to refine your video and improve visual clarity:
- Change cursor style, size, and movement speed
- Adjust cursor highlight effects for better visibility
- Add or customize video background (wallpaper, solid color, or custom image)
- Modify padding and rounded corners for a cleaner layout
- Change screen animation style for smoother transitions
- Mute or adjust system audio if needed
These editing features help turn basic screen recordings into more professional and visually appealing videos.
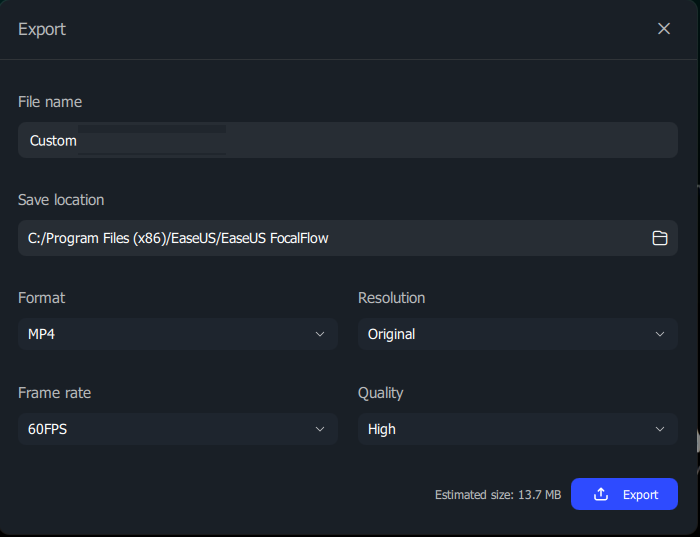
Step 4. Export and Share Your Video
Customize the file name, save location, and output settings. Export your video in optimized formats for platforms like YouTube, online courses, or social media, making it easy to share high-quality tutorial or demo content.
Share this post to help more users record mouse clicks in Windows 10!
Way 2. Track Pointer Actions on Windows 10 with Built-in Game Bar
🖥️Supported OS: Windows 10
💰Price: Free
📃Supported file format: MP4
👌Best for: Capturing regular mouse movements without visual effects
If you only need to capture standard mouse movements and clicks without emphasis, use the built-in Xbox Game Bar. No additional software is required.
See how to show mouse clicks and movements on Windows 10.
Step 1. Press Windows + G to open the Game Bar.
Step 2. Click on the Record button or press Windows + Alt + R.
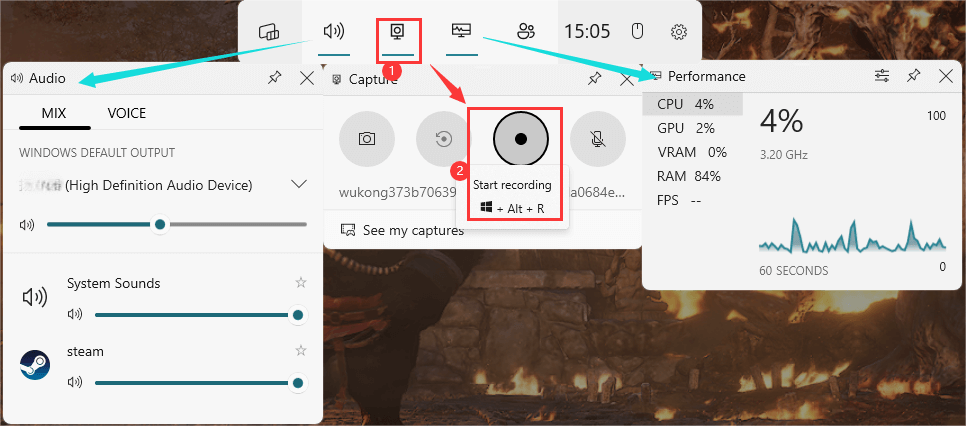
Step 3. Perform your tasks while the screen records.
Step 4. Click the Stop recording button or press Windows + Alt + R again to stop recording.

Step 5. Access the recorded video in See my captures or the Captures folder.

⭐Notes:
- Xbox Game Bar does not highlight mouse clicks or movements and only supports full-screen recording.
- It cannot capture the desktop and File Explorer page. Or you will find the Xbox Game Bar capture grayed out.
Share this post to help more users record mouse clicks in Windows 10!
Way 3. Record Mouse Movements and Clicks Windows 11 with Snipping Tool
🖥️Supported OS: Windows 11
💰Price: Free
📃Supported file format: MP4
👌Best for: Recording screen activities with optional mouse highlights
While the Xbox Game Bar does not highlight mouse clicks, you can use the Snipping Tool on Windows 11 in combination with Microsoft PowerToys to emphasize mouse interactions.
See how to show mouse clicks on screen Windows 11.
Stage 1. Enable Mouse Highlighter in PowerToys
Step 1. If you haven't used PowerToys, download and install PowerToys from the Microsoft Store.
Step 2. Open PowerToys and navigate to Input / Output > Mousing utilities from the left panel.
- Notice: For users installing PowerToys, navigate to Mouse utilities > Open settings.

Step 3. Scroll down to locate Mouse Highlighter. Make sure the Enable Mouse Highlighter is toggled on.
Step 4. Then, press Win + Shift + H to activate the highlighted movement.
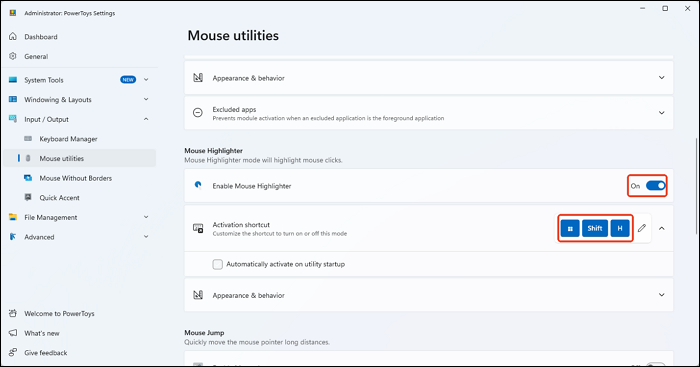
Step 5. Now, you can click any area on the screen to see the circle effect.

- Notice: To turn off the mouse movement highlights, go to PowerToys > Input / Output > Mousing utilities > toggle off Enable Mouse Highlighter (under Mouse Highlighter).
Stage 2. Record the computer screen with Snipping Tool
Make sure you run a Windows 11 device. Although the Snipping Tool is also available on Windows 10, there are no recording options (only screenshot features are available in Win 10).
Step 1. Click on the Start menu and type Snipping Tool in the search bar. Select the Snipping Tool app from the search results.
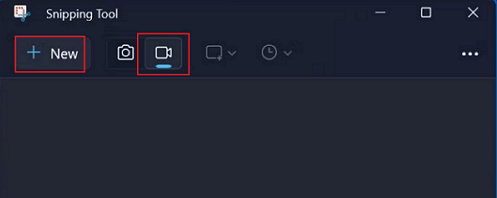
Step 2. In the Snipping Tool window, click the Record button (a video camera icon). Then, click the New button to start a new screen recording session.
Step 3. Click and drag your mouse to draw a rectangle around the area of the screen you wish to record.
Step 4. Click on the Start button within the Snipping Tool interface. A 3-second countdown will appear, after which the recording will begin.
Step 5. When you've captured the necessary content, click on the Stop button.
Step 6. After stopping the recording, you can preview it using the Snipping Tool. To save the recording, click on the Save icon.
Share this post to help more users record mouse clicks in Windows 10!
Conclusion
You may have learned how to capture mouse recording in Windows 10, Windows 11, or Mac. Choosing the proper method depends on your needs:
1️⃣EaseUS FocalFlow: Best for enhanced cursor effects and professional recordings.
2️⃣Xbox Game Bar: Best for basic, full-screen recordings without cursor highlights.
3️⃣Snipping Tool + PowerToys: Best for Windows 11 users who need basic cursor tracking.
By following this guide, you can create engaging tutorials, software demos, and instructional content with ease.
How to Show Mouse Clicks on Screen Windows 10 FAQs
Learn more questions and answers about how to record mouse clicks on Windows 10, 11, or Mac.
1. Does Windows 10 have a video capture?
Yes. Windows 10 includes Xbox Game Bar, which allows users to record their screen, including applications and gameplay. However, it does not explicitly highlight mouse movements or clicks. To start recording:
Step 1. Press Windows + G to open the Xbox Game Bar.
Step 2. Click on the Record button or press Windows + Alt + R to start recording.
Step 3. Press Windows + Alt + R again to stop recording.
The recorded video can be found in the Captures folder under Videos.
2. How to capture mouse clicks on Windows 10 with Step Recorder?
Steps Recorder is a built-in tool that logs user actions with screenshots and descriptions. However, it does not create a video. To use it:
Step 1. Press Windows + R, type psr.exe, and hit Enter.
Step 2. Click Start Record and perform the actions you want to capture.
Step 3. Each mouse click will be recorded with a corresponding screenshot and text description.
Step 4. Click Stop Record when finished.
Step 5. Review the captured steps and save the file as a ZIP for sharing.
3. How to record actions in Windows 10?
To record actions in Windows 10, you have multiple options:
- For video recording: Use Xbox Game Bar or third-party software like EaseUS FocalFlow or OBS Studio.
- For step-by-step documentation: Use Steps Recorder.
- For capturing screen activity with mouse movements and keystrokes: Use EaseUS FocalFlow or ShareX, which provide cursor effects and tracking features.